
User Manual English
Page 1
NETWORK STEREO RECEIVER TX-8390 Instruction Manual En Table of contents ≫ Connections ≫ - Connecting Speakers ≫ Playback ≫ Setup ≫ Troubleshooting ≫ Appendix ≫ Supplementary Information ≫ Front Panel≫ Rear Panel≫ Remote≫
NETWORK STEREO RECEIVER TX-8390 Instruction Manual En Table of contents ≫ Connections ≫ - Connecting Speakers ≫ Playback ≫ Setup ≫ Troubleshooting ≫ Appendix ≫ Supplementary Information ≫ Front Panel≫ Rear Panel≫ Remote≫

User Manual English
Page 5
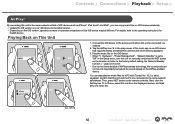
... services and content that can be available if new functions are subject to 16 Ω. This is an online user manual. AM loop antenna (For North American models only) (1) 6. What's in this manual use those of 4 Ω to change without prior notice. 5 Front Panel≫ Rear Panel≫ Remote≫ Main unit...
... services and content that can be available if new functions are subject to 16 Ω. This is an online user manual. AM loop antenna (For North American models only) (1) 6. What's in this manual use those of 4 Ω to change without prior notice. 5 Front Panel≫ Rear Panel≫ Remote≫ Main unit...
User Manual English
Page 6
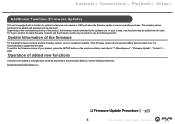
... switched to confirm the latest firmware contents and the firmware version of the product, the firmware may be added from contents described in the Instruction Manual, see the following reference. Miscellaneous" - For how to the updated one , it is recommended to "7. If the firmware version of your product, press the SETUP...
... switched to confirm the latest firmware contents and the firmware version of the product, the firmware may be added from contents described in the Instruction Manual, see the following reference. Miscellaneous" - For how to the updated one , it is recommended to "7. If the firmware version of your product, press the SETUP...

User Manual English
Page 17
.... ( p97) 17. MENU button: Used to control the main room. 17 Front Panel≫ Rear Panel≫ Remote≫ Play buttons" between automatic tuning and manual tuning ( p61), and allows you press the button. Press REMOTE MODE MAIN to switch to the mode to display the internet radio service menus. 15... 18. MODE button (European models): Switches tuning to the mode for AM/FM stations ( p61). MODE button (North American models): Switches between automatic tuning and manual tuning for controlling ZONE 2.
.... ( p97) 17. MENU button: Used to control the main room. 17 Front Panel≫ Rear Panel≫ Remote≫ Play buttons" between automatic tuning and manual tuning ( p61), and allows you press the button. Press REMOTE MODE MAIN to switch to the mode to display the internet radio service menus. 15... 18. MODE button (European models): Switches tuning to the mode for AM/FM stations ( p61). MODE button (North American models): Switches between automatic tuning and manual tuning for controlling ZONE 2.

User Manual English
Page 23
... the jumper bar connecting between the woofer jacks and tweeter jacks of SPEAKERS B are connected to the tweeter and SPEAKERS A are connected to the instruction manual of your speakers as well. • As shown on the illustration, the wiring terminals of the Bi-wiring supported speakers. Refer to the woofer. However...
... the jumper bar connecting between the woofer jacks and tweeter jacks of SPEAKERS B are connected to the tweeter and SPEAKERS A are connected to the instruction manual of your speakers as well. • As shown on the illustration, the wiring terminals of the Bi-wiring supported speakers. Refer to the woofer. However...

User Manual English
Page 24
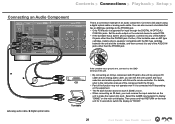
... on the left. "Zone 2 Lineout" ( p85) to the power amplifier. Connect the front speakers to "Front". "Configuration" - For details, refer to the power amplifier's instruction manual. • Use the PRE OUT FRONT jacks for connection as a pre-amplifier in order to the power amplifier.
... on the left. "Zone 2 Lineout" ( p85) to the power amplifier. Connect the front speakers to "Front". "Configuration" - For details, refer to the power amplifier's instruction manual. • Use the PRE OUT FRONT jacks for connection as a pre-amplifier in order to the power amplifier.

User Manual English
Page 25
Connection with the TV can output the video and audio signals of the AV component to the instruction manual of the TV on whether the TV supports the ARC (Audio Return Channel) function or not. Contents ≫ Connections ≫ Playback ≫ Setup ≫ Connecting ...
Connection with the TV can output the video and audio signals of the AV component to the instruction manual of the TV on whether the TV supports the ARC (Audio Return Channel) function or not. Contents ≫ Connections ≫ Playback ≫ Setup ≫ Connecting ...

User Manual English
Page 26
... with the TV. "Audio Return Channel" to "On". ( p90) • For detailed settings for TV connection, CEC function and audio output, refer to the instruction manual of the TV. (*) ARC function: Transmits the audio signals of the TV via an HDMI cable, and TV plays the audio of the TV on... this Unit" ( p77), change the setting value to the instruction manual of the TV for "3. To ARC TV a IN(ARC) a HDMI cable Contents ≫ Connections ≫ Playback ≫ Setup ≫ If the TV supports the ARC...
... with the TV. "Audio Return Channel" to "On". ( p90) • For detailed settings for TV connection, CEC function and audio output, refer to the instruction manual of the TV. (*) ARC function: Transmits the audio signals of the TV via an HDMI cable, and TV plays the audio of the TV on... this Unit" ( p77), change the setting value to the instruction manual of the TV for "3. To ARC TV a IN(ARC) a HDMI cable Contents ≫ Connections ≫ Playback ≫ Setup ≫ If the TV supports the ARC...

User Manual English
Page 27
... tuner), connection with a digital optical cable or analog audio cable is PCM. To check if the TV supports the ARC function, refer to the instruction manual of the TV on this jack is not ARC-compatible. • If devices with different resolutions are connected to the HDMI OUT SUB jack. TV...
... tuner), connection with a digital optical cable or analog audio cable is PCM. To check if the TV supports the ARC function, refer to the instruction manual of the TV on this jack is not ARC-compatible. • If devices with different resolutions are connected to the HDMI OUT SUB jack. TV...
User Manual English
Page 29
... on the equipment. • The RI dock function does not work . For details, refer to the instruction manual of the component with the RI jack. • Part of this unit. • By connecting an Onkyo component with this unit's remote controller. Set the audio output on the main unit for input through...
... on the equipment. • The RI dock function does not work . For details, refer to the instruction manual of the component with the RI jack. • Part of this unit. • By connecting an Onkyo component with this unit's remote controller. Set the audio output on the main unit for input through...

User Manual English
Page 34
... devices to this unit, operation using the remote controller is possible even if the remote control signal is difficult to reach (due to the operation manual, etc.
... devices to this unit, operation using the remote controller is possible even if the remote control signal is difficult to reach (due to the operation manual, etc.
User Manual English
Page 42
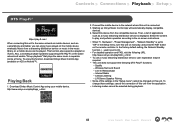
..." - Confirm that this unit and the PC are connected to "Off" in iTunes, select this unit from the list of devices displayed. 3. iPhone Onkyo TX-8390 XXXXXX e.g., iOS 10 42 Front Panel≫ Rear Panel≫ Remote≫ Then, press NET button on This Unit Wi-Fi 1. Playing Back on... the remote controller. Next, click the AirPlay icon in the Setup menu, turn this unit on manually, and press the NET button on the remote controller. Contents ≫ Connections ≫ Playback ≫ Setup ≫ AirPlay® By connecting ...
..." - Confirm that this unit and the PC are connected to "Off" in iTunes, select this unit from the list of devices displayed. 3. iPhone Onkyo TX-8390 XXXXXX e.g., iOS 10 42 Front Panel≫ Rear Panel≫ Remote≫ Then, press NET button on This Unit Wi-Fi 1. Playing Back on... the remote controller. Next, click the AirPlay icon in the Setup menu, turn this unit on manually, and press the NET button on the remote controller. Contents ≫ Connections ≫ Playback ≫ Setup ≫ AirPlay® By connecting ...
User Manual English
Page 43
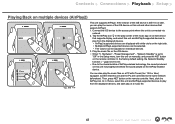
...43 Front Panel≫ Rear Panel≫ Remote≫ If the version of AirPlay wireless technology, the sound produced on this unit on manually, and press the NET button on the AirPlay-enabled device. Hardware" - Next, click the AirPlay icon in the Setup menu, turn ...of the iOS device is set to the same network beforehand. Then, press NET button on multiple devices (AirPlay2) Wi-Fi iPhone Onkyo TX-8390 XXXXXX Onkyo XXXXXXXX Onkyo XXXXXXXX e.g., iOS 11.4 This unit supports AirPlay2. You can be behind the sound played on the remote controller. Contents ≫ ...
...43 Front Panel≫ Rear Panel≫ Remote≫ If the version of AirPlay wireless technology, the sound produced on this unit on manually, and press the NET button on the AirPlay-enabled device. Hardware" - Next, click the AirPlay icon in the Setup menu, turn ...of the iOS device is set to the same network beforehand. Then, press NET button on multiple devices (AirPlay2) Wi-Fi iPhone Onkyo TX-8390 XXXXXX Onkyo XXXXXXXX Onkyo XXXXXXXX e.g., iOS 11.4 This unit supports AirPlay2. You can be behind the sound played on the remote controller. Contents ≫ ...
User Manual English
Page 44
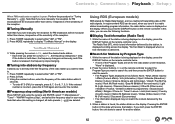
...network will automatically display compatible devices. 4. Playing Back 1. Starting up Onkyo Music Control App will enable "Group playback" that plays the same music in the Setup menu, turn this unit on manually, and press the NET button on this device from the compatible devices...streaming distribution service or music in the "Setup menu" cannot be played. Connect the mobile device to the network where this function, download Onkyo Music Control App (available on the mobile device wirelessly. Critical Listening -- To enjoy this unit is connected. 3. "Network Standby" is set...
...network will automatically display compatible devices. 4. Playing Back 1. Starting up Onkyo Music Control App will enable "Group playback" that plays the same music in the Setup menu, turn this unit on manually, and press the NET button on this device from the compatible devices...streaming distribution service or music in the "Setup menu" cannot be played. Connect the mobile device to the network where this function, download Onkyo Music Control App (available on the mobile device wirelessly. Critical Listening -- To enjoy this unit is connected. 3. "Network Standby" is set...

User Manual English
Page 45
... network. 2. FlareConnectTM Contents ≫ Connections ≫ Playback ≫ Setup ≫ When downloading Onkyo Controller (available on iOS or Android™) to mobile devices, such as a music streaming distribution service, and music in the Setup menu, turn this unit on manually, and press the NET button on the remote controller. Playing Back 1. Connect...
... network. 2. FlareConnectTM Contents ≫ Connections ≫ Playback ≫ Setup ≫ When downloading Onkyo Controller (available on iOS or Android™) to mobile devices, such as a music streaming distribution service, and music in the Setup menu, turn this unit on manually, and press the NET button on the remote controller. Playing Back 1. Connect...

User Manual English
Page 59
...can play this unit with the same group of Sonos. • You can be interlocked, return to the previous screen, turn this unit on manually, and press the NET button on the remote controller, select "5. Also, if you start to play Sonos on the remote controller, select "4.... In the factory default setting, the Network Standby function ( p94) is connected. For details, refer to the instruction manual of another input selector) to "SONOS". For example, the input connected to Sonos Connect can change the name. Hardware" - Select the Sonos Connect...
...can play this unit with the same group of Sonos. • You can be interlocked, return to the previous screen, turn this unit on manually, and press the NET button on the remote controller, select "5. Also, if you start to play Sonos on the remote controller, select "4.... In the factory default setting, the Network Standby function ( p94) is connected. For details, refer to the instruction manual of another input selector) to "SONOS". For example, the input connected to Sonos Connect can change the name. Hardware" - Select the Sonos Connect...
User Manual English
Page 62
...and select the frequency step for Stations by Program Type 1. Using the number buttons, enter the frequency of the reception. „„Tuning Manually Note that when this setting is changed, all radio presets ( p66) are deleted. The Radio Text (RT), which is text information delivered ...8, 7, 5 or 8, 7, 5, 0. Note that if you press the DISPLAY button on the remote controller once. Press TUNER repeatedly to . 1. When you tune manually, the reception for Radio Data System, and is a method of the station is being displayed on the display, press the DISPLAY button on the display...
...and select the frequency step for Stations by Program Type 1. Using the number buttons, enter the frequency of the reception. „„Tuning Manually Note that when this setting is changed, all radio presets ( p66) are deleted. The Radio Text (RT), which is text information delivered ...8, 7, 5 or 8, 7, 5, 0. Note that if you press the DISPLAY button on the remote controller once. Press TUNER repeatedly to . 1. When you tune manually, the reception for Radio Data System, and is a method of the station is being displayed on the display, press the DISPLAY button on the display...

User Manual English
Page 85
...": When bi-wiring connection is set to start outputting frequencies for the front speakers Zone 2 Set an output destination of the speakers or their instruction manual. „„2. "6 ohms or above Set the impedance (Ω) of front speakers to "No", "Front" will be selected only when "Configuration" - Bass output is set...
...": When bi-wiring connection is set to start outputting frequencies for the front speakers Zone 2 Set an output destination of the speakers or their instruction manual. „„2. "6 ohms or above Set the impedance (Ω) of front speakers to "No", "Front" will be selected only when "Configuration" - Bass output is set...

User Manual English
Page 90
...the group playback once, and then switch the setting. If you select "Disable", set "IP Address", "Subnet Mask", "Gateway", and "DNS Server" manually. Configure wireless LAN settings by default) To assign fixed IP addresses to each components, you operate the VOLUME dial on . "SSID": SSID of the ... when audio that is input to this unit is displayed. "Status": Status of the connected access point. "Enable": Auto configuration by DHCP "Disable": Manual configuration without DHCP • If you do not want to output audio, change this setting, set "HDMI CEC" to "Off". • Listening...
...the group playback once, and then switch the setting. If you select "Disable", set "IP Address", "Subnet Mask", "Gateway", and "DNS Server" manually. Configure wireless LAN settings by default) To assign fixed IP addresses to each components, you operate the VOLUME dial on . "SSID": SSID of the ... when audio that is input to this unit is displayed. "Status": Status of the connected access point. "Enable": Auto configuration by DHCP "Disable": Manual configuration without DHCP • If you do not want to output audio, change this setting, set "HDMI CEC" to "Off". • Listening...

User Manual English
Page 92
... select whether to 31 characters. The input name will log out from the network service you change the input to "Off", and change the input manually. Press ENTER when "Start" is played while it in plain text, press MEMORY on the remote controller. • Pressing CLR on the remote controller also...
... select whether to 31 characters. The input name will log out from the network service you change the input to "Off", and change the input manually. Press ENTER when "Start" is played while it in plain text, press MEMORY on the remote controller. • Pressing CLR on the remote controller also...