Owner Manual
Page 3
... ZONE 2 LINE OUT PRE OUT SUB L L WOOFER L FRONT SPEAKERS L R CENTER SPEAKER 120V VOLTAGE SELECTOR 220-240V R REMOTE CONTROL R VOLTAGE R R SUB WOOFER CD TAPE GAME/TV CBL/SAT VCR/DVR DVD SELECTOR 220-240V Pressing the [ON/STANDBY] button to disconnect this equipment does cause harmful interference to "220-240V." Never Touch this unit or its power cord while your Onkyo dealer. 8. For Canadian Models NOTE: THIS CLASS B DIGITAL...
... ZONE 2 LINE OUT PRE OUT SUB L L WOOFER L FRONT SPEAKERS L R CENTER SPEAKER 120V VOLTAGE SELECTOR 220-240V R REMOTE CONTROL R VOLTAGE R R SUB WOOFER CD TAPE GAME/TV CBL/SAT VCR/DVR DVD SELECTOR 220-240V Pressing the [ON/STANDBY] button to disconnect this equipment does cause harmful interference to "220-240V." Never Touch this unit or its power cord while your Onkyo dealer. 8. For Canadian Models NOTE: THIS CLASS B DIGITAL...
Owner Manual
Page 5
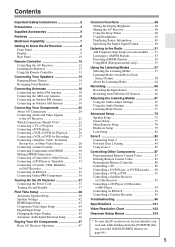
...30 Making HDMI Connections 31 Connecting a Camcorder or Other Device 32 Connecting a CD Player or Turntable 33 Connecting a Cassette, CDR, MiniDisc, or DAT Recorder 34 Connecting an RI Dock 35 Connecting Onkyo Components 36 Turning On the AV Receiver 37 Connecting the Power Cord 37 Turning On and Standby 37 First Time Setup 38 Automatic Speaker Setup 38 Speaker Settings 42 HDMI Input Setup 43 Component Video Input Setup 44 Digital Input Setup 44 Changing the Input Display 45 Automatic Audio Input Selection Setup 46 Playing Your AV Components 47 Basic AV Receiver Operation 47...
...30 Making HDMI Connections 31 Connecting a Camcorder or Other Device 32 Connecting a CD Player or Turntable 33 Connecting a Cassette, CDR, MiniDisc, or DAT Recorder 34 Connecting an RI Dock 35 Connecting Onkyo Components 36 Turning On the AV Receiver 37 Connecting the Power Cord 37 Turning On and Standby 37 First Time Setup 38 Automatic Speaker Setup 38 Speaker Settings 42 HDMI Input Setup 43 Component Video Input Setup 44 Digital Input Setup 44 Changing the Input Display 45 Automatic Audio Input Selection Setup 46 Playing Your AV Components 47 Basic AV Receiver Operation 47...
Owner Manual
Page 9
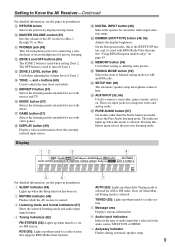
.... X AUX INPUT (32, 66) Used to turn off when Manual Tuning mode is for connecting a standard pair of Zone 2. RDS (55): Lights up when tuned to a radio station that supports RDS (Radio Data System). 7 AUTO (52): Lights up when tuned to a radio station. 5 Message area Displays various information. 6 Audio input indicators Indicate the type of the AV receiver to adjust the tone (bass and treble). J MASTER VOLUME control (47) Sets the volume of audio input that's selected as the audio source: MULTI CH, or HDMI. 7 Audyssey indicator Flashes during automatic speaker setup...
.... X AUX INPUT (32, 66) Used to turn off when Manual Tuning mode is for connecting a standard pair of Zone 2. RDS (55): Lights up when tuned to a radio station that supports RDS (Radio Data System). 7 AUTO (52): Lights up when tuned to a radio station. 5 Message area Displays various information. 6 Audio input indicators Indicate the type of the AV receiver to adjust the tone (bass and treble). J MASTER VOLUME control (47) Sets the volume of audio input that's selected as the audio source: MULTI CH, or HDMI. 7 Audyssey indicator Flashes during automatic speaker setup...

Owner Manual
Page 12
...Number buttons (53) Used to On (page 81), this AV receiver. ■ Controlling the tuner To control the AV receiver's tuner, press the [TUNER] (or [RECEIVER]) REMOTE MODE button. F LISTENING MODE buttons (57) Used to On or Standby. When the Audio TV Out setting is set to select AM and FM radio stations directly. 3 D.TUN button (53) Selects the Direct tuning mode. 4 DISPLAY button (53) Displays information about the current input source. button (54) Selects radio presets. A 2 3 RECEIVER 14 * 5 6 2 37 84 TUNER 9 J 5 K L M For detailed information, see page 95). E SETUP button Used...
...Number buttons (53) Used to On (page 81), this AV receiver. ■ Controlling the tuner To control the AV receiver's tuner, press the [TUNER] (or [RECEIVER]) REMOTE MODE button. F LISTENING MODE buttons (57) Used to On or Standby. When the Audio TV Out setting is set to select AM and FM radio stations directly. 3 D.TUN button (53) Selects the Direct tuning mode. 4 DISPLAY button (53) Displays information about the current input source. button (54) Selects radio presets. A 2 3 RECEIVER 14 * 5 6 2 37 84 TUNER 9 J 5 K L M For detailed information, see page 95). E SETUP button Used...
Owner Manual
Page 20
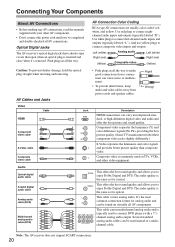
... connection format for optical. Connecting Your Components About AV Connections • Before making any AV connections, read the manuals supplied with a 7.1channel analog audio output. Optical Digital Jacks The AV receiver's optical digital jacks have shutter-type covers that open when an optical plug is typically used instead of a multichannel cable. AV Connection Color Coding RCA-type AV connections are usually color coded: red, white, and yellow. Use red plugs to connect left-channel audio inputs and outputs (typically labeled "L"). And use yellow plugs to connect DVD players...
... connection format for optical. Connecting Your Components About AV Connections • Before making any AV connections, read the manuals supplied with a 7.1channel analog audio output. Optical Digital Jacks The AV receiver's optical digital jacks have shutter-type covers that open when an optical plug is typically used instead of a multichannel cable. AV Connection Color Coding RCA-type AV connections are usually color coded: red, white, and yellow. Use red plugs to connect left-channel audio inputs and outputs (typically labeled "L"). And use yellow plugs to connect DVD players...
Owner Manual
Page 31
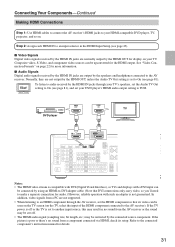
... an HDMI component through your TV's speakers, set your HDMI-compatible DVD player, TV, projector, and so on the TV, select the input of the HDMI component connected to your DVD player's HDMI audio output setting to the AV receiver. Refer to On (see page 81). Connecting Your Components-Continued Making HDMI Connections Step 1: Use HDMI cables to connect the AV receiver's HDMI jacks to the AV receiver). In addition, video signals from a PC are not output by the connected source component. Step 2: Assign each HDMI IN to another input source, this...
... an HDMI component through your TV's speakers, set your HDMI-compatible DVD player, TV, projector, and so on the TV, select the input of the HDMI component connected to your DVD player's HDMI audio output setting to the AV receiver. Refer to On (see page 81). Connecting Your Components-Continued Making HDMI Connections Step 1: Use HDMI cables to connect the AV receiver's HDMI jacks to the AV receiver). In addition, video signals from a PC are not output by the connected source component. Step 2: Assign each HDMI IN to another input source, this...
Owner Manual
Page 36
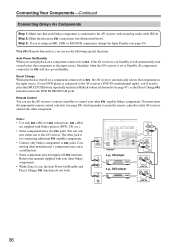
... SURR CENTER SURR BACK L R SUB WOOFER DVD FRONT L R DVD e.g., CD player e.g., DVD player R L ANALOG AUDIO OUT R L ANALOG AUDIO OUT 36 Step 2: Make the necessary connections (see page 88). With (Remote Interactive), you 're using an MD, CDR, or RI DOCK component, change the Input Display (see page 45). And remember to the manuals supplied with Onkyo players (DVD, CD, etc.). • Some components have two jacks. You can use the AV receiver's remote controller to jacks. Notes: • Use only cables for connecting...
... SURR CENTER SURR BACK L R SUB WOOFER DVD FRONT L R DVD e.g., CD player e.g., DVD player R L ANALOG AUDIO OUT R L ANALOG AUDIO OUT 36 Step 2: Make the necessary connections (see page 88). With (Remote Interactive), you 're using an MD, CDR, or RI DOCK component, change the Input Display (see page 45). And remember to the manuals supplied with Onkyo players (DVD, CD, etc.). • Some components have two jacks. You can use the AV receiver's remote controller to jacks. Notes: • Use only cables for connecting...
Owner Manual
Page 37
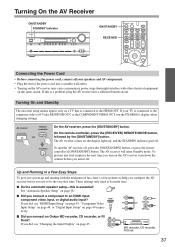
.... Turning On the AV Receiver ON/STANDBY STANDBY indicator ON/STANDBY STANDBY ZONE 2 TUNING PRESET MASTER VOLUME PURE AUDIO MULTI CH DVD VCR/DVR CBL/SAT GAME/TV AUX TAPE TUNER CD SETUP ENTER RETURN PHONES ZONE 2 OFF ZONE 2 LEVEL TONE MOVIE/TV MUSIC GAME DISPLAY DIGITAL INPUT RT/PTY/TP MEMORY TUNING MODE CLEAR SETUP MIC AUX INPUT VIDEO L AUDIO R AV RECEIVER TX-SR606 ON/STANDBY RECEIVER Connecting the Power Cord • Before connecting the power cord, connect all your speakers and AV components. • Plug the end of fuss, here's a few pointers to the HDMI...
.... Turning On the AV Receiver ON/STANDBY STANDBY indicator ON/STANDBY STANDBY ZONE 2 TUNING PRESET MASTER VOLUME PURE AUDIO MULTI CH DVD VCR/DVR CBL/SAT GAME/TV AUX TAPE TUNER CD SETUP ENTER RETURN PHONES ZONE 2 OFF ZONE 2 LEVEL TONE MOVIE/TV MUSIC GAME DISPLAY DIGITAL INPUT RT/PTY/TP MEMORY TUNING MODE CLEAR SETUP MIC AUX INPUT VIDEO L AUDIO R AV RECEIVER TX-SR606 ON/STANDBY RECEIVER Connecting the Power Cord • Before connecting the power cord, connect all your speakers and AV components. • Plug the end of fuss, here's a few pointers to the HDMI...

Owner Manual
Page 48
.../STANDBY STANDBY ZONE 2 TUNING PRESET MASTER VOLUME PURE AUDIO MULTI CH DVD VCR/DVR CBL/SAT GAME/TV AUX TAPE TUNER CD SETUP ENTER RETURN PHONES ZONE 2 OFF ZONE 2 LEVEL TONE MOVIE/TV MUSIC GAME DISPLAY DIGITAL INPUT DIMMER MEMORY TUNING MODE CLEAR SETUP MIC AUX INPUT VIDEO L AUDIO R AV RECEIVER TX-SR606 PHONES DIMMER Setting the Display Brightness You can be used with any input source. The output is muted and the MUTING indicator flashes on the display. Press the [RECEIVER] REMOTE MODE button, and then press the remote controller's [SLEEP] button...
.../STANDBY STANDBY ZONE 2 TUNING PRESET MASTER VOLUME PURE AUDIO MULTI CH DVD VCR/DVR CBL/SAT GAME/TV AUX TAPE TUNER CD SETUP ENTER RETURN PHONES ZONE 2 OFF ZONE 2 LEVEL TONE MOVIE/TV MUSIC GAME DISPLAY DIGITAL INPUT DIMMER MEMORY TUNING MODE CLEAR SETUP MIC AUX INPUT VIDEO L AUDIO R AV RECEIVER TX-SR606 PHONES DIMMER Setting the Display Brightness You can be used with any input source. The output is muted and the MUTING indicator flashes on the display. Press the [RECEIVER] REMOTE MODE button, and then press the remote controller's [SLEEP] button...
Owner Manual
Page 69
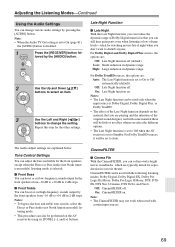
... Dolby TrueHD sources, it will be set to Standby. CinemaFILTER ■ Cinema Fltr With the CinemaFILTER, you can boost or cut high-frequency sounds output by using its [TONE], [-], and [+] buttons. Note: • When the Audio TV Out setting is set to On (page 81), the [AUDIO] button is set to Off when the AV receiver is selected. ■ Front Bass You can boost or cut low-frequency sounds output by the front speakers from...
... Dolby TrueHD sources, it will be set to Standby. CinemaFILTER ■ Cinema Fltr With the CinemaFILTER, you can boost or cut high-frequency sounds output by using its [TONE], [-], and [+] buttons. Note: • When the Audio TV Out setting is set to On (page 81), the [AUDIO] button is set to Off when the AV receiver is selected. ■ Front Bass You can boost or cut low-frequency sounds output by the front speakers from...

Owner Manual
Page 70
.... A/V Sync ■ A/V Sync When using progressive scanning on . tening mode is used with a sampling rate below 48kHz and analog audio input signals. Audyssey Dynamic EQ solves the problem of sync. Note: • The Music Optimizer function only works with PCM digital audio input signals with an analog input signal. Off: Music Optimizer off . Speaker Levels You can adjust the volume of compressed music files. Music Optimizer ■ M.Optimizer The Music Optimizer function enhances the sound quality of each speaker while...
.... A/V Sync ■ A/V Sync When using progressive scanning on . tening mode is used with a sampling rate below 48kHz and analog audio input signals. Audyssey Dynamic EQ solves the problem of sync. Note: • The Music Optimizer function only works with PCM digital audio input signals with an analog input signal. Off: Music Optimizer off . Speaker Levels You can adjust the volume of compressed music files. Music Optimizer ■ M.Optimizer The Music Optimizer function enhances the sound quality of each speaker while...

Owner Manual
Page 72
... [SETUP] button. quency bass sounds adequately, for example, speakers 5 with a good sized woofer. Refer to your TV. 6 2 Use the Up and Down [ ]/[ ] buttons to select "2. For smaller speakers, specify a crossover frequency. Some of the speaker. Sounds below the crossover fre- If no subwoofer is connected. Advanced Setup Speaker Setup 3 This section explains how to check the speaker settings and how to set them manually, which speakers are connected and a crossover frequency, distance, and level for each speaker. lowed...
... [SETUP] button. quency bass sounds adequately, for example, speakers 5 with a good sized woofer. Refer to your TV. 6 2 Use the Up and Down [ ]/[ ] buttons to select "2. For smaller speakers, specify a crossover frequency. Some of the speaker. Sounds below the crossover fre- If no subwoofer is connected. Advanced Setup Speaker Setup 3 This section explains how to check the speaker settings and how to set them manually, which speakers are connected and a crossover frequency, distance, and level for each speaker. lowed...

Owner Manual
Page 78
... [RECEIVER] REMOTE MODE button, followed by using its [SETUP], [ENTER], and arrow buttons. To use the Left and Right [ ]/[ ] buttons to select "6. Note: • The Power On Volume setting cannot be performed on the AV receiver by the [SETUP] button. The Maximum Volume range is 16:9 (default). 4:3: Select if your area. If the main menu doesn't appear, make sure the appropriate external input is 4:3. ■ Display Position This setting determines where on . Volume Setup ■ Maximum Volume...
... [RECEIVER] REMOTE MODE button, followed by using its [SETUP], [ENTER], and arrow buttons. To use the Left and Right [ ]/[ ] buttons to select "6. Note: • The Power On Volume setting cannot be performed on the AV receiver by the [SETUP] button. The Maximum Volume range is 16:9 (default). 4:3: Select if your area. If the main menu doesn't appear, make sure the appropriate external input is 4:3. ■ Display Position This setting determines where on . Volume Setup ■ Maximum Volume...
Owner Manual
Page 80
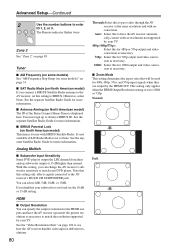
...; Subwoofer Input Sensitivity Some DVD players output the LFE channel from their analog subwoofer output at the same resolution and with SIRIUS Satellite Radio. With this to None. Otherwise, select None. HDMI ■ Output Resolution You can specify the output resolution for use with no conversion. Advanced Setup-Continued 2 Use the number buttons to obtain a SIRIUS ID. It's not available if SAT Radio Mode is set to pass video through the AV receiver...
...; Subwoofer Input Sensitivity Some DVD players output the LFE channel from their analog subwoofer output at the same resolution and with SIRIUS Satellite Radio. With this to None. Otherwise, select None. HDMI ■ Output Resolution You can specify the output resolution for use with no conversion. Advanced Setup-Continued 2 Use the number buttons to obtain a SIRIUS ID. It's not available if SAT Radio Mode is set to pass video through the AV receiver...

Owner Manual
Page 81
... complex digital video processing being applied by the HDMI Lip Sync function on the A/V Sync screen (see page 77). ■ x.v.Color If your HDMI source and HDMI-compatible TV both audio and video received by an HDMI input will output no sound may not work properly with components other component that's connected to synchronize the audio and video is selected and the signal can enable "x.v.Color" on Onkyo components. To stop the AV receiver's speakers producing sound, change the settings, change this setting. The AV receiver...
... complex digital video processing being applied by the HDMI Lip Sync function on the A/V Sync screen (see page 77). ■ x.v.Color If your HDMI source and HDMI-compatible TV both audio and video received by an HDMI input will output no sound may not work properly with components other component that's connected to synchronize the audio and video is selected and the signal can enable "x.v.Color" on Onkyo components. To stop the AV receiver's speakers producing sound, change the settings, change this setting. The AV receiver...

Owner Manual
Page 88
... the remote controller has been reset. Controlling Other Components-Continued Remote Control Codes for Onkyo Components Connected via Onkyo components that are connected via , use the following remote control codes: • [DVD] REMOTE MODE button 30627: Onkyo DVD player without (default) • [CD] REMOTE MODE button 71817: Onkyo CD player without (default) Note: • If you connect an -capable Onkyo MiniDisc recorder, CD recorder, or RI Dock to the TAPE IN/OUT jacks, or connect an RI Dock to the GAME/TV jacks, for to work properly, you must set the Input Display...
... the remote controller has been reset. Controlling Other Components-Continued Remote Control Codes for Onkyo Components Connected via Onkyo components that are connected via , use the following remote control codes: • [DVD] REMOTE MODE button 30627: Onkyo DVD player without (default) • [CD] REMOTE MODE button 71817: Onkyo CD player without (default) Note: • If you connect an -capable Onkyo MiniDisc recorder, CD recorder, or RI Dock to the TAPE IN/OUT jacks, or connect an RI Dock to the GAME/TV jacks, for to work properly, you must set the Input Display...
Owner Manual
Page 96
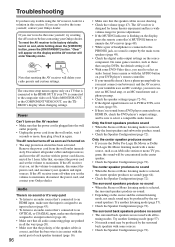
... AV receiver • Make sure that the power cord is in again. Remove the power cord from a menu or with the AUDIO button on your DVD player's remote controller. • If your turntable uses an MC cartridge, you must connect an MC head amp, or an MC transformer and a phono preamp. • Check the speaker settings (pages 72-76). • If the digital signal format is output by the surround speakers. Only the center speaker produces sound •...
... AV receiver • Make sure that the power cord is in again. Remove the power cord from a menu or with the AUDIO button on your DVD player's remote controller. • If your turntable uses an MC cartridge, you must connect an MC head amp, or an MC transformer and a phono preamp. • Check the speaker settings (pages 72-76). • If the digital signal format is output by the surround speakers. Only the center speaker produces sound •...

Owner Manual
Page 97
... analog multichannel input doesn't work • Make sure that are pushed in the LFE channel, the subwoofer produces no sound (page 83). Noise can be heard • Using cable ties to bundle audio cables with power cords, speaker cables, and so on can play DVDs, the default setting is off and only the HDMI OUT outputs video signals. • If the video source is connected to an HDMI input, you must assign that input to a digital input on the source component. This...
... analog multichannel input doesn't work • Make sure that are pushed in the LFE channel, the subwoofer produces no sound (page 83). Noise can be heard • Using cable ties to bundle audio cables with power cords, speaker cables, and so on can play DVDs, the default setting is off and only the HDMI OUT outputs video signals. • If the video source is connected to an HDMI input, you must assign that input to a digital input on the source component. This...
Owner Manual
Page 98
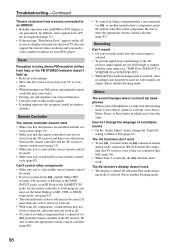
... remote controller at that component. How do I connect my headphones • When a pair of a multiplex source • On the "Audio Adjust" menu, change the "Input Ch" setting to Main or Sub (page 67). Select another listening mode. 98 ing mode is turned off when the Pure Audio listen- In addition, video signals from a PC are not supported (page 31). • If the message "Resolution Error" appears on your DVD player. The AV receiver's display doesn't work...
... remote controller at that component. How do I connect my headphones • When a pair of a multiplex source • On the "Audio Adjust" menu, change the "Input Ch" setting to Main or Sub (page 67). Select another listening mode. 98 ing mode is turned off when the Pure Audio listen- In addition, video signals from a PC are not supported (page 31). • If the message "Resolution Error" appears on your DVD player. The AV receiver's display doesn't work...
Owner Manual
Page 103
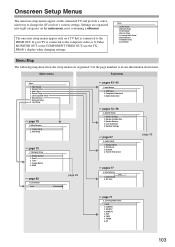
...page numbers to the composite video or S-Video MONITOR OUT, or the COMPONENT VIDEO OUT, use the TXSR606's display when changing settings. Audio Adjust 4. Lock Setup ☞ page 78 6. Speaker Distance 4. Listening Mode Preset 1. CD 103 Input Assign 2. Listening Mode Preset 6. Miscellaneous 7. Zone2 3. Analog Multich 5. Input Assign 1. Digital Audio Input ☞ pages 72-76 2. Level Calibration 5. Audio Adjust 1. Multiplex/Mono 2. GAME/TV 5. Remote Control 2. Theater-Dimensional ☞ pages 77 4. Source Setup DVD 1. CBL/SAT 4. If your TV is connected...
...page numbers to the composite video or S-Video MONITOR OUT, or the COMPONENT VIDEO OUT, use the TXSR606's display when changing settings. Audio Adjust 4. Lock Setup ☞ page 78 6. Speaker Distance 4. Listening Mode Preset 1. CD 103 Input Assign 2. Listening Mode Preset 6. Miscellaneous 7. Zone2 3. Analog Multich 5. Input Assign 1. Digital Audio Input ☞ pages 72-76 2. Level Calibration 5. Audio Adjust 1. Multiplex/Mono 2. GAME/TV 5. Remote Control 2. Theater-Dimensional ☞ pages 77 4. Source Setup DVD 1. CBL/SAT 4. If your TV is connected...


