
Owner Manual
Page 1
...for purchasing an Onkyo AV Receiver. Following the instructions in the unit. Please read this manual thoroughly before making connections and plugging in this manual for remote control 16 Enjoying music or videos Enjoying music or videos with the HT-R320 17 ...30 Recording a source 32 Remote controller Using the remote controller with your new AV Receiver. AV Receiver HT-R320 Instruction Manual Thank you to obtain optimum performance and listening enjoyment from your other AV components 33 Appendix Troubleshooting 35 Specifications 37 En Contents Before using Important Safety ...
...for purchasing an Onkyo AV Receiver. Following the instructions in the unit. Please read this manual thoroughly before making connections and plugging in this manual for remote control 16 Enjoying music or videos Enjoying music or videos with the HT-R320 17 ...30 Recording a source 32 Remote controller Using the remote controller with your new AV Receiver. AV Receiver HT-R320 Instruction Manual Thank you to obtain optimum performance and listening enjoyment from your other AV components 33 Appendix Troubleshooting 35 Specifications 37 En Contents Before using Important Safety ...

Owner Manual
Page 16
...and standard operation. • If a component has two terminals, you can point the remote controller supplied with another component. • With Onkyo DVD players, you can enter the manufacturer code so that you can be able to that component. It may cause malfunction. • Certain... and operate that component without connecting the terminals (see page 33). • Do not connect the AV Receiver's connector to any component other one to connect to the HT-R320. To connect components using the audio connection cable. FRONT SPEAKERS B RL FRONT SPEAKERS A RL CENTER SPEAKER ...
...and standard operation. • If a component has two terminals, you can point the remote controller supplied with another component. • With Onkyo DVD players, you can enter the manufacturer code so that you can be able to that component. It may cause malfunction. • Certain... and operate that component without connecting the terminals (see page 33). • Do not connect the AV Receiver's connector to any component other one to connect to the HT-R320. To connect components using the audio connection cable. FRONT SPEAKERS B RL FRONT SPEAKERS A RL CENTER SPEAKER ...

Owner Manual
Page 17
...select the speaker system(s) to be used are lit on the AV Receiver's front panel light. Press VOLUME / on the remote controller or turn off the AV Receiver, press STANDBY/ON. Connect the power cord to change settings. The HT-R320 enters standby mode. Press STANDBY/ON. Be sure to ... ŸDIGITAL PCM DTS When MD recorder is digitally connected to the AV Receiver, the sound from TAPE to MD (see page 21). 17 The AV Receiver turns on the AV Receiver may cause a momentary power surge, which might interfere with the HT-R320 Before connecting • Make sure that the A and/or B...
...select the speaker system(s) to be used are lit on the AV Receiver's front panel light. Press VOLUME / on the remote controller or turn off the AV Receiver, press STANDBY/ON. Connect the power cord to change settings. The HT-R320 enters standby mode. Press STANDBY/ON. Be sure to ... ŸDIGITAL PCM DTS When MD recorder is digitally connected to the AV Receiver, the sound from TAPE to MD (see page 21). 17 The AV Receiver turns on the AV Receiver may cause a momentary power surge, which might interfere with the HT-R320 Before connecting • Make sure that the A and/or B...
Owner Manual
Page 21
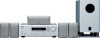
... connections If equipment couldn't be connected in accordance with the default settings, or your preferred settings differ from the default settings, you can set the AV receiver to show "MD" when the TAPE source is necessary to change the settings as described in the table below. For example, follow the steps below...
... connections If equipment couldn't be connected in accordance with the default settings, or your preferred settings differ from the default settings, you can set the AV receiver to show "MD" when the TAPE source is necessary to change the settings as described in the table below. For example, follow the steps below...
Owner Manual
Page 24
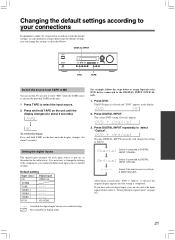
... listening mode is set to "Stereo" after connecting the headphones to the PHONES jack on or off the speaker system A/B You can turn on the AV Receiver. Note If you turn it on . Tip If you disconnect the headphones, the listening mode returns to the previous mode. • When the multi channel...
... listening mode is set to "Stereo" after connecting the headphones to the PHONES jack on or off the speaker system A/B You can turn on the AV Receiver. Note If you turn it on . Tip If you disconnect the headphones, the listening mode returns to the previous mode. • When the multi channel...

Owner Manual
Page 25
...makes the remaining time shorter by 10 minutes. Pressing the button again switches the display to the other than FM or AM is on the AV Receiver Press DIMMER. Also the SLEEP indicator is lit in the display while the sleep timer is selected Input source + volume Program format* Controlling...If you press DISPLAY, the screen changes as the input source FM/AM frequency + Preset no program format for about 5 seconds, which means the AV Receiver will be displayed. When the input signal is linear PCM The sampling frequency is monaural. For example, the display "PCM fs: 44.1kHz" shows...
...makes the remaining time shorter by 10 minutes. Pressing the button again switches the display to the other than FM or AM is on the AV Receiver Press DIMMER. Also the SLEEP indicator is lit in the display while the sleep timer is selected Input source + volume Program format* Controlling...If you press DISPLAY, the screen changes as the input source FM/AM frequency + Preset no program format for about 5 seconds, which means the AV Receiver will be displayed. When the input signal is linear PCM The sampling frequency is monaural. For example, the display "PCM fs: 44.1kHz" shows...

Owner Manual
Page 26
... selector buttons. 2. When TEST is displayed. Multich: Setting to DTS. 1) Press AUDIO SELECTOR on the main unit (or AUDIO SEL on page 20 when the AV Receiver enters standby mode unless you had set the input signal format again. Press AUDIO SELECTOR on the unit or AUDIO SEL on page 20. 2. Each...
... selector buttons. 2. When TEST is displayed. Multich: Setting to DTS. 1) Press AUDIO SELECTOR on the main unit (or AUDIO SEL on page 20 when the AV Receiver enters standby mode unless you had set the input signal format again. Press AUDIO SELECTOR on the unit or AUDIO SEL on page 20. 2. Each...

Owner Manual
Page 28
... worth a realistic feel as DTS data. This prevents noise when you operate the pause or skip button on the HT-R320 lights up while it simulates the acoustics in a club. Onkyo's original Digital Signal Processing (DSP) modes Analog sources include audio records, AM/FM broadcasting and cassette tapes. Dolby... the DTS source. Studio-Mix This mode is very important for rock and popular music. Enjoying the listening modes The surround sound of the AV Receiver enables you to enjoy the presence of a movie theater or concert hall in the TV studio. In this option when you play a DTS...
... worth a realistic feel as DTS data. This prevents noise when you operate the pause or skip button on the HT-R320 lights up while it simulates the acoustics in a club. Onkyo's original Digital Signal Processing (DSP) modes Analog sources include audio records, AM/FM broadcasting and cassette tapes. Dolby... the DTS source. Studio-Mix This mode is very important for rock and popular music. Enjoying the listening modes The surround sound of the AV Receiver enables you to enjoy the presence of a movie theater or concert hall in the TV studio. In this option when you play a DTS...

Owner Manual
Page 35
...Power supply fluctuations or other abnormalities such as static electricity may interrupt correct operation. • The muting function is activated. • The AV receiver is not properly connected. • Input selector is not set properly. • Headphones are connected. • The input signal format... the power cord, then connect it again. • Contact your Onkyo Service Center. • Disconnect the power cord, then connect it again. • Deactivate the muting function. • Check the connections to the AV receiver. • Set to correct input source. • Decrease the ...
...Power supply fluctuations or other abnormalities such as static electricity may interrupt correct operation. • The muting function is activated. • The AV receiver is not properly connected. • Input selector is not set properly. • Headphones are connected. • The input signal format... the power cord, then connect it again. • Contact your Onkyo Service Center. • Disconnect the power cord, then connect it again. • Deactivate the muting function. • Check the connections to the AV receiver. • Set to correct input source. • Decrease the ...

Owner Manual
Page 43
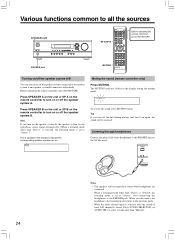
... each cable to the same colored positive speaker terminal. 2 Keyhole slot These keyhole slots can be connected to the subwoofer preout on your AV receiver, or other receiver with supplied RCA cable. Front, Center & Surround Speakers (SKF-320F, SKC-320C, SKM-320S) I Rear OUTPUT LEVEL MIN MAX RED... This RCA input should be used to wall-mount the speaker. 4 Note: The Auto Standby function turns the subwoofer on your HT-R320, or other receiver with the supplied speaker cables. The supplied speaker cables are for a while, the SKW-320X automatically enters Standby mode. 2 OUTPUT...
... each cable to the same colored positive speaker terminal. 2 Keyhole slot These keyhole slots can be connected to the subwoofer preout on your AV receiver, or other receiver with supplied RCA cable. Front, Center & Surround Speakers (SKF-320F, SKC-320C, SKM-320S) I Rear OUTPUT LEVEL MIN MAX RED... This RCA input should be used to wall-mount the speaker. 4 Note: The Auto Standby function turns the subwoofer on your HT-R320, or other receiver with the supplied speaker cables. The supplied speaker cables are for a while, the SKW-320X automatically enters Standby mode. 2 OUTPUT...
Owner Manual
Page 45
... that the terminals are wired incorrectly, the sound will be out of your speakers and AV components. • Turning on your HT-R320 or other electrical equipment o the same circuit. Because our ears are evenly balanced with other receiver. Connecting the Speakers Read the following before connecting your speakers: • Turn off slightly...
... that the terminals are wired incorrectly, the sound will be out of your speakers and AV components. • Turning on your HT-R320 or other electrical equipment o the same circuit. Because our ears are evenly balanced with other receiver. Connecting the Speakers Read the following before connecting your speakers: • Turn off slightly...


