Owner Manual
Page 1
Following the instructions in the unit. Please read this manual thoroughly before making connections and plugging in this manual for purchasing an Onkyo AV Receiver. Contents Introduction 2 Connections 11 Turning On & Basic Operations ......19 Advanced Operations 33 Controlling iPod & Other Components 51 Others 59 En Please retain this manual will enable you for future reference. AV Receiver HT-RC260 Instruction Manual Thank you to obtain optimum performance and listening enjoyment from your new AV Receiver.
Following the instructions in the unit. Please read this manual thoroughly before making connections and plugging in this manual for purchasing an Onkyo AV Receiver. Contents Introduction 2 Connections 11 Turning On & Basic Operations ......19 Advanced Operations 33 Controlling iPod & Other Components 51 Others 59 En Please retain this manual will enable you for future reference. AV Receiver HT-RC260 Instruction Manual Thank you to obtain optimum performance and listening enjoyment from your new AV Receiver.

Owner Manual
Page 11
... same time. En 11 In other words, connect positive (+) terminals only to positive (+) terminals, and negative (-) terminals only to do this automatically (➔ 23) or manually (➔ 35). Attaching the Speaker Cable Labels The AV receiver's positive (+) speaker terminals are all red (the negative (-) speaker terminals are also color-coded and...
... same time. En 11 In other words, connect positive (+) terminals only to positive (+) terminals, and negative (-) terminals only to do this automatically (➔ 23) or manually (➔ 35). Attaching the Speaker Cable Labels The AV receiver's positive (+) speaker terminals are all red (the negative (-) speaker terminals are also color-coded and...

Owner Manual
Page 13
... is output from each jack. The same signal is unpowered and you 've completed the bi-amping connections shown below and turned on your speaker manual. the SURR BACK OR FRONT HIGH OR FRONT WIDE L/R terminal posts connect to the front speakers' tweeter terminals. • Once you 're using an external...
... is output from each jack. The same signal is unpowered and you 've completed the bi-amping connections shown below and turned on your speaker manual. the SURR BACK OR FRONT HIGH OR FRONT WIDE L/R terminal posts connect to the front speakers' tweeter terminals. • Once you 're using an external...
Owner Manual
Page 14
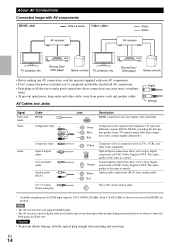
...). Blu-ray Disc/ DVD player Game console TV, projector, etc. Blu-ray Disc/ DVD player Game console • Before making any AV connections, read the manuals supplied with AV components HDMI cable : Video & Audio Other cables AV receiver : Video : Audio AV receiver TV, projector, etc. The audio quality is the same...
...). Blu-ray Disc/ DVD player Game console TV, projector, etc. Blu-ray Disc/ DVD player Game console • Before making any AV connections, read the manuals supplied with AV components HDMI cable : Video & Audio Other cables AV receiver : Video : Audio AV receiver TV, projector, etc. The audio quality is the same...

Owner Manual
Page 16
... . Connecting External Components The on-screen setup menus appear only on a TV that has a phono preamp built-in the main room; No. If your turntable's manual for 16 video recording (➔ 27). To make a connection for details. • With connection %, you can enjoy Dolby Digital and DTS. (To record or listen...
... . Connecting External Components The on-screen setup menus appear only on a TV that has a phono preamp built-in the main room; No. If your turntable's manual for 16 video recording (➔ 27). To make a connection for details. • With connection %, you can enjoy Dolby Digital and DTS. (To record or listen...
Owner Manual
Page 17
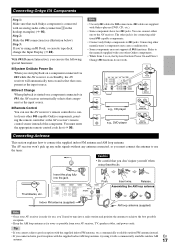
... appropriate remote control code first (➔ 56). Insert wire. Connecting Onkyo V Components Step 1: Make sure that each Onkyo component is connected with a commercially available outdoor AM En antenna. 17 The other Onkyo components. • While Zone 2 is on a component connected via...the input source. ■ Direct Change When playback is ready for connecting additional V-capable components. • Connect only Onkyo components to the manuals supplied with Onkyo players (DVD, CD, etc.). • Some components have two V jacks. Indoor FM antenna (supplied) AM ...
... appropriate remote control code first (➔ 56). Insert wire. Connecting Onkyo V Components Step 1: Make sure that each Onkyo component is connected with a commercially available outdoor AM En antenna. 17 The other Onkyo components. • While Zone 2 is on a component connected via...the input source. ■ Direct Change When playback is ready for connecting additional V-capable components. • Connect only Onkyo components to the manuals supplied with Onkyo players (DVD, CD, etc.). • Some components have two V jacks. Indoor FM antenna (supplied) AM ...

Owner Manual
Page 20
... in "Name Edit" (➔ 40). If the input signal is digital but not PCM, the signal format is displayed for the onscreen setup menus. This manual describes the procedure using the remote controller unless otherwise specified.
... in "Name Edit" (➔ 40). If the input signal is digital but not PCM, the signal format is displayed for the onscreen setup menus. This manual describes the procedure using the remote controller unless otherwise specified.

Owner Manual
Page 24
... Room Correction and Speaker Setup is not detected. Remove the source of the error messages below may have changed. Changing the Speaker Settings Manually You can view the calculated settings for appropriate settings (➔ 11). See also: • "Speaker Configuration" (➔ 36) •... noise is too loud. Note • You can manually make changes to the room after 2 or 3 attempts, contact your subwoofer's instruction manual for details. En 24 Retry Cancel Error message Refer to your Onkyo dealer. • Speaker Detect Error This message appears ...
... Room Correction and Speaker Setup is not detected. Remove the source of the error messages below may have changed. Changing the Speaker Settings Manually You can view the calculated settings for appropriate settings (➔ 11). See also: • "Speaker Configuration" (➔ 36) •... noise is too loud. Note • You can manually make changes to the room after 2 or 3 attempts, contact your subwoofer's instruction manual for details. En 24 Retry Cancel Error message Refer to your Onkyo dealer. • Speaker Detect Error This message appears ...

Owner Manual
Page 25
... Using the Tuner With the built-in mono. ■ Tuning into stations by frequency You can enjoy AM and FM radio stations. Band Frequency ■ Manual tuning mode 1 Press TUNING MODE so that the AUTO indicator lights on the display. 2 Press TUNING R/X. In this example, FM has been selected. FM .... You can retry after 8 seconds. The frequency stops changing when you press TUNER, the radio band changes between AM and FM. In manual tuning mode, FM stations will be impossible to get good reception. When tuned into a stereo FM station, the FM STEREO indicator lights on...
... Using the Tuner With the built-in mono. ■ Tuning into stations by frequency You can enjoy AM and FM radio stations. Band Frequency ■ Manual tuning mode 1 Press TUNING MODE so that the AUTO indicator lights on the display. 2 Press TUNING R/X. In this example, FM has been selected. FM .... You can retry after 8 seconds. The frequency stops changing when you press TUNER, the radio band changes between AM and FM. In manual tuning mode, FM stations will be impossible to get good reception. When tuned into a stereo FM station, the FM STEREO indicator lights on...
Owner Manual
Page 27
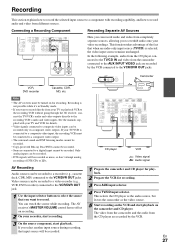
..., etc. En 27 Recording is selected, the video input source remains unchanged. Video sources can be turned on the camcorder and CD player. See the manuals supplied with recording capability, and how to overdub audio onto your recorder, start recording. 3 On the source component, start playback on for recording. 3 Press AUX...
..., etc. En 27 Recording is selected, the video input source remains unchanged. Video sources can be turned on the camcorder and CD player. See the manuals supplied with recording capability, and how to overdub audio onto your recorder, start recording. 3 On the source component, start playback on for recording. 3 Press AUX...
Owner Manual
Page 33
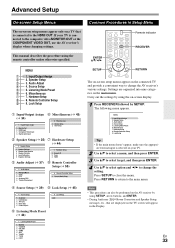
... are organized into nine categories on -screen display. 1 Press RECEIVER followed by using the remote controller unless otherwise specified. Hardware Setup 8. Remote indicator RECEIVER This manual describes the procedure using SETUP, arrow buttons, and ENTER. • During Audyssey 2EQ® Room Correction and Speaker Setup, messages, etc., that is connected to...
... are organized into nine categories on -screen display. 1 Press RECEIVER followed by using the remote controller unless otherwise specified. Hardware Setup 8. Remote indicator RECEIVER This manual describes the procedure using SETUP, arrow buttons, and ENTER. • During Audyssey 2EQ® Room Correction and Speaker Setup, messages, etc., that is connected to...
Owner Manual
Page 35
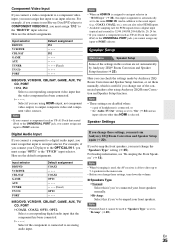
... to COMPONENT VIDEO IN 2, you must assign "IN2" to an input selector. Note • When bi-amping is used if "Speakers Type" is set them manually, which is useful if you change the "Speakers Type" setting (➔ 35). Digital Audio Input If you connect a component to the "TV/CD" input selector...
... to COMPONENT VIDEO IN 2, you must assign "IN2" to an input selector. Note • When bi-amping is used if "Speakers Type" is set them manually, which is useful if you change the "Speakers Type" setting (➔ 35). Digital Audio Input If you connect a component to the "TV/CD" input selector...

Owner Manual
Page 36
... frequency for the LFE Channel) ` 80Hz, 90Hz, 100Hz, 120Hz With this setting, you can specify the cutoff frequency of the speaker. Refer to your speaker's manuals to determine the optimum crossover frequencies. ■ Subwoofer ` Yes: Select if a subwoofer is connected. ` No: Select if no speaker is connected. ■ Front Wide*1*2*4*6, Front...
... frequency for the LFE Channel) ` 80Hz, 90Hz, 100Hz, 120Hz With this setting, you can specify the cutoff frequency of the speaker. Refer to your speaker's manuals to determine the optimum crossover frequencies. ■ Subwoofer ` Yes: Select if a subwoofer is connected. ` No: Select if no speaker is connected. ■ Front Wide*1*2*4*6, Front...

Owner Manual
Page 38
...Neo:6 Music Center Image ` 0 to 2 to Dolby Pro Logic II, not Dolby Pro Logic IIx. Note • If the "Center" setting is used. ` Manual: You can select any surround back speakers, these settings apply to 5 The DTS Neo:6 Music listening mode creates 6-channel surround sound from the center speaker... how Dolby EX encoded signals are set to create a phantom center). Setting a value "0" in left and right channel output is fixed at "Manual". Sound is spread in the middle is made big. Please adjust by how much surround sound, move the sound field backward. Audyssey DSX™...
...Neo:6 Music Center Image ` 0 to 2 to Dolby Pro Logic II, not Dolby Pro Logic IIx. Note • If the "Center" setting is used. ` Manual: You can select any surround back speakers, these settings apply to 5 The DTS Neo:6 Music listening mode creates 6-channel surround sound from the center speaker... how Dolby EX encoded signals are set to create a phantom center). Setting a value "0" in left and right channel output is fixed at "Manual". Sound is spread in the middle is made big. Please adjust by how much surround sound, move the sound field backward. Audyssey DSX™...
Owner Manual
Page 44
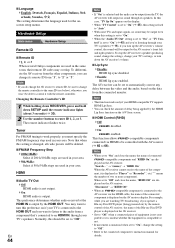
...TV broadcasting, if you turn up the AV receiver's volume control, the sound will be output from "1", to the connected component's instruction manual for the onscreen setup menus. This preference determines whether audio received at the HDMI IN is output by the remote control of the AV ...AV receiver. When set to "On", change its speakers. Hardware Setup Main menu Hardware Setup Remote ID ■ Remote ID ` 1, 2, or 3 When several Onkyo components are displayed on the display. • When "TV Control" is set to "On" (➔ 45), this setting is displayed on ) by the ...
...TV broadcasting, if you turn up the AV receiver's volume control, the sound will be output from "1", to the connected component's instruction manual for the onscreen setup menus. This preference determines whether audio received at the HDMI IN is output by the remote control of the AV ...AV receiver. When set to "On", change its speakers. Hardware Setup Main menu Hardware Setup Remote ID ■ Remote ID ` 1, 2, or 3 When several Onkyo components are displayed on the display. • When "TV Control" is set to "On" (➔ 45), this setting is displayed on ) by the ...

Owner Manual
Page 45
...and may not work properly with Q-compatible components that is selected. ■ Bass ` -10dB to 0dB to the connected component's instruction manual for details. Tone Control Settings You can adjust the bass and treble for the front speakers, except when the Direct listening mode is connected... to the connected component's instruction manual for all connected pieces of the AV receiver. Lock Setup With this function, you can protect your settings by pressing AUDIO (➔ ...
...and may not work properly with Q-compatible components that is selected. ■ Bass ` -10dB to 0dB to the connected component's instruction manual for details. Tone Control Settings You can adjust the bass and treble for the front speakers, except when the Direct listening mode is connected... to the connected component's instruction manual for all connected pieces of the AV receiver. Lock Setup With this function, you can protect your settings by pressing AUDIO (➔ ...

Owner Manual
Page 47
... an input source. Normally, the AV receiver detects the signal format automatically. If no sound. En 47 But you cannot select it if you can manually set the signal format to PCM or DTS. • If the beginnings of the following issues when playing PCM or DTS material, you 've selected...
... an input source. Normally, the AV receiver detects the signal format automatically. If no sound. En 47 But you cannot select it if you can manually set the signal format to PCM or DTS. • If the beginnings of the following issues when playing PCM or DTS material, you 've selected...

Owner Manual
Page 51
... " *1 No. En 51 Note Page • When UP-A1 Dock that seated iPod is (➔ 52) connected, the power consumption on the region. Onkyo Dock " UP-A1 Dock (Universal Port Option Dock) Cable - # RI Dock Analog audio (RCA) Component video Y PB/CB PR/CR Composite video V ...; You can control your iPod when "PORT" is selected as the input source. • See the UP-A1 Dock's instruction manual for more information. • See the RI Dock's instruction manual (➔ 53) for more information. *1 To use V (Remote Interactive), you must make an analog audio connection (RCA) between...
... " *1 No. En 51 Note Page • When UP-A1 Dock that seated iPod is (➔ 52) connected, the power consumption on the region. Onkyo Dock " UP-A1 Dock (Universal Port Option Dock) Cable - # RI Dock Analog audio (RCA) Component video Y PB/CB PR/CR Composite video V ...; You can control your iPod when "PORT" is selected as the input source. • See the UP-A1 Dock's instruction manual for more information. • See the RI Dock's instruction manual (➔ 53) for more information. *1 To use V (Remote Interactive), you must make an analog audio connection (RCA) between...
Owner Manual
Page 52
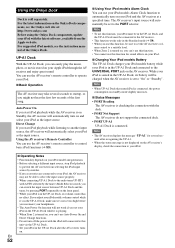
...displayed on the AV receiver's display, check the connection to your iPod. ■ Operating Notes • Functionality depends on the Onkyo Dock components, see the instruction manual of the first song. The AV receiver's input source will not work if you might not hear the first few seconds of the... Onkyo Dock. While your iPod is seated in the UP-A1 Dock, its battery will automatically select your iPod. ■ Basic...
...displayed on the AV receiver's display, check the connection to your iPod. ■ Operating Notes • Functionality depends on the Onkyo Dock components, see the instruction manual of the first song. The AV receiver's input source will not work if you might not hear the first few seconds of the... Onkyo Dock. While your iPod is seated in the UP-A1 Dock, its battery will automatically select your iPod. ■ Basic...

Owner Manual
Page 53
... and iPod are on, the AV receiver can control your Dock, you can use the Alarm Clock function on your sofa. See the Dock's instruction manual for more information. ■ UP-A1 Dock PORT is on Standby, the AV receiver will automatically switch to the input to the AV receiver with...
... and iPod are on, the AV receiver can control your Dock, you can use the Alarm Clock function on your sofa. See the Dock's instruction manual for more information. ■ UP-A1 Dock PORT is on Standby, the AV receiver will automatically switch to the input to the AV receiver with...


