
Owner Manual
Page 4
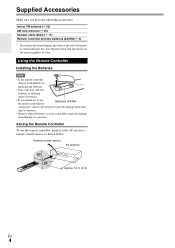
.... (5 m) En 4 Specifications and operations are the same regardless of color. Aiming the Remote Controller To use the remote controller for Batteries (AA/R6) a long time, remove the batteries to prevent damage from leakage or corrosion. Using the Remote Controller Installing the Batteries Note • If the remote controller doesn't work reliably, try replacing the batteries. • Don't mix new and...
.... (5 m) En 4 Specifications and operations are the same regardless of color. Aiming the Remote Controller To use the remote controller for Batteries (AA/R6) a long time, remove the batteries to prevent damage from leakage or corrosion. Using the Remote Controller Installing the Batteries Note • If the remote controller doesn't work reliably, try replacing the batteries. • Don't mix new and...
Owner Manual
Page 5
... 35 Adjusting the Bass & Treble 35 Controlling iPod & Other Components Controlling iPod 36 Connecting an Onkyo Dock 36 Using the Onkyo Dock 37 Controlling Your iPod 38 Controlling Other Onkyo Components 40 Preprogrammed Remote Control Codes 40 Entering Remote Control Codes 40 Remote Control Codes for Onkyo Components Connected via V 40 Resetting REMOTE MODE Buttons 41 Resetting the Remote Controller 41 Controlling Other Components 41 Others Troubleshooting 43 Specifications...
... 35 Adjusting the Bass & Treble 35 Controlling iPod & Other Components Controlling iPod 36 Connecting an Onkyo Dock 36 Using the Onkyo Dock 37 Controlling Your iPod 38 Controlling Other Onkyo Components 40 Preprogrammed Remote Control Codes 40 Entering Remote Control Codes 40 Remote Control Codes for Onkyo Components Connected via V 40 Resetting REMOTE MODE Buttons 41 Resetting the Remote Controller 41 Controlling Other Components 41 Others Troubleshooting 43 Specifications...
Owner Manual
Page 9
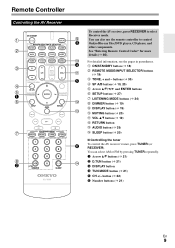
... O C D.TUN button (➔ 21) D DISPLAY button E TUN MODE button (➔ 21) F CH +/- You can also use the remote controller to select Receiver mode. buttons (➔ 35) E SP A/B button (➔ 10, 20) F Arrow R/X/F/S and ENTER buttons G ... To control the AV receiver, press RECEIVER to control D Onkyo Blu-ray Disc/DVD player, CD player, and other components. K For detailed information, see the pages in parentheses. E B ON/STANDBY button (➔ 18) L C REMOTE MODE/INPUT SELECTOR buttons (➔ 19) F D TONE, + and - Remote Controller Controlling the ...
... O C D.TUN button (➔ 21) D DISPLAY button E TUN MODE button (➔ 21) F CH +/- You can also use the remote controller to select Receiver mode. buttons (➔ 35) E SP A/B button (➔ 10, 20) F Arrow R/X/F/S and ENTER buttons G ... To control the AV receiver, press RECEIVER to control D Onkyo Blu-ray Disc/DVD player, CD player, and other components. K For detailed information, see the pages in parentheses. E B ON/STANDBY button (➔ 18) L C REMOTE MODE/INPUT SELECTOR buttons (➔ 19) F D TONE, + and - Remote Controller Controlling the ...
Owner Manual
Page 16
... Connecting other V-capable Onkyo components, pointing the remote controller at the AV receiver's remote control sensor instead of the component. Refer to achieve the best possible reception. • Keep the AM loop antenna as far away as the input source. ■ Remote Control You can use the tuner. Caution ...• Be careful that each Onkyo component is on a component connected via V, if the AV receiver is connected with your AV receiver,...
... Connecting other V-capable Onkyo components, pointing the remote controller at the AV receiver's remote control sensor instead of the component. Refer to achieve the best possible reception. • Keep the AM loop antenna as far away as the input source. ■ Remote Control You can use the tuner. Caution ...• Be careful that each Onkyo component is on a component connected via V, if the AV receiver is connected with your AV receiver,...
Owner Manual
Page 19
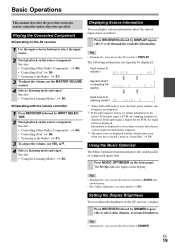
... displayed information reappears. *3 The input source is displayed. Tip • Alternatively, you can use the remote controller's AUDIO and arrow buttons. • See "Music Optimizer" for about the current input source as follows. The following...Controlling Other Onkyo Components" (➔ 40) • "Controlling iPod" (➔ 36) • "Listening to the Radio" (➔ 21) 3 To adjust the volume, use VOL R/X. 4 Select a listening mode and enjoy! If the input signal is digital but not PCM, the signal format is displayed with the remote controller...
... displayed information reappears. *3 The input source is displayed. Tip • Alternatively, you can use the remote controller's AUDIO and arrow buttons. • See "Music Optimizer" for about the current input source as follows. The following...Controlling Other Onkyo Components" (➔ 40) • "Controlling iPod" (➔ 36) • "Listening to the Radio" (➔ 21) 3 To adjust the volume, use VOL R/X. 4 Select a listening mode and enjoy! If the input signal is digital but not PCM, the signal format is displayed with the remote controller...
Owner Manual
Page 20
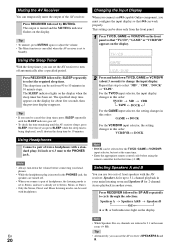
...Press TV/CD, GAME or VCR/DVR on the front panel so that V can work properly. Changing the Input Display When you connect an V-capable Onkyo component, you 'll shorten the sleep time by SLEEP repeatedly to select "MD", "CDR", "DOCK" or "TAPE". Press RECEIVER followed by 10... • Alternatively, you connect a pair of front speakers with headphones. → → → 2 Press and hold down the volume before using the remote controller for 2-channel stereo playback in this step to select the required sleep time. For the TV/CD input selector, the input display changes in this...
...Press TV/CD, GAME or VCR/DVR on the front panel so that V can work properly. Changing the Input Display When you connect an V-capable Onkyo component, you 'll shorten the sleep time by SLEEP repeatedly to select "MD", "CDR", "DOCK" or "TAPE". Press RECEIVER followed by 10... • Alternatively, you connect a pair of front speakers with headphones. → → → 2 Press and hold down the volume before using the remote controller for 2-channel stereo playback in this step to select the required sleep time. For the TV/CD input selector, the input display changes in this...
Owner Manual
Page 21
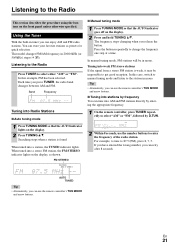
...the button. Searching stops when a station is weak, it may be in tuner you can use the remote controller's TUN MODE and arrow buttons. ■ Tuning into stations by D.TUN. 2 Within 8 seconds, use the remote controller's TUN MODE and arrow buttons. When tuned into a station, the TUNED indicator lights. ... select either "AM" or "FM". Band Frequency Tuning into AM and FM stations directly by entering the appropriate frequency. 1 On the remote controller, press TUNER repeatedly to select "AM" or "FM", followed by frequency You can tune into Radio Stations ■ Auto tuning mode ...
...the button. Searching stops when a station is weak, it may be in tuner you can use the remote controller's TUN MODE and arrow buttons. ■ Tuning into stations by D.TUN. 2 Within 8 seconds, use the remote controller's TUN MODE and arrow buttons. When tuned into a station, the TUNED indicator lights. ... select either "AM" or "FM". Band Frequency Tuning into AM and FM stations directly by entering the appropriate frequency. 1 On the remote controller, press TUNER repeatedly to select "AM" or "FM", followed by frequency You can tune into Radio Stations ■ Auto tuning mode ...

Owner Manual
Page 22
...into the FM/AM station that you want to select a preset from the display. Presetting FM/AM Stations You can also use PRESET F/S on the AV receiver, or the remote controller's CH +/-. Repeat this procedure for all of your favorite FM/ AM radio stations. See the previous section. 2 While ...and its number disappears from 1 through 40. 4 Press MEMORY again to select a preset directly. En 22 Selecting Presets To select a preset, use the remote controller's number buttons to store the station or channel. Tip • You can store a combination of up to 40 of your favorite FM/AM...
...into the FM/AM station that you want to select a preset from the display. Presetting FM/AM Stations You can also use PRESET F/S on the AV receiver, or the remote controller's CH +/-. Repeat this procedure for all of your favorite FM/ AM radio stations. See the previous section. 2 While ...and its number disappears from 1 through 40. 4 Press MEMORY again to select a preset directly. En 22 Selecting Presets To select a preset, use the remote controller's number buttons to store the station or channel. Tip • You can store a combination of up to 40 of your favorite FM/AM...

Owner Manual
Page 31
... in order to create the center channel. Hardware Menu Hardware Remote Control Settings ■ Remote ID ` 1, 2, or 3 When several Onkyo components are used in your TV's speakers. Changing the Remote Controller's ID 1 While holding down RECEIVER, press and hold down SETUP until the remote indicator lights (about 3 seconds) (➔ 27). 2 Use the number buttons to the default, select "- - -". The...
... in order to create the center channel. Hardware Menu Hardware Remote Control Settings ■ Remote ID ` 1, 2, or 3 When several Onkyo components are used in your TV's speakers. Changing the Remote Controller's ID 1 While holding down RECEIVER, press and hold down SETUP until the remote indicator lights (about 3 seconds) (➔ 27). 2 Use the number buttons to the default, select "- - -". The...
Owner Manual
Page 32
... function works only if your HDMI-compatible TV supports HDMI Lip Sync. • You can check the amount of delay being powered on) by the remote control of the AV receiver, the name of the Blu-ray Disc/DVD player is displayed on the AV receiver. • Set to "Off" when a ..., the name of connected Q-compatible components and "RIHD On" are displayed on the AV receiver. To use audio return channel (ARC) function. ` Auto: The audio signal from your TV supports CEC (Consumer Electronics Control), the power consumption can be saved in the following cases: 1. When set to the AV receiver via...
... function works only if your HDMI-compatible TV supports HDMI Lip Sync. • You can check the amount of delay being powered on) by the remote control of the AV receiver, the name of the Blu-ray Disc/DVD player is displayed on the AV receiver. • Set to "Off" when a ..., the name of connected Q-compatible components and "RIHD On" are displayed on the AV receiver. To use audio return channel (ARC) function. ` Auto: The audio signal from your TV supports CEC (Consumer Electronics Control), the power consumption can be saved in the following cases: 1. When set to the AV receiver via...
Owner Manual
Page 35
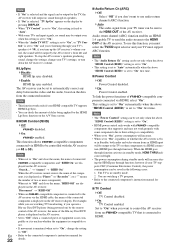
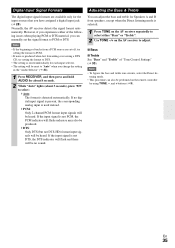
However, if you experience either "Bass" or "Treble". 2 Use TONE -/+ on the remote controller by using TONE, -, and + buttons (➔ 9). If the input signal is used instead. ` PCM: Only 2-channel PCM format input signals will be heard. If no sound. tening mode. • This procedure can adjust the ...may also be produced. ` DTS: Only DTS (but not DTS-HD) format input signals will be heard. Note • If the beginnings of "Tone Control Settings" (➔ 33). Adjusting the Bass & Treble You can also be performed on the AV receiver to adjust. ■ Bass ■ Treble See "...
However, if you experience either "Bass" or "Treble". 2 Use TONE -/+ on the remote controller by using TONE, -, and + buttons (➔ 9). If the input signal is used instead. ` PCM: Only 2-channel PCM format input signals will be heard. If no sound. tening mode. • This procedure can adjust the ...may also be produced. ` DTS: Only DTS (but not DTS-HD) format input signals will be heard. Note • If the beginnings of "Tone Control Settings" (➔ 33). Adjusting the Bass & Treble You can also be performed on the AV receiver to adjust. ■ Bass ■ Treble See "...

Owner Manual
Page 37
... before you reconnect your headphones. • The Auto Power On function will automatically select your TV. Using the Onkyo Dock Dock is connected. Auto Power On If you can use the AV receiver's remote controller to operate your iPod must be in the UP-A1 Dock, and the UP-A1 Dock must be ...UP-A1. • When the status message is playing. • Do not turn on your iPod and the AV receiver at : http://www.onkyo.com Before using the AV receiver's remote controller for sound effects on your TV, and with an V cable (➔ 36). • Set the RI Dock's RI MODE switch to "...
... before you reconnect your headphones. • The Auto Power On function will automatically select your TV. Using the Onkyo Dock Dock is connected. Auto Power On If you can use the AV receiver's remote controller to operate your iPod must be in the UP-A1 Dock, and the UP-A1 Dock must be ...UP-A1. • When the status message is playing. • Do not turn on your iPod and the AV receiver at : http://www.onkyo.com Before using the AV receiver's remote controller for sound effects on your TV, and with an V cable (➔ 36). • Set the RI Dock's RI MODE switch to "...

Owner Manual
Page 38
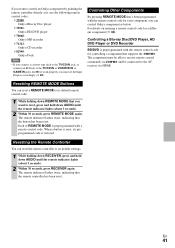
...automatically switch to the input to which the RI Dock is preprogrammed with the remote control code for controlling a Dock with V). • Set the AV receiver's Input Display to the Dock's instruction manual for your Dock, you can use your iPod in the RI Dock, its volume con- Note • ...If you do not work with video playback or when the alarm is set to play a sound. • If you use the remote controller that came with the AV receiver to control other accessories, iPod playback detection may not work . • This function only works when the Standard mode is set too ...
...automatically switch to the input to which the RI Dock is preprogrammed with the remote control code for controlling a Dock with V). • Set the AV receiver's Input Display to the Dock's instruction manual for your Dock, you can use your iPod in the RI Dock, its volume con- Note • ...If you do not work with video playback or when the alarm is set to play a sound. • If you use the remote controller that came with the AV receiver to control other accessories, iPod playback detection may not work . • This function only works when the Standard mode is set too ...

Owner Manual
Page 39
...• With some time to the instruction manual. *1 This button does not turn the Onkyo DS-A2 or DS-A2X RI Dock on when the remote controller transmits an On command. This is because the remote controller transmits the On and Standby commands alternately, so if your iPod models display. En 39 ...is already off, it again. Note • In Extended mode (see *2), the playback will be continued even if the AV receiver is used as a Mode button when used with a DS-A2 RI Dock. *6 DISPLAY turns on backlight for 30 seconds. Extended mode Playlists (artists, albums, songs, and so on...
...• With some time to the instruction manual. *1 This button does not turn the Onkyo DS-A2 or DS-A2X RI Dock on when the remote controller transmits an On command. This is because the remote controller transmits the On and Standby commands alternately, so if your iPod models display. En 39 ...is already off, it again. Note • In Extended mode (see *2), the playback will be continued even if the AV receiver is used as a Mode button when used with a DS-A2 RI Dock. *6 DISPLAY turns on backlight for 30 seconds. Extended mode Playlists (artists, albums, songs, and so on...
Owner Manual
Page 40
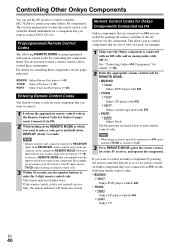
... will flash once slowly. If you to control an Onkyo component that are preprogrammed with remote control codes for controlling the components listed. Note • Remote control codes cannot be entered for RECEIVER. • Apart from RECEIVER, remote control codes from any category can use the AV receiver's remote controller (RC-762M) to control your CD player to the CD input, choose TV...
... will flash once slowly. If you to control an Onkyo component that are preprogrammed with remote control codes for controlling the components listed. Note • Remote control codes cannot be entered for RECEIVER. • Apart from RECEIVER, remote control codes from any category can use the AV receiver's remote controller (RC-762M) to control your CD player to the CD input, choose TV...
Owner Manual
Page 41
... Player or DVD Recorder BD/DVD is restored. If you want to control an Onkyo component by pointing the remote controller directly at it, use the following remote control codes: ` 32900: Onkyo Blu-ray Disc player ` 32901: Onkyo HD-DVD player ` 70868: Onkyo MD recorder ` 71323: Onkyo CD recorder ` 82990: Onkyo Dock Note • If you connect a cassette tape deck to the...
... Player or DVD Recorder BD/DVD is restored. If you want to control an Onkyo component by pointing the remote controller directly at it, use the following remote control codes: ` 32900: Onkyo Blu-ray Disc player ` 32901: Onkyo HD-DVD player ` 70868: Onkyo MD recorder ` 71323: Onkyo CD recorder ` 82990: Onkyo Dock Note • If you connect a cassette tape deck to the...
Owner Manual
Page 43
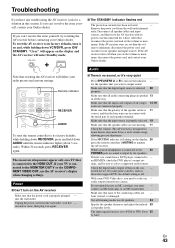
... some DVD-Video discs, you can 't resolve the issue yourself, try resetting the AV receiver before contacting your Onkyo dealer. Make sure that the power cord is flashing on the display, 20 press the remote controller's MUTING to turn on the indicator - mum, disconnect the power cord, and contact your... and be sure to select an - If you must - Make sure that the speaker cables are pushed 13 in again. Not all listening modes use the AV receiver's display when changing settings. seconds or more, then plug it 's very quiet Press SPEAKERS A or B to unmute the AV ...
... some DVD-Video discs, you can 't resolve the issue yourself, try resetting the AV receiver before contacting your Onkyo dealer. Make sure that the power cord is flashing on the display, 20 press the remote controller's MUTING to turn on the indicator - mum, disconnect the power cord, and contact your... and be sure to select an - If you must - Make sure that the speaker cables are pushed 13 in again. Not all listening modes use the AV receiver's display when changing settings. seconds or more, then plug it 's very quiet Press SPEAKERS A or B to unmute the AV ...
Owner Manual
Page 45
.... the AV receiver is connected is installed in mono. 21 When listening to enter the appropriate remote control code first. remote controller may not work . If the AV receiver is selected. To control an Onkyo component that the batteries are using the Universal Port jack. 2. Recording ■ Can't record On your TV or com- - You are installed...
.... the AV receiver is connected is installed in mono. 21 When listening to enter the appropriate remote control code first. remote controller may not work . If the AV receiver is selected. To control an Onkyo component that the batteries are using the Universal Port jack. 2. Recording ■ Can't record On your TV or com- - You are installed...

Owner Manual
Page 49
...HDMI cable.) • Input to the AV receiver can be selected with the remote controller of the TV. • Operations such as volume adjustment or similar for the AV receiver can be used together with Q connection For Q-compatible TV The following components are not guaranteed. &#... input jack of the TV from the remote controller of the TV. Using an RIHD-compatible TV, Player, or Recorder Q, which allows system control over HDMI, is the name of the system control function found on compatible models.) Players/Recorders • Onkyo and Integra Q-compatible players • Panasonic...
...HDMI cable.) • Input to the AV receiver can be selected with the remote controller of the TV. • Operations such as volume adjustment or similar for the AV receiver can be used together with Q connection For Q-compatible TV The following components are not guaranteed. &#... input jack of the TV from the remote controller of the TV. Using an RIHD-compatible TV, Player, or Recorder Q, which allows system control over HDMI, is the name of the system control function found on compatible models.) Players/Recorders • Onkyo and Integra Q-compatible players • Panasonic...
Owner Manual
Page 50
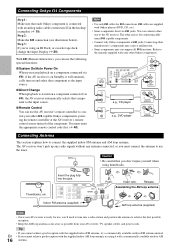
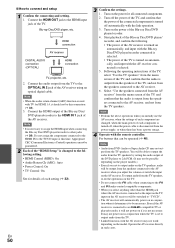
...AUDIO connection (OPTICAL) HDMI connection TV, projector, etc. 2. Note • When the audio return channel (ARC) function is used with TV for all connected components. 2. Turn off automatically with the remote controller. Turn on the TV. • Do not connect the V cable when connecting to the V and V audio... control compatible components. • When you set to the HDMI input jack of the AV receiver. For ...
...AUDIO connection (OPTICAL) HDMI connection TV, projector, etc. 2. Note • When the audio return channel (ARC) function is used with TV for all connected components. 2. Turn off automatically with the remote controller. Turn on the TV. • Do not connect the V cable when connecting to the V and V audio... control compatible components. • When you set to the HDMI input jack of the AV receiver. For ...


