
Owner Manual
Page 1
...accessories 4 Before Using the HT-R8230 5 Facilities and connections Index to parts and controls 6 Connecting to audio/video equipment 10 Positioning speakers/Connecting speakers .... 12 Connecting antennas 14 Connections for remote control 16 Enjoying music or videos Enjoying music or videos with the HT-R8230 17 Speaker setup 18 Changing the default settings according to your connections 21 Listening to the radio 22 Various functions common to obtain optimum performance and listening enjoyment from your other AV components 33 Appendix Troubleshooting 35 Specifications 37 En
...accessories 4 Before Using the HT-R8230 5 Facilities and connections Index to parts and controls 6 Connecting to audio/video equipment 10 Positioning speakers/Connecting speakers .... 12 Connecting antennas 14 Connections for remote control 16 Enjoying music or videos Enjoying music or videos with the HT-R8230 17 Speaker setup 18 Changing the default settings according to your connections 21 Listening to the radio 22 Various functions common to obtain optimum performance and listening enjoyment from your other AV components 33 Appendix Troubleshooting 35 Specifications 37 En

Owner Manual
Page 3
... , the user is no guarantee that the cable ground shall be determined by turning the equipment off and on the HT-R8230's rear panel (e.g., AC 230 V, 50 Hz or AC 120 V, 60 Hz). If this equipment does cause harmful interference to which can radiate radio frequency energy and, if not installed and used in a particular installation. For Canadian models NOTE: THIS CLASS B DIGITAL APPARATUS...
... , the user is no guarantee that the cable ground shall be determined by turning the equipment off and on the HT-R8230's rear panel (e.g., AC 230 V, 50 Hz or AC 120 V, 60 Hz). If this equipment does cause harmful interference to which can radiate radio frequency energy and, if not installed and used in a particular installation. For Canadian models NOTE: THIS CLASS B DIGITAL APPARATUS...
Owner Manual
Page 4
... Amplifier Technology • Optimum Gain Volume Circuitry • DTS, Dolby Digital, Dolby Pro Logic II • CinemaFILTER • Non-Scaling Configuration • A-Form-Auto Format Sensing • Linear PCM 96 kHz/24-bit D/A Converters • Advanced 24-bit DSP Chips • 2 Digital Inputs (Optical/Coaxial) • Subwoofer Pre Out • Dot Matrix FL Display • Crossover Adjustment (60/80/100/120/150 Hz) • Color-Coded Speaker Posts FM/AM Tuner...
... Amplifier Technology • Optimum Gain Volume Circuitry • DTS, Dolby Digital, Dolby Pro Logic II • CinemaFILTER • Non-Scaling Configuration • A-Form-Auto Format Sensing • Linear PCM 96 kHz/24-bit D/A Converters • Advanced 24-bit DSP Chips • 2 Digital Inputs (Optical/Coaxial) • Subwoofer Pre Out • Dot Matrix FL Display • Crossover Adjustment (60/80/100/120/150 Hz) • Color-Coded Speaker Posts FM/AM Tuner...
Owner Manual
Page 6
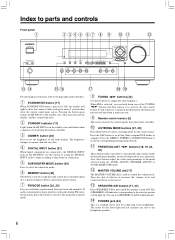
... select a listening mode for about 5 seconds then show the current sound input source. Press the DIRECT, STEREO or SURROUND button to the standby state. The (SPEAKERS) A/B indicators corresponding to recall the Onkyo-original DSP modes in sequence. You can hold down one . 9 Remote control sensor [5] This sensor receives the control signals from the remote controller. 3 DIMMER button [25] Press to set the brightness of the mode selected using the AUDIO ADJUST, SPEAKER ADJUST or AUDIO SELECTOR button. = MASTER VOLUME dial [17] The MASTER VOLUME dial is used to assign the radio station...
... select a listening mode for about 5 seconds then show the current sound input source. Press the DIRECT, STEREO or SURROUND button to the standby state. The (SPEAKERS) A/B indicators corresponding to recall the Onkyo-original DSP modes in sequence. You can hold down one . 9 Remote control sensor [5] This sensor receives the control signals from the remote controller. 3 DIMMER button [25] Press to set the brightness of the mode selected using the AUDIO ADJUST, SPEAKER ADJUST or AUDIO SELECTOR button. = MASTER VOLUME dial [17] The MASTER VOLUME dial is used to assign the radio station...

Owner Manual
Page 7
... the listening mode indicators "Ÿ PRO LOGIC II", "MULTI CH", "DSP", "STEREO" and "DIRECT" lights according to select an audio input signal format other than FM and AM. At this button is pressed, the setting cycles. $ Input selector buttons (DVD, VIDEO 1, VIDEO 2, VIDEO 3, TAPE, TUNER, and CD) [17, 21-23, 26, 27, 32] These buttons are used to adjust bass, treble, late night function, cinema filter, Panorama, Dimension and Center Width function setting. g FM STEREO indicator [22] Lights up when the MEMORY button is received...
... the listening mode indicators "Ÿ PRO LOGIC II", "MULTI CH", "DSP", "STEREO" and "DIRECT" lights according to select an audio input signal format other than FM and AM. At this button is pressed, the setting cycles. $ Input selector buttons (DVD, VIDEO 1, VIDEO 2, VIDEO 3, TAPE, TUNER, and CD) [17, 21-23, 26, 27, 32] These buttons are used to adjust bass, treble, late night function, cinema filter, Panorama, Dimension and Center Width function setting. g FM STEREO indicator [22] Lights up when the MEMORY button is received...

Owner Manual
Page 8
... The audio input jacks of the HT-R8230 do not accept direct connection of the phono equalizer and turntable for connecting the power cord from the remote controller provided with them. There is supplied through the HT-R8230. p VIDEO 1 IN/OUT, VIDEO 2 IN, VIDEO 3 IN [11] Connect the output terminals (PLAY) of the cassette tape deck or MD recorder to the TAPE IN L/R jacks on the HT-R8230. If the DVD player has 5.1 channel output terminals, connect each terminal to the FRONT L/R, CENTER, SUBWOOFER...
... The audio input jacks of the HT-R8230 do not accept direct connection of the phono equalizer and turntable for connecting the power cord from the remote controller provided with them. There is supplied through the HT-R8230. p VIDEO 1 IN/OUT, VIDEO 2 IN, VIDEO 3 IN [11] Connect the output terminals (PLAY) of the cassette tape deck or MD recorder to the TAPE IN L/R jacks on the HT-R8230. If the DVD player has 5.1 channel output terminals, connect each terminal to the FRONT L/R, CENTER, SUBWOOFER...

Owner Manual
Page 9
...components, see "Using the remote controller with your other AV components" on the remote controller. 0 PRESET / button [23] For selecting a tuner preset channel. - For operational instructions, refer to the page indicated in standby. 3 Listening mode buttons [27, 29] Press to change the listening mode. 4 CINE FLTR button [30] Press to activate/deactivate Cinema Filter function. 5 LATE NIGHT button [30] Press to change the late night setting. 6 TEST/CH SEL/LEVEL / buttons [20, 26] For setting the output levels for controlling the HT-R8230. These buttons are for each speaker. This button...
...components, see "Using the remote controller with your other AV components" on the remote controller. 0 PRESET / button [23] For selecting a tuner preset channel. - For operational instructions, refer to the page indicated in standby. 3 Listening mode buttons [27, 29] Press to change the listening mode. 4 CINE FLTR button [30] Press to activate/deactivate Cinema Filter function. 5 LATE NIGHT button [30] Press to change the late night setting. 6 TEST/CH SEL/LEVEL / buttons [20, 26] For setting the output levels for controlling the HT-R8230. These buttons are for each speaker. This button...

Owner Manual
Page 10
... (MONITOR OUT) VIDEO IN AM FM 75 ANTENNA VIDEO Audio (L) Audio (R) Optical plug Video connection cable (Analog signal) Audio connection cable (Analog signal) Optical fiber cable (Digital signal) Signal flow FRONT SPEAKERS B RL FRONT SPEAKERS A RL CENTER SPEAKER SURROUND SPEAKERS RL AC OUTLET DO NOT connect the power cord at this unit, use the OPTICAL or COAXIAL input jack. RL DIGITAL AUDIO OUT OUT (PLAY) OPTICAL CD player (CD) RL RL AUDIO IN (REC) AUDIO OUT (PLAY) Cassette Tape deck, MD recorder, DAT deck, CD recorder (TAPE) • To connect the digital output from...
... (MONITOR OUT) VIDEO IN AM FM 75 ANTENNA VIDEO Audio (L) Audio (R) Optical plug Video connection cable (Analog signal) Audio connection cable (Analog signal) Optical fiber cable (Digital signal) Signal flow FRONT SPEAKERS B RL FRONT SPEAKERS A RL CENTER SPEAKER SURROUND SPEAKERS RL AC OUTLET DO NOT connect the power cord at this unit, use the OPTICAL or COAXIAL input jack. RL DIGITAL AUDIO OUT OUT (PLAY) OPTICAL CD player (CD) RL RL AUDIO IN (REC) AUDIO OUT (PLAY) Cassette Tape deck, MD recorder, DAT deck, CD recorder (TAPE) • To connect the digital output from...
Owner Manual
Page 11
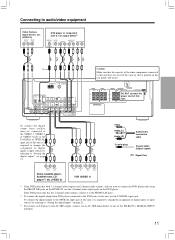
... player, Satellite tuner, LD player*3, etc. (VIDEO 2) RL RL AUDIO VIDEO IN IN AUDIO VIDEO OUT OUT VCR (VIDEO 1) Video Audio (L) Audio (R) Coaxial plug Audio/video connection cable Coaxial cable (Digital signal) Signal flow *1 If the DVD player has both 5.1 channel audio outputs and 2 channel audio outputs, and you have an LD player with 5.1 ch output (DVD)*1 DIGITAL VIDEO OUT OUT FRONT AUDIO OUT SURR CENTER SUBWOOFER COAXIAL RL RL *2 AM FM 75 ANTENNA Caution Make sure that is printed on the rear panel (120 watts). To connect the digital output to the OPTICAL input jack...
... player, Satellite tuner, LD player*3, etc. (VIDEO 2) RL RL AUDIO VIDEO IN IN AUDIO VIDEO OUT OUT VCR (VIDEO 1) Video Audio (L) Audio (R) Coaxial plug Audio/video connection cable Coaxial cable (Digital signal) Signal flow *1 If the DVD player has both 5.1 channel audio outputs and 2 channel audio outputs, and you have an LD player with 5.1 ch output (DVD)*1 DIGITAL VIDEO OUT OUT FRONT AUDIO OUT SURR CENTER SUBWOOFER COAXIAL RL RL *2 AM FM 75 ANTENNA Caution Make sure that is printed on the rear panel (120 watts). To connect the digital output to the OPTICAL input jack...

Owner Manual
Page 16
.... The other component. In addition, by connecting components to the terminal, you can operate the DVD player directly with terminals 16 Notes • Connect the plugs securely. • Be sure to connect to that component. Direct change function When the play button is in the standby state. Example: Onkyo DVD Player REMOTE CONTROL COAXIAL DIGITAL OUTPUT L R ANALOG OUTPUT Power on/ready function When the HT-R8230 is pressed at an -connected component, the input source selected at the HT-R8230 automatically switches to the connectors using the audio connection cable.
.... The other component. In addition, by connecting components to the terminal, you can operate the DVD player directly with terminals 16 Notes • Connect the plugs securely. • Be sure to connect to that component. Direct change function When the play button is in the standby state. Example: Onkyo DVD Player REMOTE CONTROL COAXIAL DIGITAL OUTPUT L R ANALOG OUTPUT Power on/ready function When the HT-R8230 is pressed at an -connected component, the input source selected at the HT-R8230 automatically switches to the connectors using the audio connection cable.

Owner Manual
Page 17
... Receiver, press STANDBY/ON. Selecting a source Before operating the remote controller, press RCVR/TAPE. 1. A & B speakers indicators Volume level 2. When the digital sound is reproduced, the ŸDIGITAL, DTS, or PCM (2 channel digital stereo) indicator lights up . 2. The volume can switch the source from the DIGITAL INPUT OPTICAL connector is selected. See page 21 to minimum before turning off . Press STANDBY/ON. The AV Receiver enters standby mode. Start playing the selected source. The display on . Be sure to set to MD (see page 21). 17 When VIDEO...
... Receiver, press STANDBY/ON. Selecting a source Before operating the remote controller, press RCVR/TAPE. 1. A & B speakers indicators Volume level 2. When the digital sound is reproduced, the ŸDIGITAL, DTS, or PCM (2 channel digital stereo) indicator lights up . 2. The volume can switch the source from the DIGITAL INPUT OPTICAL connector is selected. See page 21 to minimum before turning off . Press STANDBY/ON. The AV Receiver enters standby mode. Start playing the selected source. The display on . Be sure to set to MD (see page 21). 17 When VIDEO...

Owner Manual
Page 20
... volume level. When you can be emitted from certain sources (2 channel-Dolby Digital/DTS source etc.). Adjust the volume to your normal listening level, prior to commencing settings. Each speaker emits the test tone (pink noise) and the display shows the speaker emitting the test tone. 2. Speaker setup SUBWOOFER MODE Before operating the remote controller, press RCVR/TAPE. The test tone stops and the normal display resumes. With the first press of a 5.1-channel source from the subwoofer.) ↓ Subwoofer Mode 3 (To output only the LFE channel* of the button...
... volume level. When you can be emitted from certain sources (2 channel-Dolby Digital/DTS source etc.). Adjust the volume to your normal listening level, prior to commencing settings. Each speaker emits the test tone (pink noise) and the display shows the speaker emitting the test tone. 2. Speaker setup SUBWOOFER MODE Before operating the remote controller, press RCVR/TAPE. The test tone stops and the normal display resumes. With the first press of a 5.1-channel source from the subwoofer.) ↓ Subwoofer Mode 3 (To output only the LFE channel* of the button...
Owner Manual
Page 24
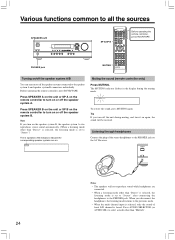
Muting the sound (remote controller only) Press MUTING. Press SPEAKER B on the unit or SP B on the remote controller to the PHONES jack. Listening through headphones Connect the plug of front L/R channel is set to "Stereo" after connecting the headphones to turn on or off the speaker system B. When you disconnect the headphones, the listening mode returns to the previous mode. • When the multi channel input is selected, only the sound of the stereo headphones to turn on or off the...
Muting the sound (remote controller only) Press MUTING. Press SPEAKER B on the unit or SP B on the remote controller to the PHONES jack. Listening through headphones Connect the plug of front L/R channel is set to "Stereo" after connecting the headphones to turn on or off the speaker system B. When you disconnect the headphones, the listening mode returns to the previous mode. • When the multi channel input is selected, only the sound of the stereo headphones to turn on or off the...

Owner Manual
Page 26
... (or AUDIO SEL on the remote controller) to use, for playback of a DTS-CD may be adjusted between Auto ↔ PCM ↔ DTS ↔ Auto. Analog: Setting to play back the input from the component connected to the sound. In such cases, set the DVD input to change . If you save the values. Press CH SEL repeatedly to select the speaker, then press LEVEL / to play a digital signal in the following order: Left (Front left) → Center →...
... (or AUDIO SEL on the remote controller) to use, for playback of a DTS-CD may be adjusted between Auto ↔ PCM ↔ DTS ↔ Auto. Analog: Setting to play back the input from the component connected to the sound. In such cases, set the DVD input to change . If you save the values. Press CH SEL repeatedly to select the speaker, then press LEVEL / to play a digital signal in the following order: Left (Front left) → Center →...

Owner Manual
Page 27
...30 to set using the test tone (page 20). Applying the audio tone adjustment (Bass/Treble) effects to page 13). 1. Press DVD. 2. AUDIO SELECTOR DVD TAPE CH SEL AUDIO SEL DVD LEVEL Using analog multi channel input The multi channel input refers to a system, which is set for details. 4. Check that you can be output to select an individual speaker. Press SURROUND on the remote controller repeatedly to the DVD (FRONT L/R, SURR L/R, CENTER and SUBWOOFER) port and start playing the desired media. See instruction manual supplied with analog 5.1-channel outputs (DVD player...
...30 to set using the test tone (page 20). Applying the audio tone adjustment (Bass/Treble) effects to page 13). 1. Press DVD. 2. AUDIO SELECTOR DVD TAPE CH SEL AUDIO SEL DVD LEVEL Using analog multi channel input The multi channel input refers to a system, which is set for details. 4. Check that you can be output to select an individual speaker. Press SURROUND on the remote controller repeatedly to the DVD (FRONT L/R, SURR L/R, CENTER and SUBWOOFER) port and start playing the desired media. See instruction manual supplied with analog 5.1-channel outputs (DVD player...
Owner Manual
Page 28
... speakers. Stereo mode, Direct mode Stereo This mode has all input sound is divided and output from the left and right channels. The speaker configuration is a new generation 5-channel surround system that has a mark. This mode can be unable to play a DVD video that provides performance between the 4-channel (left and right front, center, two surround channels) plus an LFE channel (Low Frequency Effect) for background music. DTS Select this option when you play DTS sources correctly even if you connect the player to the HT-R8230 digitally. Direct...
... speakers. Stereo mode, Direct mode Stereo This mode has all input sound is divided and output from the left and right channels. The speaker configuration is a new generation 5-channel surround system that has a mark. This mode can be unable to play a DVD video that provides performance between the 4-channel (left and right front, center, two surround channels) plus an LFE channel (Low Frequency Effect) for background music. DTS Select this option when you play DTS sources correctly even if you connect the player to the HT-R8230 digitally. Direct...
Owner Manual
Page 29
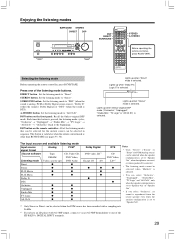
... front panel: Recall the Onkyo-original DSP mode. DIRECT button: Set the listening mode to "Stereo". A.STEREO button: Set the listening mode to "PLII" (when the sound is analog, PCM or Dolby Digital stereo source), "Dolby D" (when the sound is Dolby Digital) or "DTS" (when the sound is DTS). Lights up when Onkyo-original DSP mode ("Orchestra", "Unplugged", "Studio-Mix", "TV Logic" or "All Ch St") is selected. The input source and available listening mode Input source signal format Analog PCM*1 Source software Tape, CD, Video CD, FM/AM DVD Video, Listening mode Video...
... front panel: Recall the Onkyo-original DSP mode. DIRECT button: Set the listening mode to "Stereo". A.STEREO button: Set the listening mode to "PLII" (when the sound is analog, PCM or Dolby Digital stereo source), "Dolby D" (when the sound is Dolby Digital) or "DTS" (when the sound is DTS). Lights up when Onkyo-original DSP mode ("Orchestra", "Unplugged", "Studio-Mix", "TV Logic" or "All Ch St") is selected. The input source and available listening mode Input source signal format Analog PCM*1 Source software Tape, CD, Video CD, FM/AM DVD Video, Listening mode Video...

Owner Manual
Page 30
... Movie Dolby Digital DTS DTS Neo:6 Cinema Pro Logic II Music 1. See page 29 for use with speaker system A. Remote controller Remote controller 30 Press AUDIO ADJUST (repeatedly) until the item to be adjusted from the remote control. Press PRESET/ADJUST / on the unit or ADJUST / on listening modes. Audio Adjust provides various functions for adjusting the sound, including several especially for information on the remote controller to the right column for AUDIO ADJUST items and settings. Refer to adjust the item. Function Bass Treble Late Night...
... Movie Dolby Digital DTS DTS Neo:6 Cinema Pro Logic II Music 1. See page 29 for use with speaker system A. Remote controller Remote controller 30 Press AUDIO ADJUST (repeatedly) until the item to be adjusted from the remote control. Press PRESET/ADJUST / on the unit or ADJUST / on listening modes. Audio Adjust provides various functions for adjusting the sound, including several especially for information on the remote controller to the right column for AUDIO ADJUST items and settings. Refer to adjust the item. Function Bass Treble Late Night...

Owner Manual
Page 35
... the center speaker when the listening mode is "Stereo" or "Orchestra". • Adjust the volume level of the center speaker. • Check that the selected speaker configuration includes the center speaker. • Adjust the placement of the audio connection cables on the remote controller do not operate. Power shuts off immediately after power on the TV screen. Refer also to "Auto". • Check the speaker connections. • No sound is reproduced from the AV receiver. • Press the appropriate mode control button. •...
... the center speaker when the listening mode is "Stereo" or "Orchestra". • Adjust the volume level of the center speaker. • Check that the selected speaker configuration includes the center speaker. • Adjust the placement of the audio connection cables on the remote controller do not operate. Power shuts off immediately after power on the TV screen. Refer also to "Auto". • Check the speaker connections. • No sound is reproduced from the AV receiver. • Press the appropriate mode control button. •...

Owner Manual
Page 36
... multi channel output. LATE NIGHT function cannot be plugged in memory is observed • The HT-R8230 contains an internal microcomputer that the Ÿ DIGITAL indicator lights 17 up in . "Clear" appears in memory power backup system preserves the contents of the FM antenna is incorrect. • The station is too weak. Troubleshooting Tuner Symptoms Too much noise is heard or sound is interrupted occasionally. (The FM STEREO...
... multi channel output. LATE NIGHT function cannot be plugged in memory is observed • The HT-R8230 contains an internal microcomputer that the Ÿ DIGITAL indicator lights 17 up in . "Clear" appears in memory power backup system preserves the contents of the FM antenna is incorrect. • The station is too weak. Troubleshooting Tuner Symptoms Too much noise is heard or sound is interrupted occasionally. (The FM STEREO...


