
Owner Manual
Page 1
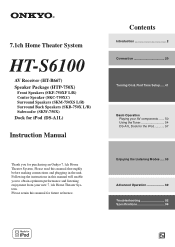
... new 7.1ch Home Theater System. Please retain this manual for purchasing an Onkyo 7.1ch Home Theater System. Following the instructions in this manual thoroughly before making connections and plugging in the unit. 7.1ch Home Theater System HT-S6100 AV Receiver (HT-R667) Speaker Package (HTP-750X) Front Speakers (SKF-750XF L/R) Center Speaker (SKC-750XC...
... new 7.1ch Home Theater System. Please retain this manual for purchasing an Onkyo 7.1ch Home Theater System. Following the instructions in this manual thoroughly before making connections and plugging in the unit. 7.1ch Home Theater System HT-S6100 AV Receiver (HT-R667) Speaker Package (HTP-750X) Front Speakers (SKF-750XF L/R) Center Speaker (SKC-750XC...
Owner Manual
Page 2
Important Safety Instructions 1. Install in any ventilation openings. A polarized plug has two blades with dry cloth. 7. Only use this indicates a need for replacement of the obsolete outlet. 10. Refer all servicing to escape. 2 If the apparatus does not operate normally by the manufacturer, or sold with the apparatus. The rear edge of uninsulated "dangerous voltage" within an equilateral triangle is intended to alert the user to its normal operation, E. WARNING AVIS RISK OF ELECTRIC SHOCK RISQUE DE CHOC ELECTRIQUE DO NOT OPEN NE PAS OUVRIR The ...
Important Safety Instructions 1. Install in any ventilation openings. A polarized plug has two blades with dry cloth. 7. Only use this indicates a need for replacement of the obsolete outlet. 10. Refer all servicing to escape. 2 If the apparatus does not operate normally by the manufacturer, or sold with the apparatus. The rear edge of uninsulated "dangerous voltage" within an equilateral triangle is intended to alert the user to its normal operation, E. WARNING AVIS RISK OF ELECTRIC SHOCK RISQUE DE CHOC ELECTRIQUE DO NOT OPEN NE PAS OUVRIR The ...
Owner Manual
Page 3
... period, remove the power cord from country to country. Don't use the original packaging to use . Make sure that interference will not occur in your Onkyo dealer. 6. This is normal. • If you originally bought it was when you do not intend to pack it how it . • Do not leave... properly the next time you should dust the unit all times. AC Fuse-The AC fuse inside this unit or its power cord while your Onkyo dealer. 3. Dry the unit immediately afterwards with Wet Hands-Never handle this unit, have it on, so be determined by turning the equipment off and...
... period, remove the power cord from country to country. Don't use the original packaging to use . Make sure that interference will not occur in your Onkyo dealer. 6. This is normal. • If you originally bought it was when you do not intend to pack it how it . • Do not leave... properly the next time you should dust the unit all times. AC Fuse-The AC fuse inside this unit or its power cord while your Onkyo dealer. 3. Dry the unit immediately afterwards with Wet Hands-Never handle this unit, have it on, so be determined by turning the equipment off and...
Owner Manual
Page 4
...TV or Computer TVs and computer monitors are magnetically sensitive devices and as EN60065, EN55013, EN55020 and EN61000-3-2, -3-3. Note that the ONKYO product described in which is within the specified rating, excessive current may still be connected to your plug, proceed as...the magnetic field, thereby removing any of the following code: Blue: Neutral Brown: Live As the colours of Conformity We, ONKYO EUROPE ELECTRONICS GmbH LIEGNITZERSTRASSE 6, 82194 GROEBENZELL, GERMANY declare in own responsibility, that discoloration can handle the specified input power when...
...TV or Computer TVs and computer monitors are magnetically sensitive devices and as EN60065, EN55013, EN55020 and EN61000-3-2, -3-3. Note that the ONKYO product described in which is within the specified rating, excessive current may still be connected to your plug, proceed as...the magnetic field, thereby removing any of the following code: Blue: Neutral Brown: Live As the colours of Conformity We, ONKYO EUROPE ELECTRONICS GmbH LIEGNITZERSTRASSE 6, 82194 GROEBENZELL, GERMANY declare in own responsibility, that discoloration can handle the specified input power when...
Owner Manual
Page 5
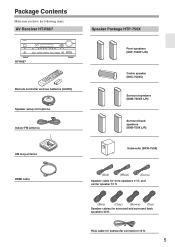
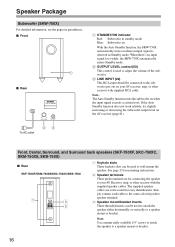
... subwoofer connection 10 ft. 5 RCA cable for surround and surround back speakers 30 ft. Package Contents Make sure you have the following items: AV Receiver HT-R667 HT-R667 Remote controller and two batteries (AA/R6) Speaker setup microphone Indoor FM antenna AM loop antenna HDMI cable Speaker Package HTP-750X Front speakers (SKF...
... subwoofer connection 10 ft. 5 RCA cable for surround and surround back speakers 30 ft. Package Contents Make sure you have the following items: AV Receiver HT-R667 HT-R667 Remote controller and two batteries (AA/R6) Speaker setup microphone Indoor FM antenna AM loop antenna HDMI cable Speaker Package HTP-750X Front speakers (SKF...
Owner Manual
Page 6
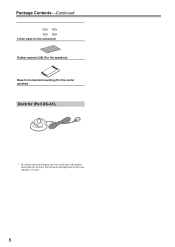
Package Contents-Continued 4 floor pads for the subwoofer Rubber spacers [28] (For the speakers) Base for horizontal mounting (For the center speaker) Dock for iPod DS-A1L * In catalogs and on packaging, the letter at the end of color. 6 Specifications and operation are the same regardless of the product name indicates the color.
Package Contents-Continued 4 floor pads for the subwoofer Rubber spacers [28] (For the speakers) Base for horizontal mounting (For the center speaker) Dock for iPod DS-A1L * In catalogs and on packaging, the letter at the end of color. 6 Specifications and operation are the same regardless of the product name indicates the color.

Owner Manual
Page 7
... MOVIE/TV MUSIC GAME LISTENING MODE DISPLAY DIGITAL INPUT DIMMER MEMORY TUNING MODE CLEAR SETUP MIC MASTER VOLUME or AUX INPUT VIDEO L AUDIO R AV RECEIVER HT-R667 Speaker set A On Off Speaker set B On Off On Off Indicator AB A B Output Set A: 5.1 channels Set B: 2 channels Set A: 7.1 channels Set B: 2 channels No sound Main Room...
... MOVIE/TV MUSIC GAME LISTENING MODE DISPLAY DIGITAL INPUT DIMMER MEMORY TUNING MODE CLEAR SETUP MIC MASTER VOLUME or AUX INPUT VIDEO L AUDIO R AV RECEIVER HT-R667 Speaker set A On Off Speaker set B On Off On Off Indicator AB A B Output Set A: 5.1 channels Set B: 2 channels Set A: 7.1 channels Set B: 2 channels No sound Main Room...
Owner Manual
Page 8
...Memory • 24-bit/192kHz D/A Converters • Powerful and Highly Accurate 32-bit DSP Processing Connections • 4 HDMI*4 Inputs and 1 Output • Onkyo RIHD*5 for System Control • HDTV-Ready Component Video Switching (2 Inputs/ 1 Output) • 4 Digital Inputs (2 Optical/2 Coaxial/4 Assignable) • ... patents issued & pending. Dolby, Pro Logic, and the double-D symbol are trademarks of DTS, Inc. DTS is a trademark of Onkyo Corporation. *4 HDMI, the HDMI logo and High Definition Multimedia Interface are registered trademarks of DTS, Inc. input power:110 ...
...Memory • 24-bit/192kHz D/A Converters • Powerful and Highly Accurate 32-bit DSP Processing Connections • 4 HDMI*4 Inputs and 1 Output • Onkyo RIHD*5 for System Control • HDTV-Ready Component Video Switching (2 Inputs/ 1 Output) • 4 Digital Inputs (2 Optical/2 Coaxial/4 Assignable) • ... patents issued & pending. Dolby, Pro Logic, and the double-D symbol are trademarks of DTS, Inc. DTS is a trademark of Onkyo Corporation. *4 HDMI, the HDMI logo and High Definition Multimedia Interface are registered trademarks of DTS, Inc. input power:110 ...
Owner Manual
Page 9
... incorporates copyright protection technology that is a trademark of Sony Corporation. Audyssey 2EQ and Dynamic EQ are trademarks of Audyssey Laboratories. *7 Theater-Dimensional is a trademark of Onkyo Corporation. *6 Manufactured under license from Audyssey Laboratories. Use of this copyright protection technology must be authorized by Macrovision Corporation, and is a trademark of...
... incorporates copyright protection technology that is a trademark of Sony Corporation. Audyssey 2EQ and Dynamic EQ are trademarks of Audyssey Laboratories. *7 Theater-Dimensional is a trademark of Onkyo Corporation. *6 Manufactured under license from Audyssey Laboratories. Use of this copyright protection technology must be authorized by Macrovision Corporation, and is a trademark of...
Owner Manual
Page 10
Contents Important Safety Instructions 2 Precautions 3 Speaker Precautions 4 Package Contents 5 AV Receiver HT-R667 5 Speaker Package HTP-750X 5 Dock for iPod DS-A1L 6 Using Two Sets of Speakers 7 Speaker Sets A and B 7 Sub Room (speaker set B 7 Main Room (speaker set A 7... Device 37 Connecting the Supplied DS-A1L Dock 37 Connecting a CD Player or Turntable 38 Connecting a Cassette, CDR, MiniDisc, or DAT Recorder 39 Connecting Onkyo Components 40 Connecting the Power Cord 40 Turning On the AV Receiver 41 Turning On and Standby 41 First Time Setup 42 Automatic Speaker Setup...
Contents Important Safety Instructions 2 Precautions 3 Speaker Precautions 4 Package Contents 5 AV Receiver HT-R667 5 Speaker Package HTP-750X 5 Dock for iPod DS-A1L 6 Using Two Sets of Speakers 7 Speaker Sets A and B 7 Sub Room (speaker set B 7 Main Room (speaker set A 7... Device 37 Connecting the Supplied DS-A1L Dock 37 Connecting a CD Player or Turntable 38 Connecting a Cassette, CDR, MiniDisc, or DAT Recorder 39 Connecting Onkyo Components 40 Connecting the Power Cord 40 Turning On the AV Receiver 41 Turning On and Standby 41 First Time Setup 42 Automatic Speaker Setup...
Owner Manual
Page 11
Contents-Continued Controlling Other Components 84 Preprogrammed Remote Control Codes 84 Entering Remote Control Codes 84 Resetting the Remote Controller 85 Controlling a DVD Player, or DVD Recorder ......86 Controlling a VCR, or PVR 87 Controlling a Satellite Receiver or Cable Receiver 88 Controlling a CD Player, CD Recorder, or MD Player 89 Controlling a Cassette Recorder 90 Controlling a TV 91 Troubleshooting 92 Specifications 96 7.1ch Home Theater Speaker Package 97 Dock DS-A1L 97 Video Resolution Chart 98 Onscreen Setup Menu Map 99 * To reset the AV receiver to its factory ...
Contents-Continued Controlling Other Components 84 Preprogrammed Remote Control Codes 84 Entering Remote Control Codes 84 Resetting the Remote Controller 85 Controlling a DVD Player, or DVD Recorder ......86 Controlling a VCR, or PVR 87 Controlling a Satellite Receiver or Cable Receiver 88 Controlling a CD Player, CD Recorder, or MD Player 89 Controlling a Cassette Recorder 90 Controlling a TV 91 Troubleshooting 92 Specifications 96 7.1ch Home Theater Speaker Package 97 Dock DS-A1L 97 Video Resolution Chart 98 Onscreen Setup Menu Map 99 * To reset the AV receiver to its factory ...
Owner Manual
Page 12
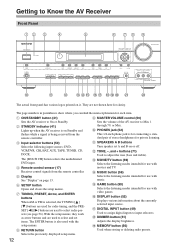
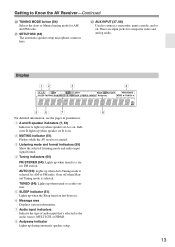
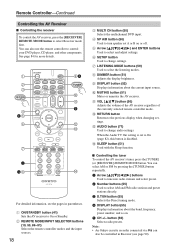
... SETUP RETURN TONE MOVIE/TV MUSIC GAME LISTENING MODE DISPLAY DIGITAL INPUT DIMMER MEMORY TUNING MODE CLEAR SETUP MIC AUX INPUT VIDEO L AUDIO R AV RECEIVER HT-R667 J K L MNO PQ RST U V The actual front panel has various logos printed on page 13. O GAME button (59) Selects the listening modes intended for use with...
... SETUP RETURN TONE MOVIE/TV MUSIC GAME LISTENING MODE DISPLAY DIGITAL INPUT DIMMER MEMORY TUNING MODE CLEAR SETUP MIC AUX INPUT VIDEO L AUDIO R AV RECEIVER HT-R667 J K L MNO PQ RST U V The actual front panel has various logos printed on page 13. O GAME button (59) Selects the listening modes intended for use with...
Owner Manual
Page 13
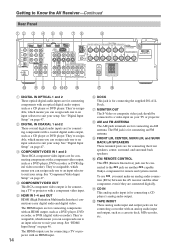
U SETUP MIC (42) The automatic speaker setup microphone connects here. Goes off when Manual Tuning mode is on. Indicator B lights up when speaker set . 6 Message area Displays various information. 7 Audio input indicators Indicate the type of audio input that's selected as the audio source: MULTI CH, or HDMI. 8 Audyssey indicator Lights up when the Sleep function has been set B is on. 2 MUTING indicator (51) Flashes while the AV receiver is selected for composite video and analog audio. V AUX INPUT (37, 68) Used to Know the AV Receiver-Continued T TUNING MODE button (54) Selects ...
U SETUP MIC (42) The automatic speaker setup microphone connects here. Goes off when Manual Tuning mode is on. Indicator B lights up when speaker set . 6 Message area Displays various information. 7 Audio input indicators Indicate the type of audio input that's selected as the audio source: MULTI CH, or HDMI. 8 Audyssey indicator Lights up when the Sleep function has been set B is on. 2 MUTING indicator (51) Flashes while the AV receiver is selected for composite video and analog audio. V AUX INPUT (37, 68) Used to Know the AV Receiver-Continued T TUNING MODE button (54) Selects ...
Owner Manual
Page 14
... components with a component video input. nected to suit your setup. They're assignable, which means you can be connected to a video input on another -capable Onkyo component for connecting a TV or projector with an analog audio input and output, such as a DVD player, DVD recorder, or DVR (digital video recorder). H AM...
... components with a component video input. nected to suit your setup. They're assignable, which means you can be connected to a video input on another -capable Onkyo component for connecting a TV or projector with an analog audio input and output, such as a DVD player, DVD recorder, or DVR (digital video recorder). H AM...
Owner Manual
Page 15
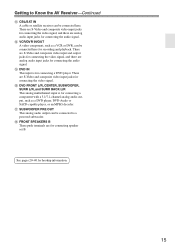
N VCR/DVR IN/OUT A video component, such as a DVD player, DVD-Audio or SACD-capable player, or an MPEG decoder. P DVD FRONT L/R, CENTER, SUBWOOFER, SURR L/R, and SURR BACK L/R This analog multichannel input is for hookup information. 15 There are for connecting a component with a 5.1/7.1-channel analog audio output, such as a VCR or DVR, can be connected here for connecting the audio signal. R FRONT SPEAKERS B These push terminals are S-Video and composite video input jacks for connecting the audio signal. Getting to a powered subwoofer. O DVD IN This input is for ...
N VCR/DVR IN/OUT A video component, such as a DVD player, DVD-Audio or SACD-capable player, or an MPEG decoder. P DVD FRONT L/R, CENTER, SUBWOOFER, SURR L/R, and SURR BACK L/R This analog multichannel input is for hookup information. 15 There are for connecting a component with a 5.1/7.1-channel analog audio output, such as a VCR or DVR, can be connected here for connecting the audio signal. R FRONT SPEAKERS B These push terminals are S-Video and composite video input jacks for connecting the audio signal. Getting to a powered subwoofer. O DVD IN This input is for ...
Owner Manual
Page 16
Simply connect each cable to the same-colored positive speaker terminal. 3 Speaker mount/bracket inserts These threaded inserts can be connected to wall-mount the speaker. When there's no input signal for connecting the speaker to a speaker mount or bracket. See page 23 for mounting instructions. 2 Speaker terminals These push terminals are color-coded for easy identification. C LINE INPUT (22) This RCA input should be used to a speaker mount or bracket. 16 To AC outlet 23 Front, Center, Surround, and Surround back speakers (SKF-750XF, SKC-750XC, SKM-750XS, SKB-...
Simply connect each cable to the same-colored positive speaker terminal. 3 Speaker mount/bracket inserts These threaded inserts can be connected to wall-mount the speaker. When there's no input signal for connecting the speaker to a speaker mount or bracket. See page 23 for mounting instructions. 2 Speaker terminals These push terminals are color-coded for easy identification. C LINE INPUT (22) This RCA input should be used to a speaker mount or bracket. 16 To AC outlet 23 Front, Center, Surround, and Surround back speakers (SKF-750XF, SKC-750XC, SKM-750XS, SKB-...
Owner Manual
Page 17
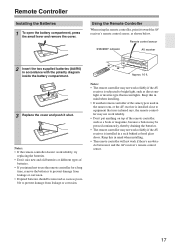
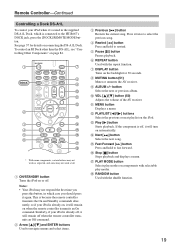
Notes: • If the remote controller doesn't work reliably, try replacing the batteries. • Don't mix new and old batteries or different types of the remote controller, such as a book or magazine, because a button may be removed as soon as shown below. Keep this in a rack behind colored glass doors. Keep this in mind when installing. • If another remote controller of the same type is used in the same room, or the AV receiver is installed in mind when installing. • The remote controller will not work reliably. • Don't put anything on top of batteries. ...
Notes: • If the remote controller doesn't work reliably, try replacing the batteries. • Don't mix new and old batteries or different types of the remote controller, such as a book or magazine, because a button may be removed as soon as shown below. Keep this in a rack behind colored glass doors. Keep this in mind when installing. • If another remote controller of the same type is used in the same room, or the AV receiver is installed in mind when installing. • The remote controller will not work reliably. • Don't put anything on top of batteries. ...
Owner Manual
Page 18
... the AV receiver to On (page 82), this button is set A or B on . 5 CH +/- When the Audio TV Out setting is disabled. Note: • An Onkyo cassette recorder connected via can select AM or FM by pressing the [TUNER] button repeatedly. 1 Arrow buttons Used to tune into radio stations and select...
... the AV receiver to On (page 82), this button is set A or B on . 5 CH +/- When the Audio TV Out setting is disabled. Note: • An Onkyo cassette recorder connected via can select AM or FM by pressing the [TUNER] button repeatedly. 1 Arrow buttons Used to tune into radio stations and select...
Owner Manual
Page 19
... a menu. button Selects the next or previous album. J VOL [ ]/[ ] button (50) Adjusts the volume of the AV receiver. If the component is connected to the HT-R667's DOCK jack, press the [DOCK] REMOTE MODE button. Notes: • Your iPod may not work at all. Q PLAY MODE button Selects play modes. See page...
... a menu. button Selects the next or previous album. J VOL [ ]/[ ] button (50) Adjusts the volume of the AV receiver. If the component is connected to the HT-R667's DOCK jack, press the [DOCK] REMOTE MODE button. Notes: • Your iPod may not work at all. Q PLAY MODE button Selects play modes. See page...
Owner Manual
Page 20
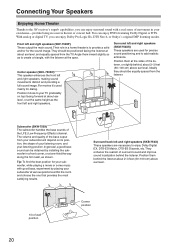
... realistic ambience. Connecting Your Speakers Enjoying Home Theater Thanks to the AV receiver's superb capabilities, you can enjoy Dolby Pro Logic IIx, DTS Neo:6, or Onkyo's original DSP listening modes. Position it 's used for dialog. Surround left and right speakers. Tip: To find the best position for the sound image...
... realistic ambience. Connecting Your Speakers Enjoying Home Theater Thanks to the AV receiver's superb capabilities, you can enjoy Dolby Pro Logic IIx, DTS Neo:6, or Onkyo's original DSP listening modes. Position it 's used for dialog. Surround left and right speakers. Tip: To find the best position for the sound image...
