
Owner Manual
Page 1
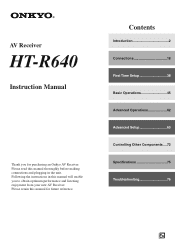
Please retain this manual thoroughly before making connections and plugging in this manual will enable you for future reference. Following the instructions in the unit. Contents Introduction 2 Connections 18 First Time Setup 38 Basic Operations 45 Advanced Operations 62 Advanced Setup 63 Controlling Other Components ....72 Specifications 75 Troubleshooting 76 En Please read this manual for purchasing an Onkyo AV Receiver. AV Receiver HT-R640 Instruction Manual Thank you to obtain optimum performance and listening enjoyment from your new AV Receiver.
Please retain this manual thoroughly before making connections and plugging in this manual will enable you for future reference. Following the instructions in the unit. Contents Introduction 2 Connections 18 First Time Setup 38 Basic Operations 45 Advanced Operations 62 Advanced Setup 63 Controlling Other Components ....72 Specifications 75 Troubleshooting 76 En Please read this manual for purchasing an Onkyo AV Receiver. AV Receiver HT-R640 Instruction Manual Thank you to obtain optimum performance and listening enjoyment from your new AV Receiver.

Owner Manual
Page 3
...Make sure that the plug is illegal without the permission of the following measures: • Reorient or relocate the receiving antenna. • Increase the separation between the equipment and receiver. • Connect the equipment into an outlet on the unit's rear panel (e.g., AC 230 V, 50 Hz or...ICES-003. AC Fuse-The AC fuse inside this unit or its power cord while your Onkyo dealer. 6. Pressing the [STANDBY/ON] button to radio or television reception, which the receiver is not userserviceable. These limits are wet or damp. Recording Copyright-Unless it occasionally. Make...
...Make sure that the plug is illegal without the permission of the following measures: • Reorient or relocate the receiving antenna. • Increase the separation between the equipment and receiver. • Connect the equipment into an outlet on the unit's rear panel (e.g., AC 230 V, 50 Hz or...ICES-003. AC Fuse-The AC fuse inside this unit or its power cord while your Onkyo dealer. 6. Pressing the [STANDBY/ON] button to radio or television reception, which the receiver is not userserviceable. These limits are wet or damp. Recording Copyright-Unless it occasionally. Make...
Owner Manual
Page 6
...Controller 12 About Home Theater 17 Connecting the AV Receiver About AV Connections 18 Connecting Your Speakers 19 Connecting Antenna 21 Connecting Your TV or Projector 24 Connecting AV Components 25 Connecting Audio Components 33 Connecting Onkyo Components .........36 Connecting the Power Cord of Another... Component 36 Turning On the AV Receiver 37 First Time Setup About the Onscreen Setup Menus............38 Digital Input 39 ...
...Controller 12 About Home Theater 17 Connecting the AV Receiver About AV Connections 18 Connecting Your Speakers 19 Connecting Antenna 21 Connecting Your TV or Projector 24 Connecting AV Components 25 Connecting Audio Components 33 Connecting Onkyo Components .........36 Connecting the Power Cord of Another... Component 36 Turning On the AV Receiver 37 First Time Setup About the Onscreen Setup Menus............38 Digital Input 39 ...

Owner Manual
Page 7
...) The page numbers in Standby mode, and it flashes while a signal is used to set the AV receiver to On or Standby. B STANDBY indicator (37) This indicator lights up when the AV receiver is in parentheses show where you can find the main explanation for each item. F RETURN button This... 4, TAPE, TUNER or CD. The [MULTI CH] button selects the DVD analog multichannel input. D Display See "Display" on page 9. 7 C Remote control sensor (12) This sensor receives control signals from the remote controller. A STANDBY/ON button (37) This button is being...
...) The page numbers in Standby mode, and it flashes while a signal is used to set the AV receiver to On or Standby. B STANDBY indicator (37) This indicator lights up when the AV receiver is in parentheses show where you can find the main explanation for each item. F RETURN button This... 4, TAPE, TUNER or CD. The [MULTI CH] button selects the DVD analog multichannel input. D Display See "Display" on page 9. 7 C Remote control sensor (12) This sensor receives control signals from the remote controller. A STANDBY/ON button (37) This button is being...

Owner Manual
Page 8
... Stereo listening mode. N DIGITAL INPUT button (39, 70) This button is used to assign the digital inputs and to specify the format of the AV receiver to adjust the volume of digital input signals. T PURE AUDIO button and indicator (57) The North American models do not have this mode is the...
... Stereo listening mode. N DIGITAL INPUT button (39, 70) This button is used to assign the digital inputs and to specify the format of the AV receiver to adjust the volume of digital input signals. T PURE AUDIO button and indicator (57) The North American models do not have this mode is the...

Owner Manual
Page 9
XM (North American models only) (52): This indicator lights up when the AV receiver is selected. supports RDS (Radio Data System). 2 HDMI indicator This indicator lights up when the HDMI input is used. 3 Listening mode & format indicators These indicators ... lights up when the Sleep function has been set. 9 MEMORY (49): This indicator lights up when the AV receiver is tuned to a radio station that muted. This indicator flashes while the AV receiver is selected. 6 SLEEP indicator (47) This indicator lights up when tuned to a stereo FM station. 5 Message area This...
XM (North American models only) (52): This indicator lights up when the AV receiver is selected. supports RDS (Radio Data System). 2 HDMI indicator This indicator lights up when the HDMI input is used. 3 Listening mode & format indicators These indicators ... lights up when the Sleep function has been set. 9 MEMORY (49): This indicator lights up when the AV receiver is tuned to a radio station that muted. This indicator flashes while the AV receiver is selected. 6 SLEEP indicator (47) This indicator lights up when tuned to a stereo FM station. 5 Message area This...
Owner Manual
Page 10
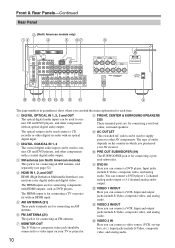
..., and analog audio. The HDMI inputs are for connecting an XM antenna, sold separately (see page 52). The type of outlet depends on your AV receiver. You can connect a VCR. Front & Rear Panels-Continued Rear Panel C (North American models only) 1B D 5 6G H S R QP O N M L K J 9 The page numbers in which you can connect...
..., and analog audio. The HDMI inputs are for connecting an XM antenna, sold separately (see page 52). The type of outlet depends on your AV receiver. You can connect a VCR. Front & Rear Panels-Continued Rear Panel C (North American models only) 1B D 5 6G H S R QP O N M L K J 9 The page numbers in which you can connect...
Owner Manual
Page 11
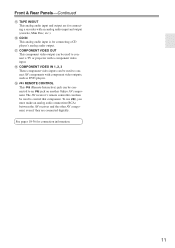
... digitally. P CD IN This analog audio input is for connection information. 11 To use , you must make an analog audio connection (RCA) between the AV receiver and the other AV component, even if they are for connecting a recorder with an analog audio input and output (cassette, Mini Disc, etc.). The AV...
... digitally. P CD IN This analog audio input is for connection information. 11 To use , you must make an analog audio connection (RCA) between the AV receiver and the other AV component, even if they are for connecting a recorder with an analog audio input and output (cassette, Mini Disc, etc.). The AV...

Owner Manual
Page 12
... light, such as shown below. Approx. 16 ft. (5 m) Notes: • The remote controller may not work if there's an obstacle between it and the AV receiver's remote control sensor. 12 Keep this in mind when installing. • If another remote controller of the same type is used in the same room..., or the AV receiver is installed close to equipment that uses infrared rays, the remote controller may not work reliably. • Don't put anything, such as a book, on the...
... light, such as shown below. Approx. 16 ft. (5 m) Notes: • The remote controller may not work if there's an obstacle between it and the AV receiver's remote control sensor. 12 Keep this in mind when installing. • If another remote controller of the same type is used in the same room..., or the AV receiver is installed close to equipment that uses infrared rays, the remote controller may not work reliably. • Don't put anything, such as a book, on the...

Owner Manual
Page 13
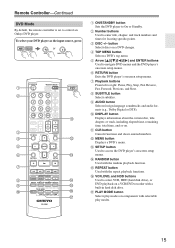
... 1, 2, 3, and 4 are selected by using the six REMOTE MODE buttons. By entering the appropriate remote control code, you can control the AV receiver and an Onkyo cassette recorder connected via . DVD M D/CDR C D HDD I DVD and CD/MD/CDR/HDD Modes With these modes, you can control a DVD... Controller-Continued Using the Remote Controller The remote controller can also be used to control an Onkyo cassette recorder connected via . TV VCR CABLE SAT 1 REMOTE MODE RECEIVER DVD TAPE/AMP M D/CDR C D HDD Press one of component. TV VCR CABLE SAT 2 Use the buttons supported by other...
... 1, 2, 3, and 4 are selected by using the six REMOTE MODE buttons. By entering the appropriate remote control code, you can control the AV receiver and an Onkyo cassette recorder connected via . DVD M D/CDR C D HDD I DVD and CD/MD/CDR/HDD Modes With these modes, you can control a DVD... Controller-Continued Using the Remote Controller The remote controller can also be used to control an Onkyo cassette recorder connected via . TV VCR CABLE SAT 1 REMOTE MODE RECEIVER DVD TAPE/AMP M D/CDR C D HDD Press one of component. TV VCR CABLE SAT 2 Use the buttons supported by other...

Owner Manual
Page 14
...) Used to select categories. J REMOTE MODE buttons (13) Used to select the available listening modes. M MUTING button (47) Mutes or unmutes the AV receiver. P L NIGHT button (62) Used with the Sleep function. Reverse Play [ ] button Starts reverse playback. I Buttons used when the TUNER input is... the pages in all remote controller modes. When a remote controller button is selected To select your Cassette deck as the input source, press: AMP RECEIVER 8 TUNER 1 Number, D TUN, and ENT buttons (48, 54) Used to turn the Audyssey equalizer on or off. 14 I DISPLAY button...
...) Used to select categories. J REMOTE MODE buttons (13) Used to select the available listening modes. M MUTING button (47) Mutes or unmutes the AV receiver. P L NIGHT button (62) Used with the Sleep function. Reverse Play [ ] button Starts reverse playback. I Buttons used when the TUNER input is... the pages in all remote controller modes. When a remote controller button is selected To select your Cassette deck as the input source, press: AMP RECEIVER 8 TUNER 1 Number, D TUN, and ENT buttons (48, 54) Used to turn the Audyssey equalizer on or off. 14 I DISPLAY button...
Owner Manual
Page 15
...(hard disk drive), or DVD playback on . To select your DVD player as the input source, press: AMP RECEIVER 6 DVD or 5 MULTI CH 1 2 3 4 5 6 7 8 9 J STANDBY/ON REMOTE MODE RECEIVER DVD TAPE/AMP INPUT SELECTOR M D/CDR 1 2 3 C D HDD V1 V2 V3 4 5 6 TV V4... MULTI CH DVD 7 8 9 VCR TAPE TUNER 10 11 +10 0 C D 12 CABLE CLR SAT D TUN --/--- E Arrow and ENTER buttons Used to control an Onkyo DVD player. H SUBTITLE button Selects ...
...(hard disk drive), or DVD playback on . To select your DVD player as the input source, press: AMP RECEIVER 6 DVD or 5 MULTI CH 1 2 3 4 5 6 7 8 9 J STANDBY/ON REMOTE MODE RECEIVER DVD TAPE/AMP INPUT SELECTOR M D/CDR 1 2 3 C D HDD V1 V2 V3 4 5 6 TV V4... MULTI CH DVD 7 8 9 VCR TAPE TUNER 10 11 +10 0 C D 12 CABLE CLR SAT D TUN --/--- E Arrow and ENTER buttons Used to control an Onkyo DVD player. H SUBTITLE button Selects ...
Owner Manual
Page 16
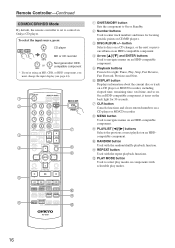
...HDD Mode By default, the remote controller is set to enter track numbers and times for 30 seconds. B Number buttons Used to control an Onkyo CD player. C DISC/ALBUM +/- E Playback buttons From left to navigate menus on CD/MD players. F DISPLAY button Displays information about ...an HDD-compatible component. L PLAY MODE button Used to navigate menus on components with selectable play modes. 16 To select the input source, press: AMP RECEIVER 9 CD player C D 7 MD or CD recorder TAPE 7 or 3 Next generation HDDcompatible component TAPE V3 * If you're using an MD, CDR...
...HDD Mode By default, the remote controller is set to enter track numbers and times for 30 seconds. B Number buttons Used to control an Onkyo CD player. C DISC/ALBUM +/- E Playback buttons From left to navigate menus on CD/MD players. F DISPLAY button Displays information about ...an HDD-compatible component. L PLAY MODE button Used to navigate menus on components with selectable play modes. 16 To select the input source, press: AMP RECEIVER 9 CD player C D 7 MD or CD recorder TAPE 7 or 3 Next generation HDDcompatible component TAPE V3 * If you're using an MD, CDR...

Owner Manual
Page 17
... of the listener, or slightly behind, about ear level, and equidistant from the TV. About Home Theater Enjoying Home Theater Thanks to the AV receiver's superb capabilities, you can enjoy DTS and Dolby Digital. Position them inward so as to provide a solid anchor for dialog. Their role in ...the front left and right speakers These output the overall sound. In general, a good bass sound can enjoy Dolby Pro Logic II or Onkyo's own DSP surround listening modes. Corner Subwoofer The subwoofer handles the bass sounds of your listening room, and your subwoofer will depend on ...
... of the listener, or slightly behind, about ear level, and equidistant from the TV. About Home Theater Enjoying Home Theater Thanks to the AV receiver's superb capabilities, you can enjoy DTS and Dolby Digital. Position them inward so as to provide a solid anchor for dialog. Their role in ...the front left and right speakers These output the overall sound. In general, a good bass sound can enjoy Dolby Pro Logic II or Onkyo's own DSP surround listening modes. Corner Subwoofer The subwoofer handles the bass sounds of your listening room, and your subwoofer will depend on ...
Owner Manual
Page 18
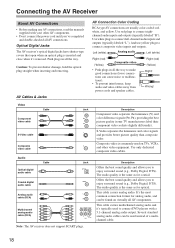
...cable Coaxial digital audio cable Analog audio cable (RCA) Cable V Jack L R Multichannel analog audio cable (RCA) Note: The AV receiver does not support SCART plugs. Use only dedicated composite video cables. This cable carries multichannel analog audio and it 's removed. Optical Digital...To prevent interference, keep audio and video cables away from power cords and speaker cables. This cable carries analog audio. Connecting the AV Receiver About AV Connections • Before making any AV connections, read the manuals supplied with a 5.1-channel analog audio output. Push plugs ...
...cable Coaxial digital audio cable Analog audio cable (RCA) Cable V Jack L R Multichannel analog audio cable (RCA) Note: The AV receiver does not support SCART plugs. Use only dedicated composite video cables. This cable carries multichannel analog audio and it 's removed. Optical Digital...To prevent interference, keep audio and video cables away from power cords and speaker cables. This cable carries analog audio. Connecting the AV Receiver About AV Connections • Before making any AV connections, read the manuals supplied with a 5.1-channel analog audio output. Push plugs ...

Owner Manual
Page 19
...right speakers. Powered subwoofer LINE INPUT LINE INPUT PRE OUT SUB WOOFER Attaching the Speaker Labels (Not North American models) The AV receiver's positive (+) speaker terminals are color-coded for a really powerful and solid bass. Center speaker 4. Dipole speakers typically have . ... 1 2 3 4 Normal speakers TV/screen 1 2 3 4 5 65 6 Connecting a Powered Subwoofer Using a suitable cable, connect the AV receiver's PRE OUT SUBWOOFER to the positive (+) side of speakers that their arrows point toward the TV/screen, as shown. Speaker terminal Color Front left ...
...right speakers. Powered subwoofer LINE INPUT LINE INPUT PRE OUT SUB WOOFER Attaching the Speaker Labels (Not North American models) The AV receiver's positive (+) speaker terminals are color-coded for a really powerful and solid bass. Center speaker 4. Dipole speakers typically have . ... 1 2 3 4 Normal speakers TV/screen 1 2 3 4 5 65 6 Connecting a Powered Subwoofer Using a suitable cable, connect the AV receiver's PRE OUT SUBWOOFER to the positive (+) side of speakers that their arrows point toward the TV/screen, as shown. Speaker terminal Color Front left ...

Owner Manual
Page 20
.... The following before making any connections. • Read the instructions supplied with your speakers: • Only connect speakers with the AV receiver's rear panel. Surround Surround left right speaker speaker Front right Front left Center speaker speaker speaker 20 If you use speakers with a lower...and use the amplifier at high volume levels for a long period of time, the built-in protection circuit may damage the AV receiver. • Don't connect one cable to negative (-) terminals. Doing so may affect the sound quality and should be activated. • ...
.... The following before making any connections. • Read the instructions supplied with your speakers: • Only connect speakers with the AV receiver's rear panel. Surround Surround left right speaker speaker Front right Front left Center speaker speaker speaker 20 If you use speakers with a lower...and use the amplifier at high volume levels for a long period of time, the built-in protection circuit may damage the AV receiver. • Don't connect one cable to negative (-) terminals. Doing so may affect the sound quality and should be activated. • ...

Owner Manual
Page 21
... they can be connected either way around.) Make sure that the wires are gripping the bare wires, not the insulation. Connecting the AV Receiver-Continued Connecting Antenna This section explains how to connect the supplied indoor FM antenna and AM loop antenna, and how to use only. ...of the FM antenna to achieve the best possible reception. 2 Use thumbtacks or something similar to achieve the best possible reception. The AV receiver won't pick up any radio signals without any antenna connected, so you cannot achieve good reception with a commercially available outdoor AM antenna (...
... they can be connected either way around.) Make sure that the wires are gripping the bare wires, not the insulation. Connecting the AV Receiver-Continued Connecting Antenna This section explains how to connect the supplied indoor FM antenna and AM loop antenna, and how to use only. ...of the FM antenna to achieve the best possible reception. 2 Use thumbtacks or something similar to achieve the best possible reception. The AV receiver won't pick up any radio signals without any antenna connected, so you cannot achieve good reception with a commercially available outdoor AM antenna (...

Owner Manual
Page 22
... lines and other high-voltage equipment. • Outdoor antenna must be used in accordance with local regulations to prevent electrical shock hazards. Connecting the AV Receiver-Continued Connecting an Outdoor FM Antenna If you cannot achieve good reception with a clear line of sight to prevent electrical shock hazards. I Using a TV/FM...
... lines and other high-voltage equipment. • Outdoor antenna must be used in accordance with local regulations to prevent electrical shock hazards. Connecting the AV Receiver-Continued Connecting an Outdoor FM Antenna If you cannot achieve good reception with a clear line of sight to prevent electrical shock hazards. I Using a TV/FM...
Owner Manual
Page 23
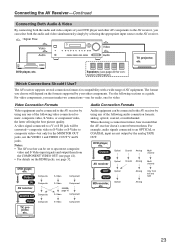
... by the analog TAPE OUT. Use the following audio connection formats: analog, optical, coaxial, or multichannel. Notes: • The AV receiver can be connected to an OPTICAL or COAXIAL input are not output by selecting the appropriate input source on the HDMI jacks, see page ...41 S-Video Component S-Video Component Audio Connection Formats Audio equipment can be converted-composite video to S-Video or S-Video to the AV receiver by using any of AV equipment. Video Connection Formats Video equipment can select both the audio and video outputs of your other AV ...
... by the analog TAPE OUT. Use the following audio connection formats: analog, optical, coaxial, or multichannel. Notes: • The AV receiver can be connected to an OPTICAL or COAXIAL input are not output by selecting the appropriate input source on the HDMI jacks, see page ...41 S-Video Component S-Video Component Audio Connection Formats Audio equipment can be converted-composite video to S-Video or S-Video to the AV receiver by using any of AV equipment. Video Connection Formats Video equipment can select both the audio and video outputs of your other AV ...


