
Owner Manual
Page 1
7.1ch Home Theater System HT-S790 AV Receiver (HT-R540) Front Speakers (SKF-540F) Center Speaker (SKC-540C) Surround Speakers (SKM-540S) Surround Back Speakers (SKB-540) Powered Subwoofer (SKW-540) Instruction Manual Thank you ... before making connections and plugging in the unit. Please read this manual will enable you for future reference. Please retain this manual for purchasing an Onkyo 7.1ch Home Theater System.
7.1ch Home Theater System HT-S790 AV Receiver (HT-R540) Front Speakers (SKF-540F) Center Speaker (SKC-540C) Surround Speakers (SKM-540S) Surround Back Speakers (SKB-540) Powered Subwoofer (SKW-540) Instruction Manual Thank you ... before making connections and plugging in the unit. Please read this manual will enable you for future reference. Please retain this manual for purchasing an Onkyo 7.1ch Home Theater System.
Owner Manual
Page 3
...without the permission of the following measures: • Reorient or relocate the receiving antenna. • Increase the separation between the equipment and receiver. • Connect the equipment into an outlet on the unit, contact your Onkyo dealer. 6. If you turn on a circuit dif- Dry the unit ...accordance with a clean cloth. For stubborn stains, use this equipment does cause harmful interference to radio or television reception, which the receiver is encouraged to try to comply with a weak solution of the FCC Rules. NOTE: This equipment has been tested and found to...
...without the permission of the following measures: • Reorient or relocate the receiving antenna. • Increase the separation between the equipment and receiver. • Connect the equipment into an outlet on the unit, contact your Onkyo dealer. 6. If you turn on a circuit dif- Dry the unit ...accordance with a clean cloth. For stubborn stains, use this equipment does cause harmful interference to radio or television reception, which the receiver is encouraged to try to comply with a weak solution of the FCC Rules. NOTE: This equipment has been tested and found to...
Owner Manual
Page 5
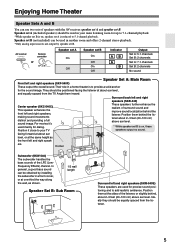
...SKF-540F) These output the overall sound. Enjoying Home Theater Speaker Sets A and B You can use two sets of the LFE (LowFrequency Effects) channel. AV receiver SPEAKERS A B Remote controller or Speaker set A On Off Speaker set B On Off On Off Indicator AB A B Output Set A: 5.1 channels Set B: ...set B is on , these speakers output no sound. Subwoofer (SKW-540) The subwoofer handles the bass sounds of speakers with the AV receiver: speaker set A and speaker set A is reduced to add realistic ambience. Speaker set B. Position them inward. Ideally they should be ...
...SKF-540F) These output the overall sound. Enjoying Home Theater Speaker Sets A and B You can use two sets of the LFE (LowFrequency Effects) channel. AV receiver SPEAKERS A B Remote controller or Speaker set A On Off Speaker set B On Off On Off Indicator AB A B Output Set A: 5.1 channels Set B: ...set B is on , these speakers output no sound. Subwoofer (SKW-540) The subwoofer handles the bass sounds of speakers with the AV receiver: speaker set A and speaker set A is reduced to add realistic ambience. Speaker set B. Position them inward. Ideally they should be ...
Owner Manual
Page 6
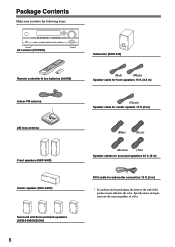
...fications and operation are the same regardless of the product name indicates the color. Package Contents Make sure you have the following items: AV receiver (HT-R540) Remote controller & two batteries (AA/R6) Indoor FM antenna AM loop antenna Front speakers (SKF-540F) Center speaker (SKC-540C) Surround and Surround back speakers...
...fications and operation are the same regardless of the product name indicates the color. Package Contents Make sure you have the following items: AV receiver (HT-R540) Remote controller & two batteries (AA/R6) Indoor FM antenna AM loop antenna Front speakers (SKF-540F) Center speaker (SKC-540C) Surround and Surround back speakers...
Owner Manual
Page 8
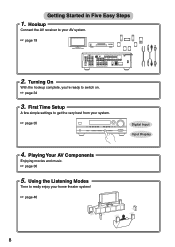
... Input Input Display 4. Using the Listening Modes Time to get the very best from your home theater system! ☞ page 46 8 Hookup Connect the AV receiver to switch on. ☞ page 34 3. Playing Your AV Components Enjoying movies and music. ☞ page 36 5. Turning On With the hookup complete, you're...
... Input Input Display 4. Using the Listening Modes Time to get the very best from your home theater system! ☞ page 46 8 Hookup Connect the AV receiver to switch on. ☞ page 34 3. Playing Your AV Components Enjoying movies and music. ☞ page 36 5. Turning On With the hookup complete, you're...
Owner Manual
Page 9
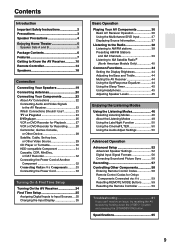
..., MiniDisc, or DAT Recorder 32 Connecting the Power Cord of Another Component 32 Connecting Onkyo Components..........33 Connecting the Power Cord 33 Turning On & First Time Setup Turning On the AV Receiver 34 First Time Setup 35 Assigning Digital Inputs to Input Sources ....35 Changing the Input... (North American Models Only 40 Common Functions 44 Setting the Display Brightness 44 Adjusting the Bass and Treble 44 Muting the AV Receiver 44 Using the OptiResponse Equalizer 44 Using the Sleep Timer 45 Using Headphones 45 Adjusting Speaker Levels 45 Enjoying the Listening Modes Using...
..., MiniDisc, or DAT Recorder 32 Connecting the Power Cord of Another Component 32 Connecting Onkyo Components..........33 Connecting the Power Cord 33 Turning On & First Time Setup Turning On the AV Receiver 34 First Time Setup 35 Assigning Digital Inputs to Input Sources ....35 Changing the Input... (North American Models Only 40 Common Functions 44 Setting the Display Brightness 44 Adjusting the Bass and Treble 44 Muting the AV Receiver 44 Using the OptiResponse Equalizer 44 Using the Sleep Timer 45 Using Headphones 45 Adjusting Speaker Levels 45 Enjoying the Listening Modes Using...
Owner Manual
Page 10
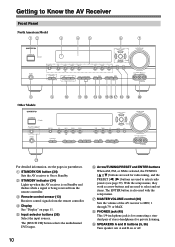
... ] buttons are used to select radio presets (see the pages in parentheses. B STANDBY indicator (34) Lights up when the AV receiver is also used for private listening. C Remote-control sensor (13) Receives control signals from the remote controller. F Arrow/TUNING/PRESET and ENTER buttons When AM, FM, or XM is selected, the...With the setup menus, they work as arrow buttons and are used with the setup menus. A STANDBY/ON button (34) Sets the AV receiver to On or Standby. D Display See "Display" on Standby and flashes while a signal is for connecting a standard pair of the AV...
... ] buttons are used to select radio presets (see the pages in parentheses. B STANDBY indicator (34) Lights up when the AV receiver is also used for private listening. C Remote-control sensor (13) Receives control signals from the remote controller. F Arrow/TUNING/PRESET and ENTER buttons When AM, FM, or XM is selected, the...With the setup menus, they work as arrow buttons and are used with the setup menus. A STANDBY/ON button (34) Sets the AV receiver to On or Standby. D Display See "Display" on Standby and flashes while a signal is for connecting a standard pair of the AV...

Owner Manual
Page 11
... FM STEREO (38): Lights up when tuned to connect a camcorder, games console, and so on . 2 MUTING indicator (44) Flashes while the AV receiver is on. K STEREO button (46) Selects the Stereo listening mode. Q TUNING MODE button (38) Selects the Auto or Manual tuning mode for composite ...when tuned to specify the format of digital audio signals. 4 Radio indicators TUNED (38): Lights up when presetting radio stations. Getting to Know the AV Receiver-Continued J TONE, [-], and [+] buttons (44) Used to access the setup menus. U PURE AUDIO button and indicator (46) The North American model ...
... FM STEREO (38): Lights up when tuned to connect a camcorder, games console, and so on . 2 MUTING indicator (44) Flashes while the AV receiver is on. K STEREO button (46) Selects the Stereo listening mode. Q TUNING MODE button (38) Selects the Auto or Manual tuning mode for composite ...when tuned to specify the format of digital audio signals. 4 Radio indicators TUNED (38): Lights up when presetting radio stations. Getting to Know the AV Receiver-Continued J TONE, [-], and [+] buttons (44) Used to access the setup menus. U PURE AUDIO button and indicator (46) The North American model ...
Owner Manual
Page 12
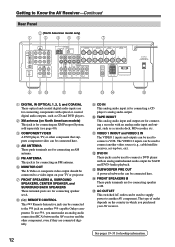
... speaker set -top box, etc). F MONITOR OUT The S-Video or composite video output should be used to supply power to another -capable Onkyo com- To use , you purchased your TV or projector. O AC OUTLET This switched AC outlet can be used to connect a DVD player...SURROUND CENTER SURR BACK R VIDEO 2 VIDEO 1 SUB WOOFER DVD SURROUND SPEAKERS FRONT SPEAKERS A L CENTER SPEAKER R PRE OUT SUB WOOFER FRONT SPEAKERS B L R AV RECEIVER AC OUTLET AC 120V 60Hz SWITCHED TOTAL 120W 1A MAX. 8 9J K L MN O A DIGITAL IN OPTICAL 1, 2, 3, and COAXIAL These optical and coaxial digital audio...
... speaker set -top box, etc). F MONITOR OUT The S-Video or composite video output should be used to supply power to another -capable Onkyo com- To use , you purchased your TV or projector. O AC OUTLET This switched AC outlet can be used to connect a DVD player...SURROUND CENTER SURR BACK R VIDEO 2 VIDEO 1 SUB WOOFER DVD SURROUND SPEAKERS FRONT SPEAKERS A L CENTER SPEAKER R PRE OUT SUB WOOFER FRONT SPEAKERS B L R AV RECEIVER AC OUTLET AC 120V 60Hz SWITCHED TOTAL 120W 1A MAX. 8 9J K L MN O A DIGITAL IN OPTICAL 1, 2, 3, and COAXIAL These optical and coaxial digital audio...

Owner Manual
Page 13
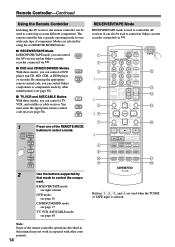
...8226; Expired batteries should be pressed continuously, thereby draining the batteries. • The remote controller may not work reliably if the AV receiver is subjected to bright light, such as direct sunlight or inverter-type fluorescent lights. Keep this in mind when installing. •... batteries to prevent damage from leakage or corrosion. Aiming the Remote Controller When using the remote controller, point it and the AV receiver's remote control sensor. 13 Remote Controller Installing the Batteries 1 To open the battery compartment, press the small hollow and slide open...
...8226; Expired batteries should be pressed continuously, thereby draining the batteries. • The remote controller may not work reliably if the AV receiver is subjected to bright light, such as direct sunlight or inverter-type fluorescent lights. Keep this in mind when installing. •... batteries to prevent damage from leakage or corrosion. Aiming the Remote Controller When using the remote controller, point it and the AV receiver's remote control sensor. 13 Remote Controller Installing the Batteries 1 To open the battery compartment, press the small hollow and slide open...
Owner Manual
Page 14
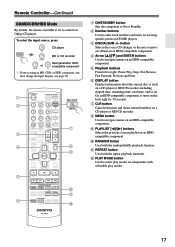
... Use the buttons supported by using the six REMOTE MODE buttons. ■ RECEIVER/TAPE Mode In RECEIVER/TAPE mode, you can control RECEIVER the AV receiver and an Onkyo cassette TAPE recorder connected via . 1 2 3 1 4 2 5 36 7 4 8 9 J K ON/STANDBY REMOTE MODE RECEIVER DVD TAPE INPUT SELECTOR 1 2 3 V1 V2 V3 M D/CDR C... 12 CABLE CLR SAT D TUN --/--- Remote Controller-Continued Using the Remote Controller Including the AV receiver, the remote controller can be used to control an Onkyo cassette recorder connected via . ■ DVD and CD/MD/CDR/HDD Modes With these modes...
... Use the buttons supported by using the six REMOTE MODE buttons. ■ RECEIVER/TAPE Mode In RECEIVER/TAPE mode, you can control RECEIVER the AV receiver and an Onkyo cassette TAPE recorder connected via . 1 2 3 1 4 2 5 36 7 4 8 9 J K ON/STANDBY REMOTE MODE RECEIVER DVD TAPE INPUT SELECTOR 1 2 3 V1 V2 V3 M D/CDR C... 12 CABLE CLR SAT D TUN --/--- Remote Controller-Continued Using the Remote Controller Including the AV receiver, the remote controller can be used to control an Onkyo cassette recorder connected via . ■ DVD and CD/MD/CDR/HDD Modes With these modes...
Owner Manual
Page 15
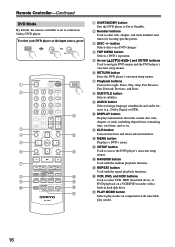
...On twin cassette decks, only deck B can enjoy a powerful sound with the speakers included in this package. A ON/STANDBY button (34) Sets the AV receiver to select the listening modes. E SP A/B button (5, 36) Used to select the available listening modes. Stop [ ] button Stops playback. The FF [...and B on , you can be controlled. K OR-EQ button (44) Turns on the OptiResponse Equalizer, which optimizes performance when the HT-R540 is used when the TAPE input is on or off. N VOL [ ]/[ ] button (36) Adjusts the volume of the AV receiver regardless of each speaker.
...On twin cassette decks, only deck B can enjoy a powerful sound with the speakers included in this package. A ON/STANDBY button (34) Sets the AV receiver to select the listening modes. E SP A/B button (5, 36) Used to select the available listening modes. Stop [ ] button Stops playback. The FF [...and B on , you can be controlled. K OR-EQ button (44) Turns on the OptiResponse Equalizer, which optimizes performance when the HT-R540 is used when the TAPE input is on or off. N VOL [ ]/[ ] button (36) Adjusts the volume of the AV receiver regardless of each speaker.
Owner Manual
Page 16
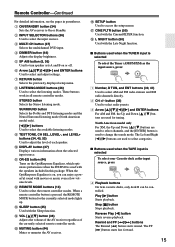
...set to enter title, chapter, and track numbers and times for locating specific points. B Number buttons Used to control an Onkyo DVD player. I AUDIO button Selects foreign language soundtracks and audio formats (e.g., Dolby Digital or DTS). M SETUP button Used to right... the repeat playback functions. Q PLAY MODE button Selects play modes. 16 To select your DVD player as the input source, press: RECEIVER 6 DVD or 5 MULTI CH 1 2 3 4 5 6 7 8 9 J ON/STANDBY REMOTE MODE RECEIVER DVD TAPE INPUT SELECTOR 1 2 3 V1 V2 V3 M D/CDR C D HDD 4 5 6 TV MULTI CH DVD 7 8 ...
...set to enter title, chapter, and track numbers and times for locating specific points. B Number buttons Used to control an Onkyo DVD player. I AUDIO button Selects foreign language soundtracks and audio formats (e.g., Dolby Digital or DTS). M SETUP button Used to right... the repeat playback functions. Q PLAY MODE button Selects play modes. 16 To select your DVD player as the input source, press: RECEIVER 6 DVD or 5 MULTI CH 1 2 3 4 5 6 7 8 9 J ON/STANDBY REMOTE MODE RECEIVER DVD TAPE INPUT SELECTOR 1 2 3 V1 V2 V3 M D/CDR C D HDD 4 5 6 TV MULTI CH DVD 7 8 ...
Owner Manual
Page 17
...Playback buttons From left to On or Standby. K REPEAT button Used with the random/shuffle playback function. To select the input source, press: RECEIVER 9 CD player C D 7 MD or CD recorder TAPE 7 or 2 Next generation HDDcompatible component TAPE V2 * If you're using an MD, ... 6 TV MULTI CH DVD 7 8 9 VCR TAPE TUNER 10 11 +10 0 C D 12 CABLE CLR SAT D TUN --/--- L PLAY MODE button Used to control an Onkyo CD player. I PLAYLIST [ ]/[ ] buttons Selects the previous or next playlist on CD/MD players. ENT DIMMER SLEEP TV VOL INPUT GUIDE TOP MENU CH DISC...
...Playback buttons From left to On or Standby. K REPEAT button Used with the random/shuffle playback function. To select the input source, press: RECEIVER 9 CD player C D 7 MD or CD recorder TAPE 7 or 2 Next generation HDDcompatible component TAPE V2 * If you're using an MD, ... 6 TV MULTI CH DVD 7 8 9 VCR TAPE TUNER 10 11 +10 0 C D 12 CABLE CLR SAT D TUN --/--- L PLAY MODE button Used to control an Onkyo CD player. I PLAYLIST [ ]/[ ] buttons Selects the previous or next playlist on CD/MD players. ENT DIMMER SLEEP TV VOL INPUT GUIDE TOP MENU CH DISC...
Owner Manual
Page 18
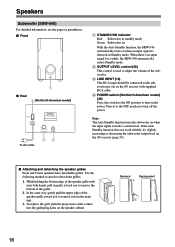
... the speaker grille with supplied RCA cable. To replace the grill, push the projections at the corners into the grille plug holes on the AV receiver (page 53). ■ Attaching and detaching the speaker grilles Front and Center speakers have detachable grilles. If the Auto Standby function does not work ... With the Auto Standby function, the SKW-540 automatically turns on when an input signal is used to the subwoofer pre out on the AV receiver with your both hands, pull it to the OFF position to attach or detach the grilles. 1. When there's no input signal for a while, the ...
... the speaker grille with supplied RCA cable. To replace the grill, push the projections at the corners into the grille plug holes on the AV receiver (page 53). ■ Attaching and detaching the speaker grilles Front and Center speakers have detachable grilles. If the Auto Standby function does not work ... With the Auto Standby function, the SKW-540 automatically turns on when an input signal is used to the subwoofer pre out on the AV receiver with your both hands, pull it to the OFF position to attach or detach the grilles. 1. When there's no input signal for a while, the ...
Owner Manual
Page 19
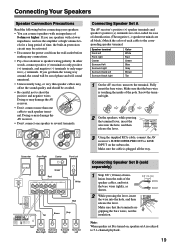
...the ends of the pole. Brown Gray Tan Surround Surround Surround Surround Back Right Back Left Right Left Connecting Speaker Set A The AV receiver's positive (+) speaker terminals and speaker's positive (+) terminals are color-coded for a long period of each speaker terminal. Screw the terminal... While pressing the lever, insert the wire into the hole, and then release the lever. 3 Using the supplied RCA cable, connect the AV receiver's SUBWOOFER PRE OUT to several terminals. Connecting Speaker Set B (sold separately) 1 Strip 3/8" (10 mm) of insulation from the wall outlet ...
...the ends of the pole. Brown Gray Tan Surround Surround Surround Surround Back Right Back Left Right Left Connecting Speaker Set A The AV receiver's positive (+) speaker terminals and speaker's positive (+) terminals are color-coded for a long period of each speaker terminal. Screw the terminal... While pressing the lever, insert the wire into the hole, and then release the lever. 3 Using the supplied RCA cable, connect the AV receiver's SUBWOOFER PRE OUT to several terminals. Connecting Speaker Set B (sold separately) 1 Strip 3/8" (10 mm) of insulation from the wall outlet ...
Owner Manual
Page 20
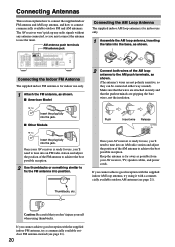
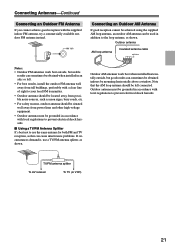
... Insert wire Release Insert the plug fully into the base, as shown. 2 Connect both wires of the AM antenna to tune into position. The AV receiver won't pick up any radio signals without any antenna connected, so you must connect the antenna to use , you don't injure yourself when using it... 21). Connecting the Indoor FM Antenna The supplied indoor FM antenna is for indoor use only. 1 Attach the FM antenna, as possible from your AV receiver is for use the tuner. Make sure that the wires are attached securely and that you 'll need to tune into an FM radio station...
... Insert wire Release Insert the plug fully into the base, as shown. 2 Connect both wires of the AM antenna to tune into position. The AV receiver won't pick up any radio signals without any antenna connected, so you must connect the antenna to use , you don't injure yourself when using it... 21). Connecting the Indoor FM Antenna The supplied indoor FM antenna is for indoor use only. 1 Attach the FM antenna, as possible from your AV receiver is for use the tuner. Make sure that the wires are attached securely and that you 'll need to tune into an FM radio station...
Owner Manual
Page 21
... antenna must be grounded in accordance with the supplied indoor FM antenna, try a commercially available outdoor FM antenna instead. TV/FM antenna splitter To AV receiver To TV (or VCR) 21 Connecting Antennas-Continued Connecting an Outdoor FM Antenna If you cannot achieve good reception with local regulations to prevent electrical...
... antenna must be grounded in accordance with the supplied indoor FM antenna, try a commercially available outdoor FM antenna instead. TV/FM antenna splitter To AV receiver To TV (or VCR) 21 Connecting Antennas-Continued Connecting an Outdoor FM Antenna If you cannot achieve good reception with local regulations to prevent electrical...
Owner Manual
Page 22
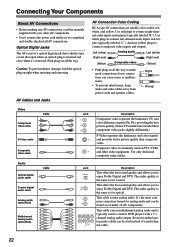
... cause noise or malfunctions). • To prevent interference, keep audio and video cables away from power cords and speaker cables. Optical Digital Jacks The AV receiver's optical digital jacks have shutter-type covers that open when an optical plug is the same as for optical. Use red plugs to connect left...
... cause noise or malfunctions). • To prevent interference, keep audio and video cables away from power cords and speaker cables. Optical Digital Jacks The AV receiver's optical digital jacks have shutter-type covers that open when an optical plug is the same as for optical. Use red plugs to connect left...
Owner Manual
Page 23
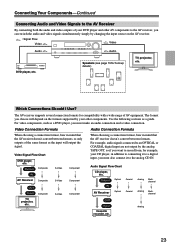
...you must also connect it to record from, for example, your DVD player and other components. Output Optical Coaxial IN AV Receiver Optical Coaxial Analog Multichannel Analog Multichannel TV, projector, etc. For example, audio signals connected to an OPTICAL or COAXIAL digital .... OUT Input Cassette recorder, etc. Video Connection Formats Audio Connection Formats When choosing a connection format, bear in mind that the AV receiver doesn't convert between formats. For video components, such as a guide. Audio Signal Flow Chart CD player, etc. The format you ...
...you must also connect it to record from, for example, your DVD player and other components. Output Optical Coaxial IN AV Receiver Optical Coaxial Analog Multichannel Analog Multichannel TV, projector, etc. For example, audio signals connected to an OPTICAL or COAXIAL digital .... OUT Input Cassette recorder, etc. Video Connection Formats Audio Connection Formats When choosing a connection format, bear in mind that the AV receiver doesn't convert between formats. For video components, such as a guide. Audio Signal Flow Chart CD player, etc. The format you ...


