
Owner Manual
Page 1
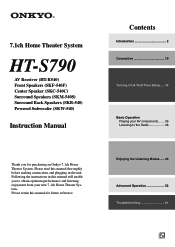
...for future reference. 7.1ch Home Theater System HT-S790 AV Receiver (HT-R540) Front Speakers (SKF-540F) Center Speaker (SKC-540C) Surround Speakers (SKM-540S) Surround Back Speakers (SKB-540) Powered Subwoofer (SKW-540) Instruction Manual Thank you to obtain optimum performance and ...46 Advanced Operation 52 Troubleshooting 61 En Following the instructions in the unit. Please read this manual thoroughly before making connections and plugging in this manual for purchasing an Onkyo 7.1ch Home Theater System. Contents Introduction 2 Connection 19 Turning On & First Time Setup...
...for future reference. 7.1ch Home Theater System HT-S790 AV Receiver (HT-R540) Front Speakers (SKF-540F) Center Speaker (SKC-540C) Surround Speakers (SKM-540S) Surround Back Speakers (SKB-540) Powered Subwoofer (SKW-540) Instruction Manual Thank you to obtain optimum performance and ...46 Advanced Operation 52 Troubleshooting 61 En Following the instructions in the unit. Please read this manual thoroughly before making connections and plugging in this manual for purchasing an Onkyo 7.1ch Home Theater System. Contents Introduction 2 Connection 19 Turning On & First Time Setup...

Owner Manual
Page 11
... For detailed information, see the pages in parentheses. 1 A and B speaker indicators (5, 36) Indicator A lights up when Auto Tuning is selected, and disappears when Manual Tuning mode is on. AUTO (38): For AM and FM radio, lights up when speaker set A is selected. XM (North American models only) (40): Lights... and indicator. P MEMORY button (39) Used when storing or deleting radio presets. Q TUNING MODE button (38) Selects the Auto or Manual tuning mode for composite video and analog audio. S SETUP button Used to adjust the bass and treble. There are jacks for AM and FM...
... For detailed information, see the pages in parentheses. 1 A and B speaker indicators (5, 36) Indicator A lights up when Auto Tuning is selected, and disappears when Manual Tuning mode is on. AUTO (38): For AM and FM radio, lights up when speaker set A is selected. XM (North American models only) (40): Lights... and indicator. P MEMORY button (39) Used when storing or deleting radio presets. Q TUNING MODE button (38) Selects the Auto or Manual tuning mode for composite video and analog audio. S SETUP button Used to adjust the bass and treble. There are jacks for AM and FM...
Owner Manual
Page 14
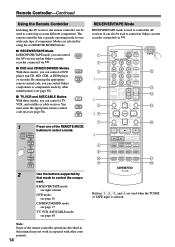
... code, you can control Onkyo components or components made by that mode to control the compo- TV VCR CABLE SAT 1 REMOTE MODE RECEIVER DVD TAPE M D/CDR C D HDD Press one of the remote controller operations described in this manual may not work as expected... selected by using the six REMOTE MODE buttons. ■ RECEIVER/TAPE Mode In RECEIVER/TAPE mode, you can control RECEIVER the AV receiver and an Onkyo cassette TAPE recorder connected via . 1 2 3 1 4 2 5 36 7 4 8 9 J K ON/STANDBY REMOTE MODE RECEIVER DVD TAPE INPUT SELECTOR 1 2 3 V1 V2 V3 M D/CDR C D HDD 4 ...
... code, you can control Onkyo components or components made by that mode to control the compo- TV VCR CABLE SAT 1 REMOTE MODE RECEIVER DVD TAPE M D/CDR C D HDD Press one of the remote controller operations described in this manual may not work as expected... selected by using the six REMOTE MODE buttons. ■ RECEIVER/TAPE Mode In RECEIVER/TAPE mode, you can control RECEIVER the AV receiver and an Onkyo cassette TAPE recorder connected via . 1 2 3 1 4 2 5 36 7 4 8 9 J K ON/STANDBY REMOTE MODE RECEIVER DVD TAPE INPUT SELECTOR 1 2 3 V1 V2 V3 M D/CDR C D HDD 4 ...
Owner Manual
Page 22
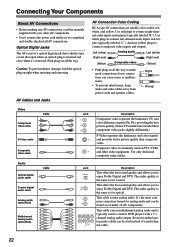
... shutter damage, hold the optical plug straight when inserting and removing. Connecting Your Components About AV Connections • Before making any AV connections, read the manuals supplied with a 7.1channel analog audio output.
... shutter damage, hold the optical plug straight when inserting and removing. Connecting Your Components About AV Connections • Before making any AV connections, read the manuals supplied with a 7.1channel analog audio output.
Owner Manual
Page 31
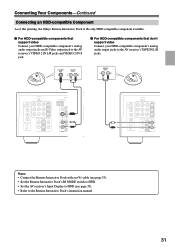
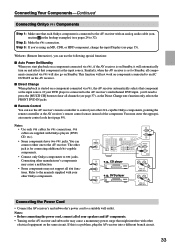
... page 35). • Refer to the AV receiver's TAPE IN L/R jacks. Connecting Your Components-Continued Connecting an HDD-compatible Component As of this printing, the Onkyo Remote Interactive Dock is the only HDD-compatible component available. ■ For HDD-compatible components that support video Connect your HDD-compatible component's analog audio... S jack. ■ For HDD-compatible components that don't support video Connect your HDD-compatible component's analog audio output jacks to the Remote Interactive Dock's instruction manual. 31
... page 35). • Refer to the AV receiver's TAPE IN L/R jacks. Connecting Your Components-Continued Connecting an HDD-compatible Component As of this printing, the Onkyo Remote Interactive Dock is the only HDD-compatible component available. ■ For HDD-compatible components that support video Connect your HDD-compatible component's analog audio... S jack. ■ For HDD-compatible components that don't support video Connect your HDD-compatible component's analog audio output jacks to the Remote Interactive Dock's instruction manual. 31
Owner Manual
Page 33
...(see page 37), as the input source. Notes: • Use only cables for connecting additional -capable components. • Connect only Onkyo components to the manuals supplied with Onkyo players (DVD, CD, etc.). • Some components have two jacks. Refer to jacks. Step 3: If you 'll need to ...press the [MULTI CH] button to hear all of the component. Connecting other -capable Onkyo components, pointing the remote controller at ...
...(see page 37), as the input source. Notes: • Use only cables for connecting additional -capable components. • Connect only Onkyo components to the manuals supplied with Onkyo players (DVD, CD, etc.). • Some components have two jacks. Refer to jacks. Step 3: If you 'll need to ...press the [MULTI CH] button to hear all of the component. Connecting other -capable Onkyo components, pointing the remote controller at ...
Owner Manual
Page 35
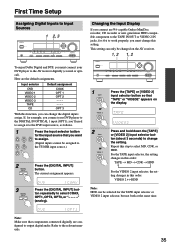
..., you connect your DVD player to the AV receiver digitally (coaxial or optical). Changing the Input Display If you connect an -capable Onkyo MiniDisc recorder, CD recorder or next generation HDD-compatible component to the TAPE IN/OUT or VIDEO 2 IN jacks, for to work ... you want DVD VIDEO 1 VIDEO 2 to assign. The current assignment appears. 3 DIGITAL INPUT Press the [DIGITAL INPUT] button repeatedly to the relevant manuals. 35 Repeat this function, you can only be assigned to the TUNER input source.) C D 2 DIGITAL INPUT Press the [DIGITAL INPUT] button. Note...
..., you connect your DVD player to the AV receiver digitally (coaxial or optical). Changing the Input Display If you connect an -capable Onkyo MiniDisc recorder, CD recorder or next generation HDD-compatible component to the TAPE IN/OUT or VIDEO 2 IN jacks, for to work ... you want DVD VIDEO 1 VIDEO 2 to assign. The current assignment appears. 3 DIGITAL INPUT Press the [DIGITAL INPUT] button repeatedly to the relevant manuals. 35 Repeat this function, you can only be assigned to the TUNER input source.) C D 2 DIGITAL INPUT Press the [DIGITAL INPUT] button. Note...
Owner Manual
Page 38
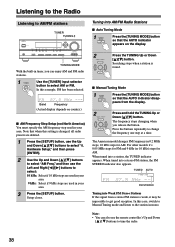
... FM and 9 kHz (or 10 kHz) steps for AM. For other models it may be impossible to get good reception. In this case, switch to Manual Tuning mode and listen to select "0. Band Frequency (Actual display depends on the display. 2 TUNING PRESET Press the TUNING Up or Down [ ]/[ ] button. ... in 0.2 MHz steps, 10 kHz steps for AM. Tuning into Weak FM Stereo Stations If the signal from a stereo FM station is found. ■ Manual Tuning Mode 1 TUNING MODE Press the [TUNING MODE] button so that the AUTO indicator disappears from the display. 2 TUNING PRESET Press and hold the TUNING...
... FM and 9 kHz (or 10 kHz) steps for AM. For other models it may be impossible to get good reception. In this case, switch to Manual Tuning mode and listen to select "0. Band Frequency (Actual display depends on the display. 2 TUNING PRESET Press the TUNING Up or Down [ ]/[ ] button. ... in 0.2 MHz steps, 10 kHz steps for AM. Tuning into Weak FM Stereo Stations If the signal from a stereo FM station is found. ■ Manual Tuning Mode 1 TUNING MODE Press the [TUNING MODE] button so that the AUTO indicator disappears from the display. 2 TUNING PRESET Press and hold the TUNING...

Owner Manual
Page 51
...; Mono (2ch) This setting determines which channel is output from the multichannel subwoofer output is used with multiplex sources, multilingual TV broadcasts, and so on . Manual: You can select 0 dB (default), +5 dB, +10 dB, or +15 dB. Using the Listening Modes-Continued 4 SETUP Press the [SETUP] button. R: Only the right channel...
...; Mono (2ch) This setting determines which channel is output from the multichannel subwoofer output is used with multiplex sources, multilingual TV broadcasts, and so on . Manual: You can select 0 dB (default), +5 dB, +10 dB, or +15 dB. Using the Listening Modes-Continued 4 SETUP Press the [SETUP] button. R: Only the right channel...
Owner Manual
Page 55
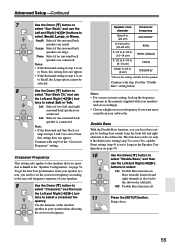
... 3) is set - Small: Select if the surround back speakers are connected. Notes: • If the Surround setting in step 6 is set to Large in the manuals supplied with step 10 of the "Crossover Frequency" setting. Continue with step 9 of the "Double Bass" setting below. Setup closes. 55 quency. Crossover Frequency This...
... 3) is set - Small: Select if the surround back speakers are connected. Notes: • If the Surround setting in step 6 is set to Large in the manuals supplied with step 10 of the "Crossover Frequency" setting. Continue with step 9 of the "Double Bass" setting below. Setup closes. 55 quency. Crossover Frequency This...

