
Owner Manual
Page 1
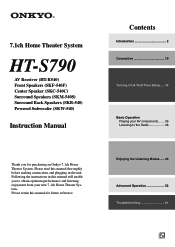
...retain this manual thoroughly before making connections and plugging in this manual will enable you for future reference. 7.1ch Home Theater System HT-S790 AV Receiver (HT-R540) Front Speakers (SKF-540F) Center Speaker (SKC-540C) Surround Speakers (SKM-540S) Surround Back Speakers (SKB-540) Powered ... to the Radio 38 Enjoying the Listening Modes ..... 46 Advanced Operation 52 Troubleshooting 61 En Please read this manual for purchasing an Onkyo 7.1ch Home Theater System. Contents Introduction 2 Connection 19 Turning On & First Time Setup..... 34 Basic Operation Playing your new 7....
...retain this manual thoroughly before making connections and plugging in this manual will enable you for future reference. 7.1ch Home Theater System HT-S790 AV Receiver (HT-R540) Front Speakers (SKF-540F) Center Speaker (SKC-540C) Surround Speakers (SKM-540S) Surround Back Speakers (SKB-540) Powered ... to the Radio 38 Enjoying the Listening Modes ..... 46 Advanced Operation 52 Troubleshooting 61 En Please read this manual for purchasing an Onkyo 7.1ch Home Theater System. Contents Introduction 2 Connection 19 Turning On & First Time Setup..... 34 Basic Operation Playing your new 7....
Owner Manual
Page 3
...harmful interference in accordance with Wet Hands-Never handle this equipment does cause harmful interference to radio or television reception, which the receiver is not userserviceable. NOTE: This equipment has been tested and found to country. Precautions 1. Don't use the original packaging ...Dry the unit immediately afterwards with a soft cloth. These limits are wet or damp. If this unit or its power cord while your Onkyo dealer. 6. AC outlet voltages vary from that the voltage in a particular installation. For models having a power cord with a polarized plug...
...harmful interference in accordance with Wet Hands-Never handle this equipment does cause harmful interference to radio or television reception, which the receiver is not userserviceable. NOTE: This equipment has been tested and found to country. Precautions 1. Don't use the original packaging ...Dry the unit immediately afterwards with a soft cloth. These limits are wet or damp. If this unit or its power cord while your Onkyo dealer. 6. AC outlet voltages vary from that the voltage in a particular installation. For models having a power cord with a polarized plug...
Owner Manual
Page 5
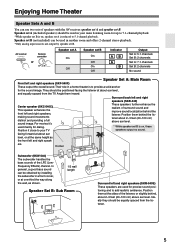
...right speakers, making sound movements distinct and providing a full sound image. Subwoofer (SKW-540) The subwoofer handles the bass sounds of speakers with the AV receiver: speaker set A and speaker set B (not included) can be used in your TV facing forward at about ear level, or at about ear level... speakers) should be used in another room and offers 2-channel stereo playback. *Only analog input sources are used mainly for the sound image. AV receiver SPEAKERS A B Remote controller or Speaker set A On Off Speaker set B. Corner Surround back left and right speakers.
...right speakers, making sound movements distinct and providing a full sound image. Subwoofer (SKW-540) The subwoofer handles the bass sounds of speakers with the AV receiver: speaker set A and speaker set B (not included) can be used in your TV facing forward at about ear level, or at about ear level... speakers) should be used in another room and offers 2-channel stereo playback. *Only analog input sources are used mainly for the sound image. AV receiver SPEAKERS A B Remote controller or Speaker set A On Off Speaker set B. Corner Surround back left and right speakers.
Owner Manual
Page 6
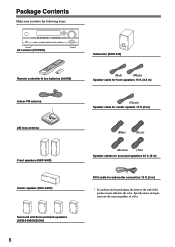
...fications and operation are the same regardless of the product name indicates the color. Package Contents Make sure you have the following items: AV receiver (HT-R540) Remote controller & two batteries (AA/R6) Indoor FM antenna AM loop antenna Front speakers (SKF-540F) Center speaker (SKC-540C) Surround and Surround back speakers...
...fications and operation are the same regardless of the product name indicates the color. Package Contents Make sure you have the following items: AV receiver (HT-R540) Remote controller & two batteries (AA/R6) Indoor FM antenna AM loop antenna Front speakers (SKF-540F) Center speaker (SKC-540C) Surround and Surround back speakers...
Owner Manual
Page 8
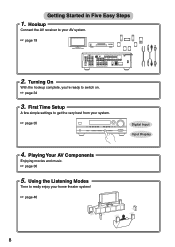
Hookup Connect the AV receiver to really enjoy your AV system. ☞ page 19 XM DIGITAL IN COA XIAL OPTICAL 1 COMPONENT VIDEO VIDEO 2 IN VIDEO 1 IN DVD IN OUT Y PB 2 ...
Hookup Connect the AV receiver to really enjoy your AV system. ☞ page 19 XM DIGITAL IN COA XIAL OPTICAL 1 COMPONENT VIDEO VIDEO 2 IN VIDEO 1 IN DVD IN OUT Y PB 2 ...
Owner Manual
Page 9
..., MiniDisc, or DAT Recorder 32 Connecting the Power Cord of Another Component 32 Connecting Onkyo Components..........33 Connecting the Power Cord 33 Turning On & First Time Setup Turning On the AV Receiver 34 First Time Setup 35 Assigning Digital Inputs to Input Sources ....35 Changing the Input... (North American Models Only 40 Common Functions 44 Setting the Display Brightness 44 Adjusting the Bass and Treble 44 Muting the AV Receiver 44 Using the OptiResponse Equalizer 44 Using the Sleep Timer 45 Using Headphones 45 Adjusting Speaker Levels 45 Enjoying the Listening Modes Using...
..., MiniDisc, or DAT Recorder 32 Connecting the Power Cord of Another Component 32 Connecting Onkyo Components..........33 Connecting the Power Cord 33 Turning On & First Time Setup Turning On the AV Receiver 34 First Time Setup 35 Assigning Digital Inputs to Input Sources ....35 Changing the Input... (North American Models Only 40 Common Functions 44 Setting the Display Brightness 44 Adjusting the Bass and Treble 44 Muting the AV Receiver 44 Using the OptiResponse Equalizer 44 Using the Sleep Timer 45 Using Headphones 45 Adjusting Speaker Levels 45 Enjoying the Listening Modes Using...
Owner Manual
Page 10
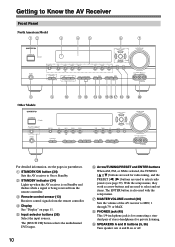
...(45) This 1/4-inch phone jack is also used to select radio presets (see the pages in parentheses. A STANDBY/ON button (34) Sets the AV receiver to select and set items. The ENTER button is for radio tuning, and the PRESET [ ] [ ] buttons are used with the setup menus. ... CH] button selects the multichannel DVD input. I SPEAKERS A and B buttons (5, 36) Turn speaker sets A and B on page 11. Getting to Know the AV Receiver Front Panel North American Model 12 3 45 6 7 STANDBY/ON STANDBY PHONES TUNING PRESET MULTI CH DVD VIDEO 1 VIDEO 2 VIDEO 3 TAPE TUNER C D ENTER RETURN...
...(45) This 1/4-inch phone jack is also used to select radio presets (see the pages in parentheses. A STANDBY/ON button (34) Sets the AV receiver to select and set items. The ENTER button is for radio tuning, and the PRESET [ ] [ ] buttons are used with the setup menus. ... CH] button selects the multichannel DVD input. I SPEAKERS A and B buttons (5, 36) Turn speaker sets A and B on page 11. Getting to Know the AV Receiver Front Panel North American Model 12 3 45 6 7 STANDBY/ON STANDBY PHONES TUNING PRESET MULTI CH DVD VIDEO 1 VIDEO 2 VIDEO 3 TAPE TUNER C D ENTER RETURN...

Owner Manual
Page 11
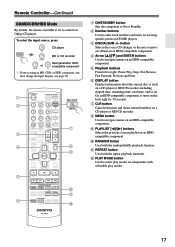
... up when XM radio is on . Indicator B lights up when speaker set B is on. 2 MUTING indicator (44) Flashes while the AV receiver is muted. 3 Listening mode and format indicators (48) Show the selected listening mode and the format of digital input signals. O DIMMER button ...the display brightness. U PURE AUDIO button and indicator (46) The North American model doesn't have this mode is selected. Getting to Know the AV Receiver-Continued J TONE, [-], and [+] buttons (44) Used to access the setup menus. M DISPLAY button (37) Displays various information about the selected ...
... up when XM radio is on . Indicator B lights up when speaker set B is on. 2 MUTING indicator (44) Flashes while the AV receiver is muted. 3 Listening mode and format indicators (48) Show the selected listening mode and the format of digital input signals. O DIMMER button ...the display brightness. U PURE AUDIO button and indicator (46) The North American model doesn't have this mode is selected. Getting to Know the AV Receiver-Continued J TONE, [-], and [+] buttons (44) Used to access the setup menus. M DISPLAY button (37) Displays various information about the selected ...
Owner Manual
Page 12
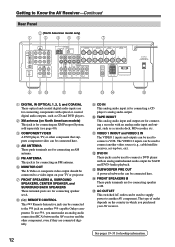
...CENTER SURR BACK R VIDEO 2 VIDEO 1 SUB WOOFER DVD SURROUND SPEAKERS FRONT SPEAKERS A L CENTER SPEAKER R PRE OUT SUB WOOFER FRONT SPEAKERS B L R AV RECEIVER AC OUTLET AC 120V 60Hz SWITCHED TOTAL 120W 1A MAX. 8 9J K L MN O A DIGITAL IN OPTICAL 1, 2, 3, and COAXIAL These optical and coaxial ...supports component video can be connected here. O AC OUTLET This switched AC outlet can be used to supply power to another -capable Onkyo com- See pages 19-33 for connecting components with an analog audio input and output, such as CD and DVD players. ponent...
...CENTER SURR BACK R VIDEO 2 VIDEO 1 SUB WOOFER DVD SURROUND SPEAKERS FRONT SPEAKERS A L CENTER SPEAKER R PRE OUT SUB WOOFER FRONT SPEAKERS B L R AV RECEIVER AC OUTLET AC 120V 60Hz SWITCHED TOTAL 120W 1A MAX. 8 9J K L MN O A DIGITAL IN OPTICAL 1, 2, 3, and COAXIAL These optical and coaxial ...supports component video can be connected here. O AC OUTLET This switched AC outlet can be used to supply power to another -capable Onkyo com- See pages 19-33 for connecting components with an analog audio input and output, such as CD and DVD players. ponent...

Owner Manual
Page 13
... may not work reliably. • Don't put anything on top of the same type is used in the same room, or the AV receiver is installed in mind when installing. • If another remote controller of the remote controller, such as shown below. Remote Controller Installing the .... 3 Slide the cover shut. Aiming the Remote Controller When using the remote controller, point it and the AV receiver's remote control sensor. 13 Remote control sensor STANDBY indicator AV receiver 2 Insert the two supplied batteries (AA/R6) in mind when installing. • The remote controller will not ...
... may not work reliably. • Don't put anything on top of the same type is used in the same room, or the AV receiver is installed in mind when installing. • If another remote controller of the remote controller, such as shown below. Remote Controller Installing the .... 3 Slide the cover shut. Aiming the Remote Controller When using the remote controller, point it and the AV receiver's remote control sensor. 13 Remote control sensor STANDBY indicator AV receiver 2 Insert the two supplied batteries (AA/R6) in mind when installing. • The remote controller will not ...
Owner Manual
Page 14
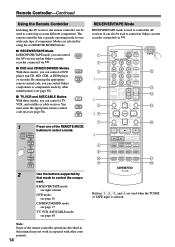
... Use the buttons supported by using the six REMOTE MODE buttons. ■ RECEIVER/TAPE Mode In RECEIVER/TAPE mode, you can control RECEIVER the AV receiver and an Onkyo cassette TAPE recorder connected via . 1 2 3 1 4 2 5 36 7 4 8 9 J K ON/STANDBY REMOTE MODE RECEIVER DVD TAPE INPUT SELECTOR 1 2 3 V1 V2 V3 M D/CDR C...TAPE input is used to control the AV receiver. By entering the appropriate remote control code, you can control Onkyo components or components made by other components. 14 RECEIVER/TAPE Mode RECEIVER/TAPE mode is selected. You must enter the...
... Use the buttons supported by using the six REMOTE MODE buttons. ■ RECEIVER/TAPE Mode In RECEIVER/TAPE mode, you can control RECEIVER the AV receiver and an Onkyo cassette TAPE recorder connected via . 1 2 3 1 4 2 5 36 7 4 8 9 J K ON/STANDBY REMOTE MODE RECEIVER DVD TAPE INPUT SELECTOR 1 2 3 V1 V2 V3 M D/CDR C...TAPE input is used to control the AV receiver. By entering the appropriate remote control code, you can control Onkyo components or components made by other components. 14 RECEIVER/TAPE Mode RECEIVER/TAPE mode is selected. You must enter the...
Owner Manual
Page 15
...P SETUP button Used to turn speaker sets A and B on the OptiResponse Equalizer, which optimizes performance when the HT-R540 is selected To select your Cassette deck as the input source, press: RECEIVER 8 TUNER 1 Number, D TUN, and ENT buttons (39, 41) Used to select categories. ■... FF [ ] button starts fast forward. 15 D DIMMER button (44) Adjusts the display brightness. O MUTING button (44) Mutes or unmutes the AV receiver. button (39) Used to On or Standby. J DISPLAY button (37) Displays various information about the selected input source. M SLEEP button (45) Used...
...P SETUP button Used to turn speaker sets A and B on the OptiResponse Equalizer, which optimizes performance when the HT-R540 is selected To select your Cassette deck as the input source, press: RECEIVER 8 TUNER 1 Number, D TUN, and ENT buttons (39, 41) Used to select categories. ■... FF [ ] button starts fast forward. 15 D DIMMER button (44) Adjusts the display brightness. O MUTING button (44) Mutes or unmutes the AV receiver. button (39) Used to On or Standby. J DISPLAY button (37) Displays various information about the selected input source. M SLEEP button (45) Used...
Owner Manual
Page 16
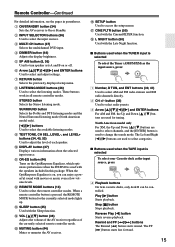
... disk drive), or DVD playback on components with the repeat playback functions. E Arrow and ENTER buttons Used to control an Onkyo DVD player. O REPEAT button Used with selectable play modes on a VCR/DVD recorder with the random playback function. ENT ... and times for locating specific points. H SUBTITLE button Selects subtitles. To select your DVD player as the input source, press: RECEIVER 6 DVD or 5 MULTI CH 1 2 3 4 5 6 7 8 9 J ON/STANDBY REMOTE MODE RECEIVER DVD TAPE INPUT SELECTOR 1 2 3 V1 V2 V3 M D/CDR C D HDD 4 5 6 TV MULTI CH DVD 7 8 9 ...
... disk drive), or DVD playback on components with the repeat playback functions. E Arrow and ENTER buttons Used to control an Onkyo DVD player. O REPEAT button Used with selectable play modes on a VCR/DVD recorder with the random playback function. ENT ... and times for locating specific points. H SUBTITLE button Selects subtitles. To select your DVD player as the input source, press: RECEIVER 6 DVD or 5 MULTI CH 1 2 3 4 5 6 7 8 9 J ON/STANDBY REMOTE MODE RECEIVER DVD TAPE INPUT SELECTOR 1 2 3 V1 V2 V3 M D/CDR C D HDD 4 5 6 TV MULTI CH DVD 7 8 9 ...
Owner Manual
Page 17
... CD player or MD/CD recorder. J RANDOM button Used with the repeat playback functions. To select the input source, press: RECEIVER 9 CD player C D 7 MD or CD recorder TAPE 7 or 2 Next generation HDDcompatible component TAPE V2 * If you're... using an MD, CDR, or HDD component, you must change the Input Display (see page 35). 1 2 3 4 E F ON/STANDBY REMOTE MODE RECEIVER DVD TAPE INPUT SELECTOR 1 2 3 V1 V2 V3 M D/CDR C D HDD 4 5 6 TV MULTI CH DVD 7 8 9 VCR TAPE TUNER 10 11 +... CD/MD players. L PLAY MODE button Used to control an Onkyo CD player.
... CD player or MD/CD recorder. J RANDOM button Used with the repeat playback functions. To select the input source, press: RECEIVER 9 CD player C D 7 MD or CD recorder TAPE 7 or 2 Next generation HDDcompatible component TAPE V2 * If you're... using an MD, CDR, or HDD component, you must change the Input Display (see page 35). 1 2 3 4 E F ON/STANDBY REMOTE MODE RECEIVER DVD TAPE INPUT SELECTOR 1 2 3 V1 V2 V3 M D/CDR C D HDD 4 5 6 TV MULTI CH DVD 7 8 9 VCR TAPE TUNER 10 11 +... CD/MD players. L PLAY MODE button Used to control an Onkyo CD player.
Owner Manual
Page 18
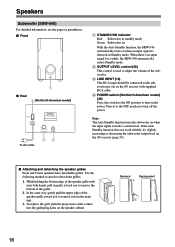
... RCA input should be connected to the subwoofer pre out on the speaker cabinet. Note: The Auto Standby function turns the subwoofer on the AV receiver (page 53). ■ Attaching and detaching the speaker grilles Front and Center speakers have detachable grilles. While holding the bottom edge of the speaker grille... with supplied RCA cable. To replace the grill, push the projections at the corners into the grille plug holes on the AV receiver with your both hands, pull it to the OFF position to remove it from the main unit. 3.
... RCA input should be connected to the subwoofer pre out on the speaker cabinet. Note: The Auto Standby function turns the subwoofer on the AV receiver (page 53). ■ Attaching and detaching the speaker grilles Front and Center speakers have detachable grilles. While holding the bottom edge of the speaker grille... with supplied RCA cable. To replace the grill, push the projections at the corners into the grille plug holes on the AV receiver with your both hands, pull it to the OFF position to remove it from the main unit. 3.
Owner Manual
Page 19
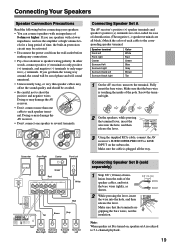
...SURROUND SPEAKERS FRONT SPEAKERS A L CENTER SPEAKER R T SURROUND CENTER SURR BACK SUB WOOFER DVD PRE OUT SUB WOOFER FRONT SPEAKERS B L R AV RECEIVER AC OUTLET AC 120V 60Hz SWITCHED TOTAL 120W 1A MAX. In other words, connect positive (+) terminals to only positive (+) terminals, and negative (-)...5.1-channel playback. 19 Brown Gray Tan Surround Surround Surround Surround Back Right Back Left Right Left Connecting Speaker Set A The AV receiver's positive (+) speaker terminals and speaker's positive (+) terminals are color-coded for a long period of time, the built-in ...
...SURROUND SPEAKERS FRONT SPEAKERS A L CENTER SPEAKER R T SURROUND CENTER SURR BACK SUB WOOFER DVD PRE OUT SUB WOOFER FRONT SPEAKERS B L R AV RECEIVER AC OUTLET AC 120V 60Hz SWITCHED TOTAL 120W 1A MAX. In other words, connect positive (+) terminals to only positive (+) terminals, and negative (-)...5.1-channel playback. 19 Brown Gray Tan Surround Surround Surround Surround Back Right Back Left Right Left Connecting Speaker Set A The AV receiver's positive (+) speaker terminals and speaker's positive (+) terminals are color-coded for a long period of time, the built-in ...
Owner Manual
Page 20
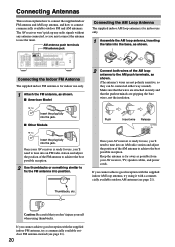
...cannot achieve good reception with the supplied indoor AM loop antenna, try a commercially available outdoor FM antenna instead (see page 21). Once your AV receiver is ready for use the tuner. Caution: Be careful that the push terminals are gripping the bare wires, not the insulation. If you '...into an AM radio station and adjust the position of the AM loop antenna to the AM push terminals, as possible from your AV receiver, TV, speaker cables, and power cords. Connecting Antennas This section explains how to connect the supplied indoor FM antenna and AM loop antenna...
...cannot achieve good reception with the supplied indoor AM loop antenna, try a commercially available outdoor FM antenna instead (see page 21). Once your AV receiver is ready for use the tuner. Caution: Be careful that the push terminals are gripping the bare wires, not the insulation. If you '...into an AM radio station and adjust the position of the AM loop antenna to the AM push terminals, as possible from your AV receiver, TV, speaker cables, and power cords. Connecting Antennas This section explains how to connect the supplied indoor FM antenna and AM loop antenna...
Owner Manual
Page 21
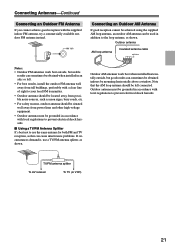
TV/FM antenna splitter To AV receiver To TV (or VCR) 21 FM 75 Connecting an Outdoor AM Antenna If good reception cannot be achieved using the supplied AM loop antenna, an ...
TV/FM antenna splitter To AV receiver To TV (or VCR) 21 FM 75 Connecting an Outdoor AM Antenna If good reception cannot be achieved using the supplied AM loop antenna, an ...
Owner Manual
Page 22
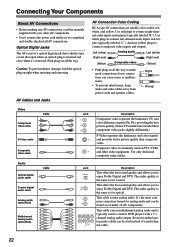
... noise or malfunctions). • To prevent interference, keep audio and video cables away from power cords and speaker cables. Wrong! Optical Digital Jacks The AV receiver's optical digital jacks have shutter-type covers that open when an optical plug is inserted and close when it's removed.
... noise or malfunctions). • To prevent interference, keep audio and video cables away from power cords and speaker cables. Wrong! Optical Digital Jacks The AV receiver's optical digital jacks have shutter-type covers that open when an optical plug is inserted and close when it's removed.
Owner Manual
Page 23
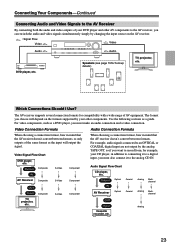
... simply by the analog TAPE OUT, so if you must make an audio connection and a video connection. OUT Input Cassette recorder, etc. The AV receiver supports several connection formats for hookup details) TV, projector, etc. For example, audio signals connected to an OPTICAL or COAXIAL digital input are not output... by changing the input source on the formats supported by your other AV components to the AV receiver, you must also connect it to a digital input, you want to record from, for example, your CD player, in mind that the AV...
... simply by the analog TAPE OUT, so if you must make an audio connection and a video connection. OUT Input Cassette recorder, etc. The AV receiver supports several connection formats for hookup details) TV, projector, etc. For example, audio signals connected to an OPTICAL or COAXIAL digital input are not output... by changing the input source on the formats supported by your other AV components to the AV receiver, you must also connect it to a digital input, you want to record from, for example, your CD player, in mind that the AV...


