
WS-710M Instructions (English)
Page 1
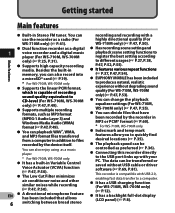
DIGITAL VOICE RECORDER DETAILED INSTRUCTIONS Thank you test the record function and volume before use. Register your product on www.olympus-consumer.com/register and get additional benefits from Olympus! EN Please read these instructions for future reference. Keep the instructions handy for information about using the product correctly and safely. To ensure successful recordings, we recommend that you for purchasing an Olympus Digital Voice Recorder.
DIGITAL VOICE RECORDER DETAILED INSTRUCTIONS Thank you test the record function and volume before use. Register your product on www.olympus-consumer.com/register and get additional benefits from Olympus! EN Please read these instructions for future reference. Keep the instructions handy for information about using the product correctly and safely. To ensure successful recordings, we recommend that you for purchasing an Olympus Digital Voice Recorder.
WS-710M Instructions (English)
Page 2
... • Any liability for the latest information relating to product names and model numbers. • The illustration of the screen and the recorder shown in the future without advanced notice. Other product and brand names mentioned herein may be changed in this manual may differ from NEC ...Center for passive damages or damage of any other reason is a trademark of the product, repair performed by the third party other than Olympus or an Olympus authorized service station, or any kind occurred due to data loss incurred by a defect of DiMAGIC Corporation. • The product was ...
... • Any liability for the latest information relating to product names and model numbers. • The illustration of the screen and the recorder shown in the future without advanced notice. Other product and brand names mentioned herein may be changed in this manual may differ from NEC ...Center for passive damages or damage of any other reason is a trademark of the product, repair performed by the third party other than Olympus or an Olympus authorized service station, or any kind occurred due to data loss incurred by a defect of DiMAGIC Corporation. • The product was ...
WS-710M Instructions (English)
Page 3
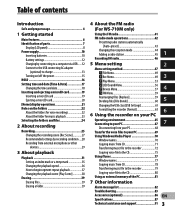
... Erasing files 39 Erasing a folder 39 4 About the FM radio (For WS-710M only) Using the FM radio 41 FM radio mode operations 42 Presetting radio stations automatically [Auto-preset 43 1 Changing the reception mode 44 Adding a radio station 45 Recording FM radio 46 5 Menu setting 2 Menu setting method 47 3 + File Menu...
... Erasing files 39 Erasing a folder 39 4 About the FM radio (For WS-710M only) Using the FM radio 41 FM radio mode operations 42 Presetting radio stations automatically [Auto-preset 43 1 Changing the reception mode 44 Adding a radio station 45 Recording FM radio 46 5 Menu setting 2 Menu setting method 47 3 + File Menu...
WS-710M Instructions (English)
Page 4
...such as alcohol and lacquer thinner to another place, or move the recorder further away from electrical products such as TVs or refrigerators. • Avoid recording or playing back near to recording: • Olympus will vary substantially depending on top of children. Keep this manual ...of the product, repair performed by the third party other than Olympus or an Olympus authorized service station, or any deletion or corruption of recorded files caused by malfunction of the recorder or your new recorder, read the warnings and information provided. To protect yourself and ...
...such as alcohol and lacquer thinner to another place, or move the recorder further away from electrical products such as TVs or refrigerators. • Avoid recording or playing back near to recording: • Olympus will vary substantially depending on top of children. Keep this manual ...of the product, repair performed by the third party other than Olympus or an Olympus authorized service station, or any deletion or corruption of recorded files caused by malfunction of the recorder or your new recorder, read the warnings and information provided. To protect yourself and ...
WS-710M Instructions (English)
Page 6
...) (☞ P.41). s It has a USB charging function (For WS-710M, WS-700M only) (☞ P.12). s Supports high capacity recording media. s Supports multiple recording formats, such as a digital 1 voice recorder and a digital music player (For WS-710M, WS-700M only) (☞ P.25, P.31). s You can use the recorder as a music player. * For WS-710M, WS-700M only. s It has a backlight full-dot display (LCD...
...) (☞ P.41). s It has a USB charging function (For WS-710M, WS-700M only) (☞ P.12). s Supports high capacity recording media. s Supports multiple recording formats, such as a digital 1 voice recorder and a digital music player (For WS-710M, WS-700M only) (☞ P.25, P.31). s You can use the recorder as a music player. * For WS-710M, WS-700M only. s It has a backlight full-dot display (LCD...

WS-710M Instructions (English)
Page 7
POWER/HOLD switch = USB connector slide lever q USB connector ) 1 - EN 7 Identification of parts Identification of parts 4 5 6 & 8 ^ 9 % 0 $ ! @ # 7 1 2 3 ( * = q 1 Built-in stereo microphone (L) 2 Built-in stereo microphone (R) 3 Recording indicator light 4 EAR (Earphone) jack 5 MIC (Microphone) jack 6 Display (LCD panel) 7 Built-in speaker 8 + button 9 REC (s) (Record) button 0 9 button ! - button @ LIST button # ERASE button $ SCENE/INDEX button % OK `/MENU button ^ 0 button & STOP (4) button * Battery cover ( Card cover ) Strap hole -
POWER/HOLD switch = USB connector slide lever q USB connector ) 1 - EN 7 Identification of parts Identification of parts 4 5 6 & 8 ^ 9 % 0 $ ! @ # 7 1 2 3 ( * = q 1 Built-in stereo microphone (L) 2 Built-in stereo microphone (R) 3 Recording indicator light 4 EAR (Earphone) jack 5 MIC (Microphone) jack 6 Display (LCD panel) 7 Built-in speaker 8 + button 9 REC (s) (Record) button 0 9 button ! - button @ LIST button # ERASE button $ SCENE/INDEX button % OK `/MENU button ^ 0 button & STOP (4) button * Battery cover ( Card cover ) Strap hole -
WS-710M Instructions (English)
Page 8
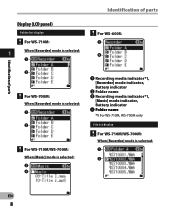
Identification of parts Identification of parts Display (LCD panel) Folder list display For WS-710M: 1 When [Recorder] mode is selected: 1 For WS-600S: 1 2 2 For WS-700M: When [Recorder] mode is selected: 1 2 For WS-710M/WS-700M: When [Music] mode is selected: 3 4 1 Recording media indicator*1, [Recorder] mode indicator, Battery indicator 2 Folder name 3 Recording media indicator*1, [Music] mode indicator, Battery indicator 4 Folder name *1 For WS-710M, WS-700M only File list display For WS-710M/WS-700M: When [Recorder] mode is selected: 1 2 EN 8
Identification of parts Identification of parts Display (LCD panel) Folder list display For WS-710M: 1 When [Recorder] mode is selected: 1 For WS-600S: 1 2 2 For WS-700M: When [Recorder] mode is selected: 1 2 For WS-710M/WS-700M: When [Music] mode is selected: 3 4 1 Recording media indicator*1, [Recorder] mode indicator, Battery indicator 2 Folder name 3 Recording media indicator*1, [Music] mode indicator, Battery indicator 4 Folder name *1 For WS-710M, WS-700M only File list display For WS-710M/WS-700M: When [Recorder] mode is selected: 1 2 EN 8
WS-710M Instructions (English)
Page 9
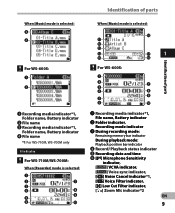
... When [Music] mode is selected: 3 4 For WS-600S: 1 2 1 Recording media indicator*1, Folder name, Battery indicator 2 File name 3 Recording media indicator*1, Folder name, Battery indicator 4 File name *1 For WS-710M, WS-700M only File display For WS-710M/WS-700M: When [Recorder] mode is selected: 1 2 7 3 4 8 9 5 6 0 When [Music] mode is selected: ^ ! @ # $ & 1 % * Identification of parts For WS-600S: 1 2 7 3 4 8 9 5 6 0 1 Recording media indicator*1, File name, Battery indicator...
... When [Music] mode is selected: 3 4 For WS-600S: 1 2 1 Recording media indicator*1, Folder name, Battery indicator 2 File name 3 Recording media indicator*1, Folder name, Battery indicator 4 File name *1 For WS-710M, WS-700M only File display For WS-710M/WS-700M: When [Recorder] mode is selected: 1 2 7 3 4 8 9 5 6 0 When [Music] mode is selected: ^ ! @ # $ & 1 % * Identification of parts For WS-600S: 1 2 7 3 4 8 9 5 6 0 1 Recording media indicator*1, File name, Battery indicator...

WS-710M Instructions (English)
Page 10
For WS-710M/WS-700M: • When charging the recorder, be used with either Ni-MH Rechargeable Batteries or AAA Alkaline Batteries. For WS-600S: • This recorder cannot charge rechargeable batteries. 1 Lightly press down on the arrow and slide the battery cover open. Title ...indicator, Current file number/ Total number of recorded files in the folder [í] Erase lock indicator, [Ø] Speaker muting indicator & File length * Playback mode indicator *1 For WS-710M, WS-700M only *2 For WS-710M only Inserting batteries This recorder can be sure to use the supplied ...
For WS-710M/WS-700M: • When charging the recorder, be used with either Ni-MH Rechargeable Batteries or AAA Alkaline Batteries. For WS-600S: • This recorder cannot charge rechargeable batteries. 1 Lightly press down on the arrow and slide the battery cover open. Title ...indicator, Current file number/ Total number of recorded files in the folder [í] Erase lock indicator, [Ø] Speaker muting indicator & File length * Playback mode indicator *1 For WS-710M, WS-700M only *2 For WS-710M only Inserting batteries This recorder can be sure to use the supplied ...

WS-710M Instructions (English)
Page 11
... use Ni-MH rechargeable batteries (optional). Notes • Manganese batteries may cause a malfunction such as corrupting the file, etc. In this recorder. • When changing batteries, AAA alkaline batteries or Olympus Ni-MH rechargeable batteries are not going to the direction B. Power supply Power supply 2 Insert size-AAA battery, observing the correct...
... use Ni-MH rechargeable batteries (optional). Notes • Manganese batteries may cause a malfunction such as corrupting the file, etc. In this recorder. • When changing batteries, AAA alkaline batteries or Olympus Ni-MH rechargeable batteries are not going to the direction B. Power supply Power supply 2 Insert size-AAA battery, observing the correct...

WS-710M Instructions (English)
Page 12
... lower the volume of the batteries depending on the display and the recorder shuts down. For WS-710M/WS-700M: You can charge the batteries by connecting to correctly place the rechargeable batteries (supplied) into the recorder (☞ P.10). When the batteries are using a commercially available ... cause battery leakage heating and recorder malfunction. 1 Boot the PC. 2 Slide the USB connector slide lever in the direction indicated by connecting to a computer via USB [Ni-MH] (õ): Select when using the Olympus Ni-MH rechargeable battery (BR401). [Alkaline] (ú): Select ...
... lower the volume of the batteries depending on the display and the recorder shuts down. For WS-710M/WS-700M: You can charge the batteries by connecting to correctly place the rechargeable batteries (supplied) into the recorder (☞ P.10). When the batteries are using a commercially available ... cause battery leakage heating and recorder malfunction. 1 Boot the PC. 2 Slide the USB connector slide lever in the direction indicated by connecting to a computer via USB [Ni-MH] (õ): Select when using the Olympus Ni-MH rechargeable battery (BR401). [Alkaline] (ú): Select ...

WS-710M Instructions (English)
Page 13
...at the room temperature. The charging time will be charged by connecting to the USBconnecting AC adapter (A514) (optional). 1 Connect the recorder to the AC adapter's USB port. 4 Press the OK `/MENU button to [¿]. Power supply 3 Make sure that the... recorder is completed when battery indication becomes to start charging. To the Household power outlet EN 13 To the USBconnecting AC adapter's (A514) USB connecter Power supply 5 Charging is Connect to the USB connecting AC stopped, and connect to a household power outlet. adapter (optional) to charge For WS-710M/WS-700M:...
...at the room temperature. The charging time will be charged by connecting to the USBconnecting AC adapter (A514) (optional). 1 Connect the recorder to the AC adapter's USB port. 4 Press the OK `/MENU button to [¿]. Power supply 3 Make sure that the... recorder is completed when battery indication becomes to start charging. To the Household power outlet EN 13 To the USBconnecting AC adapter's (A514) USB connecter Power supply 5 Charging is Connect to the USB connecting AC stopped, and connect to a household power outlet. adapter (optional) to charge For WS-710M/WS-700M:...

WS-710M Instructions (English)
Page 14
...set to [AC Adapter], [Please wait] will not be using time becomes notably short even after the batteries are chemical products. Otherwise, the recorder may not be charged when the PC is not switched on, or when it is completed when battery indication becomes to [Ni-MH]. The ... 107.6°F Charging: 5°C - 35°C/ 41°F - 95°F Storage for a long time, and store them regularly before use . In order to the recorder. Using cables from 5°C to 35°C (41°F to [Alkaline], you use the Ni-MH rechargeable batteries. Be sure to push the USB connector...
...set to [AC Adapter], [Please wait] will not be using time becomes notably short even after the batteries are chemical products. Otherwise, the recorder may not be charged when the PC is not switched on, or when it is completed when battery indication becomes to [Ni-MH]. The ... 107.6°F Charging: 5°C - 35°C/ 41°F - 95°F Storage for a long time, and store them regularly before use . In order to the recorder. Using cables from 5°C to 35°C (41°F to [Alkaline], you use the Ni-MH rechargeable batteries. Be sure to push the USB connector...
WS-710M Instructions (English)
Page 15
... on /off the power When the recorder is not being used for a long time (more than one month), It is turned before disposing. EN 15 For customers in Germany: Olympus has a contract with the GRS (Joint Battery Disposal Association) in the 1 • When disposing rechargeable batteries, direction indicated by the arrow. Even...
... on /off the power When the recorder is not being used for a long time (more than one month), It is turned before disposing. EN 15 For customers in Germany: Olympus has a contract with the GRS (Joint Battery Disposal Association) in the 1 • When disposing rechargeable batteries, direction indicated by the arrow. Even...

WS-710M Instructions (English)
Page 16
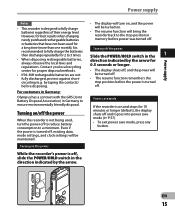
... HOLD mode Slide the POWER/HOLD switch to the remaining memory being used up, it will stop to prevent accident during playback (recording), operation is useful when the recorder has to be disabled. HOLD Notes • If you press any button in a bag or pocket. EN • If HOLD is ...applied during recording. HOLD If you bring the recorder is set to HOLD mode, the running conditions will be preserved, and all buttons will be carried in HOLD mode, the clock display...
... HOLD mode Slide the POWER/HOLD switch to the remaining memory being used up, it will stop to prevent accident during playback (recording), operation is useful when the recorder has to be disabled. HOLD Notes • If you press any button in a bag or pocket. EN • If HOLD is ...applied during recording. HOLD If you bring the recorder is set to HOLD mode, the running conditions will be preserved, and all buttons will be carried in HOLD mode, the clock display...

WS-710M Instructions (English)
Page 17
... used in a long time, the [Set Time & Date] will appear. Note • If you press the OK `/MENU button during the setup operation, the recorder will start from the set date and time. Example: July 15, 2010 7M 15D 2010Y (Initial setting) 15D 7M 2010Y +− button 9 0 button OK `/... management. Setting time and date [Time & Date] Setting time and date If you set the time and date beforehand, the information when the file is recorded is flashing, conduct the setup from the "Hour", "Minute", "Year", "Month" and "Day" with a flashing point. • The clock will save the items that...
... used in a long time, the [Set Time & Date] will appear. Note • If you press the OK `/MENU button during the setup operation, the recorder will start from the set date and time. Example: July 15, 2010 7M 15D 2010Y (Initial setting) 15D 7M 2010Y +− button 9 0 button OK `/... management. Setting time and date [Time & Date] Setting time and date If you set the time and date beforehand, the information when the file is recorded is flashing, conduct the setup from the "Hour", "Minute", "Year", "Month" and "Day" with a flashing point. • The clock will save the items that...

WS-710M Instructions (English)
Page 18
EN 18 The following steps are the same as Step 1 through Step 3 of the Time and Date setup process. 1 While the recorder is not correct, set it using the procedure below. 3 Press the OK `/MENU or 9 button to move the cursor to the item to set. • [...; You can change the menu display by moving the settings tab cursor. Setting time and date [Time & Date] Changing the time and date While the recorder is during stop mode, press and hold the OK `/MENU button. • The menu will flash on the display (☞ P.47). 2 Press the + or −...
EN 18 The following steps are the same as Step 1 through Step 3 of the Time and Date setup process. 1 While the recorder is not correct, set it using the procedure below. 3 Press the OK `/MENU or 9 button to move the cursor to the item to set. • [...; You can change the menu display by moving the settings tab cursor. Setting time and date [Time & Date] Changing the time and date While the recorder is during stop mode, press and hold the OK `/MENU button. • The menu will flash on the display (☞ P.47). 2 Press the + or −...
WS-710M Instructions (English)
Page 19
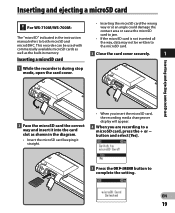
...Face the microSD card the correct way and insert it into the card slot as the built-in memory. Inserting a microSD card 1 While the recorder is during stop mode, open the card cover. • Inserting the microSD card the wrong way or at an angle could damage the contact... you insert the microSD card, the recording media changeover display will appear. 4 When you are recording to a microSD card, press the + or − button and select [Yes]. 5 Press the OK `/MENU button to both microSD and microSDHC. Inserting and ejecting a microSD card For WS-710M/WS-700M: The "microSD" indicated in the ...
...Face the microSD card the correct way and insert it into the card slot as the built-in memory. Inserting a microSD card 1 While the recorder is during stop mode, open the card cover. • Inserting the microSD card the wrong way or at an angle could damage the contact... you insert the microSD card, the recording media changeover display will appear. 4 When you are recording to a microSD card, press the + or − button and select [Yes]. 5 Press the OK `/MENU button to both microSD and microSDHC. Inserting and ejecting a microSD card For WS-710M/WS-700M: The "microSD" indicated in the ...

WS-710M Instructions (English)
Page 20
...Built-in memory (☞ P.47, P.57 ). • In some microSD cards which are not compatible with Ejecting a microSD card this recorder. • This recorder may cause it eject partially. Inserting and ejecting a microSD card • The microSD card is during stop mode, open the card cover.... Check the Olympus website regarding microSD cards which are confirmed operation with this recorder. • In the case when the microSD card cannot 2 Push the microSD card inward to format them...
...Built-in memory (☞ P.47, P.57 ). • In some microSD cards which are not compatible with Ejecting a microSD card this recorder. • This recorder may cause it eject partially. Inserting and ejecting a microSD card • The microSD card is during stop mode, open the card cover.... Check the Olympus website regarding microSD cards which are confirmed operation with this recorder. • In the case when the microSD card cannot 2 Push the microSD card inward to format them...
WS-710M Instructions (English)
Page 21
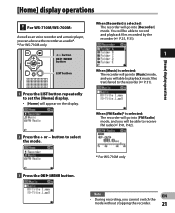
...; P.31). [Home] display operations [Home] display operations For WS-710M/WS-700M: As well as a radio*. * For WS-710M only. +− button OK `/MENU button LIST button 1 Press the LIST button repeatedly to record and playback files recorded by the recorder (☞ P.25, P.31). 1 When [Music] is selected: The recorder will be able to set the [Home] display...
...; P.31). [Home] display operations [Home] display operations For WS-710M/WS-700M: As well as a radio*. * For WS-710M only. +− button OK `/MENU button LIST button 1 Press the LIST button repeatedly to record and playback files recorded by the recorder (☞ P.25, P.31). 1 When [Music] is selected: The recorder will be able to set the [Home] display...


