
WS-710M Instructions (English)
Page 3
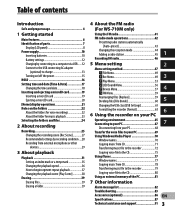
... USB connecting AC adapter (optional) to charge 13 Turning on/off the power 15 HOLD 16 Setting time and date [Time & Date 17 Changing the time and date 18 Inserting and ejecting a microSD card 19 Inserting a microSD card 19 Ejecting a microSD card 20 [Home] display operations 21 Notes on your PC 7 Operating environment 65 Connecting to your PC 67 Disconnecting from your PC 68 Transfer the voice files to your PC 69 Using Windows Media Player 70 Window names 70 Copying music...
... USB connecting AC adapter (optional) to charge 13 Turning on/off the power 15 HOLD 16 Setting time and date [Time & Date 17 Changing the time and date 18 Inserting and ejecting a microSD card 19 Inserting a microSD card 19 Ejecting a microSD card 20 [Home] display operations 21 Notes on your PC 7 Operating environment 65 Connecting to your PC 67 Disconnecting from your PC 68 Transfer the voice files to your PC 69 Using Windows Media Player 70 Window names 70 Copying music...
WS-710M Instructions (English)
Page 4
... unit. • Do not place the recorder on where you know how to data loss incurred by a defect of the product, repair performed by malfunction of the recorder or your new recorder, read the warnings and information provided. Keep this manual carefully to a window and away from the Olympus's liability. Safe and proper usage Before using the radio. Precautions relating to recording...
... unit. • Do not place the recorder on where you know how to data loss incurred by a defect of the product, repair performed by malfunction of the recorder or your new recorder, read the warnings and information provided. Keep this manual carefully to a window and away from the Olympus's liability. Safe and proper usage Before using the radio. Precautions relating to recording...
WS-710M Instructions (English)
Page 6
... without USB cable or driver software (☞ P.69, P.81). s Connecting this recorder directly to CD-level (For WS-710M, WS-700M only) (☞ P.47, P.49). You can be controlled as a radio (For WS-710M only) (☞ P.41). s You can be transferred or saved without degrading sound quality (For WS-710M, WS-700M only) (☞ P.47, P.53). s The playback speed can change the playback equalizer settings (For WS-710M, WS-700M only) (☞ P.47, P.55). s Supports the linear PCM format...
... without USB cable or driver software (☞ P.69, P.81). s Connecting this recorder directly to CD-level (For WS-710M, WS-700M only) (☞ P.47, P.49). You can be controlled as a radio (For WS-710M only) (☞ P.41). s You can be transferred or saved without degrading sound quality (For WS-710M, WS-700M only) (☞ P.47, P.53). s The playback speed can change the playback equalizer settings (For WS-710M, WS-700M only) (☞ P.47, P.55). s Supports the linear PCM format...

WS-710M Instructions (English)
Page 10
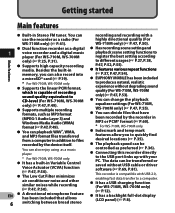
... recording mode: Remaining recording time During playback or stop mode: File length 0 Playback mode indicator ! Before using the unit or after long periods of disuse, it is recommended that you continuously charge them until full (☞ P.12). Identification of parts/Power supply Identification of parts Power supply 7 [í] Erase lock indicator, [Ø] Speaker muting indicator, Current file number/ Total number of recorded files in the folder [í] Erase lock indicator, [Ø] Speaker muting indicator & File length * Playback mode indicator *1 For WS-710M, WS-700M...
... recording mode: Remaining recording time During playback or stop mode: File length 0 Playback mode indicator ! Before using the unit or after long periods of disuse, it is recommended that you continuously charge them until full (☞ P.12). Identification of parts/Power supply Identification of parts Power supply 7 [í] Erase lock indicator, [Ø] Speaker muting indicator, Current file number/ Total number of recorded files in the folder [í] Erase lock indicator, [Ø] Speaker muting indicator & File length * Playback mode indicator *1 For WS-710M, WS-700M...

WS-710M Instructions (English)
Page 18
..." will flash on the display, indicating the start of "Setting time and date [Time & Date]" (☞ P.17). 6 Press the STOP (4) button to close the menu screen. EN 18 The following steps are the same as Step 1 through Step 3 of the Time and Date setup process. 1 While the recorder is during stop mode, press and hold the STOP (4) button to display the [Time & Date] and [Remain]. If the current time and 1 date is not correct, set it using the...
..." will flash on the display, indicating the start of "Setting time and date [Time & Date]" (☞ P.17). 6 Press the STOP (4) button to close the menu screen. EN 18 The following steps are the same as Step 1 through Step 3 of the Time and Date setup process. 1 While the recorder is during stop mode, press and hold the STOP (4) button to display the [Time & Date] and [Remain]. If the current time and 1 date is not correct, set it using the...
WS-710M Instructions (English)
Page 21
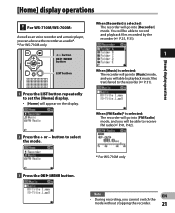
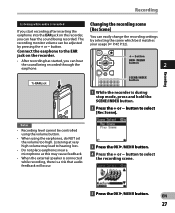
[Home] display operations [Home] display operations For WS-710M/WS-700M: As well as an voice recorder and a music player, you can also use the recorder as a radio*. * For WS-710M only. +− button OK `/MENU button LIST button 1 Press the LIST button repeatedly to the recorder (☞ P.31). You will be able to select the mode. When [FM Radio]* is selected: The recorder will be able to record and playback files recorded by the recorder (☞ P.25, P.31). 1 When [Music] is selected...
[Home] display operations [Home] display operations For WS-710M/WS-700M: As well as an voice recorder and a music player, you can also use the recorder as a radio*. * For WS-710M only. +− button OK `/MENU button LIST button 1 Press the LIST button repeatedly to the recorder (☞ P.31). You will be able to select the mode. When [FM Radio]* is selected: The recorder will be able to record and playback files recorded by the recorder (☞ P.25, P.31). 1 When [Music] is selected...
WS-710M Instructions (English)
Page 25
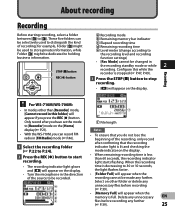
... the WS-710M, you press the REC (s) button. a b c d e f f File length Notes • To ensure that the recording indicator light is lit and checking the mode indicator on the display. • Turn the microphone in the direction of the source to be used to distinguish the kind of the recording, only record after you have set the mode to holding business information. STOP (4)button REC (s) button a Recording mode b Remaining memory bar indicator c Elapsed recording time d Remaining recording time e Level meter (change according to stop recording...
... the WS-710M, you press the REC (s) button. a b c d e f f File length Notes • To ensure that the recording indicator light is lit and checking the mode indicator on the display. • Turn the microphone in the direction of the source to be used to distinguish the kind of the recording, only record after you have set the mode to holding business information. STOP (4)button REC (s) button a Recording mode b Remaining memory bar indicator c Elapsed recording time d Remaining recording time e Level meter (change according to stop recording...
WS-710M Instructions (English)
Page 26
... the recorder is during recording mode, press the OK `/MENU button. • [•] will appear on the display. • The recorder will time out after 60 minutes when left in [Rec Pause]. Sets the start recording again. Select a folder from [Folder A] through [Folder E] and start level for voice sync recording. Recording Recording For WS-710M, WS-700M only: • We recommend formatting the record media in the recorder before recording (☞ P.63). • When a microSD card is inserted in the recorder, be play...
... the recorder is during recording mode, press the OK `/MENU button. • [•] will appear on the display. • The recorder will time out after 60 minutes when left in [Rec Pause]. Sets the start recording again. Select a folder from [Folder A] through [Folder E] and start level for voice sync recording. Recording Recording For WS-710M, WS-700M only: • We recommend formatting the record media in the recorder before recording (☞ P.63). • When a microSD card is inserted in the recorder, be play...
WS-710M Instructions (English)
Page 27
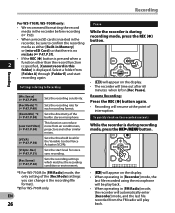
... `/MENU button. 4 Press the + or − button to select [Rec Scene]. You can be controlled using the volume button. • When using the earphones, do NOT set the volume too high. The recording monitor volume can easily change the recording settings by pressing the + or − button. Recording Recording Listening while audio is recorded Changing the recording scene If you start recording after inserting the [Rec Scene] earphone into the EAR jack on the recorder. +− button • After recording...
... `/MENU button. 4 Press the + or − button to select [Rec Scene]. You can be controlled using the volume button. • When using the earphones, do NOT set the volume too high. The recording monitor volume can easily change the recording settings by pressing the + or − button. Recording Recording Listening while audio is recorded Changing the recording scene If you start recording after inserting the [Rec Scene] earphone into the EAR jack on the recorder. +− button • After recording...
WS-710M Instructions (English)
Page 28
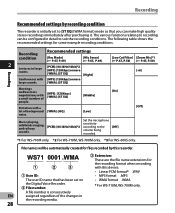
...] [On] people. A file number is initially set on • WMA format .WMA the Digital Voice Recorder. 2 File number: * For WS-710M, WS-700M only. Recording Recording Recommended settings by this device. • Linear PCM format* .WAV 1 User ID: • MP3 format .MP3 The user ID name that you can make high quality stereo recordings immediately after purchasing it. Recording Recommended settings condition [Rec Mode] (☞ P.47, P.49) [Mic Sense] (☞ P.47, P.49) 2 Lectures in the recording media. 28 The following...
...] [On] people. A file number is initially set on • WMA format .WMA the Digital Voice Recorder. 2 File number: * For WS-710M, WS-700M only. Recording Recording Recommended settings by this device. • Linear PCM format* .WAV 1 User ID: • MP3 format .MP3 The user ID name that you can make high quality stereo recordings immediately after purchasing it. Recording Recommended settings condition [Rec Mode] (☞ P.47, P.49) [Mic Sense] (☞ P.47, P.49) 2 Lectures in the recording media. 28 The following...
WS-710M Instructions (English)
Page 29
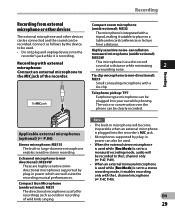
... recorder's MIC jack. • Microphones supported by plug-in power which are highly sensitive omnidirectional microphones supported by the device from external Compact zoom microphone microphone or other devices tripod, making it suitable to place on a can be connected and the sound can also be used. • When the external stereo microphone is used while [Rec Mode] is set to a stereo recording mode, it is used . • Do not plug and unplug devices into your ear while phoning. Recording Recording from a distance. The voice...
... recorder's MIC jack. • Microphones supported by plug-in power which are highly sensitive omnidirectional microphones supported by the device from external Compact zoom microphone microphone or other devices tripod, making it suitable to place on a can be connected and the sound can also be used. • When the external stereo microphone is used while [Rec Mode] is set to a stereo recording mode, it is used . • Do not plug and unplug devices into your ear while phoning. Recording Recording from a distance. The voice...

WS-710M Instructions (English)
Page 46
... set to start recording. Also, be stored automatically in the [FM Radio] folder in the [Recorder] folder. Recording FM radio For WS-710M: Plug in a location with the best possible reception. 4 Press the STOP (4) button to stop recording. • [´] will disappear and the reception display will not be appended with the recording, make a test recording. To ensure that there are no mistakes with a date and time. a Recording format b Preset number EN c Tuning frequency d Elapsed recording time...
... set to start recording. Also, be stored automatically in the [FM Radio] folder in the [Recorder] folder. Recording FM radio For WS-710M: Plug in a location with the best possible reception. 4 Press the STOP (4) button to stop recording. • [´] will disappear and the reception display will not be appended with the recording, make a test recording. To ensure that there are no mistakes with a date and time. a Recording format b Preset number EN c Tuning frequency d Elapsed recording time...
WS-710M Instructions (English)
Page 50
... a Low Cut Filter function to [Off] (☞ P.51). The VCVA feature extends recording time and conserves memory by focusing on the display. Adjust the start/stop actuation level: 1 Press the REC (s) button to be more clearly. To use this function, set other than [LP] in Variable Control Voice Actuator (VCVA) starts recording automatically, and stops when the volume drops below the threshold level. This function can record in normal mode. • When [V-Sync. The recording indicator light glows when recording starts...
... a Low Cut Filter function to [Off] (☞ P.51). The VCVA feature extends recording time and conserves memory by focusing on the display. Adjust the start/stop actuation level: 1 Press the REC (s) button to be more clearly. To use this function, set other than [LP] in Variable Control Voice Actuator (VCVA) starts recording automatically, and stops when the volume drops below the threshold level. This function can record in normal mode. • When [V-Sync. The recording indicator light glows when recording starts...
WS-710M Instructions (English)
Page 52
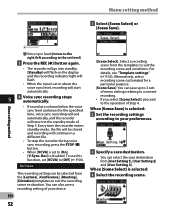
... disabled. To use this function, set level) 3 Press the REC (s) button again. • The recorder will go into standby. [Standby] will flash on the display and the recording indicator light will start automatically. 5 4 Voice sync recording stops automatically. • If sound at a volume below the voice sync level continues for a particular purpose. [Scene Save]: You can also save a recording setting of Step 3. Menu setting method a a Voice sync level (moves to the right/left according to the set [VCVA] to the standby mode of your...
... disabled. To use this function, set level) 3 Press the REC (s) button again. • The recorder will go into standby. [Standby] will flash on the display and the recording indicator light will start automatically. 5 4 Voice sync recording stops automatically. • If sound at a volume below the voice sync level continues for a particular purpose. [Scene Save]: You can also save a recording setting of Step 3. Menu setting method a a Voice sync level (moves to the right/left according to the set [VCVA] to the standby mode of your...
WS-710M Instructions (English)
Page 57
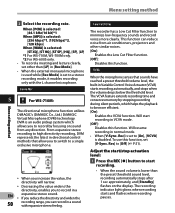
...]: Output sound from before the power will be turned off can use the built-in memory. [microSD Card]: microSD card. Power Save Forgetting to turn the power off . [Off]: Disables this function. • If any button is different function to their initial settings. 57 If the recorder remains in stop mode for over again. Time & Date Refer to "Changing the USB class [USB Settings]" (☞ P.61). Reset Settings This returns the functions back to their initial settings (factory default). [Start]: Returns...
...]: Output sound from before the power will be turned off can use the built-in memory. [microSD Card]: microSD card. Power Save Forgetting to turn the power off . [Off]: Disables this function. • If any button is different function to their initial settings. 57 If the recorder remains in stop mode for over again. Time & Date Refer to "Changing the USB class [USB Settings]" (☞ P.61). Reset Settings This returns the functions back to their initial settings (factory default). [Start]: Returns...
WS-710M Instructions (English)
Page 62
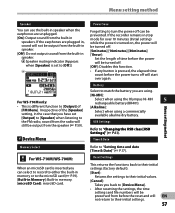
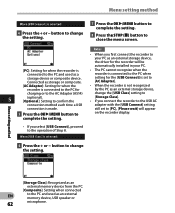
... change the setting. 7 Press the OK `/MENU button to complete the setting. 8 Press the STOP (4) button to close the menu screen. [PC]: Setting for when the recorder is connected to the PC and used as a storage device or composite device. Menu setting method [Storage Class]: Recognized as an external memory device from the PC. [Composite]: Setting when connected EN to the PC and used as an external memory device, USB speaker or 62 microphone. Connected as an external storage device, change the setting. When [USB...
... change the setting. 7 Press the OK `/MENU button to complete the setting. 8 Press the STOP (4) button to close the menu screen. [PC]: Setting for when the recorder is connected to the PC and used as a storage device or composite device. Menu setting method [Storage Class]: Recognized as an external memory device from the PC. [Composite]: Setting when connected EN to the PC and used as an external memory device, USB speaker or 62 microphone. Connected as an external storage device, change the setting. When [USB...
WS-710M Instructions (English)
Page 66
...) from music distribution services. To transfer the instructions in [Format] screen of the a WMA file with DRM10. such as Explorer files with DRM purchased from online music in Microsoft Windows and Finder in distribution service to a portable device 6 Macintosh are different from the folder names that are downloading a file from By the Copyright Act, any voice/music the recorder or uploading a file to the files and music CDs downloaded from the recorder, do not format the...
...) from music distribution services. To transfer the instructions in [Format] screen of the a WMA file with DRM10. such as Explorer files with DRM purchased from online music in Microsoft Windows and Finder in distribution service to a portable device 6 Macintosh are different from the folder names that are downloading a file from By the Copyright Act, any voice/music the recorder or uploading a file to the files and music CDs downloaded from the recorder, do not format the...
WS-710M Instructions (English)
Page 79
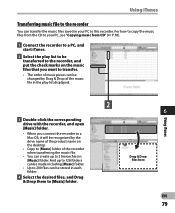
... "Copying music from CD" (☞ P.78). 1 Connect the recorder to a PC, and start iTunes. 2 Select the play list to be transferred to the recorder, and put the check marks on the music files that you want to transfer. • The order of music pieces can be changed by Drag & Drop of the music file in the play list displayed. 3 Double-click the corresponding drive with the recorder, and open [Music] folder...
... "Copying music from CD" (☞ P.78). 1 Connect the recorder to a PC, and start iTunes. 2 Select the play list to be transferred to the recorder, and put the check marks on the music files that you want to transfer. • The order of music pieces can be changed by Drag & Drop of the music file in the play list displayed. 3 Double-click the corresponding drive with the recorder, and open [Music] folder...

WS-710M Instructions (English)
Page 84
... set to the stereo recording mode (☞ P.47, P.49). [Zoom Mic] is recommended that audio feedback will only be recognized by the L-channel. [Rec Mode] is monaural. Troubleshooting Set [Rec Mode] to the + side. The file is read -only setting of marks has been reached. Connect the recorder to P.24). --- Unlock the file (☞ P.47, P.49). Cannot find the recorded Voice File Noise heard during recording. The file is locked. Move the recorder. Switch to the correct folder...
... set to the stereo recording mode (☞ P.47, P.49). [Zoom Mic] is recommended that audio feedback will only be recognized by the L-channel. [Rec Mode] is monaural. Troubleshooting Set [Rec Mode] to the + side. The file is read -only setting of marks has been reached. Connect the recorder to P.24). --- Unlock the file (☞ P.47, P.49). Cannot find the recorded Voice File Noise heard during recording. The file is locked. Move the recorder. Switch to the correct folder...
WS-710M Instructions (English)
Page 86
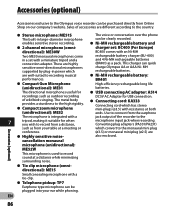
...-directional microphones supported by plug-in power which are also enclosed. 86 Accessories (optional) s Telephone pickup: TP7 Earphone type microphone can be clearly recorded. EN The voice or conversation over the phone can be plugged into your table at a distance while minimizing surrounding noise. Use to connect from the earphone jack output of accessories are different according to the country. Converting plug adapters (PA331/PA231) which has stereo mini-plugs...
...-directional microphones supported by plug-in power which are also enclosed. 86 Accessories (optional) s Telephone pickup: TP7 Earphone type microphone can be clearly recorded. EN The voice or conversation over the phone can be plugged into your table at a distance while minimizing surrounding noise. Use to connect from the earphone jack output of accessories are different according to the country. Converting plug adapters (PA331/PA231) which has stereo mini-plugs...


