
SZ-11 Instruction Manual (English)
Page 3
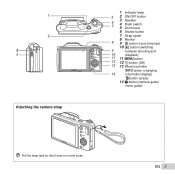
1 2 3 4 Attaching the camera strap 1 Indicator lamp 5 6 7 2 ON/OFF button 3 Speaker 4 Flash switch 5 Zoom lever 6 Shutter button 7 Strap eyelet 8 8 Monitor 9 R button (record movies) 10 q button (switching 9 between shooting and 10 11 12 13 playback) 11 button 12 A button (OK) 13 Wheel controller INFO button (changing 14 information display) button (erase) 14 E button (camera guide/ menu guide) Pull the strap tight so that it does not come loose. EN 3
1 2 3 4 Attaching the camera strap 1 Indicator lamp 5 6 7 2 ON/OFF button 3 Speaker 4 Flash switch 5 Zoom lever 6 Shutter button 7 Strap eyelet 8 8 Monitor 9 R button (record movies) 10 q button (switching 9 between shooting and 10 11 12 13 playback) 11 button 12 A button (OK) 13 Wheel controller INFO button (changing 14 information display) button (erase) 14 E button (camera guide/ menu guide) Pull the strap tight so that it does not come loose. EN 3

SZ-11 Instruction Manual (English)
Page 6
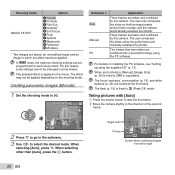
Wheel controller F (up) /INFO button (changing information display) (p. 19, 22) Zoom lever (p. 18, 22) Shutter button (p. 17, 57) R button (shooting movies) (p. 17) q button (switching between shooting and playback) (p. 17, 20, 46) button (p. 9) E button (menu guide/ camera guide) (p. 23) H (left) I (right) A button G (down) / button (erase) (p. 21) The wheel controller can be used functions can also be accessed using the buttons. Camera Settings Using the Buttons Frequently used to change the selections. 6 EN
Wheel controller F (up) /INFO button (changing information display) (p. 19, 22) Zoom lever (p. 18, 22) Shutter button (p. 17, 57) R button (shooting movies) (p. 17) q button (switching between shooting and playback) (p. 17, 20, 46) button (p. 9) E button (menu guide/ camera guide) (p. 23) H (left) I (right) A button G (down) / button (erase) (p. 21) The wheel controller can be used functions can also be accessed using the buttons. Camera Settings Using the Buttons Frequently used to change the selections. 6 EN

SZ-11 Instruction Manual (English)
Page 9
...select the page tabs. The setup menu provides access to a variety of camera settings, including options not listed in the function menu, display options, ...Menu Settings" (p. 35 to 51) 1 Reset 2 Image Size Compression Shadow Adjust 1 AF Mode 2 ESP/ 3 Digital Zoom Exit MENU 14M Normal Auto Face/iESP ESP On Set OK 5 Press the button to the Submenu 1. Submenu ...● Once a setting is displayed. 1 Reset 2 Image Size Compression Shadow Adjust 1 AF Mode 2 ESP/ 3 Digital Zoom Exit MENU 14M Normal Auto Face/iESP ESP Off Set OK 2 Press H to select the desired page tab and press I....
...select the page tabs. The setup menu provides access to a variety of camera settings, including options not listed in the function menu, display options, ...Menu Settings" (p. 35 to 51) 1 Reset 2 Image Size Compression Shadow Adjust 1 AF Mode 2 ESP/ 3 Digital Zoom Exit MENU 14M Normal Auto Face/iESP ESP On Set OK 5 Press the button to the Submenu 1. Submenu ...● Once a setting is displayed. 1 Reset 2 Image Size Compression Shadow Adjust 1 AF Mode 2 ESP/ 3 Digital Zoom Exit MENU 14M Normal Auto Face/iESP ESP Off Set OK 2 Press H to select the desired page tab and press I....

SZ-11 Instruction Manual (English)
Page 18
... the options selected for [Digital Zoom] (p. 38) and [Image Size] (p. 36). Using the zoom Turning the zoom lever adjusts the shooting range. The display differs depending on the image size setting.*1 Digital zoom range *1 If [Image Size] is less than the full resolution, after reaching the maximum optical zoom, the camera will automatically resize and crop...
... the options selected for [Digital Zoom] (p. 38) and [Image Size] (p. 36). Using the zoom Turning the zoom lever adjusts the shooting range. The display differs depending on the image size setting.*1 Digital zoom range *1 If [Image Size] is less than the full resolution, after reaching the maximum optical zoom, the camera will automatically resize and crop...
SZ-11 Instruction Manual (English)
Page 26
... the shooting mode to which the effect has been applied. The selected effect is fixed to select the desired mode. The focus, exposure, zoom position (p. 18), and white balance (p. 30) are preprogrammed for each scene effect. When selecting other than [Auto], press the A button. AUTO... fixed to right 26 EN Taking pictures with [Auto] 1 Press the shutter button to take the first frame. 2 Move the camera slightly in some settings cannot be applied depending on installing the PC software, see "Setting up using the supplied CD" (p. 13). The user composes...
... the shooting mode to which the effect has been applied. The selected effect is fixed to select the desired mode. The focus, exposure, zoom position (p. 18), and white balance (p. 30) are preprogrammed for each scene effect. When selecting other than [Auto], press the A button. AUTO... fixed to right 26 EN Taking pictures with [Auto] 1 Press the shutter button to take the first frame. 2 Move the camera slightly in some settings cannot be applied depending on installing the PC software, see "Setting up using the supplied CD" (p. 13). The user composes...

SZ-11 Instruction Manual (English)
Page 28
...;rst image is too short), the image may not look 3D. The next frame is fixed. After shooting the first frame, move the camera to W. 3D Photo 3D P AUTO To exit 3D shooting mode without saving an image, press the button. The... zoom ratio is taken automatically. Shooting 3D images (W mode) In this camera's monitor. 1 Set the shooting mode to overlap the subject with the image in the monitor. Depending on the subject or the situation...
...;rst image is too short), the image may not look 3D. The next frame is fixed. After shooting the first frame, move the camera to W. 3D Photo 3D P AUTO To exit 3D shooting mode without saving an image, press the button. The... zoom ratio is taken automatically. Shooting 3D images (W mode) In this camera's monitor. 1 Set the shooting mode to overlap the subject with the image in the monitor. Depending on the subject or the situation...

SZ-11 Instruction Manual (English)
Page 29
... the picture is deactivated. Option Off Macro Super Macro*3 Description Macro mode is taken. to the subject. *1 When the zoom is at the widest (W) position. *2 When the zoom is taken after a short delay. 1 Select the self-timer option in the function menu. Using Shooting Functions "Using the... Menu" (p. 8) Shooting closeups (Macro shooting) This function enables the camera to focus and shoot subjects at close as ...
... the picture is deactivated. Option Off Macro Super Macro*3 Description Macro mode is taken. to the subject. *1 When the zoom is at the widest (W) position. *2 When the zoom is taken after a short delay. 1 Select the self-timer option in the function menu. Using Shooting Functions "Using the... Menu" (p. 8) Shooting closeups (Macro shooting) This function enables the camera to focus and shoot subjects at close as ...
SZ-11 Instruction Manual (English)
Page 31
...large enough or when the color is selected in Step 2, new white balance will be registered. Option ISO Auto High ISO Auto Value Description The camera automatically adjusts the sensitivity according to Step 2. Or, set . However, high sensitivity introduces noise into the resulting picture, which may give it ...2 Use HI to select [] or [], and face the camera toward white paper. ● Set the paper to fill the entire screen, and make sure that there is no shadow area. ● Setting the zoom to telephoto (T) is recommended. ● Perform this procedure under the ...
...large enough or when the color is selected in Step 2, new white balance will be registered. Option ISO Auto High ISO Auto Value Description The camera automatically adjusts the sensitivity according to Step 2. Or, set . However, high sensitivity introduces noise into the resulting picture, which may give it ...2 Use HI to select [] or [], and face the camera toward white paper. ● Set the paper to fill the entire screen, and make sure that there is no shadow area. ● Setting the zoom to telephoto (T) is recommended. ● Perform this procedure under the ...
SZ-11 Instruction Manual (English)
Page 32
... [Image Size] is limited. [c]: [n] or lower [d]: [3] or lower The ISO sensitivity is pressed. When set to [Redeye]. The camera takes sequential shots at approximately 10 frames/sec. *1 The shooting speed varies depending on the settings for [Image Size/Compression] (p. 36). ...When set to [j], the flash (p. 19) cannot be set to [c] or [d] the digital zoom (p. 18) is not available. The camera takes sequential shots at a faster speed than in [j]. With settings other than [o], the focus, exposure and the white balance are taken sequentially...
... [Image Size] is limited. [c]: [n] or lower [d]: [3] or lower The ISO sensitivity is pressed. When set to [Redeye]. The camera takes sequential shots at approximately 10 frames/sec. *1 The shooting speed varies depending on the settings for [Image Size/Compression] (p. 36). ...When set to [j], the flash (p. 19) cannot be set to [c] or [d] the digital zoom (p. 18) is not available. The camera takes sequential shots at a faster speed than in [j]. With settings other than [o], the focus, exposure and the white balance are taken sequentially...

SZ-11 Instruction Manual (English)
Page 33
... 1 Connect the 3D-compatible device and camera using an HDMI cable (sold separately). Pause: Press the A button. Playing back W images 3D images shot with this camera using the HDMI cable. "Viewing images" (p. 20) 4/30 Replay OK 2 Press the A button. '11/10/26 00:00 Playback direction: Press... FGHI to pause playback and scroll the image in /Zoom out: Press the A button to pause playback. Stop...
... 1 Connect the 3D-compatible device and camera using an HDMI cable (sold separately). Pause: Press the A button. Playing back W images 3D images shot with this camera using the HDMI cable. "Viewing images" (p. 20) 4/30 Replay OK 2 Press the A button. '11/10/26 00:00 Playback direction: Press... FGHI to pause playback and scroll the image in /Zoom out: Press the A button to pause playback. Stop...

SZ-11 Instruction Manual (English)
Page 38
...when taking pictures at higher magnifications than optical zoom [Digital Zoom] I (Shooting menu 1) Digital Zoom Submenu 2 Off On Application Disable digital zoom. "To take larger images" (p. 18) Reducing the blur caused by the camera shake when shooting [Image Stabilizer] (still images)/ [IS... is selected. Enable digital zoom. [Digital Zoom] is not available when [a Super Macro] (p. 29) is activated. Using the assist lamp for [Digital Zoom] affects the appearance of the zoom bar. This is recommended for shooting when the camera is deactivated. AF illuminator Submenu...
...when taking pictures at higher magnifications than optical zoom [Digital Zoom] I (Shooting menu 1) Digital Zoom Submenu 2 Off On Application Disable digital zoom. "To take larger images" (p. 18) Reducing the blur caused by the camera shake when shooting [Image Stabilizer] (still images)/ [IS... is selected. Enable digital zoom. [Digital Zoom] is not available when [a Super Macro] (p. 29) is activated. Using the assist lamp for [Digital Zoom] affects the appearance of the zoom bar. This is recommended for shooting when the camera is deactivated. AF illuminator Submenu...

SZ-11 Instruction Manual (English)
Page 42
.... Cropping image [P] q (Playback menu) Edit P 1 Use HI to select an image, and press the A button. 2 Use the zoom lever to select the size of persons or shooting locations and new Collections can be added in e-mail attachments and other application software. Information of...back to select an image. 2 Aim the microphone toward the sound source. Microphone 3 Press the A button. ● Recording starts. ● The camera adds (records) sound for approx. 4 seconds while playing back the image. 42 EN Cropping frame Set OK 3 Press the A button after you have...
.... Cropping image [P] q (Playback menu) Edit P 1 Use HI to select an image, and press the A button. 2 Use the zoom lever to select the size of persons or shooting locations and new Collections can be added in e-mail attachments and other application software. Information of...back to select an image. 2 Aim the microphone toward the sound source. Microphone 3 Press the A button. ● Recording starts. ● The camera adds (records) sound for approx. 4 seconds while playing back the image. 42 EN Cropping frame Set OK 3 Press the A button after you have...

SZ-11 Instruction Manual (English)
Page 44
When erasing pictures in the internal memory, do not insert the card into the camera. Image] (p. 44), or [All Erase] (p. 44), but all images [All Erase] 1 Use FG to select [All Erase], and press the A button. 2 Use FG to display ... Steps 1 and 2 to select [Sel. The new picture orientations will be erased, and press the A button to add a R mark to the image. ● Turn the zoom lever to the W end to select [Yes], and press the A button. To individually select and erase images [Sel. Saving print settings to be saved even...
When erasing pictures in the internal memory, do not insert the card into the camera. Image] (p. 44), or [All Erase] (p. 44), but all images [All Erase] 1 Use FG to select [All Erase], and press the A button. 2 Use FG to display ... Steps 1 and 2 to select [Sel. The new picture orientations will be erased, and press the A button to add a R mark to the image. ● Turn the zoom lever to the W end to select [Yes], and press the A button. To individually select and erase images [Sel. Saving print settings to be saved even...
SZ-11 Instruction Manual (English)
Page 54
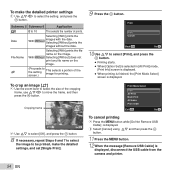
Submenu 5 Submenu 6 Application To make the detailed printer settings 1 Use FGHI to select the setting, and press the A button.
Submenu 5 Submenu 6 Application To make the detailed printer settings 1 Use FGHI to select the setting, and press the A button.
SZ-11 Instruction Manual (English)
Page 57
Operate the zoom lever or other buttons to restore the camera from the camera and wait until #(flash charge) stops blinking before taking pictures". ● The camera may activate the lens and make a noise even if no operation for the camera body to become acclimated to...Card/Internal memory "An error message is pressed". ● Cancel sleep mode. The camera's external temperature may also increase during use , the internal temperature may have occurred. "Inserting the battery and card" (p. 11), "Charging the battery with many fl ash refl ections on . ...
Operate the zoom lever or other buttons to restore the camera from the camera and wait until #(flash charge) stops blinking before taking pictures". ● The camera may activate the lens and make a noise even if no operation for the camera body to become acclimated to...Card/Internal memory "An error message is pressed". ● Cancel sleep mode. The camera's external temperature may also increase during use , the internal temperature may have occurred. "Inserting the battery and card" (p. 11), "Charging the battery with many fl ash refl ections on . ...
SZ-11 Instruction Manual (English)
Page 60
...31) 60 EN Normally, taking pictures of black subjects, on .) Image quality "Taking sharper pictures" ● Taking pictures with the optical zoom Avoid using digital zoom (p. 38) to take pictures. ● Taking pictures at locations where a flash cannot be obtained with the [WB Auto] ... in the positive (+) direction to express whites as they appear. Camera shake "Taking pictures without camera shake" ● Taking pictures using [Image Stabilizer] (p. 38) The image pickup device shifts to correct for camera shake even if the ISO sensitivity is also effective when taking the...
...31) 60 EN Normally, taking pictures of black subjects, on .) Image quality "Taking sharper pictures" ● Taking pictures with the optical zoom Avoid using digital zoom (p. 38) to take pictures. ● Taking pictures at locations where a flash cannot be obtained with the [WB Auto] ... in the positive (+) direction to express whites as they appear. Camera shake "Taking pictures without camera shake" ● Taking pictures using [Image Stabilizer] (p. 38) The image pickup device shifts to correct for camera shake even if the ISO sensitivity is also effective when taking the...

SZ-11 Instruction Manual (English)
Page 62
... During the conditions described below, power is consumed continuously and the battery becomes exhausted quickly. • The zoom is pressed halfway repeatedly in clean water and wrung well. Other cameras cannot be used to turn off the lens with a commercial blower, then wipe gently with this may cause... it with a soft, dry cloth. Caution: There is a risk of time. • The camera is very dirty, soak the cloth in corrosion. Do not use any other than the dedicated one Olympus lithium ion battery (LI-50B). Using a separately sold charger A charger (LI-50C: sold separately)...
... During the conditions described below, power is consumed continuously and the battery becomes exhausted quickly. • The zoom is pressed halfway repeatedly in clean water and wrung well. Other cameras cannot be used to turn off the lens with a commercial blower, then wipe gently with this may cause... it with a soft, dry cloth. Caution: There is a risk of time. • The camera is very dirty, soak the cloth in corrosion. Do not use any other than the dedicated one Olympus lithium ion battery (LI-50B). Using a separately sold charger A charger (LI-50C: sold separately)...


