

SP-800UZ Instruction Manual (English)
Page 2
............. 26 ¾ Menus for Shooting Functions... 30 ¾ Menus for Playback, Editing, and Printing Functions 35 ¾ Menus for Other Camera Settings 41 ¾ Printing 48 ¾ Usage Tips 53 ¾ Appendix 58 2 EN AV cable USB-AC adapter (F-2AC) 2 Step Preparing ...Preparing the Camera" (p. 10) 3 Step Shooting and Playing Back Images "Shooting, Playback, and Erasing" (p. 15) 4 Step How to Use the Camera "Camera Settings" (p. 3) 5 Step Printing "Direct printing (PictBridge)" (p. 48) "Print Reservations (DPOF)" (p. 51) Contents ¾ Names of the box Digital camera Lens ...
............. 26 ¾ Menus for Shooting Functions... 30 ¾ Menus for Playback, Editing, and Printing Functions 35 ¾ Menus for Other Camera Settings 41 ¾ Printing 48 ¾ Usage Tips 53 ¾ Appendix 58 2 EN AV cable USB-AC adapter (F-2AC) 2 Step Preparing ...Preparing the Camera" (p. 10) 3 Step Shooting and Playing Back Images "Shooting, Playback, and Erasing" (p. 15) 4 Step How to Use the Camera "Camera Settings" (p. 3) 5 Step Printing "Direct printing (PictBridge)" (p. 48) "Print Reservations (DPOF)" (p. 51) Contents ¾ Names of the box Digital camera Lens ...

SP-800UZ Instruction Manual (English)
Page 3
... Frequently used functions can be used by pressing, not turning, the wheel controller sections shown below. IMAGE SET OK Operation guide OK ERASE/CANCEL MENU EN 3 X Y M D TIME 2010. 02 . 26 12 : 30 Y/M/D CANCEL MENU SET OK 4/30 SINGLE PRINT NORM 14M FILE 100 0004 '10/02/26 12:30 PRINT OK MORE... to be used . 1 IMAGE SIZE 14M 2 COMPRESSION NORMAL SHADOW ADJUST AUTO AF MODE FACE/iESP 1 ESP/ ESP 2 FINE ZOOM OFF 3 DIGITAL ZOOM OFF EXIT MENU SET OK SEL. Zoom lever (p. 16, 19) Shutter button (p. 15, 53) Operation guide The symbols FGHI displayed for image selections and...
... Frequently used functions can be used by pressing, not turning, the wheel controller sections shown below. IMAGE SET OK Operation guide OK ERASE/CANCEL MENU EN 3 X Y M D TIME 2010. 02 . 26 12 : 30 Y/M/D CANCEL MENU SET OK 4/30 SINGLE PRINT NORM 14M FILE 100 0004 '10/02/26 12:30 PRINT OK MORE... to be used . 1 IMAGE SIZE 14M 2 COMPRESSION NORMAL SHADOW ADJUST AUTO AF MODE FACE/iESP 1 ESP/ ESP 2 FINE ZOOM OFF 3 DIGITAL ZOOM OFF EXIT MENU SET OK SEL. Zoom lever (p. 16, 19) Shutter button (p. 15, 53) Operation guide The symbols FGHI displayed for image selections and...
SP-800UZ Instruction Manual (English)
Page 4
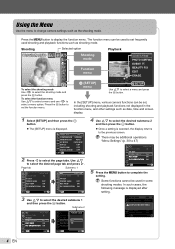
...mode and press the A button. Submenu 2 1X 2 WORLD TIME x TV OUT POWER SAVE OFF 1 REC VIEW ON 2 PIC ORIENTATION ON 3 EXIT MENU SET OK 1X POW--E.-R-.-S- Press the m button to the previous screen. There may be used to select the page tabs. A-V-:E-- 2 WORLD TIME HOME TV OUT ...a menu option. The function menu can be used shooting and playback functions such as the shooting mode. Press the A button to complete the setting. In the [SETUP] menu, various camera functions can be additional operations. Using the Menu Use the menu to select the desired page tab ...
...mode and press the A button. Submenu 2 1X 2 WORLD TIME x TV OUT POWER SAVE OFF 1 REC VIEW ON 2 PIC ORIENTATION ON 3 EXIT MENU SET OK 1X POW--E.-R-.-S- Press the m button to the previous screen. There may be used to select the page tabs. A-V-:E-- 2 WORLD TIME HOME TV OUT ...a menu option. The function menu can be used shooting and playback functions such as the shooting mode. Press the A button to complete the setting. In the [SETUP] menu, various camera functions can be additional operations. Using the Menu Use the menu to select the desired page tab ...

SP-800UZ Instruction Manual (English)
Page 5
... (Still images p. 33 R (Movies p. 33 IMAGE STABILIZER (Still images)/ IS MOVIE MODE (Movies p. 33 BKT p. 33 NOISE REDUCT p. 34 SET TIME LAPSE p. 34 FULLTIME AF p. 34 AF ILLUMINAT p. 34 ICON GUIDE p. 34 SLIDESHOW 1 PHOTO SURFING 2 EVENT 3 COLLECTION 4 BEAUTY FIX ...5 EDIT 6 ERASE 7 SETUP 8 1 PRINT ORDER 20 y R 1 2 3 EXIT MENU SET OK 1 SLIDESHOW p. 35 2 PHOTO SURFING p. 35 3 EVENT q p. 36 4 COLLECTION q p. 36 5 BEAUTY FIX p. 37 6 EDIT p. 38 7 ERASE p. 39 8 o (SETUP...
... (Still images p. 33 R (Movies p. 33 IMAGE STABILIZER (Still images)/ IS MOVIE MODE (Movies p. 33 BKT p. 33 NOISE REDUCT p. 34 SET TIME LAPSE p. 34 FULLTIME AF p. 34 AF ILLUMINAT p. 34 ICON GUIDE p. 34 SLIDESHOW 1 PHOTO SURFING 2 EVENT 3 COLLECTION 4 BEAUTY FIX ...5 EDIT 6 ERASE 7 SETUP 8 1 PRINT ORDER 20 y R 1 2 3 EXIT MENU SET OK 1 SLIDESHOW p. 35 2 PHOTO SURFING p. 35 3 EVENT q p. 36 4 COLLECTION q p. 36 5 BEAUTY FIX p. 37 6 EDIT p. 38 7 ERASE p. 39 8 o (SETUP...

SP-800UZ Instruction Manual (English)
Page 11
...by the computer. Multiconnector USB cable (supplied) Charging the battery When the camera is not guaranteed in the direction of the arrow. Camera setup Set the camera date and time, time zone and display language automatically; Doing so will turn off. System requirements Windows XP (SP2 or later)/ ...installed OS and home-built computers Double-click the icon for details on how to use the PC software (ib). 2 Select and execute "OLYMPUS Camera Initialization", which is displayed on the camera screen even after connecting the camera to the computer, the battery in the camera will be charged...
...by the computer. Multiconnector USB cable (supplied) Charging the battery When the camera is not guaranteed in the direction of the arrow. Camera setup Set the camera date and time, time zone and display language automatically; Doing so will turn off. System requirements Windows XP (SP2 or later)/ ...installed OS and home-built computers Double-click the icon for details on how to use the PC software (ib). 2 Select and execute "OLYMPUS Camera Initialization", which is displayed on the camera screen even after connecting the camera to the computer, the battery in the camera will be charged...

SP-800UZ Instruction Manual (English)
Page 12
... use, be sure to charge the battery until the indicator lamp turns off (up to the computer. When using a computer See the next section under "Setting the date, time and time zone." If the indicator lamp does not light, the AC adapter is not fully charged at shipment. Battery can be...
... use, be sure to charge the battery until the indicator lamp turns off (up to the computer. When using a computer See the next section under "Setting the date, time and time zone." If the indicator lamp does not light, the AC adapter is not fully charged at shipment. Battery can be...

SP-800UZ Instruction Manual (English)
Page 13
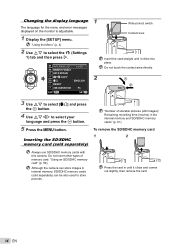
... MENU 4 As in Steps 2 and 3, use FGHI and the A button to save the setting for [Y]. To change the selected time zone. [WORLD TIME] (p. 45) 3 Press I to set . Setting the date, time and time zone The date and time set here are not set [M] (month), [D] (day), [TIME] (hours and minutes), and [Y/M/D] (date order). X Y ...zone and then press the A button. ● Use FG to turn daylight saving time ([SUMMER]) on the camera. ● The date and time setting screen is displayed when the date and time are saved to image file names, date prints, and other data. 1 Press the n button ...
... MENU 4 As in Steps 2 and 3, use FGHI and the A button to save the setting for [Y]. To change the selected time zone. [WORLD TIME] (p. 45) 3 Press I to set . Setting the date, time and time zone The date and time set here are not set [M] (month), [D] (day), [TIME] (hours and minutes), and [Y/M/D] (date order). X Y ...zone and then press the A button. ● Use FG to turn daylight saving time ([SUMMER]) on the camera. ● The date and time setting screen is displayed when the date and time are saved to image file names, date prints, and other data. 1 Press the n button ...
SP-800UZ Instruction Manual (English)
Page 14
... separately) "Number of memory card. Do not touch the contact area directly. 3 Use FG to select [D] and press the A button. 4 Use FGHI to select the r (Settings 1) tab and then press I. 1 INTERNAL/SD AUTO 2 MEMORY FORMAT DATA REPAIR COPY 2 1 ENGLISH 2 RESET 3 USB CONNECTION PC EXIT MENU... SET OK Write-protect switch Contact area Insert the card straight until it clicks into place. Press the card in the internal memory and SD/SDHC ...
... separately) "Number of memory card. Do not touch the contact area directly. 3 Use FG to select [D] and press the A button. 4 Use FGHI to select the r (Settings 1) tab and then press I. 1 INTERNAL/SD AUTO 2 MEMORY FORMAT DATA REPAIR COPY 2 1 ENGLISH 2 RESET 3 USB CONNECTION PC EXIT MENU... SET OK Write-protect switch Contact area Insert the card straight until it clicks into place. Press the card in the internal memory and SD/SDHC ...

SP-800UZ Instruction Manual (English)
Page 15
...camera, take care not to cover the flash with the optimum aperture value and shutter speed (P mode) In this mode, automatic shooting settings are displayed), and the AF target mark changes to green. ● The camera was unable to turn on the subject, the exposure is ... storable still pictures (p. 61) Monitor (standby mode screen) If P mode is not displayed, press the m button to display the function menu screen and then set the shooting mode to P. Try focusing again. EN 15 as exposure compensation, white balance, etc. AF target mark P PROGRAM AUTO P Press halfway 4 14M ...
...camera, take care not to cover the flash with the optimum aperture value and shutter speed (P mode) In this mode, automatic shooting settings are displayed), and the AF target mark changes to green. ● The camera was unable to turn on the subject, the exposure is ... storable still pictures (p. 61) Monitor (standby mode screen) If P mode is not displayed, press the m button to display the function menu screen and then set the shooting mode to P. Try focusing again. EN 15 as exposure compensation, white balance, etc. AF target mark P PROGRAM AUTO P Press halfway 4 14M ...
SP-800UZ Instruction Manual (English)
Page 16
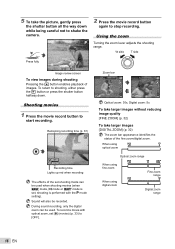
... Sound will also be used when shooting movies (when P mode, A mode or Q mode is set, shooting is performed with optical zoom, set shooting mode can be recorded. To record a movie with the P mode setting). 5 To take larger images [DIGITAL ZOOM] (p. 32) The zoom bar appearance identifies ...to stop recording. W side T side Press fully 1/400 F2.8 Image review screen To view images during shooting Pressing the q button enables playback of the set [R] (movies) (p. 33) to shake the camera. Remaining recording time (p. 61) 00:34 REC 00:12 Recording time Lights up red when recording ...
... Sound will also be used when shooting movies (when P mode, A mode or Q mode is set, shooting is performed with optical zoom, set shooting mode can be recorded. To record a movie with the P mode setting). 5 To take larger images [DIGITAL ZOOM] (p. 32) The zoom bar appearance identifies ...to stop recording. W side T side Press fully 1/400 F2.8 Image review screen To view images during shooting Pressing the q button enables playback of the set [R] (movies) (p. 33) to shake the camera. Remaining recording time (p. 61) 00:34 REC 00:12 Recording time Lights up red when recording ...

SP-800UZ Instruction Manual (English)
Page 18
... rewind. During pause, fast forward or reverse, press the A button to select [ERASE], and press the A button. [ALL ERASE] (p. 39) and [SEL. IMAGE ERASE CANCEL SET OK 2 Press FG to restart playback. Press I or H pressed for continuous advance or rewind. The speed at the same time. Adjusting the volume Turn the...
... rewind. During pause, fast forward or reverse, press the A button to select [ERASE], and press the A button. [ALL ERASE] (p. 39) and [SEL. IMAGE ERASE CANCEL SET OK 2 Press FG to restart playback. Press I or H pressed for continuous advance or rewind. The speed at the same time. Adjusting the volume Turn the...

SP-800UZ Instruction Manual (English)
Page 19
... close -up to display the selected image in the order shown below each time the button is pressed. Changing the image information display Shooting information settings displayed on the screen can be changed. 1 Press F (INFO). ● The displayed image information changes in single-image view. In event index*1, images are played...
... close -up to display the selected image in the order shown below each time the button is pressed. Changing the image information display Shooting information settings displayed on the screen can be changed. 1 Press F (INFO). ● The displayed image information changes in single-image view. In event index*1, images are played...

SP-800UZ Instruction Manual (English)
Page 20
... functions and basic operating methods for viewing. "Viewing images" (p. 17) 4/30 Using the menu guide If the E button is pressed while settings are being adjusted in /Zoom out: Press the A button to search the desired contents. 20 EN Playback direction: Press the A button to... look up camera operations. 1 Press the E button in the direction of the selected option is shown about the camera History Message EXIT SET OK ● Follow the on-screen instructions to pause playback. Information is displayed. Searches can be performed from a term or shooting objective. ...
... functions and basic operating methods for viewing. "Viewing images" (p. 17) 4/30 Using the menu guide If the E button is pressed while settings are being adjusted in /Zoom out: Press the A button to search the desired contents. 20 EN Playback direction: Press the A button to... look up camera operations. 1 Press the E button in the direction of the selected option is shown about the camera History Message EXIT SET OK ● Follow the on-screen instructions to pause playback. Information is displayed. Searches can be performed from a term or shooting objective. ...
SP-800UZ Instruction Manual (English)
Page 21
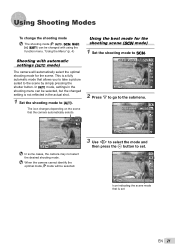
...mode. "Using the Menu" (p. 4) Using the best mode for the scene. Shooting with using the function menu. In M mode, settings in the actual shot. 1 Set the shooting mode to M. When the camera cannot identify the optimal mode, P mode will automatically select the optimal shooting mode for the shooting... scene (s mode) 1 Set the shooting mode to s. The icon changes depending on the scene that allows you to take a picture suited to the scene by simply pressing...
...mode. "Using the Menu" (p. 4) Using the best mode for the scene. Shooting with using the function menu. In M mode, settings in the actual shot. 1 Set the shooting mode to M. When the camera cannot identify the optimal mode, P mode will automatically select the optimal shooting mode for the shooting... scene (s mode) 1 Set the shooting mode to s. The icon changes depending on the scene that allows you to take a picture suited to the scene by simply pressing...

SP-800UZ Instruction Manual (English)
Page 22
...CUISINE/d DOCUMENTS/ q BEACH & SNOW/ z BIRD WATCHING/ 1 SOFT BACKGROUND SHOT/ PET Application The camera takes a picture using the optimum settings for specific shooting scenes. This approximately doubles the shooting time during which no other pictures can be taken in the second frame over the...;rst frame. ● The exposure is automatically activated. To retake the second shot, press the shutter button again. While shooting settings cannot be changed in some modes. Taking pictures with fireworks ([b MULTI FIREWORKS] mode) 1 Use HI to select [b MULTI...
...CUISINE/d DOCUMENTS/ q BEACH & SNOW/ z BIRD WATCHING/ 1 SOFT BACKGROUND SHOT/ PET Application The camera takes a picture using the optimum settings for specific shooting scenes. This approximately doubles the shooting time during which no other pictures can be taken in the second frame over the...;rst frame. ● The exposure is automatically activated. To retake the second shot, press the shutter button again. While shooting settings cannot be changed in some modes. Taking pictures with fireworks ([b MULTI FIREWORKS] mode) 1 Use HI to select [b MULTI...

SP-800UZ Instruction Manual (English)
Page 23
...14M Icon indicating P mode that the target marks and pointers overlap, and the camera automatically releases the shutter. The flash (p. 26) is set Shooting mode MAGIC FILTER Option [ POP ART \ PIN HOLE ] FISH EYE @ DRAWING For details on installing the PC software (ib), see "...1 AUTO MANUAL PC Application Three frames are combined into a panorama image using the guide frame and manually releases the shutter. When set . MAGIC FILTER Creating panoramic images (A mode) 1 Set the shooting mode to P. PANORAMA AUTO 0.0 WB AUTO 4 14M 2 Press G to go to the submenu. 3 Use HI...
...14M Icon indicating P mode that the target marks and pointers overlap, and the camera automatically releases the shutter. The flash (p. 26) is set Shooting mode MAGIC FILTER Option [ POP ART \ PIN HOLE ] FISH EYE @ DRAWING For details on installing the PC software (ib), see "...1 AUTO MANUAL PC Application Three frames are combined into a panorama image using the guide frame and manually releases the shutter. When set . MAGIC FILTER Creating panoramic images (A mode) 1 Set the shooting mode to P. PANORAMA AUTO 0.0 WB AUTO 4 14M 2 Press G to go to the submenu. 3 Use HI...

SP-800UZ Instruction Manual (English)
Page 25
... the first shot, the area shown in the monitor. 3 Repeat Step 2 until the number of the retouched image is possible for taking the picture. 1 Set the shooting mode to Q. Refer to [n] or lower. EN 25
... the first shot, the area shown in the monitor. 3 Repeat Step 2 until the number of the retouched image is possible for taking the picture. 1 Set the shooting mode to Q. Refer to [n] or lower. EN 25

SP-800UZ Instruction Manual (English)
Page 26
... the A button to reduce the occurrence of red eye in your photos. P OFF 0.0 WB AUTO ISO AUTO 4 14M 26 EN Flash knob The flash settings cannot be selected to best match the shooting conditions. 1 Lift the flash knob to $ (FLASH OFF) mode. 2 Select the flash option in ...flash. This sets to flip up the built-in the shooting function menu. The flash fires at close distances. 1 Select the macro option in low...
... the A button to reduce the occurrence of red eye in your photos. P OFF 0.0 WB AUTO ISO AUTO 4 14M 26 EN Flash knob The flash settings cannot be selected to best match the shooting conditions. 1 Lift the flash knob to $ (FLASH OFF) mode. 2 Select the flash option in ...flash. This sets to flip up the built-in the shooting function menu. The flash fires at close distances. 1 Select the macro option in low...

SP-800UZ Instruction Manual (English)
Page 27
...the brightness (Exposure compensation) The standard brightness (appropriate exposure) set by the camera based on for approx. 10 seconds, then blinks for M) can be set when [a SUPER MACRO] is taken. P 0.0 0.3 0.0 0.3 WB AUTO ISO AUTO 2 Use HI to set. to the subject. *1 When the zoom is at the... This enables shooting as close as 1 cm/0.4 in the shooting function menu. 2 Use HI to select the setting option, and press the A button to set. 2 Use HI to select the setting option, and press the A button to select the desired brightness, and press the A button. EN 27 P...
...the brightness (Exposure compensation) The standard brightness (appropriate exposure) set by the camera based on for approx. 10 seconds, then blinks for M) can be set when [a SUPER MACRO] is taken. P 0.0 0.3 0.0 0.3 WB AUTO ISO AUTO 2 Use HI to set. to the subject. *1 When the zoom is at the... This enables shooting as close as 1 cm/0.4 in the shooting function menu. 2 Use HI to select the setting option, and press the A button to set. 2 Use HI to select the setting option, and press the A button to select the desired brightness, and press the A button. EN 27 P...

SP-800UZ Instruction Manual (English)
Page 28
... The camera automatically adjusts the white balance according to minimize blur caused by a moving subject or by camera shake. In the ISO setting, although smaller values result in the shooting function menu. For shooting outdoors under tungsten lighting. Option Description ISO AUTO The camera automatically ...sky. However, high sensitivity introduces noise into the resulting picture, which may give it a grainy appearance. 1 Select the ISO setting option in higher sensitivity, and images can be taken at fast shutter speeds even under low light conditions. ISO standards specify ...
... The camera automatically adjusts the white balance according to minimize blur caused by a moving subject or by camera shake. In the ISO setting, although smaller values result in the shooting function menu. For shooting outdoors under tungsten lighting. Option Description ISO AUTO The camera automatically ...sky. However, high sensitivity introduces noise into the resulting picture, which may give it a grainy appearance. 1 Select the ISO setting option in higher sensitivity, and images can be taken at fast shutter speeds even under low light conditions. ISO standards specify ...


