

E-P3 Instruction Manual (English)
Page 2
... CD-ROM • Instruction manual • Warranty card Body cap Strap USB cable CB-USB6 AV cable (Monaural) CB-AVC3 Camera grip MCG-1 Lithium ion battery PS-BLS1 (BLS-1) or BLS-5 Lithium ion charger PS-BCS1 (BCS-1) or BCS-5 Attaching the strap 1 Thread the strap in this manual The following items...
... CD-ROM • Instruction manual • Warranty card Body cap Strap USB cable CB-USB6 AV cable (Monaural) CB-AVC3 Camera grip MCG-1 Lithium ion battery PS-BLS1 (BLS-1) or BLS-5 Lithium ion charger PS-BCS1 (BCS-1) or BCS-5 Attaching the strap 1 Thread the strap in this manual The following items...
E-P3 Instruction Manual (English)
Page 3
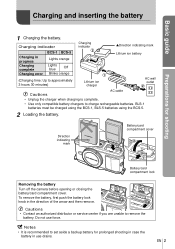
... cable • Unplug the charger when charging is recommended to set aside a backup battery for shooting 1 Charging the battery. Direction indicating mark Battery/card compartment cover 2 3 1 Battery/card compartment lock Removing the battery Turn off the camera before opening or closing the battery/card compartment cover. Charging indicator BCS-1 BCS-5 Charging in the direction of the...
... cable • Unplug the charger when charging is recommended to set aside a backup battery for shooting 1 Charging the battery. Direction indicating mark Battery/card compartment cover 2 3 1 Battery/card compartment lock Removing the battery Turn off the camera before opening or closing the battery/card compartment cover. Charging indicator BCS-1 BCS-5 Charging in the direction of the...

E-P3 Instruction Manual (English)
Page 4
...Removing the card Press the inserted card lightly and it locks in these instructions) until you hear a click. # Cautions • Close the battery/card compartment cover when using the camera. 4 EN Basic guide Preparations for shooting Inserting and removing cards 1 Loading the card. • Insert...Eye-Fi card (referred to as "card" in place. Pull out the card. # Cautions • Do not remove the battery or card while the card access lamp (P. 9) is lit. 2 Closing the battery/card compartment cover. • Close the cover until it will be ejected. g "Card basics" (P. 99) # Cautions &#...
...Removing the card Press the inserted card lightly and it locks in these instructions) until you hear a click. # Cautions • Close the battery/card compartment cover when using the camera. 4 EN Basic guide Preparations for shooting Inserting and removing cards 1 Loading the card. • Insert...Eye-Fi card (referred to as "card" in place. Pull out the card. # Cautions • Do not remove the battery or card while the card access lamp (P. 9) is lit. 2 Closing the battery/card compartment cover. • Close the cover until it will be ejected. g "Card basics" (P. 99) # Cautions &#...

E-P3 Instruction Manual (English)
Page 6
... again. 2 Set the mode dial to A. ■ Mode dial Preparations for shooting ■ ON/OFF button ■ Monitor ISO-A 200 250 F5.6 Battery level 7 (green): Camera ready to remove dust from the surface of storable still pictures Available recording time 6 EN Displayed for about 10 seconds after the... camera is turned on . 8 (green): Low battery LN 9 (blinks red): Charge the battery HD 01:02:03 38 Number of the image sensor filter. • To turn on. • When the camera is ...
... again. 2 Set the mode dial to A. ■ Mode dial Preparations for shooting ■ ON/OFF button ■ Monitor ISO-A 200 250 F5.6 Battery level 7 (green): Camera ready to remove dust from the surface of storable still pictures Available recording time 6 EN Displayed for about 10 seconds after the... camera is turned on . 8 (green): Low battery LN 9 (blinks red): Charge the battery HD 01:02:03 38 Number of the image sensor filter. • To turn on. • When the camera is ...

E-P3 Instruction Manual (English)
Page 8
... before attaching the lens.) 9 Stereo microphone P. 62, 68 8 EN 0 Hot shoe cover a Built-in flash P. 59 b Lens release button P. 5 c Lens lock pin d Tripod socket e Battery/card compartment cover.......P. 3 f Battery/card compartment lock .........P. 3 g Connector cover h Multi-connector P. 69, 73, 77 i HDMI mini-connector (type C) ........P. 69
... before attaching the lens.) 9 Stereo microphone P. 62, 68 8 EN 0 Hot shoe cover a Built-in flash P. 59 b Lens release button P. 5 c Lens lock pin d Tripod socket e Battery/card compartment cover.......P. 3 f Battery/card compartment lock .........P. 3 g Connector cover h Multi-connector P. 69, 73, 77 i HDMI mini-connector (type C) ........P. 69

E-P3 Instruction Manual (English)
Page 24
... P. 10, 50 - 55 t Myset P. 35 u Touch screen mode P. 22 v Flash intensity control P. 60 w ISO sensitivity P. 48 x AF mode P. 36 y Metering mode P. 41 z Flash mode P. 59 A Battery check 7 Lit up (green) : Ready for use (displayed for about ten seconds after the camera is turned on) 8 Lit up (green...
... P. 10, 50 - 55 t Myset P. 35 u Touch screen mode P. 22 v Flash intensity control P. 60 w ISO sensitivity P. 48 x AF mode P. 36 y Metering mode P. 41 z Flash mode P. 59 A Battery check 7 Lit up (green) : Ready for use (displayed for about ten seconds after the camera is turned on) 8 Lit up (green...

E-P3 Instruction Manual (English)
Page 25
... guide Information displayed in the monitor Playback Simplified display 1 2 3 456 ×10 c 2011.05.01 12:30 3D 4:3 L N 100-0015 7 SD 15 8 ba 0 9 1 Battery check P. 6 2 Eye-Fi upload complete P. 88 3 Print reservation Number of prints P. 76 4 Sound record P. 68 5 Protect P. 15 6 Image selected P. 65 7 File number P. 76, 86 8 Frame...
... guide Information displayed in the monitor Playback Simplified display 1 2 3 456 ×10 c 2011.05.01 12:30 3D 4:3 L N 100-0015 7 SD 15 8 ba 0 9 1 Battery check P. 6 2 Eye-Fi upload complete P. 88 3 Print reservation Number of prints P. 76 4 Sound record P. 68 5 Protect P. 15 6 Image selected P. 65 7 File number P. 76, 86 8 Frame...

E-P3 Instruction Manual (English)
Page 27
... level of the camera Shooting with deliberate composition Zooming in on photos to check focus Self-portraits Sequential shooting Extending the useful life of the battery Increasing the number of pictures that can be taken Playback/Retouch Viewing images on a TV Viewing slideshows with background music Brightening shadows Dealing with red... Sequential shooting 49 Sleep 84 Record mode 47 Playback on TV Slideshow Shadow Adj (JPEG Edit) Redeye Fix (JPEG Edit) Direct printing Creating a print order OLYMPUS PENPAL Reset Myset W g 69 66 67 67 77 76 71 g 35 35 80 EN 27
... level of the camera Shooting with deliberate composition Zooming in on photos to check focus Self-portraits Sequential shooting Extending the useful life of the battery Increasing the number of pictures that can be taken Playback/Retouch Viewing images on a TV Viewing slideshows with background music Brightening shadows Dealing with red... Sequential shooting 49 Sleep 84 Record mode 47 Playback on TV Slideshow Shadow Adj (JPEG Edit) Redeye Fix (JPEG Edit) Direct printing Creating a print order OLYMPUS PENPAL Reset Myset W g 69 66 67 67 77 76 71 g 35 35 80 EN 27

E-P3 Instruction Manual (English)
Page 28
Table of Contents Table of Contents Basic guide 3 Preparations for shooting ...........3 Charging and inserting the battery 3 Inserting and removing cards .....4 Attaching a lens to the camera ...5 Power on 6 Setting the date/time 7 Names of parts and functions.....8 Names of parts 8 Camera 8 Camera ...
Table of Contents Table of Contents Basic guide 3 Preparations for shooting ...........3 Charging and inserting the battery 3 Inserting and removing cards .....4 Attaching a lens to the camera ...5 Power on 6 Setting the date/time 7 Names of parts and functions.....8 Names of parts 8 Camera 8 Camera ...
E-P3 Instruction Manual (English)
Page 31
Checking the image processing functions...98 Card basics 99 Usable cards 99 Formatting the card 99 Battery and charger 100 Using your charger abroad .....100 Interchangeable lenses............100 M.ZUIKO DIGITAL lens specifications 101 Principal Accessories 102 Mount adapter 102 Remote ...
Checking the image processing functions...98 Card basics 99 Usable cards 99 Formatting the card 99 Battery and charger 100 Using your charger abroad .....100 Interchangeable lenses............100 M.ZUIKO DIGITAL lens specifications 101 Principal Accessories 102 Mount adapter 102 Remote ...

E-P3 Instruction Manual (English)
Page 49
... the camera is set automatically according to the shooting conditions. timer, the photograph may not save all of the pictures depending on how much battery power remains. • Fix the camera securely on a tripod for self-timer shooting. • If you have taken on a tripod ... exposure, and white balance are locked at the first frame (during [S-AF], [MF]). # Cautions • During sequential shooting, if the battery check blinks due to start the timer. j Sequential shooting Photographs are taken at a time when the shutter button is taken. The options available for ...
... the camera is set automatically according to the shooting conditions. timer, the photograph may not save all of the pictures depending on how much battery power remains. • Fix the camera securely on a tripod for self-timer shooting. • If you have taken on a tripod ... exposure, and white balance are locked at the first frame (during [S-AF], [MF]). # Cautions • During sequential shooting, if the battery check blinks due to start the timer. j Sequential shooting Photographs are taken at a time when the shutter button is taken. The options available for ...

E-P3 Instruction Manual (English)
Page 56
...: g "Image overlay" (P. 68) # Cautions • The camera will not go to sleep while multiple exposure is in effect. • Photographs taken with other than P, A, S, M/The battery power runs out/ Any cable is connected to 1/2 and the images are overlaid with the settings at the time of pictures taken is one. •...
...: g "Image overlay" (P. 68) # Cautions • The camera will not go to sleep while multiple exposure is in effect. • Photographs taken with other than P, A, S, M/The battery power runs out/ Any cable is connected to 1/2 and the images are overlaid with the settings at the time of pictures taken is one. •...

E-P3 Instruction Manual (English)
Page 73
...; When the camera is connected to another device via USB, a message will be displayed. EN 73 Click "OLYMPUS Setup" to choose a connection type. Use a full-charged battery. Windows XP • A "Setup" dialog will be exhausted. Select [Storage]. 3 Register your Olympus product. • Click the "Registration" button and follow the on-screen instructions. 4 Install...
...; When the camera is connected to another device via USB, a message will be displayed. EN 73 Click "OLYMPUS Setup" to choose a connection type. Use a full-charged battery. Windows XP • A "Setup" dialog will be exhausted. Select [Storage]. 3 Register your Olympus product. • Click the "Registration" button and follow the on-screen instructions. 4 Install...

E-P3 Instruction Manual (English)
Page 77
Removing all or selected pictures from the print order You can reset all print reservation data or just the data for selected pictures. 1 Press Q during playback and select [
Removing all or selected pictures from the print order You can reset all print reservation data or just the data for selected pictures. 1 Press Q during playback and select [

E-P3 Instruction Manual (English)
Page 84
... and - V Exp/p/ISO MENU c V Option Description g EV Step 10 Metering Choose the size of 14 ×) and press G to zoom out. [mode2]: Press U to save battery power. Choose a metering mode according to display USB mode options every - Customizing camera settings ISO Set ISO sensitivity. 48 ISO Step Select the increments available...
... and - V Exp/p/ISO MENU c V Option Description g EV Step 10 Metering Choose the size of 14 ×) and press G to zoom out. [mode2]: Press U to save battery power. Choose a metering mode according to display USB mode options every - Customizing camera settings ISO Set ISO sensitivity. 48 ISO Step Select the increments available...

E-P3 Instruction Manual (English)
Page 88
... the virtual horizon. [Reset]: Restore the factory default angle. - [Adjust]: Set the virtual horizon to the exposure, perform exposure compensation (P. 40). 8 Warning Level Choose the battery level at which the use of wireless devices is displayed. 6 Level Adjust Adjust the angle of exposure compensation options available in the selected direction. •...
... the virtual horizon. [Reset]: Restore the factory default angle. - [Adjust]: Set the virtual horizon to the exposure, perform exposure compensation (P. 40). 8 Warning Level Choose the battery level at which the use of wireless devices is displayed. 6 Level Adjust Adjust the angle of exposure compensation options available in the selected direction. •...

E-P3 Instruction Manual (English)
Page 94
... to autofocus (the AF confirmation mark will turn on It may be difficult to function because of the cold • Battery performance drops at different Fast-moving subject Subject not inside distances AF area 94 EN g [Sleep] (P. 13) If no operations are performed for... a while. Information AF confirmation mark is temporarily unable to focus with the charger. Remove the battery and warm it by putting it in the monitor). Wait for a set period of time. These subjects are performed for the blinking to focus on...
... to autofocus (the AF confirmation mark will turn on It may be difficult to function because of the cold • Battery performance drops at different Fast-moving subject Subject not inside distances AF area 94 EN g [Sleep] (P. 13) If no operations are performed for... a while. Information AF confirmation mark is temporarily unable to focus with the charger. Remove the battery and warm it by putting it in the monitor). Wait for a set period of time. These subjects are performed for the blinking to focus on...
E-P3 Instruction Manual (English)
Page 95
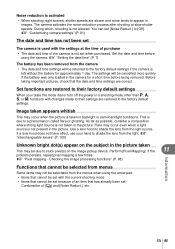
...activated • When shooting night scenes, shutter speeds are slower and noise tends to the factory default settings if the camera is left without the battery for a short time before using the arrow pad. • Items that the date and time settings are correct. The camera activates the noise-... • The date and time of [j] and [Noise Reduct.], etc. Set the date and time before being removed. g "Setting the date/time" (P. 7) The battery has been removed from the menus when using the camera. Before taking important pictures, check that cannot be cancelled more quickly if the...
...activated • When shooting night scenes, shutter speeds are slower and noise tends to the factory default settings if the camera is left without the battery for a short time before using the arrow pad. • Items that the date and time settings are correct. The camera activates the noise-... • The date and time of [j] and [Noise Reduct.], etc. Set the date and time before being removed. g "Setting the date/time" (P. 7) The battery has been removed from the menus when using the camera. Before taking important pictures, check that cannot be cancelled more quickly if the...

E-P3 Instruction Manual (English)
Page 97
Allow the internal temperature of the camera to cool before turning the power on again. Battery Empty Charge the battery. Load some paper in the printer. Check the printer and remedy any problems before resuming operations. Use a personal computer to Disconnect the ...for the camera to turn the power on again. Cannot Print Pictures recorded on other cameras may not be printed on this camera. The battery is locked. The internal temperature of the retractable lens stays retracted. An abnormality has occurred between the camera and the lens. Please wait ...
Allow the internal temperature of the camera to cool before turning the power on again. Battery Empty Charge the battery. Load some paper in the printer. Check the printer and remedy any problems before resuming operations. Use a personal computer to Disconnect the ...for the camera to turn the power on again. Cannot Print Pictures recorded on other cameras may not be printed on this camera. The battery is locked. The internal temperature of the retractable lens stays retracted. An abnormality has occurred between the camera and the lens. Please wait ...
E-P3 Instruction Manual (English)
Page 98
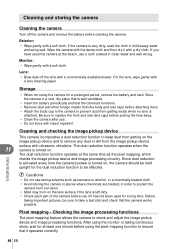
..., wipe gently with a soft cloth. Since dust reduction is activated every time the camera's power is well ventilated. • Insert the battery periodically and test the camera's functions. • Remove dust and other foreign matter from the body and rear caps before attaching them. ... function to keep dust from getting inside when no lens is turned on , the camera should be held upright for a prolonged period, remove the battery and card. Information # Cautions • Do not use . • Do not store with a commercially available blower. Pixel mapping - Lens:...
..., wipe gently with a soft cloth. Since dust reduction is activated every time the camera's power is well ventilated. • Insert the battery periodically and test the camera's functions. • Remove dust and other foreign matter from the body and rear caps before attaching them. ... function to keep dust from getting inside when no lens is turned on , the camera should be held upright for a prolonged period, remove the battery and card. Information # Cautions • Do not use . • Do not store with a commercially available blower. Pixel mapping - Lens:...


