ML6300FB User Manual
Page 4
Troubleshooting 43 Clearing paper jams 43 Cut sheet paper jammed in printer 43 Continuous forms jammed in printer 45 Responding to alarm conditions 46 Responding to general problems 47 Cleaning your printer 56 Printer exterior 56 Printer interior 56 Consumables and accessories 58 Consumables 58 Changing a ribbon cartridge 58 Ribbon cartridge order information 63 Accessories 63 Accessory order information 63 Specifications 64 Appendix A: Removing the Rear Cover 67 Removing the rear cover 67 Replacing the rear cover 68 > 4
Troubleshooting 43 Clearing paper jams 43 Cut sheet paper jammed in printer 43 Continuous forms jammed in printer 45 Responding to alarm conditions 46 Responding to general problems 47 Cleaning your printer 56 Printer exterior 56 Printer interior 56 Consumables and accessories 58 Consumables 58 Changing a ribbon cartridge 58 Ribbon cartridge order information 63 Accessories 63 Accessory order information 63 Specifications 64 Appendix A: Removing the Rear Cover 67 Removing the rear cover 67 Replacing the rear cover 68 > 4

ML6300FB User Manual
Page 6
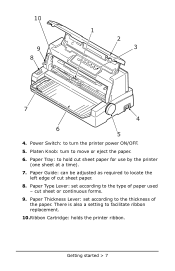
Keep closed for example when changing a ribbon cartridge. Getting started > 6 Print Head: prints the characters on page 27. Control Panel: contains button switches and indicators that allow you ever need to operate the printer. Getting started Retaining packing materials Please retain your packing materials and container in case you to ship or transport your printer. Identifying component parts Front view 10 1 2 9 3 8 7 4 6 5 1. Top Cover: open and close for access, for noise reduction. 3. See "Control panel" on the paper. 2.
Keep closed for example when changing a ribbon cartridge. Getting started > 6 Print Head: prints the characters on page 27. Control Panel: contains button switches and indicators that allow you ever need to operate the printer. Getting started Retaining packing materials Please retain your packing materials and container in case you to ship or transport your printer. Identifying component parts Front view 10 1 2 9 3 8 7 4 6 5 1. Top Cover: open and close for access, for noise reduction. 3. See "Control panel" on the paper. 2.
ML6300FB User Manual
Page 7
... required to the thickness of paper used - There is also a setting to hold cut sheet or continuous forms. 9. Paper Tray: to facilitate ribbon replacement. 10.Ribbon Cartridge: holds the printer ribbon. Power Switch: to turn to the type of the paper. 10 9 8 1 2 3 7 4 6 5 4. cut sheet paper for use by the printer (one sheet at...
... required to the thickness of paper used - There is also a setting to hold cut sheet or continuous forms. 9. Paper Tray: to facilitate ribbon replacement. 10.Ribbon Cartridge: holds the printer ribbon. Power Switch: to turn to the type of the paper. 10 9 8 1 2 3 7 4 6 5 4. cut sheet paper for use by the printer (one sheet at...

ML6300FB User Manual
Page 25
sensitive paper (40 gsm) 2 part X 3 part X 4 part X 5 part X 6 part X 5 - 9 See below See below Paper handling > 25 Setting the Paper Thickness lever There are 10 lever positions, the first 9 for different paper types as follows: Lever position Paper TYPE Cut sheet paper 1234 52 - 80 gsm X 81 - 127 gsm X 128 - 156 gsm X Envelope X Carbon paper or Pressure- Set the Paper Thickness lever for printing purposes and the tenth to facilitate ribbon replacement.
sensitive paper (40 gsm) 2 part X 3 part X 4 part X 5 part X 6 part X 5 - 9 See below See below Paper handling > 25 Setting the Paper Thickness lever There are 10 lever positions, the first 9 for different paper types as follows: Lever position Paper TYPE Cut sheet paper 1234 52 - 80 gsm X 81 - 127 gsm X 128 - 156 gsm X Envelope X Carbon paper or Pressure- Set the Paper Thickness lever for printing purposes and the tenth to facilitate ribbon replacement.

ML6300FB User Manual
Page 26
... 0.67 - 0.75 mm 0.76 - 0.84 mm Lever position 1 2 3 4 5 6 7 8 9 Notes Printing with the lever position set to 4 for paper thickness up to avoid possible pin breakage/ribbon snagging.
... 0.67 - 0.75 mm 0.76 - 0.84 mm Lever position 1 2 3 4 5 6 7 8 9 Notes Printing with the lever position set to 4 for paper thickness up to avoid possible pin breakage/ribbon snagging.

ML6300FB User Manual
Page 42
Do not use emphasis printing. Use this for printing multipart forms. You have to set emphasis printing by using a new ribbon. Operating instructions > 42 Emphasis printing CAUTION! In emphasis mode, ensure that duplication on the paper below it fails, use emphasis printing if performing horizontal tab ...
Do not use emphasis printing. Use this for printing multipart forms. You have to set emphasis printing by using a new ribbon. Operating instructions > 42 Emphasis printing CAUTION! In emphasis mode, ensure that duplication on the paper below it fails, use emphasis printing if performing horizontal tab ...

ML6300FB User Manual
Page 43
Set the Paper Thickness lever to OFF. 2. The Print Head may be hot after printing. Troubleshooting > 43 Set the Power Switch to the Replace Ribbon position (position 10). Open the Top Cover. 3. Allow it to ON. 1. Troubleshooting Clearing paper jams Cut sheet paper jammed in printer WARNING! Do not carry out any operations inside the printer with the Power Switch set to cool before touching it. WARNING!
Set the Paper Thickness lever to OFF. 2. The Print Head may be hot after printing. Troubleshooting > 43 Set the Power Switch to the Replace Ribbon position (position 10). Open the Top Cover. 3. Allow it to ON. 1. Troubleshooting Clearing paper jams Cut sheet paper jammed in printer WARNING! Do not carry out any operations inside the printer with the Power Switch set to cool before touching it. WARNING!
ML6300FB User Manual
Page 47
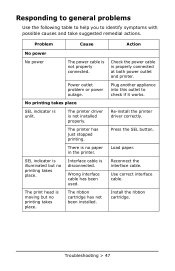
... printer. Use correct interface cable. Power outlet problem or power outage. Re-install the printer driver correctly. Press the SEL button. There is disconnected. The ribbon cartridge has not been installed. Responding to general problems Use the following table to help you to check if it works. Problem Cause Action No.... The printer driver is moving but no printing takes place. Load paper. Reconnect the interface cable. The print head is not installed properly. Install the ribbon cartridge.
... printer. Use correct interface cable. Power outlet problem or power outage. Re-install the printer driver correctly. Press the SEL button. There is disconnected. The ribbon cartridge has not been installed. Responding to general problems Use the following table to help you to check if it works. Problem Cause Action No.... The printer driver is moving but no printing takes place. Load paper. Reconnect the interface cable. The print head is not installed properly. Install the ribbon cartridge.
ML6300FB User Manual
Page 49
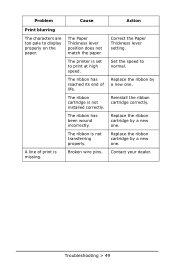
.... Set the speed to display properly on the paper. Contact your dealer. Replace the ribbon by a new one. A line of life. The ribbon cartridge is missing. Replace the ribbon cartridge by a new one . Replace the ribbon cartridge by a new one . The ribbon has reached its end of print is not installed correctly. Troubleshooting > 49 Reinstall...
.... Set the speed to display properly on the paper. Contact your dealer. Replace the ribbon by a new one. A line of life. The ribbon cartridge is missing. Replace the ribbon cartridge by a new one . Replace the ribbon cartridge by a new one . The ribbon has reached its end of print is not installed correctly. Troubleshooting > 49 Reinstall...

ML6300FB User Manual
Page 57
Using a soft cloth, cotton swabs and a vacuum cleaner, clean the interior of the printer with the suction nozzle to avoid possible damage to the printer. CAUTION! Cleaning your printer > 57 When you clean the interior of the printer as follows: 1 2 Where to Clean The carriage (1) and the area around it The paper travel surface (2) What to clean any parts smaller than the suction nozzle. Do not clean any interior working parts with a vacuum cleaner, do not attempt to Clean Clean and remove paper waste, dirt, dust and ribbon shreds.
Using a soft cloth, cotton swabs and a vacuum cleaner, clean the interior of the printer with the suction nozzle to avoid possible damage to the printer. CAUTION! Cleaning your printer > 57 When you clean the interior of the printer as follows: 1 2 Where to Clean The carriage (1) and the area around it The paper travel surface (2) What to clean any parts smaller than the suction nozzle. Do not clean any interior working parts with a vacuum cleaner, do not attempt to Clean Clean and remove paper waste, dirt, dust and ribbon shreds.
ML6300FB User Manual
Page 58
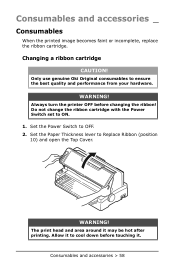
...the Power Switch to ON. 1. Allow it to cool down before changing the ribbon! Set the Paper Thickness lever to ensure the best quality and performance from your hardware. WARNING! Changing a ribbon cartridge CAUTION! Always turn the printer OFF before touching it may be hot after... printing. WARNING! The print head and area around it . Only use genuine Oki Original consumables to Replace Ribbon (position 10) and open the Top ...
...the Power Switch to ON. 1. Allow it to cool down before changing the ribbon! Set the Paper Thickness lever to ensure the best quality and performance from your hardware. WARNING! Changing a ribbon cartridge CAUTION! Always turn the printer OFF before touching it may be hot after... printing. WARNING! The print head and area around it . Only use genuine Oki Original consumables to Replace Ribbon (position 10) and open the Top ...

ML6300FB User Manual
Page 59
Hold the ribbon cartridge (1) with your fingers pressing on its ribbon guide (2) and slope it from the carriage. 1 2 Consumables and accessories > 59 3. Move the carriage (1) to remove it up and out to the cutout (2) for ribbon replacement position. 1 2 4.
Hold the ribbon cartridge (1) with your fingers pressing on its ribbon guide (2) and slope it from the carriage. 1 2 Consumables and accessories > 59 3. Move the carriage (1) to remove it up and out to the cutout (2) for ribbon replacement position. 1 2 4.

ML6300FB User Manual
Page 60
Remove the new ribbon cartridge from its wrapping and note the position of the cartridge in accordance with your local guidelines. 7. 5. Dispose of the Ribbon Guide (1), Knob (2) and Pin (3). 1 2 3 Consumables and accessories > 60 Holding the ribbon cartridge (1) close to both ends, slope it up and out until it unlocks then remove it along the direction indicated by the arrows. 1 6.
Remove the new ribbon cartridge from its wrapping and note the position of the cartridge in accordance with your local guidelines. 7. 5. Dispose of the Ribbon Guide (1), Knob (2) and Pin (3). 1 2 3 Consumables and accessories > 60 Holding the ribbon cartridge (1) close to both ends, slope it up and out until it unlocks then remove it along the direction indicated by the arrows. 1 6.

ML6300FB User Manual
Page 61
Hold the ribbon cartridge (1) with the topside of the ribbon cartridge (1) into the U grooves (2) in the printer until the ribbon cartridge is fully locked. Note It may make it easier to mount the ribbon cartridge in place if you align it with your fingers pressing on its ribbon guide (2) and slope it upward and inward Consumables and accessories > 61 Also, a slightly loose ribbon may be easier to mount the ribbon cartridge. 2 1 9. 8. In the direction indicated by the arrows, insert the pins at both ends of the grooves.
Hold the ribbon cartridge (1) with the topside of the ribbon cartridge (1) into the U grooves (2) in the printer until the ribbon cartridge is fully locked. Note It may make it easier to mount the ribbon cartridge in place if you align it with your fingers pressing on its ribbon guide (2) and slope it upward and inward Consumables and accessories > 61 Also, a slightly loose ribbon may be easier to mount the ribbon cartridge. 2 1 9. 8. In the direction indicated by the arrows, insert the pins at both ends of the grooves.

ML6300FB User Manual
Page 62
Do not turn the knob counterclockwise as the ribbon might jam. Make sure that the ribbon is not twisted or damaged when it goes through the gap between the Print Head and the ribbon guide. 1 Consumables and accessories > 62 CAUTION! along the guide rails until the ribbon guide (2) comes in line with the U slot at the top of the cartridge. 1 2 10.Turn the knob (1) clockwise (in the direction of the arrow) to wind up the ribbon.
Do not turn the knob counterclockwise as the ribbon might jam. Make sure that the ribbon is not twisted or damaged when it goes through the gap between the Print Head and the ribbon guide. 1 Consumables and accessories > 62 CAUTION! along the guide rails until the ribbon guide (2) comes in line with the U slot at the top of the cartridge. 1 2 10.Turn the knob (1) clockwise (in the direction of the arrow) to wind up the ribbon.

ML6300FB User Manual
Page 63
... Thickness lever to match the paper being used. (See "Setting the Paper Thickness lever" on page 25.) 13.Set the printer Power Switch to ON. Ribbon cartridge order information Item Ribbon cartridge (Black) Order no . 70012801 70051901 Consumables and accessories > 63
... Thickness lever to match the paper being used. (See "Setting the Paper Thickness lever" on page 25.) 13.Set the printer Power Switch to ON. Ribbon cartridge order information Item Ribbon cartridge (Black) Order no . 70012801 70051901 Consumables and accessories > 63

ML6300FB User Manual
Page 65
... Paper length Single-part Weight Pressure-sensitive Weight Number of copies Thickness Multipart-carbon-lined or multipart-interleaf Weight Number of copies Thickness Original OKI cartridge ribbon Ink color Ribbon life Print head life Dimensions Weight Specification Standard ASCII Epson (Italics/Graphics) IBM (Set1/Set2) Foreign Code Page 90 to 304.8 mm (3.54...
... Paper length Single-part Weight Pressure-sensitive Weight Number of copies Thickness Multipart-carbon-lined or multipart-interleaf Weight Number of copies Thickness Original OKI cartridge ribbon Ink color Ribbon life Print head life Dimensions Weight Specification Standard ASCII Epson (Italics/Graphics) IBM (Set1/Set2) Foreign Code Page 90 to 304.8 mm (3.54...
ML6300FB Safety & Warranty Manual
Page 3
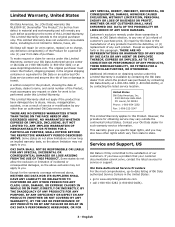
... WARRANTIES OF ANY KIND BY OKI DATA OR ANY AGENT OR EMPLOYEE THEREOF, EXPRESS OR IMPLIED, AS TO THE CONDITION OR PERFORMANCE OF ANY PRODUCTS, THEIR MERCHANTABILITY, OR FITNESS FOR A PARTICULAR PURPOSE, OR OTHERWISE. Mt. This Limited Warranty extends to ribbons, fuses, etc. A written... receipt for work to be performed under this Limited Warranty is firmly committed to the satisfaction of Oki Data authorized Service Centers in the United States: • go to www....
... WARRANTIES OF ANY KIND BY OKI DATA OR ANY AGENT OR EMPLOYEE THEREOF, EXPRESS OR IMPLIED, AS TO THE CONDITION OR PERFORMANCE OF ANY PRODUCTS, THEIR MERCHANTABILITY, OR FITNESS FOR A PARTICULAR PURPOSE, OR OTHERWISE. Mt. This Limited Warranty extends to ribbons, fuses, etc. A written... receipt for work to be performed under this Limited Warranty is firmly committed to the satisfaction of Oki Data authorized Service Centers in the United States: • go to www....

ML6300FB Safety & Warranty Manual
Page 6
... available. Sensitivity: Not available. Reproductive Toxicity: Not available. Incompatibility: None. Desirable in some cases. Spill Cleanup If ribbon is inadvertently released, it should be rewound. Precautions for 43503601 Black Ribbon For more information, contact Oki Data at: 2000 Bishops Gate Boulevard, Mount Laurel, NJ 08054-4620. Hazardous Ingredients Mineral Oil (4% by weight) CAS...
... available. Sensitivity: Not available. Reproductive Toxicity: Not available. Incompatibility: None. Desirable in some cases. Spill Cleanup If ribbon is inadvertently released, it should be rewound. Precautions for 43503601 Black Ribbon For more information, contact Oki Data at: 2000 Bishops Gate Boulevard, Mount Laurel, NJ 08054-4620. Hazardous Ingredients Mineral Oil (4% by weight) CAS...
