
User Guide
Page 4
Rear Cover removal 65 Removal 65 Refitting 66 Index 67 Oki Printing Solutions contact details 68 Preface > 4 Initialising menu settings 40 Adjusting TOF position 41 Quick printer settings 42 Printer impact mode 42 Troubleshooting 44 Clearing ... alarm conditions 47 Responding to general problems 48 Cleaning your printer 54 Printer exterior 54 Printer interior 54 Consumables and accessories 56 Consumables 56 Changing a ribbon cartridge 56 Consumable order information 61 Accessories 61 Accessory order information 61 Specifications 62 Appendix A -
Rear Cover removal 65 Removal 65 Refitting 66 Index 67 Oki Printing Solutions contact details 68 Preface > 4 Initialising menu settings 40 Adjusting TOF position 41 Quick printer settings 42 Printer impact mode 42 Troubleshooting 44 Clearing ... alarm conditions 47 Responding to general problems 48 Cleaning your printer 54 Printer exterior 54 Printer interior 54 Consumables and accessories 56 Consumables 56 Changing a ribbon cartridge 56 Consumable order information 61 Accessories 61 Accessory order information 61 Specifications 62 Appendix A -

User Guide
Page 10
... a setting to hold cut sheet paper for use by the printer (one sheet at a time). 7. Paper Tray: to facilitate ribbon replacement. 10. Ribbon Cartridge: holds the printer ribbon. Keep closed for example when changing a ribbon cartridge. cut sheet paper. 8. Paper Type Lever: set according to turn to the type of cut sheet or continuous...
... a setting to hold cut sheet paper for use by the printer (one sheet at a time). 7. Paper Tray: to facilitate ribbon replacement. 10. Ribbon Cartridge: holds the printer ribbon. Keep closed for example when changing a ribbon cartridge. cut sheet paper. 8. Paper Type Lever: set according to turn to the type of cut sheet or continuous...

User Guide
Page 26
... the Pin Tractor covers. 7. Lift the Pin Tractor covers (1) and remove the forms. 1 6. Close the Rear Cover by gently pulling it out horizontally to facilitate ribbon replacement. 4. Set the Paper Thickness lever for printing purposes and the tenth to the end of its travel then swinging it upwards until it locks...
... the Pin Tractor covers. 7. Lift the Pin Tractor covers (1) and remove the forms. 1 6. Close the Rear Cover by gently pulling it out horizontally to facilitate ribbon replacement. 4. Set the Paper Thickness lever for printing purposes and the tenth to the end of its travel then swinging it upwards until it locks...

User Guide
Page 27
... - 0.66 mm 7 0.67 - 0.75 mm 8 0.76 - 0.84 mm 9 NOTE Printing with the lever position set to 4 for paper thickness up to avoid possible pin breakage/ribbon snagging. If the lever position does not suit the paper thickness, paper feeding and printing may decline resulting in illegible characters for carbon paper may...
... - 0.66 mm 7 0.67 - 0.75 mm 8 0.76 - 0.84 mm 9 NOTE Printing with the lever position set to 4 for paper thickness up to avoid possible pin breakage/ribbon snagging. If the lever position does not suit the paper thickness, paper feeding and printing may decline resulting in illegible characters for carbon paper may...

User Guide
Page 43
The print may become blurred if high density characters and graphics are printed using a new ribbon. Operating instructions > 43 In emphasis printing mode, printing is flat to avoid possible printing errors. In emphasis mode, ensure that duplication on the paper below it fails, use emphasis printing. NOTE If the paper on top is so thick that the paper is carried out twice.
The print may become blurred if high density characters and graphics are printed using a new ribbon. Operating instructions > 43 In emphasis printing mode, printing is flat to avoid possible printing errors. In emphasis mode, ensure that duplication on the paper below it fails, use emphasis printing. NOTE If the paper on top is so thick that the paper is carried out twice.

User Guide
Page 44
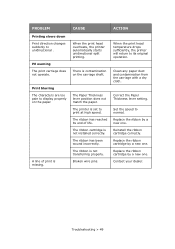
The Print Head may be hot after printing. Allow it to the Replace Ribbon position (position 10). WARNING! Set the Paper Thickness lever to cool before touching it. Do not carry out any operations inside the printer with the Power Switch set to OFF. 2. Troubleshooting > 44 TROUBLESHOOTING CLEARING PAPER JAMS CUT SHEET PAPER JAMMED IN PRINTER WARNING! Open the Top Cover. 3. Set the Power Switch to ON. 1.
The Print Head may be hot after printing. Allow it to the Replace Ribbon position (position 10). WARNING! Set the Paper Thickness lever to cool before touching it. Do not carry out any operations inside the printer with the Power Switch set to OFF. 2. Troubleshooting > 44 TROUBLESHOOTING CLEARING PAPER JAMS CUT SHEET PAPER JAMMED IN PRINTER WARNING! Open the Top Cover. 3. Set the Power Switch to ON. 1.
User Guide
Page 48
... installed properly. Use correct interface cable. When the printer is not properly connected. Check the power cable is disconnected. Install the ribbon cartridge. Power outlet problem or power outage. The ribbon cartridge has not been installed. The printer has just stopped printing. Inrterface cable is properly connected at both power outlet and...
... installed properly. Use correct interface cable. When the printer is not properly connected. Check the power cable is disconnected. Install the ribbon cartridge. Power outlet problem or power outage. The ribbon cartridge has not been installed. The printer has just stopped printing. Inrterface cable is properly connected at both power outlet and...
User Guide
Page 49
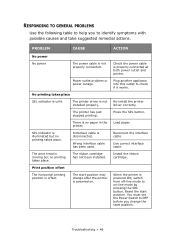
...at high speed. Troubleshooting > 49 PE warning The print carriage does not operate. A line of life. The ribbon cartridge is missing. The ribbon has been wound incorrectly. Clean any paper dust and contamination from the carriage with a dry cloth. Print blurring ... dealer. When the print head overheats, the printer automatically starts unidirectional split printing. Reinstall the ribbon cartridge correctly. The ribbon has reached its original operation. Replace the ribbon cartridge by a new one. PROBLEM CAUSE ACTION Printing slows down Print direction changes suddenly to ...
...at high speed. Troubleshooting > 49 PE warning The print carriage does not operate. A line of life. The ribbon cartridge is missing. The ribbon has been wound incorrectly. Clean any paper dust and contamination from the carriage with a dry cloth. Print blurring ... dealer. When the print head overheats, the printer automatically starts unidirectional split printing. Reinstall the ribbon cartridge correctly. The ribbon has reached its original operation. Replace the ribbon cartridge by a new one. PROBLEM CAUSE ACTION Printing slows down Print direction changes suddenly to ...

User Guide
Page 55
Using a soft cloth, cotton swabs and a vacuum cleaner, clean the interior of the printer with a vacuum cleaner, do not attempt to clean any interior working parts with the suction nozzle to avoid possible damage to the printer. Do not clean any parts smaller than the suction nozzle. CAUTION! Cleaning your printer > 55 When you clean the interior of the printer as follows: 1 2 WHERE TO CLEAN The carriage (1) and the area around it The paper travel surface (2) WHAT TO CLEAN Clean and remove paper waste, dirt, dust and ribbon shreds.
Using a soft cloth, cotton swabs and a vacuum cleaner, clean the interior of the printer with a vacuum cleaner, do not attempt to clean any interior working parts with the suction nozzle to avoid possible damage to the printer. Do not clean any parts smaller than the suction nozzle. CAUTION! Cleaning your printer > 55 When you clean the interior of the printer as follows: 1 2 WHERE TO CLEAN The carriage (1) and the area around it The paper travel surface (2) WHAT TO CLEAN Clean and remove paper waste, dirt, dust and ribbon shreds.

User Guide
Page 56
... hardware. WARNING! Set the Paper Thickness lever to ON. 1. Only use genuine Oki Original consumables to OFF. 2. Do not change the ribbon cartridge with the Power Switch set to Replace Ribbon (position 10) and open the Top Cover. WARNING! Set the Power Switch to... quality and performance from your warranty. Non-Oki Original products may be hot after printing. Consumables and accessories > 56 CONSUMABLES AND ACCESSORIES CONSUMABLES When the printed image becomes faint or incomplete, replace the ribbon cartridge. CHANGING A RIBBON CARTRIDGE CAUTION! The print head and area ...
... hardware. WARNING! Set the Paper Thickness lever to ON. 1. Only use genuine Oki Original consumables to OFF. 2. Do not change the ribbon cartridge with the Power Switch set to Replace Ribbon (position 10) and open the Top Cover. WARNING! Set the Power Switch to... quality and performance from your warranty. Non-Oki Original products may be hot after printing. Consumables and accessories > 56 CONSUMABLES AND ACCESSORIES CONSUMABLES When the printed image becomes faint or incomplete, replace the ribbon cartridge. CHANGING A RIBBON CARTRIDGE CAUTION! The print head and area ...

User Guide
Page 57
Move the carriage (1) to remove it from the carriage. 1 2 Consumables and accessories > 57 3. Hold the ribbon cartridge (1) with your fingers pressing on its ribbon guide (2) and slope it up and out to the cutout (2) for ribbon replacement position. 1 2 4.
Move the carriage (1) to remove it from the carriage. 1 2 Consumables and accessories > 57 3. Hold the ribbon cartridge (1) with your fingers pressing on its ribbon guide (2) and slope it up and out to the cutout (2) for ribbon replacement position. 1 2 4.

User Guide
Page 58
Holding the ribbon cartridge (1) close to both ends, slope it up and out until it unlocks then remove it along the direction indicated by the arrows. 1 6. Remove the new ribbon cartridge from its wrapping and note the position of the cartridge in accordance with your local guidelines. 7. Dispose of the Ribbon Guide (1), Knob (2) and Pin (3). 1 2 3 Consumables and accessories > 58 5.
Holding the ribbon cartridge (1) close to both ends, slope it up and out until it unlocks then remove it along the direction indicated by the arrows. 1 6. Remove the new ribbon cartridge from its wrapping and note the position of the cartridge in accordance with your local guidelines. 7. Dispose of the Ribbon Guide (1), Knob (2) and Pin (3). 1 2 3 Consumables and accessories > 58 5.

User Guide
Page 59
... (2) comes in line with the topside of the cartridge. 1 2 Consumables and accessories > 59 8. Also, a slightly loose ribbon may be easier to mount the ribbon cartridge. 2 1 9. In the direction indicated by the arrows, insert the pins at the top of the grooves. NOTE It may make it with the U slot... at both ends of the ribbon cartridge (1) into the U grooves (2) in place if you align it easier to mount the ribbon cartridge in the printer until the ribbon cartridge is fully locked.
... (2) comes in line with the topside of the cartridge. 1 2 Consumables and accessories > 59 8. Also, a slightly loose ribbon may be easier to mount the ribbon cartridge. 2 1 9. In the direction indicated by the arrows, insert the pins at the top of the grooves. NOTE It may make it with the U slot... at both ends of the ribbon cartridge (1) into the U grooves (2) in place if you align it easier to mount the ribbon cartridge in the printer until the ribbon cartridge is fully locked.

User Guide
Page 60
Do not turn the knob anticlockwise as the ribbon might jam. Set the Paper Thickness lever to ON. Consumables and accessories > 60 Make sure that the ribbon is not twisted or damaged when it goes through the gap between the Print Head and the ribbon guide. 1 11. Set the printer Power Switch to match the paper being used. (See "Setting the Paper Thickness lever" on page 26.) 13. Close the printer Top Cover. 12. 10. Turn the knob (1) clockwise (in the direction of the arrow) to wind up the ribbon. CAUTION!
Do not turn the knob anticlockwise as the ribbon might jam. Set the Paper Thickness lever to ON. Consumables and accessories > 60 Make sure that the ribbon is not twisted or damaged when it goes through the gap between the Print Head and the ribbon guide. 1 11. Set the printer Power Switch to match the paper being used. (See "Setting the Paper Thickness lever" on page 26.) 13. Close the printer Top Cover. 12. 10. Turn the knob (1) clockwise (in the direction of the arrow) to wind up the ribbon. CAUTION!

User Guide
Page 61
... for your printer: > RS-232C Serial Interface > OL7120e 100BASE-TX/10BASE-T Network Interface Installation instructions are supplied with the accessories. CONSUMABLE ORDER INFORMATION ITEM LIFE Ribbon cartridge (Black) 4 million characters ORDER NO. 43503601 ACCESSORIES The following accessories are available for the OL7120e.
... for your printer: > RS-232C Serial Interface > OL7120e 100BASE-TX/10BASE-T Network Interface Installation instructions are supplied with the accessories. CONSUMABLE ORDER INFORMATION ITEM LIFE Ribbon cartridge (Black) 4 million characters ORDER NO. 43503601 ACCESSORIES The following accessories are available for the OL7120e.

User Guide
Page 63
... Paper length Single-part Weight Pressure-sensitive Weight Number of copies Thickness Multipart-carbon-lined or multipart-interleaf Weight Number of copies Thickness Original OKI cartridge ribbon Ink color Ribbon life Print head life Dimensions Weight Power rating Voltage Frequency Power consumption Operation Standby mode Powersave mode Power cable Interfaces SPECIFICATION 90 to...
... Paper length Single-part Weight Pressure-sensitive Weight Number of copies Thickness Multipart-carbon-lined or multipart-interleaf Weight Number of copies Thickness Original OKI cartridge ribbon Ink color Ribbon life Print head life Dimensions Weight Power rating Voltage Frequency Power consumption Operation Standby mode Powersave mode Power cable Interfaces SPECIFICATION 90 to...
