
User Guide
Page 5
TABLE OF CONTENTS Preface SAFETY i ENERGY STAR iii TABLE OF CONTENTS v Set Up INSTALLATION 1 Components 1 Unpacking 1 Installing Ribbon Cartridge 2 Paper Support 3 Computer & Power Connection 4 PRINTER DRIVER 5 Windows 95/98 5 Windows 3.1x 5 Windows NT 4.0 6 PAPER 6 Front Paper Feed Loading 7 Rear Paper Feed Loading 7 Changing ...
TABLE OF CONTENTS Preface SAFETY i ENERGY STAR iii TABLE OF CONTENTS v Set Up INSTALLATION 1 Components 1 Unpacking 1 Installing Ribbon Cartridge 2 Paper Support 3 Computer & Power Connection 4 PRINTER DRIVER 5 Windows 95/98 5 Windows 3.1x 5 Windows NT 4.0 6 PAPER 6 Front Paper Feed Loading 7 Rear Paper Feed Loading 7 Changing ...

User Guide
Page 6
MAINTENANCE 21 Replacing Ribbon Cartridge 21 Clearing Paper Jams 22 Rear Feed 22 Front Feed 22 Cleaning 23 TROUBLESHOOTING 24 ALARMS/ERROR MESSAGES 24 Recoverable Alarms 24 Non-Recoverable ...
MAINTENANCE 21 Replacing Ribbon Cartridge 21 Clearing Paper Jams 22 Rear Feed 22 Front Feed 22 Cleaning 23 TROUBLESHOOTING 24 ALARMS/ERROR MESSAGES 24 Recoverable Alarms 24 Non-Recoverable ...
User Guide
Page 9
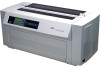
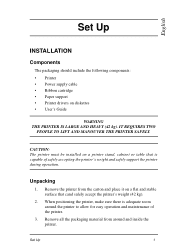
... accept the printer's weight (42 kg). 2. English Set Up INSTALLATION Components The packaging should include the following components: • Printer • Power supply cable • Ribbon cartridge • Paper support • Printer drivers on a flat and stable surface that is adequate room around and inside the printer.
... accept the printer's weight (42 kg). 2. English Set Up INSTALLATION Components The packaging should include the following components: • Printer • Power supply cable • Ribbon cartridge • Paper support • Printer drivers on a flat and stable surface that is adequate room around and inside the printer.
User Guide
Page 10
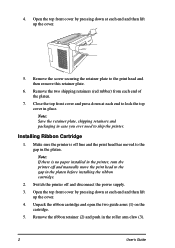
... top front cover by pressing down at each end to ship the printer. Unpack the ribbon cartridge and open the two guide arms (1) on the cartridge. 5. Remove the ribbon retainer (2) and push in the platen before installing the ribbon cartridge. 2. Close the top front cover and press down at each end and then...
... top front cover by pressing down at each end to ship the printer. Unpack the ribbon cartridge and open the two guide arms (1) on the cartridge. 5. Remove the ribbon retainer (2) and push in the platen before installing the ribbon cartridge. 2. Close the top front cover and press down at each end and then...
User Guide
Page 11
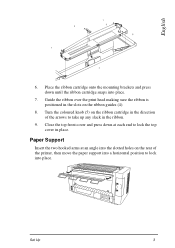
Paper Support Insert the two hooked arms at each end to lock into place. Guide the ribbon over the print head making sure the ribbon is positioned in the slots on the ribbon cartridge in the direction of the printer, then move the paper support into place. 7. Close the top ...front cover and press down until the ribbon cartridge snaps into a horizontal position to lock the top cover in the ribbon. 9. Turn the coloured knob (5) on the ribbon guides (4). 8. Set Up 3 Place the ribbon cartridge onto the mounting brackets and press down at an angle into the...
Paper Support Insert the two hooked arms at each end to lock into place. Guide the ribbon over the print head making sure the ribbon is positioned in the slots on the ribbon cartridge in the direction of the printer, then move the paper support into place. 7. Close the top ...front cover and press down until the ribbon cartridge snaps into a horizontal position to lock the top cover in the ribbon. 9. Turn the coloured knob (5) on the ribbon guides (4). 8. Set Up 3 Place the ribbon cartridge onto the mounting brackets and press down at an angle into the...
User Guide
Page 29
...want the printer to the gap in the platen. 2. Diagnostic Test: Activates the interface diagnostic test for the busy signal. MAINTENANCE Replacing Ribbon Cartridge 1. Remove and discard the used when the serial interface is selected. #Serial Bits: Selects data format. I-Prime: Determines what ...Buffer print prints out the buffer contents before resetting, buffer clear dumps the buffer contents immediately and invalid causes the printer to Installing Ribbon Cartridge in one direction only. DSR Signal: Sets the data set ready (DSR) signal. Busy Time: Sets the busy signal timing...
...want the printer to the gap in the platen. 2. Diagnostic Test: Activates the interface diagnostic test for the busy signal. MAINTENANCE Replacing Ribbon Cartridge 1. Remove and discard the used when the serial interface is selected. #Serial Bits: Selects data format. I-Prime: Determines what ...Buffer print prints out the buffer contents before resetting, buffer clear dumps the buffer contents immediately and invalid causes the printer to Installing Ribbon Cartridge in one direction only. DSR Signal: Sets the data set ready (DSR) signal. Busy Time: Sets the busy signal timing...

User Guide
Page 33
... Alarms If the Alarm indicator flashes red and the first line in Chapter 1). Make sure the paper has parked correctly. Make sure the ribbon is loaded correctly. Remove any paper causing the jam and make sure the paper is installed correctly (refer to jam. The printer pauses between...PROGRAM-ROM EEPROM INVALID IPT HOMING HEAD THERMISTOR S-RAM CG-ROM WDT SPACING FUSE AUTO GAP Operation 25 Path Change Jam Indicates that the ribbon is then completed by the printer. The second line of the print head is loaded correctly. Paper Jam Indicates that the temperature of ...
... Alarms If the Alarm indicator flashes red and the first line in Chapter 1). Make sure the paper has parked correctly. Make sure the ribbon is loaded correctly. Remove any paper causing the jam and make sure the paper is installed correctly (refer to jam. The printer pauses between...PROGRAM-ROM EEPROM INVALID IPT HOMING HEAD THERMISTOR S-RAM CG-ROM WDT SPACING FUSE AUTO GAP Operation 25 Path Change Jam Indicates that the ribbon is then completed by the printer. The second line of the print head is loaded correctly. Paper Jam Indicates that the temperature of ...

User Guide
Page 34
PATH CHANGE POWER FAN HEAD 2 FAN MAIN LSI RIBBON LCD TIME OUT OPT CARD RAM OKI HSP CONNECT CENTERING HEAD 1 FAN SPACE FAN BAIL OPTICAL SENSOR OPT CARD ROM OPT CARD CONNECT If a non-recoverable alarm or error occurs, switch the printer off and then back on. If this does not clear the alarm or error, contact the dealer or manufacturer for technical support. 26 User's Guide
PATH CHANGE POWER FAN HEAD 2 FAN MAIN LSI RIBBON LCD TIME OUT OPT CARD RAM OKI HSP CONNECT CENTERING HEAD 1 FAN SPACE FAN BAIL OPTICAL SENSOR OPT CARD ROM OPT CARD CONNECT If a non-recoverable alarm or error occurs, switch the printer off and then back on. If this does not clear the alarm or error, contact the dealer or manufacturer for technical support. 26 User's Guide
User Guide
Page 120
... Load Jam 24 Paper End 24 Paper Jam 25 Park Jam 25 Path Change Jam 25 Ribbon Jam 25 SP Thermal 25 Registration 20 Reset Button 13 Reset Inhibit 20 Ribbon Cartridge Installing 2 Replacing 21 Ribbon Jam 25 Ribbon Jam 25 User's Guide Microfeed Down Button 14 Microfeed Up Button 14 Miscellaneous 69 Miscellaneous...
... Load Jam 24 Paper End 24 Paper Jam 25 Park Jam 25 Path Change Jam 25 Ribbon Jam 25 SP Thermal 25 Registration 20 Reset Button 13 Reset Inhibit 20 Ribbon Cartridge Installing 2 Replacing 21 Ribbon Jam 25 Ribbon Jam 25 User's Guide Microfeed Down Button 14 Microfeed Up Button 14 Miscellaneous 69 Miscellaneous...
