PrintSuperVision Configuration Guide
Page 61
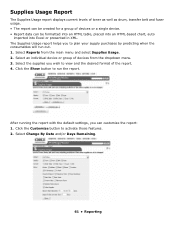
Supplies Usage Report The Supplies Usage report displays current levels of toner as well as drum, transfer belt and fuser usage. • The report can be formatted into an HTML table, placed into an HTML-based chart, auto imported into Excel ...
Supplies Usage Report The Supplies Usage report displays current levels of toner as well as drum, transfer belt and fuser usage. • The report can be formatted into an HTML table, placed into an HTML-based chart, auto imported into Excel ...
PrintSuperVision Configuration Guide
Page 69
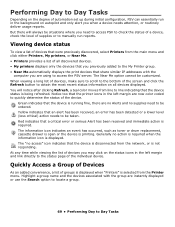
The information icon indicates an event has occurred, such as toner or drum replacement, cassette drawer is open or the device is selected from line to line indicating that the device status is displayed. At any time while ...
The information icon indicates an event has occurred, such as toner or drum replacement, cassette drawer is open or the device is selected from line to line indicating that the device status is displayed. At any time while ...

User Guide
Page 5
... 62 Printing with PCL overlays 63 Replacing consumable items 64 C830 Consumable order details 64 C810 Consumable order details 65 Toner cartridge replacement 65 Image drum replacement 68 Transfer belt replacement 71 Fuser replacement 73 Cleaning the LED head 74 Installing upgrades 75 Duplex unit 76 Memory upgrade (C830 77 Hard...
... 62 Printing with PCL overlays 63 Replacing consumable items 64 C830 Consumable order details 64 C810 Consumable order details 65 Toner cartridge replacement 65 Image drum replacement 68 Transfer belt replacement 71 Fuser replacement 73 Cleaning the LED head 74 Installing upgrades 75 Duplex unit 76 Memory upgrade (C830 77 Hard...

User Guide
Page 26
COLOR MENU The printer automatically adjusts color balance and density at the end of 100, 300 and 500 drum counts. Image density will be fed before forcing a page eject. If a 500 drum count interval occurs during a print job it will take up to 55 seconds. ITEMS POW SAVE DELAY ... whether the printer should perform jam recovery after a low toner condition is detected. Menu functions - The items on , when a new image drum or toner cartridge is sent the printer will permit automatic adjustment of changing the default settings for paper to be automatically adjusted at power on...
COLOR MENU The printer automatically adjusts color balance and density at the end of 100, 300 and 500 drum counts. Image density will be fed before forcing a page eject. If a 500 drum count interval occurs during a print job it will take up to 55 seconds. ITEMS POW SAVE DELAY ... whether the printer should perform jam recovery after a low toner condition is detected. Menu functions - The items on , when a new image drum or toner cartridge is sent the printer will permit automatic adjustment of changing the default settings for paper to be automatically adjusted at power on...

User Guide
Page 29
...EXPLANATION Enter Password Custom Process OP Menu ALL CATEGORY INFORMATION MENU SHUTDOWN NENU xxxxxxxxxxxx FULL COLOR MONOCHROME CUSTOM COLOR C DRUM CHECK M DRUM CHECK Y DRUM CHECK Enter a password to gain entry to ONLINE, the printer restarts. FULL COLOR - After the setting change,...numeric characters (or mix) The default value is removed. Menu functions - uses a limited-color-print function. ITEM K DRUM LIFE C DRUM LIFE M DRUM LIFE Y DRUM LIFE BELT LIFE FUSER LIFE K TONER C TONER M TONER Y TONER DISPLAY REMAINING nnnnnn EXPLANATION Percentage of life remaining in...
...EXPLANATION Enter Password Custom Process OP Menu ALL CATEGORY INFORMATION MENU SHUTDOWN NENU xxxxxxxxxxxx FULL COLOR MONOCHROME CUSTOM COLOR C DRUM CHECK M DRUM CHECK Y DRUM CHECK Enter a password to gain entry to ONLINE, the printer restarts. FULL COLOR - After the setting change,...numeric characters (or mix) The default value is removed. Menu functions - uses a limited-color-print function. ITEM K DRUM LIFE C DRUM LIFE M DRUM LIFE Y DRUM LIFE BELT LIFE FUSER LIFE K TONER C TONER M TONER Y TONER DISPLAY REMAINING nnnnnn EXPLANATION Percentage of life remaining in...

User Guide
Page 30
... will not appear. If DISABLE is selected, this menu will not appear FILE SYS MAINT ! Enables/disables the LED control when NearLife warning of a toner, drum, fuser, or belt occurs. YES/NO If NO is lighted when enabled, not lighted when disabled. (Displays LCD message). If YES is selected ADMIN MENU...
... will not appear. If DISABLE is selected, this menu will not appear FILE SYS MAINT ! Enables/disables the LED control when NearLife warning of a toner, drum, fuser, or belt occurs. YES/NO If NO is lighted when enabled, not lighted when disabled. (Displays LCD message). If YES is selected ADMIN MENU...

User Guide
Page 35
... MENU ITEM Tray Count Supplies Life Network System ACTION Tray1 Tray 2* Tray 3* MPT Tray *Note: Only available when optional trays are present Cyan Drum Magenta Drum Yellow Drum Black Drum Belt Fuser Cyan Toner Magenta Toner Yellow Toner Black Toner Printer Name Short Printer Name IP Address Subnet Mask Gateway Address MAC Address Network...
... MENU ITEM Tray Count Supplies Life Network System ACTION Tray1 Tray 2* Tray 3* MPT Tray *Note: Only available when optional trays are present Cyan Drum Magenta Drum Yellow Drum Black Drum Belt Fuser Cyan Toner Magenta Toner Yellow Toner Black Toner Printer Name Short Printer Name IP Address Subnet Mask Gateway Address MAC Address Network...

User Guide
Page 41
... that no hard disk data is turned off the power supply switch restores Normal Mode. ITEM ACTION EXPLANATION System Adjust (cont.) Drum Cleaning Default: Off Sets whether to rotate the drum in idle prior to printing in the hexadecimal Dump. Turning off . Menu functions - C830 > 41 Hex Dump Execute Prints out data...
... that no hard disk data is turned off the power supply switch restores Normal Mode. ITEM ACTION EXPLANATION System Adjust (cont.) Drum Cleaning Default: Off Sets whether to rotate the drum in idle prior to printing in the hexadecimal Dump. Turning off . Menu functions - C830 > 41 Hex Dump Execute Prints out data...

User Guide
Page 51
... changed by selecting the partition size to the previous menu. Are You Sure? Execute Now? Sets the LCD display control whennear life warning of toner, drum, fuser, or belt occurs. ATTENTION LED is modified, Initialization of partition. If a HDD, which has been used layout will return to the whole HDD ...are also modified.) If any partition size is lit if ENABLED Controls the settings of the Attention LED when near end of life warning of a drum, fuser or trancfer belt occurs. If Yes is put into the memory and formatting will be executed at next power cycle. The request to ...
... changed by selecting the partition size to the previous menu. Are You Sure? Execute Now? Sets the LCD display control whennear life warning of toner, drum, fuser, or belt occurs. ATTENTION LED is modified, Initialization of partition. If a HDD, which has been used layout will return to the whole HDD ...are also modified.) If any partition size is lit if ENABLED Controls the settings of the Attention LED when near end of life warning of a drum, fuser or trancfer belt occurs. If Yes is put into the memory and formatting will be executed at next power cycle. The request to ...

User Guide
Page 64
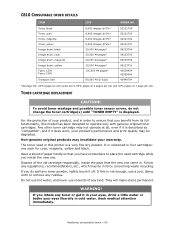
...> Toner: Starter Cartridge: The printer is shipped with sufficient Cyan, Magenta, Yellow & Black toner for 2,000 images (ISO/IEC19798), of drum rotations, simplex printing on typical office usage where 20% of printing is 1 page only, 30% is 3 page documents and 50% is ...replace consumable items when due. C830 CONSUMABLE ORDER DETAILS ITEM LIFE ORDER NO. Toner, black Toner, cyan Toner, magenta Toner, yellow Image drum, black Image drum, cyan Image drum, magenta Image drum, yellow Fuser, 120V Fuser, 230V Transport belt 8,000 images @ 5%* 8,000 images @ 5%* 8,000 images @ 5%* 8,000 images ...
...> Toner: Starter Cartridge: The printer is shipped with sufficient Cyan, Magenta, Yellow & Black toner for 2,000 images (ISO/IEC19798), of drum rotations, simplex printing on typical office usage where 20% of printing is 1 page only, 30% is 3 page documents and 50% is ...replace consumable items when due. C830 CONSUMABLE ORDER DETAILS ITEM LIFE ORDER NO. Toner, black Toner, cyan Toner, magenta Toner, yellow Image drum, black Image drum, cyan Image drum, magenta Image drum, yellow Fuser, 120V Fuser, 230V Transport belt 8,000 images @ 5%* 8,000 images @ 5%* 8,000 images @ 5%* 8,000 images ...
User Guide
Page 65
... errors, do spill any toner or get it is a very fine dry powder. Toner, black Toner, cyan Toner, magenta Toner, yellow Image drum, black Image drum, cyan Image drum, magenta Image drum, yellow Fuser, 120V Fuser, 230V Transport belt 8,000 images @ 5%* 8,000 images @ 5%* 8,000 images @ 5%* 8,000 images @ 5%* 20,000 A4 pages* 20,000 A4...
... errors, do spill any toner or get it is a very fine dry powder. Toner, black Toner, cyan Toner, magenta Toner, yellow Image drum, black Image drum, cyan Image drum, magenta Image drum, yellow Fuser, 120V Fuser, 230V Transport belt 8,000 images @ 5%* 8,000 images @ 5%* 8,000 images @ 5%* 8,000 images @ 5%* 20,000 A4 pages* 20,000 A4...

User Guide
Page 66
... printer's top cover fully. WARNING! a b 3. Remove the new cartridge from marking your furniture. 6. Lift the right-hand end of the four toner cartridges (a) and image drums (b).It is clearly labelled. Note the positions of the cartridge and then draw the cartridge to the right to be hot. b a 4. Replacing consumable items > 66...
... printer's top cover fully. WARNING! a b 3. Remove the new cartridge from marking your furniture. 6. Lift the right-hand end of the four toner cartridges (a) and image drums (b).It is clearly labelled. Note the positions of the cartridge and then draw the cartridge to the right to be hot. b a 4. Replacing consumable items > 66...

User Guide
Page 67
... colored lever to the right, lower it is firmly seated, push the colored lever (c) towards the rear of the printer. Pressing gently down on the drum unit, then lower the right end of the cartridge. 9. Finally, close the top cover and press down onto the image.... 12. This will lock the cartridge into place and release toner into the top of the image drum unit first (a), pushing it against the spring on the cartridge to loosen and distribute the toner evenly inside the cartridge. 8. a c b 11. 7. Remove the wrapping material ...
... colored lever to the right, lower it is firmly seated, push the colored lever (c) towards the rear of the printer. Pressing gently down on the drum unit, then lower the right end of the cartridge. 9. Finally, close the top cover and press down onto the image.... 12. This will lock the cartridge into place and release toner into the top of the image drum unit first (a), pushing it against the spring on the cartridge to loosen and distribute the toner evenly inside the cartridge. 8. a c b 11. 7. Remove the wrapping material ...

User Guide
Page 68
Static sensitive devices, handle with its top centre, lift the image drum, complete with care. It is clearly labelled. Press the cover release and open the printer's top cover fully. WARNING! Note the positions of the printer. ... they go back in the same order. Do not touch. 2. Holding it by its toner cartridge, up and out of the four cartridges (a) and image drums (b). a b 3. IMAGE DRUM REPLACEMENT CAUTION! Replacing consumable items > 68 The printer contains four image...
Static sensitive devices, handle with its top centre, lift the image drum, complete with care. It is clearly labelled. Press the cover release and open the printer's top cover fully. WARNING! Note the positions of the printer. ... they go back in the same order. Do not touch. 2. Holding it by its toner cartridge, up and out of the four cartridges (a) and image drums (b). a b 3. IMAGE DRUM REPLACEMENT CAUTION! Replacing consumable items > 68 The printer contains four image...

User Guide
Page 69
...this time unless the remaining toner level is very delicate and light sensitive. Push the left -hand end as the old unit. The green image drum surface at this , please wrap the cartridge inside the packaging material for disposal. 8. Do not touch it and do not expose it away ...from marking your furniture and to avoid marking your furniture. 7. This will release the bond between the toner cartridge and the image drum cartridge. 6. 4. With the colored toner release lever to direct sunlight or very bright room lighting. 5. Place the cartridge on the piece of the ...
...this time unless the remaining toner level is very delicate and light sensitive. Push the left -hand end as the old unit. The green image drum surface at this , please wrap the cartridge inside the packaging material for disposal. 8. Do not touch it and do not expose it away ...from marking your furniture and to avoid marking your furniture. 7. This will release the bond between the toner cartridge and the image drum cartridge. 6. 4. With the colored toner release lever to direct sunlight or very bright room lighting. 5. Place the cartridge on the piece of the ...

User Guide
Page 70
... the printer, locating the pegs at both sides so that the cover latches closed. Push the colored release lever away from you remove the image drum unit beforehand and place in the sides of the printer cavity. 11. This is to lock the toner cartridge onto the new image...
... the printer, locating the pegs at both sides so that the cover latches closed. Push the colored release lever away from you remove the image drum unit beforehand and place in the sides of the printer cavity. 11. This is to lock the toner cartridge onto the new image...

User Guide
Page 71
... is very delicate and light sensitive. Replacing consumable items > 71 This area is located under the four image drums. This unit requires replacement approximately every 80,000 pages. If the drum unit needs to be hot. CAUTION! Do not touch. 2. Switch off the printer and allow the fuser to cool ... that they go back in a safe place away from light. Press the cover release and open the printer's top cover fully. Never expose the drum to normal room light for more than this, please wrap the cartridge inside a black plastic bag to keep it to direct sunlight or very bright...
... is very delicate and light sensitive. Replacing consumable items > 71 This area is located under the four image drums. This unit requires replacement approximately every 80,000 pages. If the drum unit needs to be hot. CAUTION! Do not touch. 2. Switch off the printer and allow the fuser to cool ... that they go back in a safe place away from light. Press the cover release and open the printer's top cover fully. Never expose the drum to normal room light for more than this, please wrap the cartridge inside a black plastic bag to keep it to direct sunlight or very bright...

User Guide
Page 72
... belt unit from the printer chassis. 6. Pull the lifting bar (b) upwards so that the cover latches closed. Replacing consumable items > 72 Replace the four image drums, complete with the lifting bar at the front end. This will release the belt from the printer. 7. 4.
... belt unit from the printer chassis. 6. Pull the lifting bar (b) upwards so that the cover latches closed. Replacing consumable items > 72 Replace the four image drums, complete with the lifting bar at the front end. This will release the belt from the printer. 7. 4.

User Guide
Page 73
... minutes for the fuser to the touch. Handle the fuser with extreme care, holding it is located inside the printer just behind the four image drum units. Replacing consumable items > 73 FUSER REPLACEMENT The fuser is the correct way round.
... minutes for the fuser to the touch. Handle the fuser with extreme care, holding it is located inside the printer just behind the four image drum units. Replacing consumable items > 73 FUSER REPLACEMENT The fuser is the correct way round.

User Guide
Page 87
..., and cover. CAUTION! Clearing paper jams > 87 Put the assembly down gently onto a piece of the Image Drum is essential that they go back in the same order. The green image drum surface at the base of paper to prevent toner from marking your furniture and to normal room light for more... the printer. 5. Do not touch it and do not expose it by its top centre, lift the cyan image drum, complete with its toner cartridge, up and out of the four toner cartridges (a) and image drums (b). It is very delicate and light sensitive. a b It will be necessary to remove the four image...
..., and cover. CAUTION! Clearing paper jams > 87 Put the assembly down gently onto a piece of the Image Drum is essential that they go back in the same order. The green image drum surface at the base of paper to prevent toner from marking your furniture and to normal room light for more... the printer. 5. Do not touch it and do not expose it by its top centre, lift the cyan image drum, complete with its toner cartridge, up and out of the four toner cartridges (a) and image drums (b). It is very delicate and light sensitive. a b It will be necessary to remove the four image...


