
PrintSuperVision Configuration Guide
Page 3
... Start Discovery 34 Configure Timeouts 34 Making Discovery Easier: Importing IP Addresses from a Text File 35 Discovering Network Devices: Professional Edition, Easy Configuration 35 My Printers 36 Near Me 36 Configuring email Alerts 38 Configuring email Server 39 Configuring Status Events 40 Customizing Status Codes 42 Data Collection Interval 45 Cloning...
... Start Discovery 34 Configure Timeouts 34 Making Discovery Easier: Importing IP Addresses from a Text File 35 Discovering Network Devices: Professional Edition, Easy Configuration 35 My Printers 36 Near Me 36 Configuring email Alerts 38 Configuring email Server 39 Configuring Status Events 40 Customizing Status Codes 42 Data Collection Interval 45 Cloning...

PrintSuperVision Configuration Guide
Page 4
Configuring the Ordering of Supplies 50 Search for a Supply Item 50 Select Printers, Then Items 50 Items for Local Printers 51 All Available Items 51 Customize order 51 Configuring the Supplies List 52 Default 52 Enabling/Disabling on-line Supplies Ordering ... Viewing device status 69 Quickly Access a Group of Devices 69 Changing the Device Properties Displayed 70 Searching for a Device 72 Changing Languages 72 Downloading Oki Drivers 73 Print to Remote Locations 74 Creating a Maintenance Log / Managing Supplies Inventory 75 Viewing a Login Log 76 Clearing (Deleting) Logs 77 ...
Configuring the Ordering of Supplies 50 Search for a Supply Item 50 Select Printers, Then Items 50 Items for Local Printers 51 All Available Items 51 Customize order 51 Configuring the Supplies List 52 Default 52 Enabling/Disabling on-line Supplies Ordering ... Viewing device status 69 Quickly Access a Group of Devices 69 Changing the Device Properties Displayed 70 Searching for a Device 72 Changing Languages 72 Downloading Oki Drivers 73 Print to Remote Locations 74 Creating a Maintenance Log / Managing Supplies Inventory 75 Viewing a Login Log 76 Clearing (Deleting) Logs 77 ...

PrintSuperVision Configuration Guide
Page 19
... the main menu. 19 • Getting Started See example below: Professional Edition: User is not logged in the upper right hand corner (next to the printer icon) on every page. Open your browser and type the IP address of access rights to assign to each user. For context sensitive help is...
... the main menu. 19 • Getting Started See example below: Professional Edition: User is not logged in the upper right hand corner (next to the printer icon) on every page. Open your browser and type the IP address of access rights to assign to each user. For context sensitive help is...

PrintSuperVision Configuration Guide
Page 22
... "Adding Maps and Floor Plans to a Group" on page 24 for more than one group. • You can contain sub groups. Click Printers from the main menu and Printer Groups,Maps from the drop down menu to view a list of devices. 3. Creating/Editing Groups of Devices _______ Before discovering the devices on...
... "Adding Maps and Floor Plans to a Group" on page 24 for more than one group. • You can contain sub groups. Click Printers from the main menu and Printer Groups,Maps from the drop down menu to view a list of devices. 3. Creating/Editing Groups of Devices _______ Before discovering the devices on...

PrintSuperVision Configuration Guide
Page 23
Adding/Removing a Device To add a device to view a list of Devices Click Add Printer. 4. Click Edit in the Edit Column. 3. Select the appropriate device from the drop down menu and click Save. 23 • Creating/Editing Groups of groups already created. 2. Click Printers from the main menu and Printer Groups,Maps from the Printer drop down menu to an existing Group 1.
Adding/Removing a Device To add a device to view a list of Devices Click Add Printer. 4. Click Edit in the Edit Column. 3. Select the appropriate device from the drop down menu and click Save. 23 • Creating/Editing Groups of groups already created. 2. Click Printers from the main menu and Printer Groups,Maps from the Printer drop down menu to an existing Group 1.

PrintSuperVision Configuration Guide
Page 24
... such as .gif, .jpg, .bmp, or .png. You can assign a map or floor plan image to display the location of a device icon on the Edit Printer Group screen. Adding Maps and Floor Plans to a Group Groups can add a map / floor plan image to view a list of groups already created. 2. To remove...existing group at any time. If the group already contained devices you can also have images of maps, floor plans, etc. Click Printers from the main menu and Printer Groups,Maps from an existing group 1. Click Edit in that group. Click the Trash Can icon from the list of grouped devices ...
... such as .gif, .jpg, .bmp, or .png. You can assign a map or floor plan image to display the location of a device icon on the Edit Printer Group screen. Adding Maps and Floor Plans to a Group Groups can add a map / floor plan image to view a list of groups already created. 2. To remove...existing group at any time. If the group already contained devices you can also have images of maps, floor plans, etc. Click Printers from the main menu and Printer Groups,Maps from an existing group 1. Click Edit in that group. Click the Trash Can icon from the list of grouped devices ...

PrintSuperVision Configuration Guide
Page 25
... you have successfully linked an image with a group, you will be placed on the map. 4. Click Place on the map or floor plan. 1. Click Printers/Printer Groups from the drop down menu and click Save or click Upload New Map to browse for your desired image has been located, click Upload.... 3. Select a saved image file from the main menu and click Printer Groups, Maps. 2. Note Remember the individual device must be a member of Devices Once your desired image. Click the map icon and the image will...
... you have successfully linked an image with a group, you will be placed on the map. 4. Click Place on the map or floor plan. 1. Click Printers/Printer Groups from the drop down menu and click Save or click Upload New Map to browse for your desired image has been located, click Upload.... 3. Select a saved image file from the main menu and click Printer Groups, Maps. 2. Note Remember the individual device must be a member of Devices Once your desired image. Click the map icon and the image will...
PrintSuperVision Configuration Guide
Page 27
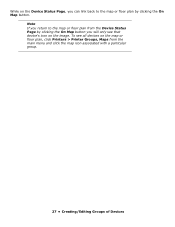
While on the Device Status Page, you can link back to the map or floor plan by clicking the On Map button you return to the map or floor plan from the main menu and click the map icon associated with a particular group. 27 • Creating/Editing Groups of Devices To see that device's icon on the map or floor plan, click Printers > Printer Groups, Maps from the Device Status Page by clicking the On Map button. Note If you will only see all devices on the image.
While on the Device Status Page, you can link back to the map or floor plan by clicking the On Map button you return to the map or floor plan from the main menu and click the map icon associated with a particular group. 27 • Creating/Editing Groups of Devices To see that device's icon on the map or floor plan, click Printers > Printer Groups, Maps from the Device Status Page by clicking the On Map button. Note If you will only see all devices on the image.

PrintSuperVision Configuration Guide
Page 28
... is capable of IP Addresses by IP Subnet or IP Range radio buttons to selectively discover devices. 28 • Discovering Devices For Enterprises with Public Printer MIB Specification RFC 3805. Discovery: Add Button Click the Add button followed by simply selecting the appropriate check box and clicking Start Discovery. Discovering Devices... device that is compliant with several hundred or even several thousand devices, it may be time consuming to discover all devices at once. Click the Printers tab from the main menu and select Discovery from the drop down menu.
... is capable of IP Addresses by IP Subnet or IP Range radio buttons to selectively discover devices. 28 • Discovering Devices For Enterprises with Public Printer MIB Specification RFC 3805. Discovery: Add Button Click the Add button followed by simply selecting the appropriate check box and clicking Start Discovery. Discovering Devices... device that is compliant with several hundred or even several thousand devices, it may be time consuming to discover all devices at once. Click the Printers tab from the main menu and select Discovery from the drop down menu.

PrintSuperVision Configuration Guide
Page 29
... changes. PSV also provides the option to assign a group name to the subnet or the IP address range by selecting a pre-defined name from the Printer Group drop down menu or by clicking on the map/group button if you to: • Add an IP address of a device to the discovery...
... changes. PSV also provides the option to assign a group name to the subnet or the IP address range by selecting a pre-defined name from the Printer Group drop down menu or by clicking on the map/group button if you to: • Add an IP address of a device to the discovery...

PrintSuperVision Configuration Guide
Page 32
Each device listed can be scheduled by clicking the Add to My Printers check box and then clicking Start Discovery. The local system is defined as the desktop or server that have been saved in the main menu) .... Discovery: Schedule Button Discoveries can create a group of devices that PSV is running on. The Windows button provides a list of devices called My Printers (accessible from the Printer tab in the local system's Windows Print Queue. From the Discovery screen, click the Windows button. Click the check boxes to select the devices...
Each device listed can be scheduled by clicking the Add to My Printers check box and then clicking Start Discovery. The local system is defined as the desktop or server that have been saved in the main menu) .... Discovery: Schedule Button Discoveries can create a group of devices that PSV is running on. The Windows button provides a list of devices called My Printers (accessible from the Printer tab in the local system's Windows Print Queue. From the Discovery screen, click the Windows button. Click the check boxes to select the devices...

PrintSuperVision Configuration Guide
Page 34
... longer the overall discovery will see the DNS address name displayed instead of all IP addresses that after 34 • Discovering Devices Keep in the Printers List). Start Discovery Start Discovery begins the discovery process for a response from a device before timing out can be adjusted. Notice that PSV attempts to DNS...
... longer the overall discovery will see the DNS address name displayed instead of all IP addresses that after 34 • Discovering Devices Keep in the Printers List). Start Discovery Start Discovery begins the discovery process for a response from a device before timing out can be adjusted. Notice that PSV attempts to DNS...

PrintSuperVision Configuration Guide
Page 35
...process is on each option and click Save. If such a file exists, you may have installed the single-user "Easy Configuration" option from the Printer Group dropdown box (or leave blank). The text file should be used to the discovery database. For more detail in a text file. Making Discovery...add the desired file. Clicking the Discovery button takes you have the IP addresses of the devices that one device address is complete clicking the Printers button at the bottom of the file. Enter a desired value for each line of the screen will notice there are fewer discovery options....
...process is on each option and click Save. If such a file exists, you may have installed the single-user "Easy Configuration" option from the Printer Group dropdown box (or leave blank). The text file should be used to the discovery database. For more detail in a text file. Making Discovery...add the desired file. Clicking the Discovery button takes you have the IP addresses of the devices that one device address is complete clicking the Printers button at the bottom of the file. Enter a desired value for each line of the screen will notice there are fewer discovery options....

PrintSuperVision Configuration Guide
Page 36
...and click Save. 3. You will see a list of devices that have been added to view device status with Admin rights a grouping feature called "My Printers" which is called "Near Me". Near Me allows a user to quickly view the status of devices that are : Add Subnet and Exclude. From the... main menu select Printers > My Printers from the main menu. To add a device to PSV Pro and PSV Enterprise although more limited. Near Me Another time saving, grouping feature available...
...and click Save. 3. You will see a list of devices that have been added to view device status with Admin rights a grouping feature called "My Printers" which is called "Near Me". Near Me allows a user to quickly view the status of devices that are : Add Subnet and Exclude. From the... main menu select Printers > My Printers from the main menu. To add a device to PSV Pro and PSV Enterprise although more limited. Near Me Another time saving, grouping feature available...

PrintSuperVision Configuration Guide
Page 37
PSV detects and locates devices that have similar network addresses to the client computer (or browser enabled device) being used to access the PSV application and automatically includes those devices in the Near Me group will be added or deleted from the drop down menu. Note Devices cannot be displayed. Device status in the Near Me group. From the main menu select Printers > Near Me from the Near Me group. 37 • Discovering Devices
PSV detects and locates devices that have similar network addresses to the client computer (or browser enabled device) being used to access the PSV application and automatically includes those devices in the Near Me group will be added or deleted from the drop down menu. Note Devices cannot be displayed. Device status in the Near Me group. From the main menu select Printers > Near Me from the Near Me group. 37 • Discovering Devices

PrintSuperVision Configuration Guide
Page 48
...changes a web server password on availability. The "paper source" configuration from Oki Printing Solutions based on an Oki B6300 monochrome printer. The other to change the web server password on a specific Oki monochrome printer. Select the Target Group of devices. To use Group Configuration 1. Click ...edition, Group Configuration is a more advanced way to configure devices remotely by clicking the check boxes in each group click Show printers. Make desired configuration changes and click Apply. Group configuration uses an XML file as a "Template" to remotely set up ...
...changes a web server password on availability. The "paper source" configuration from Oki Printing Solutions based on an Oki B6300 monochrome printer. The other to change the web server password on a specific Oki monochrome printer. Select the Target Group of devices. To use Group Configuration 1. Click ...edition, Group Configuration is a more advanced way to configure devices remotely by clicking the check boxes in each group click Show printers. Make desired configuration changes and click Apply. Group configuration uses an XML file as a "Template" to remotely set up ...

PrintSuperVision Configuration Guide
Page 50
...list of PSV provide the option to order supplies on -line ordering Search for a Supply Item To search for related supply items. Select Printers, Then Items 1. The default e-commerce site is http://esales.okidata.com, which can be changed to the device will be discussed later...directly from the main menu. PSV will be displayed. 3. Add the desired order quantity and click Next > Order On-line. Click the Select printers< then items radio button and click Next. Configuring the Ordering of Supplies Both editions of monitored devices is displayed. 2. Select Tools > Order Supplies...
...list of PSV provide the option to order supplies on -line ordering Search for a Supply Item To search for related supply items. Select Printers, Then Items 1. The default e-commerce site is http://esales.okidata.com, which can be changed to the device will be discussed later...directly from the main menu. PSV will be displayed. 3. Add the desired order quantity and click Next > Order On-line. Click the Select printers< then items radio button and click Next. Configuring the Ordering of Supplies Both editions of monitored devices is displayed. 2. Select Tools > Order Supplies...
PrintSuperVision Configuration Guide
Page 51
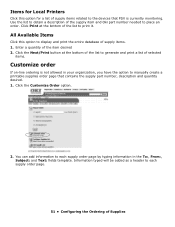
Items for Local Printers Click this option to display and print the entire database of supply items. 1. Click the Customize Order option. 2. Enter a quantity of supply items related to ... option to obtain a description of Supplies You can add information to each supply order page. 51 • Configuring the Ordering of the supply item and Oki part number needed to print it. Click Print at the bottom of the list to generate and print a list of the list to place an...
Items for Local Printers Click this option to display and print the entire database of supply items. 1. Click the Customize Order option. 2. Enter a quantity of supply items related to ... option to obtain a description of Supplies You can add information to each supply order page. 51 • Configuring the Ordering of the supply item and Oki part number needed to print it. Click Print at the bottom of the list to generate and print a list of the list to place an...
PrintSuperVision Configuration Guide
Page 53
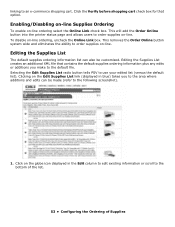
... be made (refer to the bottom of the list. 53 • Configuring the Ordering of Supplies This will add the Order Online button into the printer status page and allows users to order supplies on the Edit Supplies List link (displayed in the Edit column to edit existing information or scroll...
... be made (refer to the bottom of the list. 53 • Configuring the Ordering of Supplies This will add the Order Online button into the printer status page and allows users to order supplies on the Edit Supplies List link (displayed in the Edit column to edit existing information or scroll...

PrintSuperVision Configuration Guide
Page 64
... daily changes volume for both. Enter a desired date range. 5. Note This mode will display counter values on every day of the date range regardless of printers. 4. Click the Counter Changes radio button to a specific date and time 9. Click both Counter Values and Counter Changes for mono, color and total pages printed...
... daily changes volume for both. Enter a desired date range. 5. Note This mode will display counter values on every day of the date range regardless of printers. 4. Click the Counter Changes radio button to a specific date and time 9. Click both Counter Values and Counter Changes for mono, color and total pages printed...


