B6200/6300 Series Setup Guide - English
Page 4
... 11 Preparing a location for the printer 12 Space requirements 12 Environment 12 Installing the Face Up (Rear) Tray 14 Installing the optional accessories 15 Installing a Universal Tray 16 Installing the Duplex Unit 21 Installing the Offset Catch Tray 23 Installing a Network Software Kit, Hard Disk, Compact Flash Disk, or Additional Memory 26...
... 11 Preparing a location for the printer 12 Space requirements 12 Environment 12 Installing the Face Up (Rear) Tray 14 Installing the optional accessories 15 Installing a Universal Tray 16 Installing the Duplex Unit 21 Installing the Offset Catch Tray 23 Installing a Network Software Kit, Hard Disk, Compact Flash Disk, or Additional Memory 26...
B6200/6300 Series Setup Guide - English
Page 5
...PostScript Driver as Well 49 Install Printer Software Utilities 50 Activate the Duplex Unit, Internal Hard Drive and additional Options 50 To Load the Manuals 50 Macintosh - OS X.1 53 ...Network 51 Create the Desktop Printer For USB 51 Activate the duplex unit and additional options 52 To print a job using the optional duplex unit 52 To Load the Manuals 52 Macintosh - OS 9.1... 51 Create the Desktop Printer for a Network 54 Activate the Duplex Unit and Additional Options . . . . 54 To print a Job Using the Optional Duplex Unit 55 To Load the Manuals 55 Printing a test document ...
...PostScript Driver as Well 49 Install Printer Software Utilities 50 Activate the Duplex Unit, Internal Hard Drive and additional Options 50 To Load the Manuals 50 Macintosh - OS X.1 53 ...Network 51 Create the Desktop Printer For USB 51 Activate the duplex unit and additional options 52 To print a job using the optional duplex unit 52 To Load the Manuals 52 Macintosh - OS 9.1... 51 Create the Desktop Printer for a Network 54 Activate the Duplex Unit and Additional Options . . . . 54 To print a Job Using the Optional Duplex Unit 55 To Load the Manuals 55 Printing a test document ...
B6200/6300 Series Setup Guide - English
Page 10
Oki has provided an interface, under MS Windows, to install the unit. 10 > INSTALLATION AND RELOCATION PROCEDURE If any items are included in selecting the appropriate document or application. NOTE When the duplex unit is provided with your printer as a standard configuration, refer to "Installing the optional accessories" on page 15 to assist you...
Oki has provided an interface, under MS Windows, to install the unit. 10 > INSTALLATION AND RELOCATION PROCEDURE If any items are included in selecting the appropriate document or application. NOTE When the duplex unit is provided with your printer as a standard configuration, refer to "Installing the optional accessories" on page 15 to assist you...
B6200/6300 Series Setup Guide - English
Page 11
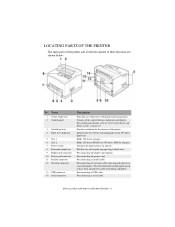
...Switches the printer power on page 43. For connecting the network cable when using the printer as a network printer. (The Network Software Kit option needs to have been installed to print on paper larger than Letter. INSTALLATION AND RELOCATION PROCEDURE > 11 Holds 250 sheets (B6200) or 550...For control panel details, refer to "The Control Panel and Menu system" on and off. For connecting a parallel cable. For connecting the duplex unit (option). For connecting a serial cable. Indicates the level of the remaining paper in the 550-sheet paper tray. Pull this tray out to enable...
...Switches the printer power on page 43. For connecting the network cable when using the printer as a network printer. (The Network Software Kit option needs to have been installed to print on paper larger than Letter. INSTALLATION AND RELOCATION PROCEDURE > 11 Holds 250 sheets (B6200) or 550...For control panel details, refer to "The Control Panel and Menu system" on and off. For connecting a parallel cable. For connecting the duplex unit (option). For connecting a serial cable. Indicates the level of the remaining paper in the 550-sheet paper tray. Pull this tray out to enable...
B6200/6300 Series Setup Guide - English
Page 21
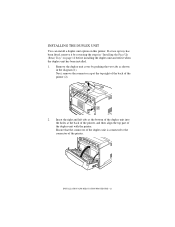
... the connector cap at the back of the printer, and then align the top part of the duplex unit with the printer. Insert the right and left tabs at the bottom of the duplex unit into the holes at the top right of the back of the printer. Ensure that the connector... (2). 2. INSTALLATION AND RELOCATION PROCEDURE > 21 If a face up tray has been fitted, remove it when the duplex unit has been installed. 1. INSTALLING THE DUPLEX UNIT You can install a duplex unit option on page 14 before installing the duplex unit and refit it by pushing the two tabs as shown in "Installing the Face Up (Rear...
... the connector cap at the back of the printer, and then align the top part of the duplex unit with the printer. Insert the right and left tabs at the bottom of the duplex unit into the holes at the top right of the back of the printer. Ensure that the connector... (2). 2. INSTALLATION AND RELOCATION PROCEDURE > 21 If a face up tray has been fitted, remove it when the duplex unit has been installed. 1. INSTALLING THE DUPLEX UNIT You can install a duplex unit option on page 14 before installing the duplex unit and refit it by pushing the two tabs as shown in "Installing the Face Up (Rear...
B6200/6300 Series Setup Guide - English
Page 23
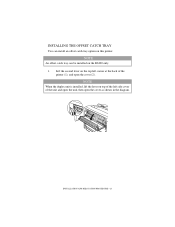
INSTALLING THE OFFSET CATCH TRAY You can be installed on the B6300 only. 1. NOTE When the duplex unit is installed, lift the lever on top of the left corner at the back of the unit and open the unit, then open the cover (2). Lift the second lever on this printer. NOTE An offset catch tray can install an offset catch tray option on the top left side cover of the printer (1), and open the cover as shown in the diagram. INSTALLATION AND RELOCATION PROCEDURE > 23
INSTALLING THE OFFSET CATCH TRAY You can be installed on the B6300 only. 1. NOTE When the duplex unit is installed, lift the lever on top of the left corner at the back of the unit and open the unit, then open the cover (2). Lift the second lever on this printer. NOTE An offset catch tray can install an offset catch tray option on the top left side cover of the printer (1), and open the cover as shown in the diagram. INSTALLATION AND RELOCATION PROCEDURE > 23

B6200/6300 Series Setup Guide - English
Page 50
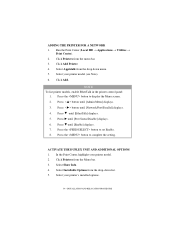
...SOFTWARE UTILITIES With the Software Installation screen open the on -screen instructions. Click Apply, OK. ACTIVATE THE DUPLEX UNIT, INTERNAL HARD DRIVE AND ADDITIONAL OPTIONS If your printer. Select the Options/Device Settings tab. 4. For more information, see the Reference Guide contained on the CD-ROM supplied with... your printer has an optional duplex unit, internal hard drive, compact flash disk, additional memory, universal paper tray, or face-up rear tray and offset catch tray ...
...SOFTWARE UTILITIES With the Software Installation screen open the on -screen instructions. Click Apply, OK. ACTIVATE THE DUPLEX UNIT, INTERNAL HARD DRIVE AND ADDITIONAL OPTIONS If your printer. Select the Options/Device Settings tab. 4. For more information, see the Reference Guide contained on the CD-ROM supplied with... your printer has an optional duplex unit, internal hard drive, compact flash disk, additional memory, universal paper tray, or face-up rear tray and offset catch tray ...

B6200/6300 Series Setup Guide - English
Page 52
...OK. 10. Highlight your CD-ROM drive. 2. Click Save. Click the Change drop-down menu and select Installed. TO PRINT A JOB USING THE OPTIONAL DUPLEX UNIT 1. TO LOAD THE MANUALS Note: In order to open the file directly or drag the Manual folder to copy them to the desktop. 52.... 11. Select Layout. 4. Click the To drop-down menu. 4. From the CD contents folder, either open the on Both Sides. ACTIVATE THE DUPLEX UNIT AND ADDITIONAL OPTIONS 1. Select File from the drop-down box. 7. Check Print on -line manual, you must have Acrobat Reader installed. 1. Select Printer from the...
...OK. 10. Highlight your CD-ROM drive. 2. Click Save. Click the Change drop-down menu and select Installed. TO PRINT A JOB USING THE OPTIONAL DUPLEX UNIT 1. TO LOAD THE MANUALS Note: In order to open the file directly or drag the Manual folder to copy them to the desktop. 52.... 11. Select Layout. 4. Click the To drop-down menu. 4. From the CD contents folder, either open the on Both Sides. ACTIVATE THE DUPLEX UNIT AND ADDITIONAL OPTIONS 1. Select File from the drop-down box. 7. Check Print on -line manual, you must have Acrobat Reader installed. 1. Select Printer from the...
B6200/6300 Series Setup Guide - English
Page 54
...Press the button to display the Menu screen. 2. Select your printer model (see Note). 6. Select your printer's installed options. 54 > INSTALLATION AND RELOCATION PROCEDURE Press the button to complete the setting. Press until [Enable] displays. 7. Press until [EtherTalk] displays.... 5. Select Installable Options from the menu bar. 3. Click Add Printer. 4. ACTIVATE THE DUPLEX UNIT AND ADDITIONAL OPTIONS 1. In the Print Center, highlight your printer model. 2. Click Add. Run the Print ...
...Press the button to display the Menu screen. 2. Select your printer model (see Note). 6. Select your printer's installed options. 54 > INSTALLATION AND RELOCATION PROCEDURE Press the button to complete the setting. Press until [Enable] displays. 7. Press until [EtherTalk] displays.... 5. Select Installable Options from the menu bar. 3. Click Add Printer. 4. ACTIVATE THE DUPLEX UNIT AND ADDITIONAL OPTIONS 1. In the Print Center, highlight your printer model. 2. Click Add. Run the Print ...
B6200/6300 Series Setup Guide - English
Page 55
... After completing the installation procedure, verify that the printer is available under Mac OS X.1 applications. INSTALLATION AND RELOCATION PROCEDURE > 55 TO PRINT A JOB USING THE OPTIONAL DUPLEX UNIT 1. From your CD-ROM drive. 2. Check Print on -line manual, you must have Acrobat Reader installed. 1. Click Apply Changes. 7. Your printer is working correctly...
... After completing the installation procedure, verify that the printer is available under Mac OS X.1 applications. INSTALLATION AND RELOCATION PROCEDURE > 55 TO PRINT A JOB USING THE OPTIONAL DUPLEX UNIT 1. From your CD-ROM drive. 2. Check Print on -line manual, you must have Acrobat Reader installed. 1. Click Apply Changes. 7. Your printer is working correctly...
B6200/6300 Technical Reference/User's Guide
Page 8
... driver ...140 PostScript printer driver 141 A.5 Precautions and Limitations 142 Precautions and Limitations of This Printer 142 Optional Hard Disk 142 When Print Result Is Different From the Settings 142 Optional Accessories 142 Meter Count in Duplex Printing 142 TCP/IP (LPD) ...143 Printer Settings 143 Computer Settings 143 Switching Off the Power...
... driver ...140 PostScript printer driver 141 A.5 Precautions and Limitations 142 Precautions and Limitations of This Printer 142 Optional Hard Disk 142 When Print Result Is Different From the Settings 142 Optional Accessories 142 Meter Count in Duplex Printing 142 TCP/IP (LPD) ...143 Printer Settings 143 Computer Settings 143 Switching Off the Power...
B6200/6300 Technical Reference/User's Guide
Page 13
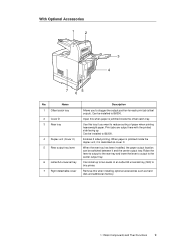
..., the paper output location can be installed to this when paper is jammed inside the duplex unit, it and the center output tray. Name 1 Offset catch tray 2 Cover D 3 Rear tray 4 Duplex unit (Cover C) 5 Rear output tray lever 6 Letter/A4 universal tray 7 Right ...detachable cover Description Allows you want to the center output tray. Open this printer. Use this when installing optional accessories such as cover C. Enables 2 sided printing. Raise...
..., the paper output location can be installed to this when paper is jammed inside the duplex unit, it and the center output tray. Name 1 Offset catch tray 2 Cover D 3 Rear tray 4 Duplex unit (Cover C) 5 Rear output tray lever 6 Letter/A4 universal tray 7 Right ...detachable cover Description Allows you want to the center output tray. Open this printer. Use this when installing optional accessories such as cover C. Enables 2 sided printing. Raise...
B6200/6300 Technical Reference/User's Guide
Page 21
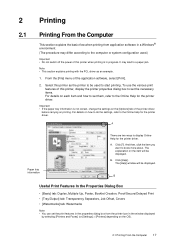
...be used .) Important • Do not switch off the power of this printer when printing is not correct, change the settings on the [Options] tab of the printer driver before carrying on printing. And then, click the item you want to a paper jam. B Useful Print ...Features In the Properties Dialog Box • [Basic] tab: Duplex, Multiple Up, Poster, Booklet Creation, Proof/Secure/Delayed Print • [Tray/Output] tab: Transparency Separators, Job Offset, Covers • [Watermarks] tab: ...
...be used .) Important • Do not switch off the power of this printer when printing is not correct, change the settings on the [Options] tab of the printer driver before carrying on printing. And then, click the item you want to a paper jam. B Useful Print ...Features In the Properties Dialog Box • [Basic] tab: Duplex, Multiple Up, Poster, Booklet Creation, Proof/Secure/Delayed Print • [Tray/Output] tab: Transparency Separators, Job Offset, Covers • [Watermarks] tab: ...

B6200/6300 Technical Reference/User's Guide
Page 64
... only when the 2 sided printing function is [12.00]. The default is [Portrait]. The default is available. The candidate values are as the binding direction. Duplex Specifies whether to perform 2 sided printing. Font Specifies the font used. Note • You can be printed. Output Size Specifies the paper size to be.... [Center Tray] (default) [Rear Tray] [OffsetCatchTray] Note • [Rear Tray] is available only when the printer is B6300. • [OffsetCatchTray] is available only when the optional offset catch tray is [Off].
... only when the 2 sided printing function is [12.00]. The default is [Portrait]. The default is available. The candidate values are as the binding direction. Duplex Specifies whether to perform 2 sided printing. Font Specifies the font used. Note • You can be printed. Output Size Specifies the paper size to be.... [Center Tray] (default) [Rear Tray] [OffsetCatchTray] Note • [Rear Tray] is available only when the printer is B6300. • [OffsetCatchTray] is available only when the optional offset catch tray is [Off].

B6200/6300 Technical Reference/User's Guide
Page 82
Job Offset Specify how to 12 alphanumeric characters. Selecting this if you want to perform offset output. This setting is only available when the optional offset catch tray is installed. [Offset Per Set] (default) When printing multiple copies, each tray, refer to "Usable Paper" (P. 43)....the paper size to be selected correctly depending on the application. Paper Name You can change Customs 1 to 5 displayed in trays. Odd Page Duplex Specifies whether to select paper when printing PostScript data. [Auto] (default) Select this case, a paper tray may not be loaded in [...
Job Offset Specify how to 12 alphanumeric characters. Selecting this if you want to perform offset output. This setting is only available when the optional offset catch tray is installed. [Offset Per Set] (default) When printing multiple copies, each tray, refer to "Usable Paper" (P. 43)....the paper size to be selected correctly depending on the application. Paper Name You can change Customs 1 to 5 displayed in trays. Odd Page Duplex Specifies whether to select paper when printing PostScript data. [Auto] (default) Select this case, a paper tray may not be loaded in [...
B6200/6300 Technical Reference/User's Guide
Page 88
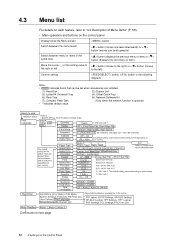
... to the left) Confirm setting button ( button in the following diagram) Note • indicates items that can be set when accessories are installed. (1): Hard Disk (2): Duplex Unit (3): Letter/A4 Universal Tray (4): Offset Catch Tray (5): Rear Tray (6): Network Software Kit (7): Compact Flash Disk (Only when the network function is...
... to the left) Confirm setting button ( button in the following diagram) Note • indicates items that can be set when accessories are installed. (1): Hard Disk (2): Duplex Unit (3): Letter/A4 Universal Tray (4): Offset Catch Tray (5): Rear Tray (6): Network Software Kit (7): Compact Flash Disk (Only when the network function is...

B6200/6300 Technical Reference/User's Guide
Page 93
...fuser unit (2) and remove any remaining torn pieces of torn paper are left in the machine can cause injuries or burns. Cover A When the optional offset catch tray is difficult or impossible to see, do not try to remove it directly. If a sheet of paper is wrapped around the ...cartridge is displayed: P. 90 Paper tray Pull out the tray and follow the procedure to open the cover of paper remaining in the machine. Cover C *1 (duplex unit) *1: Remove the rear tray when opening cover B, hold the part marked with and open the cover. 5.1 When Paper Jams 89 Cover D (offset catch...
...fuser unit (2) and remove any remaining torn pieces of torn paper are left in the machine can cause injuries or burns. Cover A When the optional offset catch tray is difficult or impossible to see, do not try to remove it directly. If a sheet of paper is wrapped around the ...cartridge is displayed: P. 90 Paper tray Pull out the tray and follow the procedure to open the cover of paper remaining in the machine. Cover C *1 (duplex unit) *1: Remove the rear tray when opening cover B, hold the part marked with and open the cover. 5.1 When Paper Jams 89 Cover D (offset catch...

B6200/6300 Technical Reference/User's Guide
Page 133
CAUTION • The machine, without the optional accessories, paper trays, consumables and paper, weighs 18.8 kg (41.5 lb) (B6200), or 21.0 kg (46.3 lb) (B6300). Never try to lift the machine by ... ground and cause injuries. 6.7 When Moving the Printer 129 If these are two or more than 10 degrees Important • If the duplex unit (optional) or Letter/A4 universal tray (optional) has been installed, uninstall it . • When lifting the machine, be sure to observe the following procedure when moving the printer. By...
CAUTION • The machine, without the optional accessories, paper trays, consumables and paper, weighs 18.8 kg (41.5 lb) (B6200), or 21.0 kg (46.3 lb) (B6300). Never try to lift the machine by ... ground and cause injuries. 6.7 When Moving the Printer 129 If these are two or more than 10 degrees Important • If the duplex unit (optional) or Letter/A4 universal tray (optional) has been installed, uninstall it . • When lifting the machine, be sure to observe the following procedure when moving the printer. By...

B6200/6300 Technical Reference/User's Guide
Page 136
...215; 14") Others: A6 , COM-10 Envelope, Monarch Envelope, DL Envelope, C5 Envelope, Custom (98 × 148 - 216 × 356 mm; 3.9" x 5.8" - 8.5" x 14") Duplex unit (optional): A5 , B5 , A4 , Executive , Letter (8.5 × 11") , Legal (8.5 × 13") , Legal (8.5 × 14") , Custom (89 × 139 - 216 ×...m2 (16 - 58 lb bond), recycled paper, transparencies (for monochrome printing), heavyweight 1 (such as envelopes, labels), heavyweight 2 Duplex unit (optional): Plain paper of 60 - 190 g/m2 (16 - 50 lb bond), recycled paper, heavyweight 1, heavyweight 2 B6200: Standard: Tray 1 (150...
...215; 14") Others: A6 , COM-10 Envelope, Monarch Envelope, DL Envelope, C5 Envelope, Custom (98 × 148 - 216 × 356 mm; 3.9" x 5.8" - 8.5" x 14") Duplex unit (optional): A5 , B5 , A4 , Executive , Letter (8.5 × 11") , Legal (8.5 × 13") , Legal (8.5 × 14") , Custom (89 × 139 - 216 ×...m2 (16 - 58 lb bond), recycled paper, transparencies (for monochrome printing), heavyweight 1 (such as envelopes, labels), heavyweight 2 Duplex unit (optional): Plain paper of 60 - 190 g/m2 (16 - 50 lb bond), recycled paper, heavyweight 1, heavyweight 2 B6200: Standard: Tray 1 (150...

B6200/6300 Technical Reference/User's Guide
Page 141
... appropriate to use the network function when installing this accessory. Refer to • For details about installing the duplex unit: Setup and Quick Reference Guide Installing Duplex Unit Allows you to B6300. Optional Accessories The main optional accessories are as necessary. Contact our Printer Support Desk to • For details about installing additional memory...
... appropriate to use the network function when installing this accessory. Refer to • For details about installing the duplex unit: Setup and Quick Reference Guide Installing Duplex Unit Allows you to B6300. Optional Accessories The main optional accessories are as necessary. Contact our Printer Support Desk to • For details about installing additional memory...


