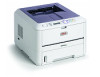

B410/B420/B430 Setup Guide (e,f,s,p)
Page 4
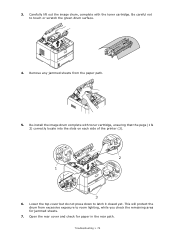
Note: Do not touch shiny green surface at bottom of drum cartridge. 3 Lift tape, then pull out protective paper as shown below (a). Prepare Image Drum Cartridge 1 Press button and lift the top cover. 4 Reinstall drum cartridge in a horizontal position, slowly peel off the tape. Install Toner Cartridge 1 Unpack the toner cartridge. Lift out and discard... vertically and horizontally to light for more than 5 minutes. Note: Do not expose cartridge to distribute toner. 3 Holding the cartridge in the printer. 2 Lift the drum cartridge from printer. B400 Series Setup Guide 4
Note: Do not touch shiny green surface at bottom of drum cartridge. 3 Lift tape, then pull out protective paper as shown below (a). Prepare Image Drum Cartridge 1 Press button and lift the top cover. 4 Reinstall drum cartridge in a horizontal position, slowly peel off the tape. Install Toner Cartridge 1 Unpack the toner cartridge. Lift out and discard... vertically and horizontally to light for more than 5 minutes. Note: Do not expose cartridge to distribute toner. 3 Holding the cartridge in the printer. 2 Lift the drum cartridge from printer. B400 Series Setup Guide 4
B410/B420/B430 Setup Guide (e,f,s,p)
Page 5
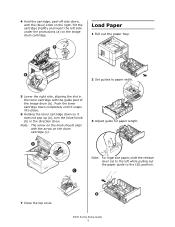
...cartridge down completely until it does not pop up (a), turn the (blue) knob (b) in the toner cartridge with the guide post of the image drum (b). Tilt the cartridge slightly and insert the left while pulling out the paper guide to the LGL position. Note: For legal size paper, slide... show. Load Paper 1 Pull out the paper tray. a B400 Series Setup Guide 5 b a 2 Set guides to the left side under the protrusions (a) on the drum cartridge (c). 3 Adjust guide for paper length. c 7 Close the top cover. 4 Hold the cartridge, peel-off side down so it snaps into place. 6 Holding ...
...cartridge down completely until it does not pop up (a), turn the (blue) knob (b) in the toner cartridge with the guide post of the image drum (b). Tilt the cartridge slightly and insert the left while pulling out the paper guide to the LGL position. Note: For legal size paper, slide... show. Load Paper 1 Pull out the paper tray. a B400 Series Setup Guide 5 b a 2 Set guides to the left side under the protrusions (a) on the drum cartridge (c). 3 Adjust guide for paper length. c 7 Close the top cover. 4 Hold the cartridge, peel-off side down so it snaps into place. 6 Holding ...
B410//B420/B430 User Guide (English)
Page 4
... the paper tray (Windows only 51 Manual duplex printing using the Manual Feed Tray (B410d and B410dn) or the Multi-Purpose Tray (B420dn and B430dn 53 Long Edge 53 Short Edge 54 Overlays and Macros (Windows only 55 What are overlays and macros 55 Creating PostScript overlays... life 61 When to replace the toner cartridge 61 Replacing the toner cartridge 61 Image drum life 65 When to replace the image drum 65 Replacing the image drum 65 Generating a cleaning page 67 B410d and B410dn 67 B420dn, B430dn 67 Cleaning the LED array 69 Troubleshooting 70 Status and error messages 70...
... the paper tray (Windows only 51 Manual duplex printing using the Manual Feed Tray (B410d and B410dn) or the Multi-Purpose Tray (B420dn and B430dn 53 Long Edge 53 Short Edge 54 Overlays and Macros (Windows only 55 What are overlays and macros 55 Creating PostScript overlays... life 61 When to replace the toner cartridge 61 Replacing the toner cartridge 61 Image drum life 65 When to replace the image drum 65 Replacing the image drum 65 Generating a cleaning page 67 B410d and B410dn 67 B420dn, B430dn 67 Cleaning the LED array 69 Troubleshooting 70 Status and error messages 70...
B410//B420/B430 User Guide (English)
Page 9
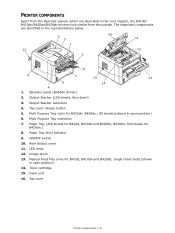
... Stacker extension 4. ON/OFF switch 10. Rear Output cover 11. Operator panel (B430dn shown) 2. Paper Tray (250 sheets for B410d, B410dn and B420dn, B430dn; 530 sheets for B420dn, B430dn.; 50 sheets)(shown in open position) 14. Image drum 13. Fuser unit 16. The important components are described in the next chapter, the B410d/ B410dn...
... Stacker extension 4. ON/OFF switch 10. Rear Output cover 11. Operator panel (B430dn shown) 2. Paper Tray (250 sheets for B410d, B410dn and B420dn, B430dn; 530 sheets for B420dn, B430dn.; 50 sheets)(shown in open position) 14. Image drum 13. Fuser unit 16. The important components are described in the next chapter, the B410d/ B410dn...
B410//B420/B430 User Guide (English)
Page 12
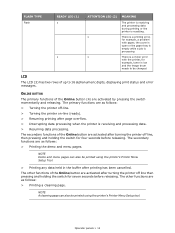
... tool. FLASH TYPE Flash READY LED (1) x x ATTENTION LED (2) x x MEANING The printer is receiving and processing data during printing or the printer is low and the image drum needs to 16 alphanumeric digits, displaying print status and error messages.
... tool. FLASH TYPE Flash READY LED (1) x x ATTENTION LED (2) x x MEANING The printer is receiving and processing data during printing or the printer is low and the image drum needs to 16 alphanumeric digits, displaying print status and error messages.
B410//B420/B430 User Guide (English)
Page 29
... input tray and which ejection method to Manual Feed Tray is for the B410d and B410dn models and the Multi Purpose Tray is for the B420dn and B430dn models. NOTE The reference to use envelopes with windows or metal clasps. > Do not use , see the section entitled "Paper and ... from moisture, direct sunlight and heat sources. > Use a smooth finished paper such as copier or laser type paper with a Sheffield (smoothness) rating of the image drum. > Do not use very smooth, shiny/glossy paper. > Do not use heavily embossed headed paper. > Do not use specially treated papers such as carbon ...
... input tray and which ejection method to Manual Feed Tray is for the B410d and B410dn models and the Multi Purpose Tray is for the B420dn and B430dn models. NOTE The reference to use envelopes with windows or metal clasps. > Do not use , see the section entitled "Paper and ... from moisture, direct sunlight and heat sources. > Use a smooth finished paper such as copier or laser type paper with a Sheffield (smoothness) rating of the image drum. > Do not use very smooth, shiny/glossy paper. > Do not use heavily embossed headed paper. > Do not use specially treated papers such as carbon ...
B410//B420/B430 User Guide (English)
Page 61
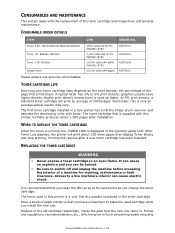
... of a machine for cleaning, maintenance or fault clearance. It can cause electric shock. Dispose of the toner cartridge and image drum and general maintenance. CONSUMABLES AND MAINTENANCE This section deals with the replacement of the old cartridge responsibly, inside the pack that... about 100 more pages then display Toner Empty and stop printing. CONSUMABLE ORDER DETAILS ITEM Toner, 3.5K: B410d/B410dn/B420dn/B430dn Toner, 7K: B420dn, B430dn Toner, 10K: B420dn Image drum LIFE ORDER NO. 3500 Letter/A4 @ 5% ISO/IEC19752 7,000 Letter/A4 @ 5% ISO/IEC19752 10,000 Letter...
... of a machine for cleaning, maintenance or fault clearance. It can cause electric shock. Dispose of the toner cartridge and image drum and general maintenance. CONSUMABLES AND MAINTENANCE This section deals with the replacement of the old cartridge responsibly, inside the pack that... about 100 more pages then display Toner Empty and stop printing. CONSUMABLE ORDER DETAILS ITEM Toner, 3.5K: B410d/B410dn/B420dn/B430dn Toner, 7K: B420dn, B430dn Toner, 10K: B420dn Image drum LIFE ORDER NO. 3500 Letter/A4 @ 5% ISO/IEC19752 7,000 Letter/A4 @ 5% ISO/IEC19752 10,000 Letter...

B410//B420/B430 User Guide (English)
Page 63
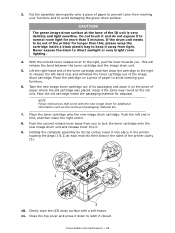
... from which the old cartridge was removed. 10. Then lower the right end of the cartridge into the image drum unit (7). 5 7 6 Consumables and maintenance > 63 Holding the cartridge by its top center with the colored lever to loosen and distribute the toner evenly ...inside the cartridge. 3 4 8. Insert the left end of the cartridge down into the image drum unit first. 7. Gently shake the cartridge (3) from the underside of the cartridge (4). 9. Remove the wrapping material and peel off the adhesive tape from end...
... from which the old cartridge was removed. 10. Then lower the right end of the cartridge into the image drum unit (7). 5 7 6 Consumables and maintenance > 63 Holding the cartridge by its top center with the colored lever to loosen and distribute the toner evenly ...inside the cartridge. 3 4 8. Insert the left end of the cartridge down into the image drum unit first. 7. Gently shake the cartridge (3) from the underside of the cartridge (4). 9. Remove the wrapping material and peel off the adhesive tape from end...

B410//B420/B430 User Guide (English)
Page 64
Gently wipe the LED array surface (9) with a soft tissue. 9 13. Close the top cover and press it down on the drum and the toner are aligned (8a). This will lock the cartridge into place and release toner into the image drum unit. 8 8a 12. Pressing gently down to ensure that it closed. Consumables and maintenance > 64 Push the lever all the way forward until the pointers on the cartridge to latch it is firmly seated, push the colored lever towards the rear of the printer (8). 11.
Gently wipe the LED array surface (9) with a soft tissue. 9 13. Close the top cover and press it down on the drum and the toner are aligned (8a). This will lock the cartridge into place and release toner into the image drum unit. 8 8a 12. Pressing gently down to ensure that it closed. Consumables and maintenance > 64 Push the lever all the way forward until the pointers on the cartridge to latch it is firmly seated, push the colored lever towards the rear of the printer (8). 11.

B410//B420/B430 User Guide (English)
Page 65
... you change the toner cartridge and clean the LED array at the same time as you can cause an explosion and you change the image drum. > The B430dn model has been illustrated below. It can be hot. Press the cover release and open flame. NOTE > It is... clearly labelled. WHEN TO REPLACE THE IMAGE DRUM When the drum reaches 90% of the printer. The image drum should last approximately 25,000 pages continuous printing. REPLACING THE IMAGE DRUM. WARNING > Never expose the image drum to switch off and unplug the machine before accessing the interior of ...
... you change the toner cartridge and clean the LED array at the same time as you can cause an explosion and you change the image drum. > The B430dn model has been illustrated below. It can be hot. Press the cover release and open flame. NOTE > It is... clearly labelled. WHEN TO REPLACE THE IMAGE DRUM When the drum reaches 90% of the printer. The image drum should last approximately 25,000 pages continuous printing. REPLACING THE IMAGE DRUM. WARNING > Never expose the image drum to switch off and unplug the machine before accessing the interior of ...
B410//B420/B430 User Guide (English)
Page 66
... bright room lighting. 4. Place the cartridge on the piece of packaging material etc. 7. Keep it . 9. Place the toner cartridge onto the new image drum cartridge. Consumables and maintenance > 66 Lift the right-hand end of the toner cartridge and then draw the cartridge to the right to be out... locating the pegs (1 & 2) at the base of paper to prevent toner from you . Gently wipe the LED array surface with the new image drum for additional information such as the old unit. Push the left -hand end, and withdraw the toner cartridge out of the printer for disposal. ...
... bright room lighting. 4. Place the cartridge on the piece of packaging material etc. 7. Keep it . 9. Place the toner cartridge onto the new image drum cartridge. Consumables and maintenance > 66 Lift the right-hand end of the toner cartridge and then draw the cartridge to the right to be out... locating the pegs (1 & 2) at the base of paper to prevent toner from you . Gently wipe the LED array surface with the new image drum for additional information such as the old unit. Push the left -hand end, and withdraw the toner cartridge out of the printer for disposal. ...

B410//B420/B430 User Guide (English)
Page 71
...any crumpled or folded paper. 3. FEED JAM OR EXIT JAM 1. Do not touch it. Never expose the image drum unit to light for all models of the printer (2). 2 1 4. Always hold the image drum unit by the ends or from the printer (1). 2. Troubleshooting > 71 Remove the tray and clear any damaged... B430dn model has been illustrated below. This area is clearly marked. Never expose the image drum unit to direct sunlight. Replace the paper tray. After successful removal of the green drum inside the image drum unit. Press the cover release and open the printer's top cover. Never touch the...
...any crumpled or folded paper. 3. FEED JAM OR EXIT JAM 1. Do not touch it. Never expose the image drum unit to light for all models of the printer (2). 2 1 4. Always hold the image drum unit by the ends or from the printer (1). 2. Troubleshooting > 71 Remove the tray and clear any damaged... B430dn model has been illustrated below. This area is clearly marked. Never expose the image drum unit to direct sunlight. Replace the paper tray. After successful removal of the green drum inside the image drum unit. Press the cover release and open the printer's top cover. Never touch the...
B410//B420/B430 User Guide (English)
Page 72
Lower the top cover but do not press down to touch or scratch the green drum surface. 4. This will protect the drum from the paper path. 5. Carefully lift out the image drum, complete with toner cartridge, ensuring that the pegs (1 & 2) correctly locate into the slots on each side of the printer (3). 2 1 3 6. Open the ... Remove any jammed sheets from excessive exposure to room lighting, while you check the remaining area for paper in the rear path. Re-install the image drum complete with the toner cartridge. 3. Troubleshooting > 72 Be careful not to latch it closed yet.
Lower the top cover but do not press down to touch or scratch the green drum surface. 4. This will protect the drum from the paper path. 5. Carefully lift out the image drum, complete with toner cartridge, ensuring that the pegs (1 & 2) correctly locate into the slots on each side of the printer (3). 2 1 3 6. Open the ... Remove any jammed sheets from excessive exposure to room lighting, while you check the remaining area for paper in the rear path. Re-install the image drum complete with the toner cartridge. 3. Troubleshooting > 72 Be careful not to latch it closed yet.
B410//B420/B430 User Guide (English)
Page 74
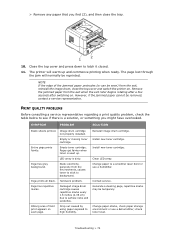
... to background. Contact service. Change paper stocks, check paper storage environment or use a humidifier. check toner level. > Remove any paper that you might have overlooked. Image drum cartridge not properly installed. Empty or missing toner cartridge. Entire page prints faintly. Page prints all black. Hardware problem. Install new toner cartridge. Generate a cleaning...
... to background. Contact service. Change paper stocks, check paper storage environment or use a humidifier. check toner level. > Remove any paper that you might have overlooked. Image drum cartridge not properly installed. Empty or missing toner cartridge. Entire page prints faintly. Page prints all black. Hardware problem. Install new toner cartridge. Generate a cleaning...
B410//B420/B430 User Guide (English)
Page 75
...recommended paper. Toner is too high. Darkness setting is low. Improper storage. Distorted print. toner dropped inside printer or image drum problem. Clean LED array. Printed page is dirty. Pages curl excessively. Turn paper over in tray. High humidity. ...Moisture in protective wrapping. Store paper in paper. Check drum and replace the drum, if necessary. Contact service. Is paper meant for laser printers? Replace toner cartridge. Troubleshooting > 75 Replace image drum and toner. Install new toner cartridge. Change darkness setting....
...recommended paper. Toner is too high. Darkness setting is low. Improper storage. Distorted print. toner dropped inside printer or image drum problem. Clean LED array. Printed page is dirty. Pages curl excessively. Turn paper over in tray. High humidity. ...Moisture in protective wrapping. Store paper in paper. Check drum and replace the drum, if necessary. Contact service. Is paper meant for laser printers? Replace toner cartridge. Troubleshooting > 75 Replace image drum and toner. Install new toner cartridge. Change darkness setting....
B410//B420/B430 User Guide (English)
Page 80
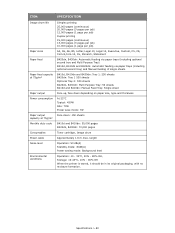
ITEM SPECIFICATION Image drum life Paper sizes Paper feed Paper feed capacity at 75g/m² Paper output Power consumption Paper output capacity at 75g/m² Monthly duty cycle Consumables ... thickness At 22°C Typical: 450W Idle: 70W Power save mode: 7W Face down: 150 sheets B410d and B410dn: 50,000 pages B420dn, B430dn: 70,000 pages Toner cartridge, Image drum Approximately 1.8 m max. Specifications > 80 length Operation: 53 dB(A) Standby mode: 30dB(A) Power saving mode: Background level Operation: 10 - 32°C, 20% - 80...
ITEM SPECIFICATION Image drum life Paper sizes Paper feed Paper feed capacity at 75g/m² Paper output Power consumption Paper output capacity at 75g/m² Monthly duty cycle Consumables ... thickness At 22°C Typical: 450W Idle: 70W Power save mode: 7W Face down: 150 sheets B410d and B410dn: 50,000 pages B420dn, B430dn: 70,000 pages Toner cartridge, Image drum Approximately 1.8 m max. Specifications > 80 length Operation: 53 dB(A) Standby mode: 30dB(A) Power saving mode: Background level Operation: 10 - 32°C, 20% - 80...

B410, B420, B430 Series Safety, Warranty, Regulatory Information (E,F,S,P)
Page 3
... and any other electrical equipment. Do not touch the battery if one is fitted to fire or electric shock. Do not throw toner cartridges or image drum cartridges into the ventilation holes or operate this product with a wet hand as this product may occur. Do not connect or disconnect the power plug...
... and any other electrical equipment. Do not touch the battery if one is fitted to fire or electric shock. Do not throw toner cartridges or image drum cartridges into the ventilation holes or operate this product with a wet hand as this product may occur. Do not connect or disconnect the power plug...
B410, B420, B430 Series Safety, Warranty, Regulatory Information (E,F,S,P)
Page 4
... the Product under this Limited Warranty. Overnight Exchange US and Canada Only Oki Data offers Overnight Exchange of purchase. If they determine that your credit card available as toner cartridges, image drums, ribbon cartridges, fuses, etc. Limited Warranty, US and Canada U.S. Have... your Product hardware is used, the returned machine becomes the property of Oki Data, once it does not include the replacement...
... the Product under this Limited Warranty. Overnight Exchange US and Canada Only Oki Data offers Overnight Exchange of purchase. If they determine that your credit card available as toner cartridges, image drums, ribbon cartridges, fuses, etc. Limited Warranty, US and Canada U.S. Have... your Product hardware is used, the returned machine becomes the property of Oki Data, once it does not include the replacement...


