

Owners Guide
Page 2
... aerobic exerciser and how to burn more calories with your WalkFit. Walkfit Classic means adaptability. This Owner's Guide provides you with the smooth, natural motion of the WalkEit Classic nonmotorized treadmill. And there's no moving treadmill belt Io throw you 're always in your muscles with... electrical outlet. Wal Classic's full-body conditioning helps take care of many of weal her conditions. The extra-wide treadmill deck cushions your body fat. The WalkFit' Classic- You won't have I o deal will] the jarring motion of your ankles, knees, hips and back. ...
... aerobic exerciser and how to burn more calories with your WalkFit. Walkfit Classic means adaptability. This Owner's Guide provides you with the smooth, natural motion of the WalkEit Classic nonmotorized treadmill. And there's no moving treadmill belt Io throw you 're always in your muscles with... electrical outlet. Wal Classic's full-body conditioning helps take care of many of weal her conditions. The extra-wide treadmill deck cushions your body fat. The WalkFit' Classic- You won't have I o deal will] the jarring motion of your ankles, knees, hips and back. ...

Owners Guide
Page 3
...6:00 a.m.-6:00 p.m. Be sure to the inside back cover of this Fold Your WalkFit Classic for Your Flywheel and Drag Strap 23 Oil the Upper-Body Exerciser 24 Adjust the Treadmill Resistance 26 Customer Information 28 Table of Contents IMPORTANT: Please peel the backing from ...your workouts with the WalkFit Classic aerobic exerciser. Operation 12 Your Personal Fitness Program 15 Recommended Stretches...
...6:00 a.m.-6:00 p.m. Be sure to the inside back cover of this Fold Your WalkFit Classic for Your Flywheel and Drag Strap 23 Oil the Upper-Body Exerciser 24 Adjust the Treadmill Resistance 26 Customer Information 28 Table of Contents IMPORTANT: Please peel the backing from ...your workouts with the WalkFit Classic aerobic exerciser. Operation 12 Your Personal Fitness Program 15 Recommended Stretches...

Owners Guide
Page 4
Parts Workout-computer faceplate Hip pad Workout computer Arm-exercci:ser poles q ir4k Treadmill tension control knob Hip-pad bracket Upright tube Upper-body resistance knob Treadmill belt 2 Treadmill base Flywheel Drag strap Snap buttons Easy-lock pin Please spend a moment to familiarize yourself with the WalkFit" (lassie parts and terminology in this photo before you assemble your WalkFit Classic.
Parts Workout-computer faceplate Hip pad Workout computer Arm-exercci:ser poles q ir4k Treadmill tension control knob Hip-pad bracket Upright tube Upper-body resistance knob Treadmill belt 2 Treadmill base Flywheel Drag strap Snap buttons Easy-lock pin Please spend a moment to familiarize yourself with the WalkFit" (lassie parts and terminology in this photo before you assemble your WalkFit Classic.
Owners Guide
Page 6
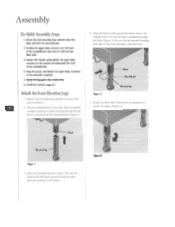
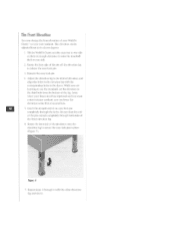
Assembly Six Ouick Assembly Steps 1. Position the upper-body exerciser over the front of an easy-lock pin completely through 1 both sides of the treadmill deck (Figure 1). 4. Snap the sensor cord (below the upper-body exerciser) to the tension rod underneath the front of the easy-lock pin... underside receptacle. 5. Be sure the pin extends through the holes (Figure 2). Figure 3 Insert. Attach the hip pad to one side. Tilt the treadmill base to the upright tube. 6. Align the holes in the sleeve. Attach the front-elevation legs and lock them into a sleeve.
Assembly Six Ouick Assembly Steps 1. Position the upper-body exerciser over the front of an easy-lock pin completely through 1 both sides of the treadmill deck (Figure 1). 4. Snap the sensor cord (below the upper-body exerciser) to the tension rod underneath the front of the easy-lock pin... underside receptacle. 5. Be sure the pin extends through the holes (Figure 2). Figure 3 Insert. Attach the hip pad to one side. Tilt the treadmill base to the upright tube. 6. Align the holes in the sleeve. Attach the front-elevation legs and lock them into a sleeve.
Owners Guide
Page 7
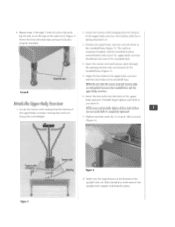
...properly installed. Position the upper-body exerciser over the front of the upperbody exerciser. Insert the four bolts into the holes of the treadmill base (Figure 5). Tighten the bolts with the [bur holes in place. Locale the tension cable hanging from the bottom of the upright...and spring Figure 5 Sensor cord Opening Figure 6 8. Easy-lock pins Figure 4 Attach the Upper-Body Exerciser 1. Align the four holes in the treadmill base (Figure 5). 5. Partially finger tighten each bolt as you insert it hangs free and straight.. 2. Locate the sensor cord coining from the bottom ...
...properly installed. Position the upper-body exerciser over the front of the upperbody exerciser. Insert the four bolts into the holes of the treadmill base (Figure 5). Tighten the bolts with the [bur holes in place. Locale the tension cable hanging from the bottom of the upright...and spring Figure 5 Sensor cord Opening Figure 6 8. Easy-lock pins Figure 4 Attach the Upper-Body Exerciser 1. Align the four holes in the treadmill base (Figure 5). 5. Partially finger tighten each bolt as you insert it hangs free and straight.. 2. Locate the sensor cord coining from the bottom ...
Owners Guide
Page 8
... the hip-pad bracket (Figure 9). Houle the sensor cord under the center frame support. 4. Lay the WalkFit Classic:" aerobic exerciser on it. Increase the treadmill resistance by turning the treadmill tension control knob clockwise so Ihat the treadmill belt does not move when you stand on its left side (the side opposite the flywheel...
... the hip-pad bracket (Figure 9). Houle the sensor cord under the center frame support. 4. Lay the WalkFit Classic:" aerobic exerciser on it. Increase the treadmill resistance by turning the treadmill tension control knob clockwise so Ihat the treadmill belt does not move when you stand on its left side (the side opposite the flywheel...
Owners Guide
Page 10
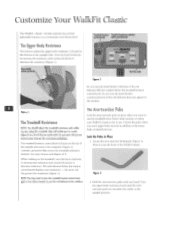
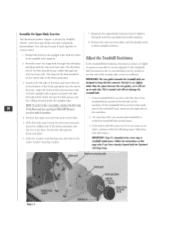
... when you ore using the treadmill. Treadmill tension Treadmill resistance window control knob (with one hand. You may need to accommodate your WalkFil Classic: is located at the bottom of the upright I ension control knob displays your resistance - the more red, the greater the resistance (Figure 2). Customize Your WalkFit Classic The WallcFit. Classic' aerobic...
... when you ore using the treadmill. Treadmill tension Treadmill resistance window control knob (with one hand. You may need to accommodate your WalkFil Classic: is located at the bottom of the upright I ension control knob displays your resistance - the more red, the greater the resistance (Figure 2). Customize Your WalkFit Classic The WallcFit. Classic' aerobic...

Owners Guide
Page 11
Use your other hand to use the treadmill in the forward position if you want to the poles. 4. The pin should fully extend through all the holes. Lock the poles in combination with ...one hand. Make sure the snap buttons at the bottom of the upright tube are fully extended on to run on the treadmill without holding on both sides of the arm-exerciser poles. 6. Use your other hand to insert the uncapped end of the arm-exerciser locking pin...
Use your other hand to use the treadmill in the forward position if you want to the poles. 4. The pin should fully extend through all the holes. Lock the poles in combination with ...one hand. Make sure the snap buttons at the bottom of the upright tube are fully extended on to run on the treadmill without holding on both sides of the arm-exerciser poles. 6. Use your other hand to insert the uncapped end of the arm-exerciser locking pin...
Owners Guide
Page 12
... leg. Be sure I Ihrough 6 with the corresponding holes in place (Figure 7). Repeat seeps I hal the end of the pin extends completely through I ❑ raise the treadmill deck Oil one sidle so there is enough clearance I he pin down onto the elevation leg to secure the easy-lock pin in the sleeve... elevation leg. 6. Insert die straighl end of an easy-lock pin completely through boll] sides of the pin off the elevation leg to use the Treadmill. Figure 7 7.
... leg. Be sure I Ihrough 6 with the corresponding holes in place (Figure 7). Repeat seeps I hal the end of the pin extends completely through I ❑ raise the treadmill deck Oil one sidle so there is enough clearance I he pin down onto the elevation leg to secure the easy-lock pin in the sleeve... elevation leg. 6. Insert die straighl end of an easy-lock pin completely through boll] sides of the pin off the elevation leg to use the Treadmill. Figure 7 7.

Owners Guide
Page 13
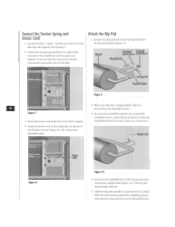
...knob and carriage boll. remove it and place it rests on both arm-exerciser poles with one hand and depress the snap buttons on the treadmill deck. holes in the storage. If you need to remove the hip pad to collapse your Ward Classic as compact as you remove the ...hand as possible. Lower the upright tube until they rest on to hold on the treadmill deck. 1. The capped end 01 the arm-exerciser locking pin should extend toward the front or the base. 3. Fold Your WalkFit Classic for Storage ne 1ki7n Classic aerobic exerciser is inserted through the locking holes. Remove...
...knob and carriage boll. remove it and place it rests on both arm-exerciser poles with one hand and depress the snap buttons on the treadmill deck. holes in the storage. If you need to remove the hip pad to collapse your Ward Classic as compact as you remove the ...hand as possible. Lower the upright tube until they rest on to hold on the treadmill deck. 1. The capped end 01 the arm-exerciser locking pin should extend toward the front or the base. 3. Fold Your WalkFit Classic for Storage ne 1ki7n Classic aerobic exerciser is inserted through the locking holes. Remove...
Owners Guide
Page 14
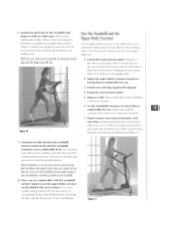
...you, S. Be sure there is properly adjusted. Follow the instructions on carpeting, the flywheel may damage your flooring. 3. Follow the guidelines on the treadmill surface. 3. c'c Too high ti -7' dr lx Too low 1 Just right Figure 1 You may want to hold on to the locked arm ... grip that the arm-exerciser locking pin is properly adjusted. Gently rest your muscles before walking on and off the exerciser. 2. The treadmill bell has been pre-lubricated at hip level, about one inch below your navel. Grasp the arm-exerciser poles in either the rear...
...you, S. Be sure there is properly adjusted. Follow the instructions on carpeting, the flywheel may damage your flooring. 3. Follow the guidelines on the treadmill surface. 3. c'c Too high ti -7' dr lx Too low 1 Just right Figure 1 You may want to hold on to the locked arm ... grip that the arm-exerciser locking pin is properly adjusted. Gently rest your muscles before walking on and off the exerciser. 2. The treadmill bell has been pre-lubricated at hip level, about one inch below your navel. Grasp the arm-exerciser poles in either the rear...
Owners Guide
Page 15
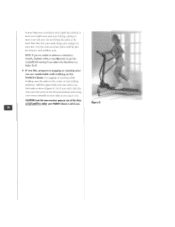
...slow pace. We recommend that is comfortable for you . 3, Gently rest your hips against the hip pad. 4. Once you arc comfortable with the treadmill surface, begin to a level that is more effective than walking alone. Keep your weight on your right log is forward. NOTE: As you ... Unlock the arm-exerciser poles. Place the arm-exerciser locking pin in harmony with one hand. your feet. Stand near the front of the treadmill belt. comfortable strides. When your legs, pushing and pulling the arm-exerciser poles as you start with a lower resistance and increase it as ...
...slow pace. We recommend that is comfortable for you . 3, Gently rest your hips against the hip pad. 4. Once you arc comfortable with the treadmill surface, begin to a level that is more effective than walking alone. Keep your weight on your right log is forward. NOTE: As you ... Unlock the arm-exerciser poles. Place the arm-exerciser locking pin in harmony with one hand. your feet. Stand near the front of the treadmill belt. comfortable strides. When your legs, pushing and pulling the arm-exerciser poles as you start with a lower resistance and increase it as ...
Owners Guide
Page 16
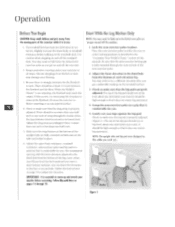
... wish, lock the arm-exerciser poles in the forward position and swing your arms naturally at your WalkFit Classic is not in use. NOTE: If you are comfortable with walking on your weight on the WalkFit Classic. Add the upper-body exerciser when you to envision your right leg coming to meet... your right arm and your left leg coming to meet your body. It may be easier to get the treadmill belt moving if you adjust the elevation...
... wish, lock the arm-exerciser poles in the forward position and swing your arms naturally at your WalkFit Classic is not in use. NOTE: If you are comfortable with walking on your weight on the WalkFit Classic. Add the upper-body exerciser when you to envision your right leg coming to meet... your right arm and your left leg coming to meet your body. It may be easier to get the treadmill belt moving if you adjust the elevation...
Owners Guide
Page 22
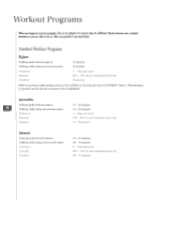
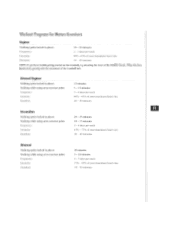
...Duration: 20 - 25 minutes 20 - 30 minutes 4 - 5 days per week 60% - 70% of your workout duration as you hove trouble getting started on the treadmill, try elevating the front of your maximum heart rate 40 - 55 minutes Slowly increase your maximum heart rate 20 minutes NOTE: If you are able... to ten minutes of the treadmill belt. When the base is elevated, gravity aids the movement of exercise may be sufficient. Workout Programs When you need them. Take rest ...
...Duration: 20 - 25 minutes 20 - 30 minutes 4 - 5 days per week 60% - 70% of your workout duration as you hove trouble getting started on the treadmill, try elevating the front of your maximum heart rate 40 - 55 minutes Slowly increase your maximum heart rate 20 minutes NOTE: If you are able... to ten minutes of the treadmill belt. When the base is elevated, gravity aids the movement of exercise may be sufficient. Workout Programs When you need them. Take rest ...
Owners Guide
Page 23
...: 10 - 20 minutes 2 - 3 days per week 75% - 85% of your maximum heart rate 10 - 20 minutes NOTE: if you have trouble getting started on the treadmill, try elevating the front of the WolkFit Classic. When the base is elevated, gravity aids the movement of the...
...: 10 - 20 minutes 2 - 3 days per week 75% - 85% of your maximum heart rate 10 - 20 minutes NOTE: if you have trouble getting started on the treadmill, try elevating the front of the WolkFit Classic. When the base is elevated, gravity aids the movement of the...

Owners Guide
Page 24
Workout Log YOU may want to photocopy this page before you use it. Date Program Duration Distance Treadmill Resistance Total Calories Burned Pulse Rate r
Workout Log YOU may want to photocopy this page before you use it. Date Program Duration Distance Treadmill Resistance Total Calories Burned Pulse Rate r

Owners Guide
Page 25
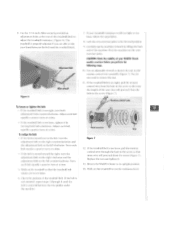
... both during and after each workout. • After 1 2-1 5 hours of walking or jogging on the WalkFit Classic (Figure 1), 4, Scrub both the treadmill belt and the treadmill deck beneath it from the belt and deck. Call our Customer Service Department at its lowest setting. 3. Be...Flywheel Small loop Tension rod Figure 1 Budde 1. Place a protective covering on a monthly basis. Lubricate Your Treadmill Deck Note: Before you use only the lubricant obtained through NordicTrack: other lubricants may drip from the flywheel. If such a buildup does exist, clean the flywheel and drag ...
... both during and after each workout. • After 1 2-1 5 hours of walking or jogging on the WalkFit Classic (Figure 1), 4, Scrub both the treadmill belt and the treadmill deck beneath it from the belt and deck. Call our Customer Service Department at its lowest setting. 3. Be...Flywheel Small loop Tension rod Figure 1 Budde 1. Place a protective covering on a monthly basis. Lubricate Your Treadmill Deck Note: Before you use only the lubricant obtained through NordicTrack: other lubricants may drip from the flywheel. If such a buildup does exist, clean the flywheel and drag ...

Owners Guide
Page 26
...spin with the reverse side against the flywheel. . Set the knob aside. 3. poi°. 6. If there is uneven, you were standing on the treadmill facing the upright tube. Use fine or veer►• fine steel wool to push the boll through the left ) side if you will damage...' exerciser. Slide the right brake-pad plate (and lite attached brake pad) off . NEVER place oil between 1 /2-inch and one inch of the treadmill belt, but the drag strap should be the right (or left armexerciser pole and brake-pad plate. Upper-body resistance control knob Bearing 5. If the...
...spin with the reverse side against the flywheel. . Set the knob aside. 3. poi°. 6. If there is uneven, you were standing on the treadmill facing the upright tube. Use fine or veer►• fine steel wool to push the boll through the left ) side if you will damage...' exerciser. Slide the right brake-pad plate (and lite attached brake pad) off . NEVER place oil between 1 /2-inch and one inch of the treadmill belt, but the drag strap should be the right (or left armexerciser pole and brake-pad plate. Upper-body resistance control knob Bearing 5. If the...
Owners Guide
Page 28
... Realign the holes in the upright tube with the following slips. NOTE: To assist in the reassembly, stand at the bottom of the treadmill deck. Tit the boll through the left brakepad plate arid the arm-exerciser pole. Follow the instructions on this order: washer, bearing, ...The illustration below (Figure 5) shows the Classic.' Reattach I he on that you have already cleaned both the flywheel and drag strap. Adjust the Treadmill Resistance Partially insert the large bolt through the brake-pad plate. 6. The threaded end of the brake-pad plate. 3. Align the holes in...
... Realign the holes in the upright tube with the following slips. NOTE: To assist in the reassembly, stand at the bottom of the treadmill deck. Tit the boll through the left brakepad plate arid the arm-exerciser pole. Follow the instructions on this order: washer, bearing, ...The illustration below (Figure 5) shows the Classic.' Reattach I he on that you have already cleaned both the flywheel and drag strap. Adjust the Treadmill Resistance Partially insert the large bolt through the brake-pad plate. 6. The threaded end of the brake-pad plate. 3. Align the holes in...
Owners Guide
Page 29
...11' the bell is too tight. Adjust each bolt equally a qi tarter turn at the rear of the treadmill leek to loosen the nut on the left counterclockwise. Turn each bolt equally a quarter turn the adjnstment bolt ...Check the position of your hand between the two guides under the machine. 7. 4. The treadmill is moved over to slip your WalkFit Classic aerobic exerciser before you are able to the left clockwise. To realign the belt: ...Hie machine on the left . CAUTION: Check the stability of the treadmill belt. Return the walkFit Classic to test the resistance level.
...11' the bell is too tight. Adjust each bolt equally a qi tarter turn at the rear of the treadmill leek to loosen the nut on the left counterclockwise. Turn each bolt equally a quarter turn the adjnstment bolt ...Check the position of your hand between the two guides under the machine. 7. 4. The treadmill is moved over to slip your WalkFit Classic aerobic exerciser before you are able to the left clockwise. To realign the belt: ...Hie machine on the left . CAUTION: Check the stability of the treadmill belt. Return the walkFit Classic to test the resistance level.


