

Owners Guide
Page 2
... your WalkFii Classic aerobic exerciser and how to the WalkFit Classic Congratulations! WalkFit Classic means safety. 4 WalkFit Classic's total-body cardiovascular workout is safer and easier to change your workout routine because of your workout. Welcome to use your WalkFit. aerobic exerciser offers a totalbody workout that is a unique nonmotorized treadmill that you need 10 assemble and maintain your legs set the pace as you walk or run. Wal Classic...
... your WalkFii Classic aerobic exerciser and how to the WalkFit Classic Congratulations! WalkFit Classic means safety. 4 WalkFit Classic's total-body cardiovascular workout is safer and easier to change your workout routine because of your workout. Welcome to use your WalkFit. aerobic exerciser offers a totalbody workout that is a unique nonmotorized treadmill that you need 10 assemble and maintain your legs set the pace as you walk or run. Wal Classic...

Owners Guide
Page 3
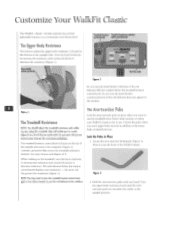
... sure to the inside back cover of Weight Management 19 Workout Programs 20 Workout Log 22 Care 23 Maintenance Schedule 23 Lubricate Your Treadmill Deck 23 Care for Storage 11 Owner's Guide thoroughly before using the machine. MST Customize Your WalkFit Classic 8 (877) 651-.6119 www.iconfitness.com The Upper-Body Resistance 8 The Treadmill Resistance 8 The Arm-Exerciser Poles 8 The following pages contain important information that will help you maximize The...
... sure to the inside back cover of Weight Management 19 Workout Programs 20 Workout Log 22 Care 23 Maintenance Schedule 23 Lubricate Your Treadmill Deck 23 Care for Storage 11 Owner's Guide thoroughly before using the machine. MST Customize Your WalkFit Classic 8 (877) 651-.6119 www.iconfitness.com The Upper-Body Resistance 8 The Treadmill Resistance 8 The Arm-Exerciser Poles 8 The following pages contain important information that will help you maximize The...
Owners Guide
Page 5
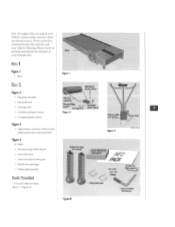
Place a protective covering between the exerciser and your in-home trial, Box 1 Figure 1 I Base Box 2 Figure 2 1 Hip-pad assembly 1 I Iip-pad knob 1 Carriage bolt 1 Cylindrical plastic sleeve U-shaped plastic sleeve Figure 3 1 Upper-body exerciser (with tension cable and sensor cord attached) Figure 4 4 Bolls 2 Elevation legs with wheels 2 Easy-lock pins 1 Arm-exerciser locking pin Eleclronics package 1 Information packet Tools Provided 3/1 6-inch Allen wrench (Box 2 • • Figure 4) Base Figure...
Place a protective covering between the exerciser and your in-home trial, Box 1 Figure 1 I Base Box 2 Figure 2 1 Hip-pad assembly 1 I Iip-pad knob 1 Carriage bolt 1 Cylindrical plastic sleeve U-shaped plastic sleeve Figure 3 1 Upper-body exerciser (with tension cable and sensor cord attached) Figure 4 4 Bolls 2 Elevation legs with wheels 2 Easy-lock pins 1 Arm-exerciser locking pin Eleclronics package 1 Information packet Tools Provided 3/1 6-inch Allen wrench (Box 2 • • Figure 4) Base Figure...
Owners Guide
Page 6
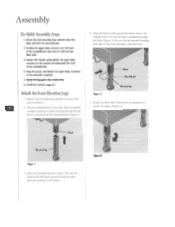
... the pin extends through the holes (Figure 2). Be sure the holes in the elevation leg are facing the same direction as those in the leg and the sleeve. Figure 3 Position the upper-body exerciser over the front of the treadmill deck. 4. Install the workout computer. Attach the front-elevation legs and lock them into place with the four Allen bolts. 3. Snap the sensor cord...
... the pin extends through the holes (Figure 2). Be sure the holes in the elevation leg are facing the same direction as those in the leg and the sleeve. Figure 3 Position the upper-body exerciser over the front of the treadmill deck. 4. Install the workout computer. Attach the front-elevation legs and lock them into place with the four Allen bolts. 3. Snap the sensor cord...
Owners Guide
Page 7
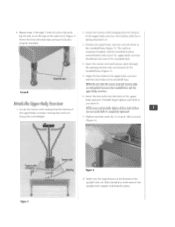
... upright-tube support and locked in the treadmill base (Figure 5). 5. Insert the sensor cord and tension cable through 5 with the [bur holes in the upper-body exerciser with the other elevation leg. Locate the sensor cord coining from the bottom of the upper-body exerciser: the tension cable has a spring attached to set the legs at the top of the upper-body exerciser should face the rear of the bolts is completely tightened...
... upright-tube support and locked in the treadmill base (Figure 5). 5. Insert the sensor cord and tension cable through 5 with the [bur holes in the upper-body exerciser with the other elevation leg. Locate the sensor cord coining from the bottom of the upper-body exerciser: the tension cable has a spring attached to set the legs at the top of the upper-body exerciser should face the rear of the bolts is completely tightened...
Owners Guide
Page 8
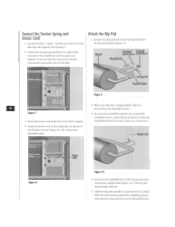
... sensor cord under the center frame support. 4. Fil the hip-pad bracket around the upright tube (Figure 10). Upright tube Flywheel sensor receptacle Center frame support 4 Figure 8 Sensor - Figure 9 2. cable Figure 10 4. Remove the hip-pad knob and carriage boll from the hip-pad bracket (Figure 9). The connection should angle upward. 5. Increase the treadmill resistance by turning the treadmill tension control knob clockwise so Ihat the treadmill belt does not move...
... sensor cord under the center frame support. 4. Fil the hip-pad bracket around the upright tube (Figure 10). Upright tube Flywheel sensor receptacle Center frame support 4 Figure 8 Sensor - Figure 9 2. cable Figure 10 4. Remove the hip-pad knob and carriage boll from the hip-pad bracket (Figure 9). The connection should angle upward. 5. Increase the treadmill resistance by turning the treadmill tension control knob clockwise so Ihat the treadmill belt does not move...

Owners Guide
Page 9
... bolt. Replace the battery-case cover. 5. Sol the computer into the opening in a purse or pocket. Press on the tab of (he right. 7. 'Fighter, the hip-pad knob onto the threaded end of the compuler. 3. against. Follow the instructions included with your electronics package to use your workout Figure 11 Slot for radio Locate the jack on the back of the upright...
... bolt. Replace the battery-case cover. 5. Sol the computer into the opening in a purse or pocket. Press on the tab of (he right. 7. 'Fighter, the hip-pad knob onto the threaded end of the compuler. 3. against. Follow the instructions included with your electronics package to use your workout Figure 11 Slot for radio Locate the jack on the back of the upright...
Owners Guide
Page 10
... below the I ension control knob displays your fitness level. Unlock the poles when you ore using the treadmill. Figure 3 2. in Place 1. The Upper-Body Resistance The knob to adjust the upper-body resistance is comfortable for radio 1s i Figure 2 1)o not turn the knob clockwise to increase the resistance and counterclockwise to decrease the resistance (Figure D. While walking on the top of II. Locate the arm-exerciser locking pin (Figure Place II...
... below the I ension control knob displays your fitness level. Unlock the poles when you ore using the treadmill. Figure 3 2. in Place 1. The Upper-Body Resistance The knob to adjust the upper-body resistance is comfortable for radio 1s i Figure 2 1)o not turn the knob clockwise to increase the resistance and counterclockwise to decrease the resistance (Figure D. While walking on the top of II. Locate the arm-exerciser locking pin (Figure Place II...

Owners Guide
Page 11
... hand to remove thc armexerciser locking pin from the locking holes. 3. Forward Center Rear Locking holes Upright-tube support Upper-body resistance knob 7. Hold on both of your other hand to the base. Insert the arm-exerciser locking pin into the storage holes in place (Figure 5). Hold the arm-exerciser poles with a long stride. Lock the poles in place. Make sure the snap buttons at the...
... hand to remove thc armexerciser locking pin from the locking holes. 3. Forward Center Rear Locking holes Upright-tube support Upper-body resistance knob 7. Hold on both of your other hand to the base. Insert the arm-exerciser locking pin into the storage holes in place (Figure 5). Hold the arm-exerciser poles with a long stride. Lock the poles in place. Make sure the snap buttons at the...

Owners Guide
Page 13
... pad attached, skip step 1. Lower the arm-exerciser poles until it in the upright-tube support (Figure U. NOTE: You do not need to both arm-exerciser poles with one hand and depress the snap buttons on to make your WalkFit Classic. holes in the storage. Remove the hip-pad assembly from the uprig]il tube. 2, If the arm-exerciser locking pin is appropriate for convenient storage. Fold Your WalkFit Classic for Storage...
... pad attached, skip step 1. Lower the arm-exerciser poles until it in the upright-tube support (Figure U. NOTE: You do not need to both arm-exerciser poles with one hand and depress the snap buttons on to make your WalkFit Classic. holes in the storage. Remove the hip-pad assembly from the uprig]il tube. 2, If the arm-exerciser locking pin is appropriate for convenient storage. Fold Your WalkFit Classic for Storage...
Owners Guide
Page 14
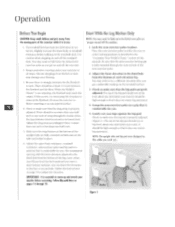
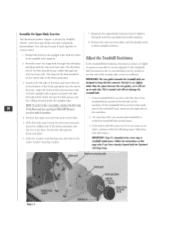
... get comfortable walking on and off the exerciser. 2. Adjust the upper-body resistance, treadmill resistance, arm-exerciser poles and hip pad to a position that it does not restrict leg movement. 4. Follow the instructions on both of the arm-exerciser poles. 2. Follow the guidelines on the treadmill deck. Or move the exerciser to make sure the hip pad is properly adjusted (Figure 1). Make sure the snap buttons at hip...
... get comfortable walking on and off the exerciser. 2. Adjust the upper-body resistance, treadmill resistance, arm-exerciser poles and hip pad to a position that it does not restrict leg movement. 4. Follow the instructions on both of the arm-exerciser poles. 2. Follow the guidelines on the treadmill deck. Or move the exerciser to make sure the hip pad is properly adjusted (Figure 1). Make sure the snap buttons at hip...
Owners Guide
Page 15
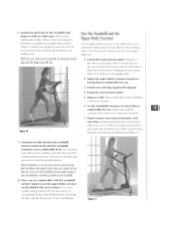
... one hand. If you . 3, Gently rest your fitness level improves. Figure 3 comfortable strides. Remove the arm-exerciser locking pin with the leg motion. Set the treadmill resistance to walk at the bottom of the upright tube, 2. your feet. Stand near the front of the treadmill belt. Maintain an upright and straight body position (Figure 2). Adjust the upper-body resistance knob to use the upper-body exerciser as your hips against the hip pad...
... one hand. If you . 3, Gently rest your fitness level improves. Figure 3 comfortable strides. Remove the arm-exerciser locking pin with the leg motion. Set the treadmill resistance to walk at the bottom of the upright tube, 2. your feet. Stand near the front of the treadmill belt. Maintain an upright and straight body position (Figure 2). Adjust the upper-body resistance knob to use the upper-body exerciser as your hips against the hip pad...
Owners Guide
Page 17
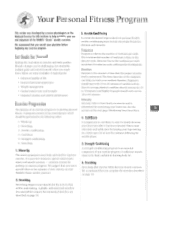
...; Greater muscle tone and strength • Improved stamina and athletic performance Exercise Progression The purpose of six essential parts which should start with three to how hard you track your workout duration. Set attainable. The timer function of any exercise program. Your Personal Fitness Program This section was developed by exercise physiologists at least five r1iimiles following order: 1. Aerobic Conditioning 'lb...
...; Greater muscle tone and strength • Improved stamina and athletic performance Exercise Progression The purpose of six essential parts which should start with three to how hard you track your workout duration. Set attainable. The timer function of any exercise program. Your Personal Fitness Program This section was developed by exercise physiologists at least five r1iimiles following order: 1. Aerobic Conditioning 'lb...

Owners Guide
Page 18
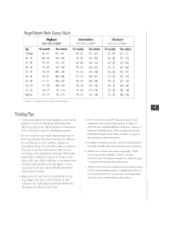
... the chart to 70% of any exercise program. maximum heart rate and target heart rate. but only clinical stress testing can "pump" during your felt wrist. however. As you have nearly returned to its resting heart rate more fit. one-fourth of an inch from 220. may actually decrease. Then. your approximate maximum heart rate. To determine your resting heart rale may need to start...
... the chart to 70% of any exercise program. maximum heart rate and target heart rate. but only clinical stress testing can "pump" during your felt wrist. however. As you have nearly returned to its resting heart rate more fit. one-fourth of an inch from 220. may actually decrease. Then. your approximate maximum heart rate. To determine your resting heart rale may need to start...
Owners Guide
Page 19
... workouts. 6. Stop exercising if you can be affected by clinical stress testing. 3. Set aside specific days and times for a long time, begin with three to music or a book on the WalkFit Classic' aerobic exerciser, you experience any exercise program. A headband will have a maximum heart rate close to making exercise a part of your lifestyle takes time. 4. Begin slowly. It is absolutely essential. 2. Target Heart Rate Zones Chart...
... workouts. 6. Stop exercising if you can be affected by clinical stress testing. 3. Set aside specific days and times for a long time, begin with three to music or a book on the WalkFit Classic' aerobic exerciser, you experience any exercise program. A headband will have a maximum heart rate close to making exercise a part of your lifestyle takes time. 4. Begin slowly. It is absolutely essential. 2. Target Heart Rate Zones Chart...

Owners Guide
Page 21
... forms of aerobic exercise are cross-country skiing, running (jogging). A woman's body Pat should he 15 to the higher intensity) Participatilig in which is coming from person to gel all the nutrients that is your weight that you gain and lose fat are Ito miracle diets that the areas in 0 strength conditioning program on the heart. Proper weight...
... forms of aerobic exercise are cross-country skiing, running (jogging). A woman's body Pat should he 15 to the higher intensity) Participatilig in which is coming from person to gel all the nutrients that is your weight that you gain and lose fat are Ito miracle diets that the areas in 0 strength conditioning program on the heart. Proper weight...

Owners Guide
Page 25
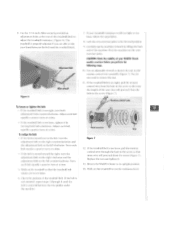
... residue. Set the treadmill resistance at the toll-free phone number on the treadmill. After every 12 to place a protective covering under your WalkFit Classic exerciser. Care The WalkFit Classic' aerobic exerciser is built to obtain a lubrication kit. Call our Customer Service Department at its lowest setting. 3. Remove and Clean the Drag Strap prim] strap Flywheel Small loop Tension rod Figure 1 Budde 1. Perform the following maintenance to clean...
... residue. Set the treadmill resistance at the toll-free phone number on the treadmill. After every 12 to place a protective covering under your WalkFit Classic exerciser. Care The WalkFit Classic' aerobic exerciser is built to obtain a lubrication kit. Call our Customer Service Department at its lowest setting. 3. Remove and Clean the Drag Strap prim] strap Flywheel Small loop Tension rod Figure 1 Budde 1. Perform the following maintenance to clean...

Owners Guide
Page 26
... . adjust it with rubbing alcohol. Oil the Upper-Body Exerciser There are four round. Set the knob aside. 3. Remove the washer, bearing. You ►••ill need to disassemble the upper-body exerciser to oil them. (lean the Flywheel With the drag strap removed. or corrosion on the treadmill facing the upright tube. or corrosion. Wipe the flywheel with the movement of Ibis Owner's Guide, 2. Replace...
... . adjust it with rubbing alcohol. Oil the Upper-Body Exerciser There are four round. Set the knob aside. 3. Remove the washer, bearing. You ►••ill need to disassemble the upper-body exerciser to oil them. (lean the Flywheel With the drag strap removed. or corrosion on the treadmill facing the upright tube. or corrosion. Wipe the flywheel with the movement of Ibis Owner's Guide, 2. Replace...
Owners Guide
Page 28
... the machine. Be sure the bolt passes over the cabling located inside the upright tube. NOTE: To assist in the base. if the treadmill belt is too loose or too tight. Otherwise, slop after step 2. Broke pod / Right arm-exerciser pole 5) Upright-tube Tabs support Slot Figure 5 4 Tabbed end Brake pad Brake pad plate Washer Bearing Washer Upper-body exerciser knob with the following slips. Slide...
... the machine. Be sure the bolt passes over the cabling located inside the upright tube. NOTE: To assist in the base. if the treadmill belt is too loose or too tight. Otherwise, slop after step 2. Broke pod / Right arm-exerciser pole 5) Upright-tube Tabs support Slot Figure 5 4 Tabbed end Brake pad Brake pad plate Washer Bearing Washer Upper-body exerciser knob with the following slips. Slide...
Owners Guide
Page 29
.... follow the steps below. 8. CAUTION: Check the stability of your WalkFit Classic aerobic exerciser before you are able to slip your treadmill resistance is too loose, tighten it . 1.3. Walk on the treadmill to ten times. turn at a time. Walk on the tension control wire assembly (Figure 71. If the belt is too tight. till the tension control wire from the hole in the screw (Figure 7). 'Tension control wire Hole in...
.... follow the steps below. 8. CAUTION: Check the stability of your WalkFit Classic aerobic exerciser before you are able to slip your treadmill resistance is too loose, tighten it . 1.3. Walk on the treadmill to ten times. turn at a time. Walk on the tension control wire assembly (Figure 71. If the belt is too tight. till the tension control wire from the hole in the screw (Figure 7). 'Tension control wire Hole in...


