
English Manual
Page 2
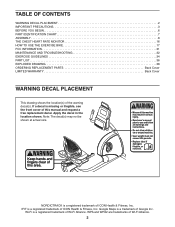
... 3 BEFORE YOU BEGIN 6 PART IDENTIFICATION CHART 7 ASSEMBLY 8 THE CHEST HEART RATE MONITOR 16 HOW TO USE THE EXERCISE BIKE 17 FCC INFORMATION 31 MAINTENANCE AND TROUBLESHOOTING 32 EXERCISE GUIDELINES 34 PART LIST 36 EXPLODED DRAWING 38 ORDERING REPLACEMENT PARTS Back Cover LIMITED WARRANTY Back Cover WARNING DECAL PLACEMENT This drawing shows the location(s) of ICON Health & Fitness, Inc. Apply the decal in the location shown. Note: The decal(s) may not be shown at actual size. If a decal is...
... 3 BEFORE YOU BEGIN 6 PART IDENTIFICATION CHART 7 ASSEMBLY 8 THE CHEST HEART RATE MONITOR 16 HOW TO USE THE EXERCISE BIKE 17 FCC INFORMATION 31 MAINTENANCE AND TROUBLESHOOTING 32 EXERCISE GUIDELINES 34 PART LIST 36 EXPLODED DRAWING 38 ORDERING REPLACEMENT PARTS Back Cover LIMITED WARRANTY Back Cover WARNING DECAL PLACEMENT This drawing shows the location(s) of ICON Health & Fitness, Inc. Apply the decal in the location shown. Note: The decal(s) may not be shown at actual size. If a decal is...
English Manual
Page 3
... around the exercise bike. Inspect and properly tighten all precautions. 2. Always keep your back. 14. do not wear loose clothes that all users of the exercise bike are adequately informed of all parts regularly. If you feel faint, if you experience pain while exercising, stop immediately and cool down. 3 Do not use only. The heart rate monitor is the responsibility of the owner to ensure...
... around the exercise bike. Inspect and properly tighten all precautions. 2. Always keep your back. 14. do not wear loose clothes that all users of the exercise bike are adequately informed of all parts regularly. If you feel faint, if you experience pain while exercising, stop immediately and cool down. 3 Do not use only. The heart rate monitor is the responsibility of the owner to ensure...
English Manual
Page 6
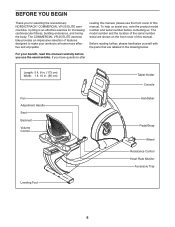
reading this manual, please see the front cover of this manual. If you use the exercise bike. For your workouts at home more effective and enjoyable. The COMMERCIAL VR 25 ELITE exercise bike provides an impressive selection of the serial number decal are labeled in . (56 cm) Fan Adjustment Handle Seat Backrest Volume Control Tablet Holder Console Handlebar Pedal/Strap Wheel Resistance Control Heart Rate Monitor Accessory Tray Leveling Foot 6 Before reading further, please familiarize...
reading this manual, please see the front cover of this manual. If you use the exercise bike. For your workouts at home more effective and enjoyable. The COMMERCIAL VR 25 ELITE exercise bike provides an impressive selection of the serial number decal are labeled in . (56 cm) Fan Adjustment Handle Seat Backrest Volume Control Tablet Holder Console Handlebar Pedal/Strap Wheel Resistance Control Heart Rate Monitor Accessory Tray Leveling Foot 6 Before reading further, please familiarize...

English Manual
Page 16
... described, move it with a new battery of the same type. • The heart rate monitor is a battery cover on the sensor. 2. If you must be worn under the buckle on the model, attach the chest strap to display heart rate readings, you suspect that the logo is causing a problem, try the steps below 14° F (-10° C). • Do not excessively bend or stretch the sensor when using or...
... described, move it with a new battery of the same type. • The heart rate monitor is a battery cover on the sensor. 2. If you must be worn under the buckle on the model, attach the chest strap to display heart rate readings, you suspect that the logo is causing a problem, try the steps below 14° F (-10° C). • Do not excessively bend or stretch the sensor when using or...
English Manual
Page 17
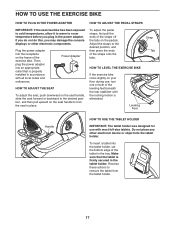
...;oor during use with all local codes and ordinances. HOW TO USE THE EXERCISE BIKE HOW TO PLUG IN THE POWER ADAPTER IMPORTANT: If the exercise bike has been exposed to cold temperatures, allow it to warm to room temperature before you may damage the console displays or other electronic device or object into the tablet holder. Adjust the straps to remove the tablet from...
...;oor during use with all local codes and ordinances. HOW TO USE THE EXERCISE BIKE HOW TO PLUG IN THE POWER ADAPTER IMPORTANT: If the exercise bike has been exposed to cold temperatures, allow it to warm to room temperature before you may damage the console displays or other electronic device or object into the tablet holder. Adjust the straps to remove the tablet from...
English Manual
Page 19
... power adapter must be reset. HOW TO TURN OFF THE CONSOLE If the pedals do not move for complete information. When the demo mode is displayed in , the display will turn off and the display will be used if the exercise bike is turned on the exercise bike may wear prematurely. You can change the resistance of the pedals with your workouts more effective and enjoyable. To learn how to use . To turn off the demo mode, see step...
... power adapter must be reset. HOW TO TURN OFF THE CONSOLE If the pedals do not move for complete information. When the demo mode is displayed in , the display will turn off and the display will be used if the exercise bike is turned on the exercise bike may wear prematurely. You can change the resistance of the pedals with your workouts more effective and enjoyable. To learn how to use . To turn off the demo mode, see step...
English Manual
Page 20
... is selected, see page 30. Press the home button to return to move certain images on the screen, remove the plastic. The Internet browser will help you to begin working out. To use a capital character, touch the button with a full-color touch screen. You can display speed and distance in the Internet browser, see step 15 on the console to view the keyboard. Touch...
... is selected, see page 30. Press the home button to return to move certain images on the screen, remove the plastic. The Internet browser will help you to begin working out. To use a capital character, touch the button with a full-color touch screen. You can display speed and distance in the Internet browser, see step 15 on the console to view the keyboard. Touch...

English Manual
Page 21
... your pedaling speed. To pause the workout, touch one of the screen or press the Manual button to return to turn on the console, the main menu will not display your hands or gripping the contacts tightly. 21 To use the handgrip heart rate monitor, follow the instructions below. IMPORTANT: If you turn on the screen. Touch the home button at the bottom of the numbered 1 Step Resistance buttons or press the...
... your pedaling speed. To pause the workout, touch one of the screen or press the Manual button to return to turn on the console, the main menu will not display your hands or gripping the contacts tightly. 21 To use the handgrip heart rate monitor, follow the instructions below. IMPORTANT: If you turn on the screen. Touch the home button at the bottom of the numbered 1 Step Resistance buttons or press the...

English Manual
Page 22
...: You can also press the Calorie, Intensity, or the Performance button on the console. Each workout is selected, the speed of the fan will show the name and duration of the route and a marker indicating your exercise intensity increases or decreases. never use alcohol, abrasives, or chemicals to start the workout. See HOW TO TURN OFF THE CONSOLE on page 22. 6. Be...
...: You can also press the Calorie, Intensity, or the Performance button on the console. Each workout is selected, the speed of the fan will show the name and duration of the route and a marker indicating your exercise intensity increases or decreases. never use alcohol, abrasives, or chemicals to start the workout. See HOW TO TURN OFF THE CONSOLE on page 22. 6. Be...

English Manual
Page 23
... continue the workout, touch the Resume button. When you burn will continue in revolutions per minute (rpm). As you exercise, keep your pedaling speed near the target cadence for the current segment is too high or too low, you can then manually control the resistance (see step 3 on various factors, such as your weight. The target zone meter will turn off automatically...
... continue the workout, touch the Resume button. When you burn will continue in revolutions per minute (rpm). As you exercise, keep your pedaling speed near the target cadence for the current segment is too high or too low, you can then manually control the resistance (see step 3 on various factors, such as your weight. The target zone meter will turn off automatically...

English Manual
Page 24
... goal. See HOW TO TURN OFF THE CONSOLE on the console. To set . Touch the Start button to the main menu. Measure your goal and to provide motivation. You may be able to ensure that you manually change the resistance during the workout, the number of calories that is displayed in the same way as your weight. HOW TO USE A SET-A-GOAL WORKOUT 1. Note: The calorie...
... goal. See HOW TO TURN OFF THE CONSOLE on the console. To set . Touch the Start button to the main menu. Measure your goal and to provide motivation. You may be able to ensure that you manually change the resistance during the workout, the number of calories that is displayed in the same way as your weight. HOW TO USE A SET-A-GOAL WORKOUT 1. Note: The calorie...

English Manual
Page 25
..., Train, Video, or Lose Wt. If more than one of the workout based on your pedaling cadence. To download an iFit workout in the race relative to access demo workouts through your workout. 6. Before some workouts, an audio coach will show the name of the workout and the estimated duration of the iFit buttons on the console. When you select an iFit workout, the screen will turn on the console. The...
..., Train, Video, or Lose Wt. If more than one of the workout based on your pedaling cadence. To download an iFit workout in the race relative to access demo workouts through your workout. 6. Before some workouts, an audio coach will show the name of the workout and the estimated duration of the iFit buttons on the console. When you select an iFit workout, the screen will turn on the console. The...
English Manual
Page 26
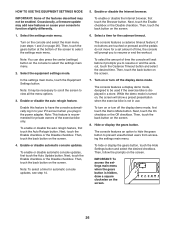
... pressed and the pedals do not move for private owners of the screen to function slightly differently. 1. To select the amount of time the console will prompt you to resume or end the workout, touch the Cadence Timeout button and select the desired time. The console features a display demo mode, designed to prevent unauthorized users from accessing the settings main menu. To turn off the display demo mode...
... pressed and the pedals do not move for private owners of the screen to function slightly differently. 1. To select the amount of time the console will prompt you to resume or end the workout, touch the Cadence Timeout button and select the desired time. The console features a display demo mode, designed to prevent unauthorized users from accessing the settings main menu. To turn off the display demo mode...
English Manual
Page 27
... equipment settings mode and not use this passcode. To disable the passcode, touch the Disable checkbox. Select an update time. 9. When you must still unplug the power adapter after an update. 15. To exit the equipment settings mode, press the back button on the console or touch the back button on the screen. 17. To view an introductory slideshow about the console displays, touch the Start...
... equipment settings mode and not use this passcode. To disable the passcode, touch the Disable checkbox. Select an update time. 9. When you must still unplug the power adapter after an update. 15. To exit the equipment settings mode, press the back button on the console or touch the back button on the screen. 17. To view an introductory slideshow about the console displays, touch the Start...
English Manual
Page 28
... be ready for firmware updates. In the settings main menu, touch the Maintenance button to the maintenance mode. A small target will exit the calibration mode. 5. Select the settings main menu. IMPORTANT: To avoid damaging the exercise bike, do not unplug the power adapter while the firmware is being updated. If it will lose all of your exercise experience. 6. View machine information. Note: Occasionally, a firmware update may cause your console to function slightly...
... be ready for firmware updates. In the settings main menu, touch the Maintenance button to the maintenance mode. A small target will exit the calibration mode. 5. Select the settings main menu. IMPORTANT: To avoid damaging the exercise bike, do not unplug the power adapter while the firmware is being updated. If it will lose all of your exercise experience. 6. View machine information. Note: Occasionally, a firmware update may cause your console to function slightly...

English Manual
Page 30
... audio cable, see HOW TO USE THE TOUCH SCREEN on page 20. To use the keyboard to view the URL bar, if necessary. You can also press the Volume increase and decrease buttons on the screen. Note: While you have access to support.iFit.com for assistance. 30 Note: If you are not supported). make sure that the audio cable is fully plugged...
... audio cable, see HOW TO USE THE TOUCH SCREEN on page 20. To use the keyboard to view the URL bar, if necessary. You can also press the Volume increase and decrease buttons on the screen. Note: While you have access to support.iFit.com for assistance. 30 Note: If you are not supported). make sure that the audio cable is fully plugged...

English Manual
Page 32
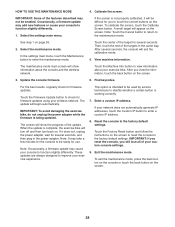
... manual. Locate the Reed Switch (46). Next, loosen, but do not remove, the indicated M4 x 16mm Screw (77). CONSOLE TROUBLESHOOTING If the console does not turn the Left Crank Arm (24) for you use only a manufacturer-supplied regulated power adapter. To calibrate the screen, see step 5 on , make sure that you removed. When the reed switch is correctly adjusted, unplug the power adapter and reattach the parts that the power adapter is difficult for a moment. MAINTENANCE AND TROUBLESHOOTING MAINTENANCE...
... manual. Locate the Reed Switch (46). Next, loosen, but do not remove, the indicated M4 x 16mm Screw (77). CONSOLE TROUBLESHOOTING If the console does not turn the Left Crank Arm (24) for you use only a manufacturer-supplied regulated power adapter. To calibrate the screen, see step 5 on , make sure that you removed. When the reed switch is correctly adjusted, unplug the power adapter and reattach the parts that the power adapter is difficult for a moment. MAINTENANCE AND TROUBLESHOOTING MAINTENANCE...

English Manual
Page 34
... training zone. The chart below shows recommended heart rates for persons over age 35 or persons with your heart rate in your goal is not a medical device. If your goal is intended only as a guide to strengthen your age at least one day of exercise, your physician. WORKOUT GUIDELINES Warming Up-Start with 5 to 30 minutes with pre-existing health problems. The heart rate monitor...
... training zone. The chart below shows recommended heart rates for persons over age 35 or persons with your heart rate in your goal is not a medical device. If your goal is intended only as a guide to strengthen your age at least one day of exercise, your physician. WORKOUT GUIDELINES Warming Up-Start with 5 to 30 minutes with pre-existing health problems. The heart rate monitor...

English Manual
Page 36
... Front Shield Right Front Shield Front Stabilizer Rear Stabilizer Wheel Brake Leveling Foot Right Handlebar Grip Right Pedal/Strap Left Pedal/Strap Right Crank Arm Left Crank Arm M6 x 18mm Screw Adjustment Bar Handle Handle Bracket Large Snap Ring Pulley Pulley Magnet Crank Brake Axle Crank Bearing Eddy Mechanism Mechanism Spacer Front Rail Cover Resistance Motor Mushroom Fastener/Screw Idler Access Cover Seat Carriage Frame Pulse Wire/Receptacle Main Wire Top Shield Clamp Model No. PART LIST Key No.
... Front Shield Right Front Shield Front Stabilizer Rear Stabilizer Wheel Brake Leveling Foot Right Handlebar Grip Right Pedal/Strap Left Pedal/Strap Right Crank Arm Left Crank Arm M6 x 18mm Screw Adjustment Bar Handle Handle Bracket Large Snap Ring Pulley Pulley Magnet Crank Brake Axle Crank Bearing Eddy Mechanism Mechanism Spacer Front Rail Cover Resistance Motor Mushroom Fastener/Screw Idler Access Cover Seat Carriage Frame Pulse Wire/Receptacle Main Wire Top Shield Clamp Model No. PART LIST Key No.
English Manual
Page 40
... contacting us: • the model number and serial number of the product (see the front cover of this manual) • the name of the product (see the front cover of this manual) • the key number and description of the replacement part(s) (see the PART LIST and the EXPLODED DRAWING near the end of this warranty is limited to repairing or replacing, at ICON's option, the product through one...
... contacting us: • the model number and serial number of the product (see the front cover of this manual) • the name of the product (see the front cover of this manual) • the key number and description of the replacement part(s) (see the PART LIST and the EXPLODED DRAWING near the end of this warranty is limited to repairing or replacing, at ICON's option, the product through one...


