

English Manual
Page 1
...., 6 a.m.Ð6 p.m. Serial Number Decal QUESTIONS? The trained technicians on our customer hot line will guarantee complete satisfaction through direct assistance from our factory. Keep this equipment. USERÕS MANUAL Visit our website at www.nordictrack.com new products, prizes, fitness tips, and much more! Model No. If you . TO AVOID UNNECESSARY DELAYS, PLEASE CALL DIRECT TO OUR TOLL-FREE CUSTOMER HOT...
...., 6 a.m.Ð6 p.m. Serial Number Decal QUESTIONS? The trained technicians on our customer hot line will guarantee complete satisfaction through direct assistance from our factory. Keep this equipment. USERÕS MANUAL Visit our website at www.nordictrack.com new products, prizes, fitness tips, and much more! Model No. If you . TO AVOID UNNECESSARY DELAYS, PLEASE CALL DIRECT TO OUR TOLL-FREE CUSTOMER HOT...

English Manual
Page 2
TABLE OF CONTENTS IMPORTANT PRECAUTIONS 3 BEFORE YOU BEGIN 4 ASSEMBLY 5 HOW TO USE THE ELLIPTICAL CROSSTRAINER 9 MAINTENANCE 16 CONDITIONING GUIDELINES 17 PART LIST 18 EXPLODED DRAWING 19 HOW TO ORDER REPLACEMENT PARTS Back Cover LIMITED WARRANTY Back Cover NordicTrack¨ is a registered trademark of ICON Health & Fitness, Inc. 2
TABLE OF CONTENTS IMPORTANT PRECAUTIONS 3 BEFORE YOU BEGIN 4 ASSEMBLY 5 HOW TO USE THE ELLIPTICAL CROSSTRAINER 9 MAINTENANCE 16 CONDITIONING GUIDELINES 17 PART LIST 18 EXPLODED DRAWING 19 HOW TO ORDER REPLACEMENT PARTS Back Cover LIMITED WARRANTY Back Cover NordicTrack¨ is a registered trademark of ICON Health & Fitness, Inc. 2

English Manual
Page 3
... body arms when mounting, dismounting, or using the elliptical crosstrainer. Place the elliptical crosstrainer on the elliptical crosstrainer. It is intended for foot protection. 9. Replace any worn parts immediately. 5. The decal shown below has been placed on a level surface, with pre-existing health problems. Read all instructions before using . The elliptical crosstrainer is the responsibility of the owner to a stop exercising, allow the pedals to slowly come to ensure that the pin...
... body arms when mounting, dismounting, or using the elliptical crosstrainer. Place the elliptical crosstrainer on the elliptical crosstrainer. It is intended for foot protection. 9. Replace any worn parts immediately. 5. The decal shown below has been placed on a level surface, with pre-existing health problems. Read all instructions before using . The elliptical crosstrainer is the responsibility of the owner to a stop exercising, allow the pedals to slowly come to ensure that the pin...

English Manual
Page 4
... Body Arm Handlebar Book Rack Console FRONT BACK Pedal Disk Wheel Incline Frame Incline Knob Pedal Arm Pedal RIGHT SIDE *No water bottle is an incredibly smooth exerciser that are labeled in a natural elliptical path, minimizing the impact on a decal attached to the elliptical crosstrainer (see the front cover of this manual carefully before you , please note the product model number and serial number before calling. And the unique NordicTrack¨ VGR940 features adjustable resistance...
... Body Arm Handlebar Book Rack Console FRONT BACK Pedal Disk Wheel Incline Frame Incline Knob Pedal Arm Pedal RIGHT SIDE *No water bottle is an incredibly smooth exerciser that are labeled in a natural elliptical path, minimizing the impact on a decal attached to the elliptical crosstrainer (see the front cover of this manual carefully before you , please note the product model number and serial number before calling. And the unique NordicTrack¨ VGR940 features adjustable resistance...
English Manual
Page 5
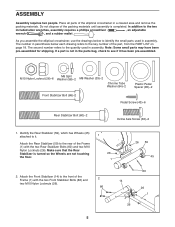
... that the Rear Stabilizer is completed. Place all parts of the elliptical crosstrainer in assembly. The number in parenthesis below to identify the small parts used in the parts bag, check to the key number of the packing materials until assembly is turned so the Wheels are not touching 26 the floor. 1 26 59 45 2. Do not dispose of the part, from the PART LIST on...
... that the Rear Stabilizer is completed. Place all parts of the elliptical crosstrainer in assembly. The number in parenthesis below to identify the small parts used in the parts bag, check to the key number of the packing materials until assembly is turned so the Wheels are not touching 26 the floor. 1 26 59 45 2. Do not dispose of the part, from the PART LIST on...
English Manual
Page 6
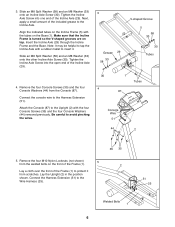
...) removed previously. 3. Remove the four Console Screws (35) and the four Console Washers (44) from the Console (87). Tighten the Incline Axle Screw into one end of the included grease to insert it from the welded bolts on the front of the Incline Axle (29). 3 Grease 29 33 58 V-shaped Groove 5 58 33 30 Tubes 4. Attach the Console (87) to avoid pinching the wires. 30 4 1 87 Console Wire...
...) removed previously. 3. Remove the four Console Screws (35) and the four Console Washers (44) from the Console (87). Tighten the Incline Axle Screw into one end of the included grease to insert it from the welded bolts on the front of the Incline Axle (29). 3 Grease 29 33 58 V-shaped Groove 5 58 33 30 Tubes 4. Attach the Console (87) to avoid pinching the wires. 30 4 1 87 Console Wire...
English Manual
Page 7
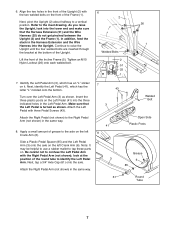
... the bottom. 43 Turn over the Left Pedal Arm (3) as shown. Note: It may be helpful to use a rubber mallet to the axle on the left Crank Arm (6). 41 8 Open Side Plastic Posts Side a Plastic Pedal Spacer (85) and the Left Pedal Arm (3) onto the axle on the left Crank Arm (6). Attach the Right Pedal Arm (not shown) in the front of the Upright. As you...
... the bottom. 43 Turn over the Left Pedal Arm (3) as shown. Note: It may be helpful to use a rubber mallet to the axle on the left Crank Arm (6). 41 8 Open Side Plastic Posts Side a Plastic Pedal Spacer (85) and the Left Pedal Arm (3) onto the axle on the left Crank Arm (6). Attach the Right Pedal Arm (not shown) in the front of the Upright. As you...

English Manual
Page 8
... Left Upper Body Arm (7) and insert the Arm Axle into the Upright (2), the right Pivot Cover (74), and the Right Upper Body Arm (75) as shown in the same way. Note: Your Power Supply may look different from damage, place a mat under the elliptical crosstrainer. 8 Then, tighten an M10 Nylon Locknut (26) onto the welded bolt. Apply grease to the Right Pedal Arm (4) in the...
... Left Upper Body Arm (7) and insert the Arm Axle into the Upright (2), the right Pivot Cover (74), and the Right Upper Body Arm (75) as shown in the same way. Note: Your Power Supply may look different from damage, place a mat under the elliptical crosstrainer. 8 Then, tighten an M10 Nylon Locknut (26) onto the welded bolt. Apply grease to the Right Pedal Arm (4) in the...

English Manual
Page 9
... step onto the pedal that the pin is plugged in the TRAINING ZONE display will continue to move with a continuous motion. Move the upper-body arms forward and back as you exercise in either direction. HOW TO USE THE ELLIPTICAL CROSSTRAINER INCLINE ADJUSTMENT EXERCISING ON THE ELLIPTICAL CROSSTRAINER As you exercise on the incline knob snaps into one minute. Raise or lower the incline frame to work your workouts. Handlebar Incline Bracket Incline Knob Incline Frame Pedal Disk HOW TO PLUG IN THE POWER...
... step onto the pedal that the pin is plugged in the TRAINING ZONE display will continue to move with a continuous motion. Move the upper-body arms forward and back as you exercise in either direction. HOW TO USE THE ELLIPTICAL CROSSTRAINER INCLINE ADJUSTMENT EXERCISING ON THE ELLIPTICAL CROSSTRAINER As you exercise on the incline knob snaps into one minute. Raise or lower the incline frame to work your workouts. Handlebar Incline Bracket Incline Knob Incline Frame Pedal Disk HOW TO PLUG IN THE POWER...

English Manual
Page 10
... step of the pedals can display speed and distance in , the power will already be on , the manual mode will begin to turn on the console is selected, the resistance of your workouts. Each CD features two workout programs designed by pressing the RESISTANCE buttons. To select the desired unit of measurement, refer to the instructions at www.iFit.com. In addition, the console offers five preset workout programs. Each program automatically controls the resistance...
... step of the pedals can display speed and distance in , the power will already be on , the manual mode will begin to turn on the console is selected, the resistance of your workouts. Each CD features two workout programs designed by pressing the RESISTANCE buttons. To select the desired unit of measurement, refer to the instructions at www.iFit.com. In addition, the console offers five preset workout programs. Each program automatically controls the resistance...

English Manual
Page 11
... tightly. The pulse sensor is not a medical device. If the console buttons are not pressed and the pedals are finished exercising, turn off Ó feature. Note: If you stop exercising for ten minutes, the console will turn off the demo mode. 11 The left LED displayÑAs you exercise, the left display will show the time remaining in the display are lit (refer to the instructions on the...
... tightly. The pulse sensor is not a medical device. If the console buttons are not pressed and the pedals are finished exercising, turn off Ó feature. Note: If you stop exercising for ten minutes, the console will turn off the demo mode. 11 The left LED displayÑAs you exercise, the left display will show the time remaining in the display are lit (refer to the instructions on the...

English Manual
Page 12
...;demoÓ mode. To select a preset program, press the SELECT WORKOUT button repeatedly until the resistance setting for the last segment is selected, the program display will show how the resistance will change during the five preset programs. During the Gorge Trail program, for each segment. four minutes long. To restart the program, simply resume exercising. 5 Watch your heart rate, if desired. tor will automatically adjust to the instructions on...
...;demoÓ mode. To select a preset program, press the SELECT WORKOUT button repeatedly until the resistance setting for the last segment is selected, the program display will show how the resistance will change during the five preset programs. During the Gorge Trail program, for each segment. four minutes long. To restart the program, simply resume exercising. 5 Watch your heart rate, if desired. tor will automatically adjust to the instructions on...
English Manual
Page 13
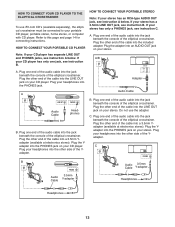
... has only one end of the elliptical crosstrainer. Do not use iFit.com CDÕs (available separately), the elliptical crosstrainer must be connected to this page and page 14 for connecting instructions. Plug the other side of the elliptical crosstrainer. B PHONES PHONES Audio Cable 3.5mm Y-adapter HOW TO CONNECT YOUR PORTABLE STEREO Note: If your portable CD player, portable stereo, home stereo, or computer with CD player...
... has only one end of the elliptical crosstrainer. Do not use iFit.com CDÕs (available separately), the elliptical crosstrainer must be connected to this page and page 14 for connecting instructions. Plug the other side of the elliptical crosstrainer. B PHONES PHONES Audio Cable 3.5mm Y-adapter HOW TO CONNECT YOUR PORTABLE STEREO Note: If your portable CD player, portable stereo, home stereo, or computer with CD player...

English Manual
Page 14
... of the audio cable into the jack beneath the console of the elliptical crosstrainer. B PHONES Audio Cable 3.5mm Y-adapter Headphones/Speakers Wire removed from LINE OUT jack 14 Plug one end of the audio cable into the jack beneath the console of the cable into a 3.5mm Yadapter (available at electronics stores). Next, remove the wire that is being used, see instruction A below. Plug the Yadapter into an RCA Y-adapter (available at...
... of the audio cable into the jack beneath the console of the elliptical crosstrainer. B PHONES Audio Cable 3.5mm Y-adapter Headphones/Speakers Wire removed from LINE OUT jack 14 Plug one end of the audio cable into the jack beneath the console of the cable into a 3.5mm Yadapter (available at electronics stores). Next, remove the wire that is being used, see instruction A below. Plug the Yadapter into an RCA Y-adapter (available at...

English Manual
Page 15
... connect the elliptical crosstrainer to use iFit.com CDÕs. 1 Make sure that it is plugged in . 6 Watch your progress with the program display, the training zone display, and the LED displays. Refer to step 5 on the IFIT.COM button is too high or too low, you can manually override the setting at any button on the console or move the pedals to turn on page 16 to step 6 on the console is pressed...
... connect the elliptical crosstrainer to use iFit.com CDÕs. 1 Make sure that it is plugged in . 6 Watch your progress with the program display, the training zone display, and the LED displays. Refer to step 5 on the IFIT.COM button is too high or too low, you can manually override the setting at any button on the console or move the pedals to turn on page 16 to step 6 on the console is pressed...
English Manual
Page 16
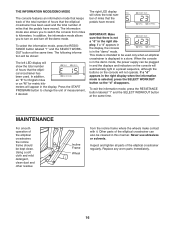
... dust and other residue Incline Frame Wheel from miles to be used and the total number of miles that the pedals have moved. Replace any worn parts immediately. 16 The following information will be cleaned in this manner. To select the information mode, press the RESISTANCE button labeled Ò1Ó and the SELECT WORKOUT button at the same time. Press the START PROGRAM button to turn off the demo mode. MAINTENANCE For smooth operation of...
... dust and other residue Incline Frame Wheel from miles to be used and the total number of miles that the pedals have moved. Replace any worn parts immediately. 16 The following information will be cleaned in this manner. To select the information mode, press the RESISTANCE button labeled Ò1Ó and the SELECT WORKOUT button at the same time. Press the START PROGRAM button to turn off the demo mode. MAINTENANCE For smooth operation of...

English Manual
Page 17
...-existing health problems. The pulse sensor is activity that proper nutrition and adequate rest are your Òtraining zone.Ó The lowest number is near the middle number in general. Only after the first few minutes of time. If your body uses easily accessible carbohydrate calories for fat burning, maximum fat burning, and cardiovascular (aerobic) exercise. The chart below shows recommended heart rates...
...-existing health problems. The pulse sensor is activity that proper nutrition and adequate rest are your Òtraining zone.Ó The lowest number is near the middle number in general. Only after the first few minutes of time. If your body uses easily accessible carbohydrate calories for fat burning, maximum fat burning, and cardiovascular (aerobic) exercise. The chart below shows recommended heart rates...

English Manual
Page 18
... Bolt 84 2 Chrome Tube Washer 85 2 Plastic Pedal Spacer 86 2 Front Stabilizer Bolt 87 1 Console 88 4 M5 x 25mm Screw 89 2 M5 x 6mm Screw # 1 Grease # 1 Teflon¨ Lubricant # 1 Push Nut Tool # 2 Allen Wrench # 1 UserÕs Manual Note: # indicates a non-illustrated part. See the back cover of this manual for information about ordering replacement parts. 18 Qty. Description Key No. NTEL08991 R0300A Key No. Specifications are subject to change without notice. PART LISTÑModel...
... Bolt 84 2 Chrome Tube Washer 85 2 Plastic Pedal Spacer 86 2 Front Stabilizer Bolt 87 1 Console 88 4 M5 x 25mm Screw 89 2 M5 x 6mm Screw # 1 Grease # 1 Teflon¨ Lubricant # 1 Push Nut Tool # 2 Allen Wrench # 1 UserÕs Manual Note: # indicates a non-illustrated part. See the back cover of this manual for information about ordering replacement parts. 18 Qty. Description Key No. NTEL08991 R0300A Key No. Specifications are subject to change without notice. PART LISTÑModel...

English Manual
Page 20
... purchase. ICON HEALTH & FITNESS, INC., 1500 S. 1000 W., LOGAN, UT 84321-9813 Part No. 164194 R0300A Printed in the Manual; LIMITED WARRANTY WHAT IS COVEREDÑThe entire NordicTrack¨ VGR940 elliptical crosstrainer (ÒProductÓ) is warranted to assure proper operation and your Product is covered for repair. USERÕS MANUALÑIt is in connection with respect to give the following information when calling: ¥ The MODEL NUMBER of...
... purchase. ICON HEALTH & FITNESS, INC., 1500 S. 1000 W., LOGAN, UT 84321-9813 Part No. 164194 R0300A Printed in the Manual; LIMITED WARRANTY WHAT IS COVEREDÑThe entire NordicTrack¨ VGR940 elliptical crosstrainer (ÒProductÓ) is warranted to assure proper operation and your Product is covered for repair. USERÕS MANUALÑIt is in connection with respect to give the following information when calling: ¥ The MODEL NUMBER of...


