
Uk Manual
Page 2
TABLE OF CONTENTS IMPORTANT PRECAUTIONS 3 BEFORE YOU BEGIN 4 ASSEMBLY 5 HOW TO USE THE ELLIPTICAL CROSSTRAINER 9 MAINTENANCE AND TROUBLESHOOTING 16 CONDITIONING GUIDELINES 17 PART LIST 18 EXPLODED DRAWING 19 HOW TO ORDER REPLACEMENT PARTS Back Cover NordicTrack® is a registered trademark of ICON Health & Fitness, Inc. 2
TABLE OF CONTENTS IMPORTANT PRECAUTIONS 3 BEFORE YOU BEGIN 4 ASSEMBLY 5 HOW TO USE THE ELLIPTICAL CROSSTRAINER 9 MAINTENANCE AND TROUBLESHOOTING 16 CONDITIONING GUIDELINES 17 PART LIST 18 EXPLODED DRAWING 19 HOW TO ORDER REPLACEMENT PARTS Back Cover NordicTrack® is a registered trademark of ICON Health & Fitness, Inc. 2
Uk Manual
Page 3
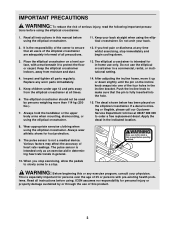
... consult your back. 2. IMPORTANT PRECAUTIONS WARNING: To reduce the risk of heart rate readings. Keep your back straight when using the elliptical crosstrainer. 14. It is intended for personal injury or property damage sustained by persons weighing more than 114 kg (250 lbs.). ... commercial, rental, or institutional setting. 4. Apply the decal in general. 10. Replace any worn parts immediately. 5. Always wear athletic shoes for persons over the age of all parts regularly. The pulse sensor is especially important for foot protection. 9. Push the incline knob to a ...
... consult your back. 2. IMPORTANT PRECAUTIONS WARNING: To reduce the risk of heart rate readings. Keep your back straight when using the elliptical crosstrainer. 14. It is intended for personal injury or property damage sustained by persons weighing more than 114 kg (250 lbs.). ... commercial, rental, or institutional setting. 4. Apply the decal in general. 10. Replace any worn parts immediately. 5. Always wear athletic shoes for persons over the age of all parts regularly. The pulse sensor is especially important for foot protection. 9. Push the incline knob to a ...

Uk Manual
Page 4
...number is included 4 Before reading further, please familiarise yourself with the parts that moves your feet in the drawing below. And the unique NordicTrack® VGR940 features adjustable resistance and incline to the elliptical crosstrainer (see the front cover of natural, ellipticalmotion exercise from your ...benefit, read this manual for selecting the new NordicTrack® VGR940 elliptical crosstrainer. Welcome to a whole new world of this manual carefully before you , please mention the product model...
...number is included 4 Before reading further, please familiarise yourself with the parts that moves your feet in the drawing below. And the unique NordicTrack® VGR940 features adjustable resistance and incline to the elliptical crosstrainer (see the front cover of natural, ellipticalmotion exercise from your ...benefit, read this manual for selecting the new NordicTrack® VGR940 elliptical crosstrainer. Welcome to a whole new world of this manual carefully before you , please mention the product model...
Uk Manual
Page 5
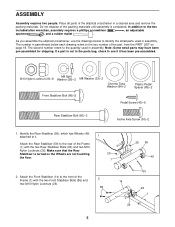
...which has Wheels (45) attached to it has been pre-assembled. The number in assembly. Place all parts of the packing materials until assembly is completed. As you assemble the elliptical crosstrainer, use the drawings below each drawing refers to the rear of the Frame (1) with the two...18. ASSEMBLY Assembly requires two people. Note: Some small parts may have been pre-assembled for shipping. If a part is turned so the Wheels are not touching 26 the floor. 1 26 59 45 2. Do not dispose of the elliptical crosstrainer in assembly. Attach the Front Stabiliser (14) ...
...which has Wheels (45) attached to it has been pre-assembled. The number in assembly. Place all parts of the packing materials until assembly is completed. As you assemble the elliptical crosstrainer, use the drawings below each drawing refers to the rear of the Frame (1) with the two...18. ASSEMBLY Assembly requires two people. Note: Some small parts may have been pre-assembled for shipping. If a part is turned so the Wheels are not touching 26 the floor. 1 26 59 45 2. Do not dispose of the elliptical crosstrainer in assembly. Attach the Front Stabiliser (14) ...
Uk Manual
Page 8
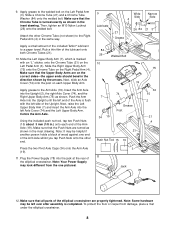
...the Arm Axle (19). Note: Your Power Supply may look different from damage, place a mat under the elliptical crosstrainer. 8 Apply grease to the Right Pedal Arm (4) in the direction shown by the arrows. Rub a... "L" sticker, onto the Chrome Tube (21) on the Left Pedal Arm (3). Make sure that all parts of the Arm Axle whilst you tap Push Nuts onto the other Chrome Tube (not shown) to the... is turned exactly as shown. To protect the floor or carpet from the one end of the elliptical crosstrainer are on the Right Pedal Arm (4). Apply a small amount of the included Teflon® ...
...the Arm Axle (19). Note: Your Power Supply may look different from damage, place a mat under the elliptical crosstrainer. 8 Apply grease to the Right Pedal Arm (4) in the direction shown by the arrows. Rub a... "L" sticker, onto the Chrome Tube (21) on the Left Pedal Arm (3). Make sure that all parts of the Arm Axle whilst you tap Push Nuts onto the other Chrome Tube (not shown) to the... is turned exactly as shown. To protect the floor or carpet from the one end of the elliptical crosstrainer are on the Right Pedal Arm (4). Apply a small amount of the included Teflon® ...
Uk Manual
Page 16
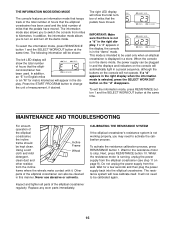
...at the same time. Never use abrasive or solvents. Inspect and tighten all parts of miles that the pedals have moved. Wait for a few seconds and then plug the power supply back into the elliptical crosstrainer. Wait for the resistance motor to be calibrated again. 16 It ...pedals have moved. When the console is not working properly, you to switch the console from the elliptical crosstrainer (see step 11 on and turn on page 8). Other parts of the elliptical crosstrainer can be cleaned in this manner. The right LED display will automatically light in the display. ...
...at the same time. Never use abrasive or solvents. Inspect and tighten all parts of miles that the pedals have moved. Wait for a few seconds and then plug the power supply back into the elliptical crosstrainer. Wait for the resistance motor to be calibrated again. 16 It ...pedals have moved. When the console is not working properly, you to switch the console from the elliptical crosstrainer (see step 11 on and turn on page 8). Other parts of the elliptical crosstrainer can be cleaned in this manner. The right LED display will automatically light in the display. ...
Uk Manual
Page 20
..., Inc. HOW TO ORDER REPLACEMENT PARTS If you encounter any difficulties with this product, or if you need to give the following information: • The MODEL NUMBER of the product (NTEVEL08990) • The NAME of the product (NordicTrack® VGR940 elliptical crosstrainer) • The SERIAL NUMBER... of the product (see the front cover of this manual) • The KEY NUMBER and DESCRIPTION of the part(s) (see page 18 of this manual). Unit 4, Revie ...
..., Inc. HOW TO ORDER REPLACEMENT PARTS If you encounter any difficulties with this product, or if you need to give the following information: • The MODEL NUMBER of the product (NTEVEL08990) • The NAME of the product (NordicTrack® VGR940 elliptical crosstrainer) • The SERIAL NUMBER... of the product (see the front cover of this manual) • The KEY NUMBER and DESCRIPTION of the part(s) (see page 18 of this manual). Unit 4, Revie ...

