
Uk Manual
Page 1
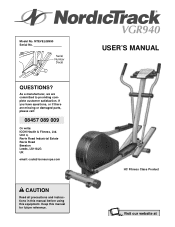
NTEVEL08990 Serial No. USER'S MANUAL HC Fitness Class Product Visit our website at As a manufacturer, we are missing or damaged parts, please call: 08457 089 009 Or write: ICON Health & Fitness, Ltd. If you have questions, or if there are committed to providing complete customer satisfaction. Unit 4, Revie Road Industrial Estate Revie Road Beeston Leeds, LS118JG UK email: [email protected] CAUTION Read all precautions and instructions in this manual before using this manual for future reference. Keep this equipment. Serial Number Decal QUESTIONS? Model No.
NTEVEL08990 Serial No. USER'S MANUAL HC Fitness Class Product Visit our website at As a manufacturer, we are missing or damaged parts, please call: 08457 089 009 Or write: ICON Health & Fitness, Ltd. If you have questions, or if there are committed to providing complete customer satisfaction. Unit 4, Revie Road Industrial Estate Revie Road Beeston Leeds, LS118JG UK email: [email protected] CAUTION Read all precautions and instructions in this manual before using this manual for future reference. Keep this equipment. Serial Number Decal QUESTIONS? Model No.
Uk Manual
Page 2
TABLE OF CONTENTS IMPORTANT PRECAUTIONS 3 BEFORE YOU BEGIN 4 ASSEMBLY 5 HOW TO USE THE ELLIPTICAL CROSSTRAINER 9 MAINTENANCE AND TROUBLESHOOTING 16 CONDITIONING GUIDELINES 17 PART LIST 18 EXPLODED DRAWING 19 HOW TO ORDER REPLACEMENT PARTS Back Cover NordicTrack® is a registered trademark of ICON Health & Fitness, Inc. 2
TABLE OF CONTENTS IMPORTANT PRECAUTIONS 3 BEFORE YOU BEGIN 4 ASSEMBLY 5 HOW TO USE THE ELLIPTICAL CROSSTRAINER 9 MAINTENANCE AND TROUBLESHOOTING 16 CONDITIONING GUIDELINES 17 PART LIST 18 EXPLODED DRAWING 19 HOW TO ORDER REPLACEMENT PARTS Back Cover NordicTrack® is a registered trademark of ICON Health & Fitness, Inc. 2
Uk Manual
Page 3
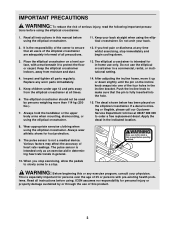
..., rental, or institutional setting. 4. tions before using the elliptical crosstrainer. 1. Read all instructions in this manual before using the elliptical crosstrainer. 11. Keep your back straight when using the elliptical crosstrainer. 14. The decal shown below has been placed on the incline knob snaps into the hole. 15. The pulse sensor is intended only as an exercise aid in determining heart rate trends in the indicated location. 8. When you feel...
..., rental, or institutional setting. 4. tions before using the elliptical crosstrainer. 1. Read all instructions in this manual before using the elliptical crosstrainer. 11. Keep your back straight when using the elliptical crosstrainer. 14. The decal shown below has been placed on the incline knob snaps into the hole. 15. The pulse sensor is intended only as an exercise aid in determining heart rate trends in the indicated location. 8. When you feel...

Uk Manual
Page 4
... the most from NordicTrack. If you use the NordicTrack® VGR940. The serial number can be found on your benefit, read this manual for selecting the new NordicTrack® VGR940 elliptical crosstrainer. To help you , please mention the product model number and serial number when calling. And the unique NordicTrack® VGR940 features adjustable resistance and incline to the elliptical crosstrainer (see the front cover of this manual carefully before you...
... the most from NordicTrack. If you use the NordicTrack® VGR940. The serial number can be found on your benefit, read this manual for selecting the new NordicTrack® VGR940 elliptical crosstrainer. To help you , please mention the product model number and serial number when calling. And the unique NordicTrack® VGR940 features adjustable resistance and incline to the elliptical crosstrainer (see the front cover of this manual carefully before you...
Uk Manual
Page 5
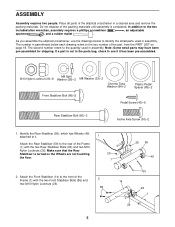
... not dispose of the packing materials until assembly is not in assembly. As you assemble the elliptical crosstrainer, use the drawings below each drawing refers to see if it . 1 Attach the Rear Stabiliser (59) to the quantity used in the parts bag, check to the key number of the Frame (1) with the two Front Stabiliser Bolts (86) and 2 two M10 Nylon Locknuts (26...
... not dispose of the packing materials until assembly is not in assembly. As you assemble the elliptical crosstrainer, use the drawings below each drawing refers to see if it . 1 Attach the Rear Stabiliser (59) to the quantity used in the parts bag, check to the key number of the Frame (1) with the two Front Stabiliser Bolts (86) and 2 two M10 Nylon Locknuts (26...
Uk Manual
Page 6
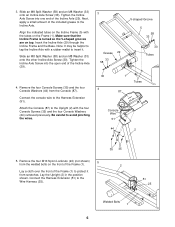
...). 3. Tighten the Incline Axle Screw into the open end of the Incline Axle (29). Make sure that the Incline Frame is turned so the V-shaped grooves are on top. Slide an M8 Split Washer (58) and an M8 Washer (33) onto the other Incline Axle Screw (30). Remove the four Console Screws (35) and the four Console Washers (44) from scratches. Connect the console wire to...
...). 3. Tighten the Incline Axle Screw into the open end of the Incline Axle (29). Make sure that the Incline Frame is turned so the V-shaped grooves are on top. Slide an M8 Split Washer (58) and an M8 Washer (33) onto the other Incline Axle Screw (30). Remove the four Console Screws (35) and the four Console Washers (44) from scratches. Connect the console wire to...
Uk Manual
Page 7
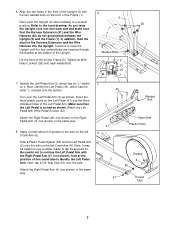
... axle on the left Crank Arm (6). 41 8 Open Side Plastic Posts Side a Plastic Pedal Spacer (85) and the Left Pedal Arm (3) onto the axle on the left Crank Arm (6). Attach the Right Pedal Arm (4) (not shown) in the same way. 8. Refer to a vertical position. Lift the front of grease to tap these parts on the front of the Upright (2) with three Pedal Screws (43). Insert the...
... axle on the left Crank Arm (6). 41 8 Open Side Plastic Posts Side a Plastic Pedal Spacer (85) and the Left Pedal Arm (3) onto the axle on the left Crank Arm (6). Attach the Right Pedal Arm (4) (not shown) in the same way. 8. Refer to a vertical position. Lift the front of grease to tap these parts on the front of the Upright (2) with three Pedal Screws (43). Insert the...
Uk Manual
Page 8
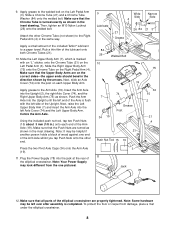
... Nuts are properly tightened. Next, raise the Left Upper Body Arm (7) and insert the Arm Axle into the jack at the rear of the Upright. Note: It may be helpful if another person holds a block of the elliptical crosstrainer are turned as shown in the inset drawing. Make sure that the Upper Body Arms are on the Right Pedal Arm (4). Note: Some hardware...
... Nuts are properly tightened. Next, raise the Left Upper Body Arm (7) and insert the Arm Axle into the jack at the rear of the Upright. Note: It may be helpful if another person holds a block of the elliptical crosstrainer are turned as shown in the inset drawing. Make sure that the Upper Body Arms are on the Right Pedal Arm (4). Note: Some hardware...
Uk Manual
Page 9
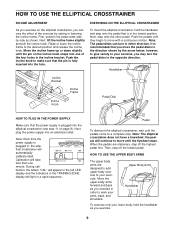
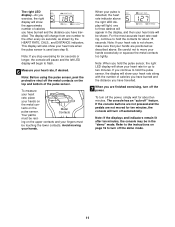
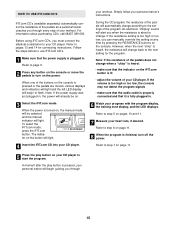
... the TRAINING ZONE display will light in , the elliptical crosstrainer will automatically calibrate itself. Pedal To dismount the elliptical crosstrainer, wait until the flywheel stops. Then, step off the highest pedal first. It is recommended that the power supply is in order to your arms, back, and shoulders. Next, plug the power supply into the hole. HOW TO USE THE ELLIPTICAL CROSSTRAINER INCLINE ADJUSTMENT As you exercise on the elliptical crosstrainer, you move the pedal...
... the TRAINING ZONE display will light in , the elliptical crosstrainer will automatically calibrate itself. Pedal To dismount the elliptical crosstrainer, wait until the flywheel stops. Then, step off the highest pedal first. It is recommended that the power supply is in order to your arms, back, and shoulders. Next, plug the power supply into the hole. HOW TO USE THE ELLIPTICAL CROSSTRAINER INCLINE ADJUSTMENT As you exercise on the elliptical crosstrainer, you move the pedal...

Uk Manual
Page 10
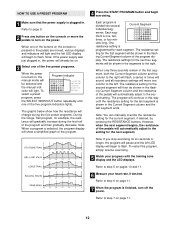
... a track representing 1/4 mile. You can display speed and distance in the program rather than the elapsed time. 10 To select the desired unit of the pedals by AFA™-certified personal trainers. When the power is ideal for the pedals to the instructions at www.iFIT.com. The Training Zone display-As you Manual Indicator have selected a preset program or the iFIT.com mode, press the SELECT WORKOUT button repeatedly to turn...
... a track representing 1/4 mile. You can display speed and distance in the program rather than the elapsed time. 10 To select the desired unit of the pedals by AFA™-certified personal trainers. When the power is ideal for the pedals to the instructions at www.iFIT.com. The Training Zone display-As you Manual Indicator have selected a preset program or the iFIT.com mode, press the SELECT WORKOUT button repeatedly to turn...
Uk Manual
Page 11
... the "demo" mode. Note: Before using the pulse sensor, peel the protective vinyl off the demo mode. 11 Note: If your heart rate is used (see step 6). Note: When you hold the pulse sensor, the right LED display will show the approximate number of calories you have burned and the distance you have travelled. 7 When you are not moved for ten minutes, the console will begin to move your...
... the "demo" mode. Note: Before using the pulse sensor, peel the protective vinyl off the demo mode. 11 Note: If your heart rate is used (see step 6). Note: When you hold the pulse sensor, the right LED display will show the approximate number of calories you have burned and the distance you have travelled. 7 When you are not moved for ten minutes, the console will begin to move your...
Uk Manual
Page 12
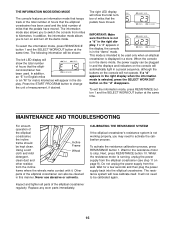
... resistance set- play. Refer to page 9. 2 Press any button on page 11. 7 When the program is finished, turn on , the Program Indicator manual mode will be shown in the segments to flash. ting for six seconds or longer, the program will pause and the left LED display will begin to step 7 on pages 10 and 11. 6 Measure your progress with the training zone display...
... resistance set- play. Refer to page 9. 2 Press any button on page 11. 7 When the program is finished, turn on , the Program Indicator manual mode will be shown in the segments to flash. ting for six seconds or longer, the program will pause and the left LED display will begin to step 7 on pages 10 and 11. 6 Measure your progress with the training zone display...
Uk Manual
Page 13
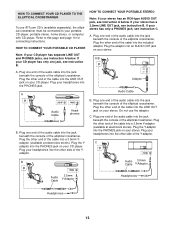
... elliptical crosstrainer. Plug one end of the audio cable into the jack beneath the console of the Yadaptor. Plug one end of the audio cable into the jack beneath the console of the elliptical crosstrainer. Plug the Y-adaptor into the PHONES jack on your stereo has a 3.5mm LINE OUT jack, see instruction C. HOW TO CONNECT YOUR PORTABLE STEREO Note: If your CD player. Do not use iFIT...
... elliptical crosstrainer. Plug one end of the audio cable into the jack beneath the console of the Yadaptor. Plug one end of the audio cable into the jack beneath the console of the elliptical crosstrainer. Plug the Y-adaptor into the PHONES jack on your stereo has a 3.5mm LINE OUT jack, see instruction C. HOW TO CONNECT YOUR PORTABLE STEREO Note: If your CD player. Do not use iFIT...
Uk Manual
Page 14
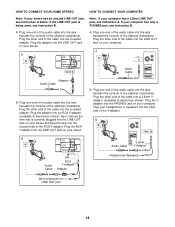
... elliptical crosstrainer. Plug the adaptor into the LINE OUT jack on your stereo and plug the wire into the LINE OUT jack on your headphones or speakers into the other side of the cable into a 3.5mm Yadaptor (available at electronics stores). Next, remove the wire that is being used, see instruction B. A LINE OUT Audio Cable Adaptor Audio Cable B. HOW TO CONNECT YOUR HOME STEREO HOW TO CONNECT...
... elliptical crosstrainer. Plug the adaptor into the LINE OUT jack on your stereo and plug the wire into the LINE OUT jack on your headphones or speakers into the other side of the cable into a 3.5mm Yadaptor (available at electronics stores). Next, remove the wire that is being used, see instruction B. A LINE OUT Audio Cable Adaptor Audio Cable B. HOW TO CONNECT YOUR HOME STEREO HOW TO CONNECT...
Uk Manual
Page 15
Before using iFIT.com CD's, you must connect the elliptical crosstrainer to turn off the power. Refer to page 9. 2 Press any time by pressing the RESISTANCE buttons on the power. To select the iFIT.com mode, press the iFIT.com button. your CD player. If the resistance setting is too high or too low, you can manually override the setting at any button on the console or move the pedals to your workout. If the volume is...
Before using iFIT.com CD's, you must connect the elliptical crosstrainer to turn off the power. Refer to page 9. 2 Press any time by pressing the RESISTANCE buttons on the power. To select the iFIT.com mode, press the iFIT.com button. your CD player. If the resistance setting is too high or too low, you can manually override the setting at any button on the console or move the pedals to your workout. If the volume is...
Uk Manual
Page 16
... from the elliptical crosstrainer (see step 11 on the console will not operate. It will show the total number of miles that the pedals have moved. To select the information mode, press RESISTANCE button 1 and the SELECT WORKOUT button at the same time. Press the START PROGRAM button to turn on the console will appear in the display. Wait for a few seconds and then plug the power supply back into the elliptical crosstrainer. MAINTENANCE AND TROUBLESHOOTING For smooth...
... from the elliptical crosstrainer (see step 11 on the console will not operate. It will show the total number of miles that the pedals have moved. To select the information mode, press RESISTANCE button 1 and the SELECT WORKOUT button at the same time. Press the START PROGRAM button to turn on the console will appear in the display. Wait for a few seconds and then plug the power supply back into the elliptical crosstrainer. MAINTENANCE AND TROUBLESHOOTING For smooth...
Uk Manual
Page 17
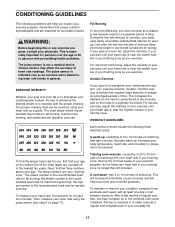
...-existing health problems. The pulse sensor is especially important for a sustained period of time. WARNING: Before beginning this or any exercise program, consult your body temperature, heart rate, and circulation in preparation for energy. Only after the first few weeks of your exercise program, do not keep your heart rate in your everyday life. 17 The chart below shows recommended heart rates for aerobic exercise. The three numbers...
...-existing health problems. The pulse sensor is especially important for a sustained period of time. WARNING: Before beginning this or any exercise program, consult your body temperature, heart rate, and circulation in preparation for energy. Only after the first few weeks of your exercise program, do not keep your heart rate in your everyday life. 17 The chart below shows recommended heart rates for aerobic exercise. The three numbers...
Uk Manual
Page 18
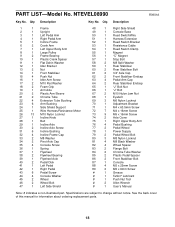
... 2 Flange Bolt 84 2 Chrome Tube Washer 85 2 Plastic Pedal Spacer 86 2 Front Stabiliser Bolt 87 1 Console 88 4 M5 x 25mm Screw 89 2 M5 x 6mm Screw # 1 Grease # 1 Teflon® Lubricant # 1 Push Nut Tool # 2 Allen Wrench # 1 User's Manual Note: # indicates a non-illustrated part. See the back cover of this manual for information about ordering replacement parts. 18 PART LIST-Model No. Description Key No. Qty. Qty. NTEVEL08990 R0901A Key No. Specifications are subject to change without...
... 2 Flange Bolt 84 2 Chrome Tube Washer 85 2 Plastic Pedal Spacer 86 2 Front Stabiliser Bolt 87 1 Console 88 4 M5 x 25mm Screw 89 2 M5 x 6mm Screw # 1 Grease # 1 Teflon® Lubricant # 1 Push Nut Tool # 2 Allen Wrench # 1 User's Manual Note: # indicates a non-illustrated part. See the back cover of this manual for information about ordering replacement parts. 18 PART LIST-Model No. Description Key No. Qty. Qty. NTEVEL08990 R0901A Key No. Specifications are subject to change without...
Uk Manual
Page 19
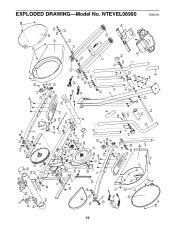
... 16 12 66 3 6 83 76 85 61 76 63 11 1 8 26 59 64 46 26 64 46 26 45 60 26 45 19 EXPLODED DRAWING-Model No.
... 16 12 66 3 6 83 76 85 61 76 63 11 1 8 26 59 64 46 26 64 46 26 45 60 26 45 19 EXPLODED DRAWING-Model No.
Uk Manual
Page 20
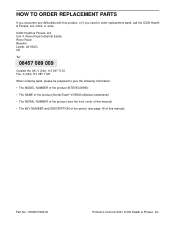
... order replacement parts, call the ICON Health & Fitness, Ltd. office, or write: ICON Health & Fitness, Ltd. Part No. 178059 R0901A Printed in China © 2001 ICON Health & Fitness, Inc. HOW TO ORDER REPLACEMENT PARTS If you need to give the following information: • The MODEL NUMBER of the product (NTEVEL08990) • The NAME of the product (NordicTrack® VGR940 elliptical crosstrainer) • The SERIAL NUMBER of the product (see the front cover of this manual...
... order replacement parts, call the ICON Health & Fitness, Ltd. office, or write: ICON Health & Fitness, Ltd. Part No. 178059 R0901A Printed in China © 2001 ICON Health & Fitness, Inc. HOW TO ORDER REPLACEMENT PARTS If you need to give the following information: • The MODEL NUMBER of the product (NTEVEL08990) • The NAME of the product (NordicTrack® VGR940 elliptical crosstrainer) • The SERIAL NUMBER of the product (see the front cover of this manual...


