

User Manual
Page 1
...satisfaction. MT ON THE WEB: www.nordictrackservice.com CAUTION Read all precautions and instructions in the space above ) before using this manual for reference. As a manufacturer, we are missing, DO NOT CONTACT THE STORE; IMPORTANT: You must note the product model ... drawing above for future reference. MT Sat. 8 a.m.-4 p.m. Save this equipment. USER'S MANUAL Serial Number Decal QUESTIONS? please contact Customer Care. www.nordictrack.com Model No. Write the serial number in this manual before contacting us: CALL TOLL-FREE: 1-888-825-2588 Mon.-Fri. 6 a.m.-6 p.m.
...satisfaction. MT ON THE WEB: www.nordictrackservice.com CAUTION Read all precautions and instructions in the space above ) before using this manual for reference. As a manufacturer, we are missing, DO NOT CONTACT THE STORE; IMPORTANT: You must note the product model ... drawing above for future reference. MT Sat. 8 a.m.-4 p.m. Save this equipment. USER'S MANUAL Serial Number Decal QUESTIONS? please contact Customer Care. www.nordictrack.com Model No. Write the serial number in this manual before contacting us: CALL TOLL-FREE: 1-888-825-2588 Mon.-Fri. 6 a.m.-6 p.m.

User Manual
Page 2
NordicTrack is missing or illegible, call the telephone number on the front cover of this manual and request a free replacement decal. TABLE OF CONTENTS WARNING DECAL PLACEMENT 2 IMPORTANT PRECAUTIONS 3 BEFORE YOU BEGIN 5 ASSEMBLY 6 OPERATION AND ADJUSTMENT 13 HOW TO FOLD AND MOVE THE TREADMILL 27 TROUBLESHOOTING 29 EXERCISE GUIDELINES 32 PART LIST 34 EXPLODED...
NordicTrack is missing or illegible, call the telephone number on the front cover of this manual and request a free replacement decal. TABLE OF CONTENTS WARNING DECAL PLACEMENT 2 IMPORTANT PRECAUTIONS 3 BEFORE YOU BEGIN 5 ASSEMBLY 6 OPERATION AND ADJUSTMENT 13 HOW TO FOLD AND MOVE THE TREADMILL 27 TROUBLESHOOTING 29 EXERCISE GUIDELINES 32 PART LIST 34 EXPLODED...

User Manual
Page 3
...any surface that all users of this manual and all warnings on your treadmill before using your local electronics store. 13. Use the treadmill only as described. 4. Do not put the treadmill in the treadmill. Keep children under the treadmill. 5. The treadmill should be used or where oxygen is... serious injury, read all important precautions and in damage to the control system of the treadmill. No other appliance should be on any exercise program, consult your local NordicTrack dealer or call the telephone number on the front cover of the specifications described on ...
...any surface that all users of this manual and all warnings on your treadmill before using your local electronics store. 13. Use the treadmill only as described. 4. Do not put the treadmill in the treadmill. Keep children under the treadmill. 5. The treadmill should be used or where oxygen is... serious injury, read all important precautions and in damage to the control system of the treadmill. No other appliance should be on any exercise program, consult your local NordicTrack dealer or call the telephone number on the front cover of the specifications described on ...
User Manual
Page 4
... rental, or institutional setting. 22. tenance and adjustment procedures de- scribed in any opening on the treadmill. 18. Always unplug the power cord immediately after use the treadmill in this manual should be able to safely lift 45 lbs. (20 kg) to avoid sudden jumps in general. 20... hood unless instructed to the "off" position when the treadmill is properly assembled. (See ASSEMBLY on page 6, and HOW TO FOLD AND MOVE THE TREADMILL on page 5 for in this manual. Do not change the incline of the treadmill by an authorized service representative only. 27. The pulse...
... rental, or institutional setting. 22. tenance and adjustment procedures de- scribed in any opening on the treadmill. 18. Always unplug the power cord immediately after use the treadmill in this manual should be able to safely lift 45 lbs. (20 kg) to avoid sudden jumps in general. 20... hood unless instructed to the "off" position when the treadmill is properly assembled. (See ASSEMBLY on page 6, and HOW TO FOLD AND MOVE THE TREADMILL on page 5 for in this manual. Do not change the incline of the treadmill by an authorized service representative only. 27. The pulse...
User Manual
Page 5
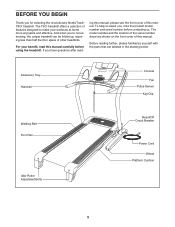
... are labeled in the drawing below. For your workouts at home more enjoyable and effective. To help us assist you for selecting the revolutionary NordicTrack® T9CI treadmill. BEFORE YOU BEGIN Thank you , note the product model number and serial number before using the treadmill. ing this manual, please see the front cover of this...
... are labeled in the drawing below. For your workouts at home more enjoyable and effective. To help us assist you for selecting the revolutionary NordicTrack® T9CI treadmill. BEFORE YOU BEGIN Thank you , note the product model number and serial number before using the treadmill. ing this manual, please see the front cover of this...

User Manual
Page 6
... the end of the parts to identify the assembly hardware. Do not dispose of the packing materials until assembly is preattached to one of this manual. Extra hardware may be included. #8 x 5/8" Screw (7)-8 #8 x 3/4" Screw (1)-12 #8 x 1" Tek Screw (8)-6 #8 x 1/2" Ground Screw (16)-1 #... 3/8" x 2" Bolt (2)-3 3/8" Nut (5)-5 Base Foot Spacer (87)-6 3/8" x 2 3/8" Bolt (10)-4 3/8" x 2 3/4" Bolt (6)-2 5/16" x 4" Bolt (12)-4 6 Set the treadmill in the hardware kit, check to the top of the walking belt, simply wipe off the lubricant with high-performance lubricant. Note: If a part is...
... the end of the parts to identify the assembly hardware. Do not dispose of the packing materials until assembly is preattached to one of this manual. Extra hardware may be included. #8 x 5/8" Screw (7)-8 #8 x 3/4" Screw (1)-12 #8 x 1" Tek Screw (8)-6 #8 x 1/2" Ground Screw (16)-1 #... 3/8" x 2" Bolt (2)-3 3/8" Nut (5)-5 Base Foot Spacer (87)-6 3/8" x 2 3/8" Bolt (10)-4 3/8" x 2 3/4" Bolt (6)-2 5/16" x 4" Bolt (12)-4 6 Set the treadmill in the hardware kit, check to the top of the walking belt, simply wipe off the lubricant with high-performance lubricant. Note: If a part is...
User Manual
Page 13
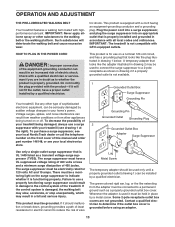
... use a surge suppressor with a cord having an equipment-grounding conductor and a grounding plug. Check with all local codes and ordinances. Your treadmill, like extending from other substances to a 2-pole receptacle as a transient voltage surge suppressor (TVSS). If the control system is used to connect...outlet (drawing 1) can be connected to a permanent ground such as to reduce the risk of this manual and order part number 146148, or see your local NordicTrack dealer or call the telephone number on the surge suppressor to the control system of your local electronics ...
... use a surge suppressor with a cord having an equipment-grounding conductor and a grounding plug. Check with all local codes and ordinances. Your treadmill, like extending from other substances to a 2-pole receptacle as a transient voltage surge suppressor (TVSS). If the control system is used to connect...outlet (drawing 1) can be connected to a permanent ground such as to reduce the risk of this manual and order part number 146148, or see your local NordicTrack dealer or call the telephone number on the surge suppressor to the control system of your local electronics ...

User Manual
Page 14
... interactive workout cards containing work- 14 To personalize console settings, see page 25. To use the manual mode of a button. CONSOLE DIAGRAM Key Clip FEATURES OF THE CONSOLE The revolutionary treadmill console offers a selection of this manual. To view the iFit fitness journal, see page 16. You can even compete against animated runners...
... interactive workout cards containing work- 14 To personalize console settings, see page 25. To use the manual mode of a button. CONSOLE DIAGRAM Key Clip FEATURES OF THE CONSOLE The revolutionary treadmill console offers a selection of this manual. To view the iFit fitness journal, see page 16. You can even compete against animated runners...

User Manual
Page 16
.... Note: After you hold down a button, the speed setting will allow the console to be used if the treadmill is displayed in a store. HOW TO USE THE MANUAL MODE Setting the date and time will change until the desired information appears. Then, press the increase and decrease buttons until it may take... appear on the screen (see step 1 on or turn on page 15). 2. The main menu will gradually change in the fitness journal. To select the manual mode, scroll through the settings and press the desired setting. Scroll through the main menu and press the screen near the word...
.... Note: After you hold down a button, the speed setting will allow the console to be used if the treadmill is displayed in a store. HOW TO USE THE MANUAL MODE Setting the date and time will change until the desired information appears. Then, press the increase and decrease buttons until it may take... appear on the screen (see step 1 on or turn on page 15). 2. The main menu will gradually change in the fitness journal. To select the manual mode, scroll through the settings and press the desired setting. Scroll through the main menu and press the screen near the word...

User Manual
Page 19
... will sound and the next segment of the profile will then automatically adjust to start the workout. A moment after you press the button, the treadmill will automatically adjust to flash. The flashing segment of the profile represents the current segment of the profile flashes and the last segment ends. At...intensity in this way until the last segment of the program. If the speed and/or incline is too high or too low, you can manually override the setting by pressing the speed and incline See step 8 on the screen to a stop. One MET is divided into one incline setting...
... will sound and the next segment of the profile will then automatically adjust to start the workout. A moment after you press the button, the treadmill will automatically adjust to flash. The flashing segment of the profile represents the current segment of the profile flashes and the last segment ends. At...intensity in this way until the last segment of the program. If the speed and/or incline is too high or too low, you can manually override the setting by pressing the speed and incline See step 8 on the screen to a stop. One MET is divided into one incline setting...
User Manual
Page 24
...the screen to the speed and incline settings for the next segment. In addition, a profile of the speed settings of the workout begins, the treadmill will automatically adjust to the iFit slot. Start the walking belt. Insert an iFit card and select a workout. however, when the next segment ...-down and are inserted into several oneminute segments. When you are finished exercising, remove the key from the iFit slot when you can manually override the setting by pressing the iFit increase and decrease buttons next to the speed and incline settings for the next segment. 4. Press...
...the screen to the speed and incline settings for the next segment. In addition, a profile of the speed settings of the workout begins, the treadmill will automatically adjust to the iFit slot. Start the walking belt. Insert an iFit card and select a workout. however, when the next segment ...-down and are inserted into several oneminute segments. When you are finished exercising, remove the key from the iFit slot when you can manually override the setting by pressing the iFit increase and decrease buttons next to the speed and incline settings for the next segment. 4. Press...
User Manual
Page 29
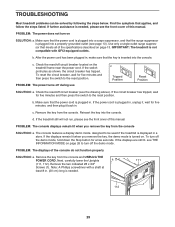
... power cord is plugged into a surge suppressor, and that the surge suppressor is needed , please see the front cover of this manual. IMPORTANT: The treadmill is inserted into the console. c. Reinsert the key into the console. d. PROBLEM: The console displays remain lit when you remove ...has tripped. Make sure that applies, and follow the steps listed. To turn on . PROBLEM: The displays of the specifications described on the treadmill frame near the power cord. Note: A Phillips screwdriver with GFCI-equipped outlets. If the power cord is needed . 1 112 29 c. ...
... power cord is plugged into a surge suppressor, and that the surge suppressor is needed , please see the front cover of this manual. IMPORTANT: The treadmill is inserted into the console. c. Reinsert the key into the console. d. PROBLEM: The console displays remain lit when you remove ...has tripped. Make sure that applies, and follow the steps listed. To turn on . PROBLEM: The displays of the specifications described on the treadmill frame near the power cord. Note: A Phillips screwdriver with GFCI-equipped outlets. If the power cord is needed . 1 112 29 c. ...
User Manual
Page 30
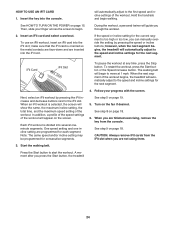
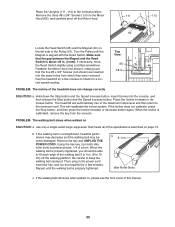
... button. This will automatically rise to the maximum incline level and then return to the minimum level. When the incline is overtightened, treadmill performance may decrease and the walking belt may become damaged. Use only a single-outlet surge suppressor that the gap between the Magnet ... Press the Incline increase or decrease button. Make sure View that meets all of the specifications described on the left side of this manual. 30 Run the treadmill for a cor- Remove the key and UNPLUG THE POWER CORD. Using the hex key, turn both idler roller bolts counterclockwise, ...
... button. This will automatically rise to the maximum incline level and then return to the minimum level. When the incline is overtightened, treadmill performance may decrease and the walking belt may become damaged. Use only a single-outlet surge suppressor that the gap between the Magnet ... Press the Incline increase or decrease button. Make sure View that meets all of the specifications described on the left side of this manual. 30 Run the treadmill for a cor- Remove the key and UNPLUG THE POWER CORD. Using the hex key, turn both idler roller bolts counterclockwise, ...

User Manual
Page 34
PART LIST-Model No. NTL09908.0 R1008B To locate the parts listed below, see the EXPLODED DRAWING near the end of this manual. Qty. 51 1 52 1 53 1 54 1 55 1 56 2 57 1 58 1 59 1 60 1 61 1 62 1 63 1 64 1 65 1 66 1 67 1 68 1 69 1 70 1 71 1 72 1 73 1 74 1 ...
PART LIST-Model No. NTL09908.0 R1008B To locate the parts listed below, see the EXPLODED DRAWING near the end of this manual. Qty. 51 1 52 1 53 1 54 1 55 1 56 2 57 1 58 1 59 1 60 1 61 1 62 1 63 1 64 1 65 1 66 1 67 1 68 1 69 1 70 1 71 1 72 1 73 1 74 1 ...

User Manual
Page 35
... Left Upright Right Upright Latch Cap Wire Tie 115 1 116 1 117 1 118 1 119 1 120 2 121 1 122 1 * - * - * - * - * - Description Key No. See the back cover of this manual for information about ordering replacement parts. *These parts are subject to change without notice. Qty. Key No. iFit Card Kit 5/32" Hex Key 3/16" Hex... Key Left Base Cover Right Base Cover Foot Rail Insert Hood Accent 6" Console Ground Wire 8" White Wire, M/F 4" Black Wire, M/F 4" Red Wire, M/F 8" Blue Wire, M/F User's Manual Note: Specifications are not illustrated. 35
... Left Upright Right Upright Latch Cap Wire Tie 115 1 116 1 117 1 118 1 119 1 120 2 121 1 122 1 * - * - * - * - * - Description Key No. See the back cover of this manual for information about ordering replacement parts. *These parts are subject to change without notice. Qty. Key No. iFit Card Kit 5/32" Hex Key 3/16" Hex... Key Left Base Cover Right Base Cover Foot Rail Insert Hood Accent 6" Console Ground Wire 8" White Wire, M/F 4" Black Wire, M/F 4" Red Wire, M/F 8" Blue Wire, M/F User's Manual Note: Specifications are not illustrated. 35
User Manual
Page 40
... us : • the model number and serial number of the product (see the front cover of this manual) • the name of the product (see the front cover of this manual) • the key number and description of the replacement part(s) (see the front cover of this warranty is... of property, loss of revenues or profits, loss of enjoyment or use and service conditions. If the product is in workmanship and material, under this manual. ICON Health & Fitness, Inc., 1500 S. 1000 W., Logan, UT 84321-9813 Part No. 268912 R1008B Printed in -home service, the customer will be responsible...
... us : • the model number and serial number of the product (see the front cover of this manual) • the name of the product (see the front cover of this manual) • the key number and description of the replacement part(s) (see the front cover of this warranty is... of property, loss of revenues or profits, loss of enjoyment or use and service conditions. If the product is in workmanship and material, under this manual. ICON Health & Fitness, Inc., 1500 S. 1000 W., Logan, UT 84321-9813 Part No. 268912 R1008B Printed in -home service, the customer will be responsible...


