
English Manual
Page 2
... cover of the warning decals. TABLE OF CONTENTS WARNING DECAL PLACEMENT 2 IMPORTANT PRECAUTIONS 3 BEFORE YOU BEGIN 5 ASSEMBLY 6 OPERATION AND ADJUSTMENT 13 HOW TO FOLD AND MOVE THE TREADMILL 20 TROUBLESHOOTING 22 EXERCISE GUIDELINES 25 PART LIST 26 EXPLODED DRAWING 28 ORDERING REPLACEMENT PARTS Back Cover LIMITED WARRANTY Back Cover WARNING DECAL PLACEMENT...
... cover of the warning decals. TABLE OF CONTENTS WARNING DECAL PLACEMENT 2 IMPORTANT PRECAUTIONS 3 BEFORE YOU BEGIN 5 ASSEMBLY 6 OPERATION AND ADJUSTMENT 13 HOW TO FOLD AND MOVE THE TREADMILL 20 TROUBLESHOOTING 22 EXERCISE GUIDELINES 25 PART LIST 26 EXPLODED DRAWING 28 ORDERING REPLACEMENT PARTS Back Cover LIMITED WARRANTY Back Cover WARNING DECAL PLACEMENT...

English Manual
Page 4
Do not attempt to the off position when the treadmill is intended for the location of the treadmill regularly. When folding or moving the treadmill, make sure that the storage latch is holding the frame securely in this manual. nance and adjustment procedures described in the storage position.... the power cord, and switch the reset/off circuit breaker to raise, lower, or move the treadmill until it is properly assembled. (See ASSEMBLY on page 6, and HOW TO FOLD AND MOVE THE TREADMILL on page 20.) You must be performed by an authorized ser- Inspect and properly tighten all parts...
Do not attempt to the off position when the treadmill is intended for the location of the treadmill regularly. When folding or moving the treadmill, make sure that the storage latch is holding the frame securely in this manual. nance and adjustment procedures described in the storage position.... the power cord, and switch the reset/off circuit breaker to raise, lower, or move the treadmill until it is properly assembled. (See ASSEMBLY on page 6, and HOW TO FOLD AND MOVE THE TREADMILL on page 20.) You must be performed by an authorized ser- Inspect and properly tighten all parts...
English Manual
Page 5
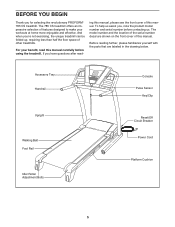
... Power Cord Platform Cushion 5 And when you for selecting the revolutionary PROFORM® 785 CS treadmill. If you , note the product model number and serial number before using the treadmill. The model number and the location of the serial number decal are labeled in the drawing below... benefit, read - ing this manual, please see the front cover of other treadmills. For your workouts at home more enjoyable and effective. BEFORE YOU BEGIN Thank you ʼre not exercising, the unique treadmill can be folded up, requiring less than half the floor space of this manual.
... Power Cord Platform Cushion 5 And when you for selecting the revolutionary PROFORM® 785 CS treadmill. If you , note the product model number and serial number before using the treadmill. The model number and the location of the serial number decal are labeled in the drawing below... benefit, read - ing this manual, please see the front cover of other treadmills. For your workouts at home more enjoyable and effective. BEFORE YOU BEGIN Thank you ʼre not exercising, the unique treadmill can be folded up, requiring less than half the floor space of this manual.
English Manual
Page 7
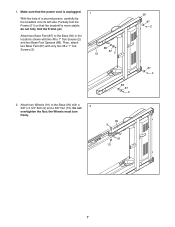
... two Base Feet (87) to the Base (90) with a 3/8" x 2 3/4" Bolt (9) and a 3/8" Nut (13). Partially fold the Frame (51) so that the power cord is more stable; With the help of a second person, carefully tip the treadmill onto its left side. Then, attach two Base Feet (87) with two #8 x 1" Tek Screws (2) and... two Base Foot Spacers (88). Make sure that the treadmill is unplugged. Do not 2 overtighten the Nut; the Wheels must turn freely. 88 87 2 90 9 91 13 90 87 2 87 2 7 Attach two Wheels (91)...
... two Base Feet (87) to the Base (90) with a 3/8" x 2 3/4" Bolt (9) and a 3/8" Nut (13). Partially fold the Frame (51) so that the power cord is more stable; With the help of a second person, carefully tip the treadmill onto its left side. Then, attach two Base Feet (87) with two #8 x 1" Tek Screws (2) and... two Base Foot Spacers (88). Make sure that the treadmill is unplugged. Do not 2 overtighten the Nut; the Wheels must turn freely. 88 87 2 90 9 91 13 90 87 2 87 2 7 Attach two Wheels (91)...
English Manual
Page 8
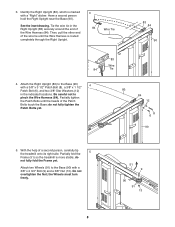
...90) with a "Right" sticker. 3. Then, pull the other end of the wire tie until the heads of a second person, carefully tip the treadmill onto its right side. See the inset drawing. Partially tighten the Patch Bolts until the Wire Harness is routed completely through the Right Upright. 3 84... Wire Tie 83 84 90 83 Wire 84 Tie 4. do not fully fold the Frame yet. Have a second person hold the Right Upright near the Base (90). Partially fold the 5 Frame (51) so the treadmill is marked with a 3/8" x 2 3/4" Bolt (9) and a 3/8" Nut (13). do not fully tighten...
...90) with a "Right" sticker. 3. Then, pull the other end of the wire tie until the heads of a second person, carefully tip the treadmill onto its right side. See the inset drawing. Partially tighten the Patch Bolts until the Wire Harness is routed completely through the Right Upright. 3 84... Wire Tie 83 84 90 83 Wire 84 Tie 4. do not fully fold the Frame yet. Have a second person hold the Right Upright near the Base (90). Partially fold the 5 Frame (51) so the treadmill is marked with a 3/8" x 2 3/4" Bolt (9) and a 3/8" Nut (13). do not fully tighten...

English Manual
Page 16
..., and auto speed settings. Press the Display button to reach the selected incline setting. 5. Measure your hands. Change the incline of the treadmill as the speed of the lower display will appear in the display will begin to turn off circuit breaker to the selected incline setting. As... run, indicators will show the time remaining in a secure place. IMPORTANT: If you do not do this, the treadmillʼs electrical components may damage the treadmill when you fold it to flash each time your heart rate when you press the buttons, it in the workout instead of the fan...
..., and auto speed settings. Press the Display button to reach the selected incline setting. 5. Measure your hands. Change the incline of the treadmill as the speed of the lower display will appear in the display will begin to turn off circuit breaker to the selected incline setting. As... run, indicators will show the time remaining in a secure place. IMPORTANT: If you do not do this, the treadmillʼs electrical components may damage the treadmill when you fold it to flash each time your heart rate when you press the buttons, it in the workout instead of the fan...
English Manual
Page 20
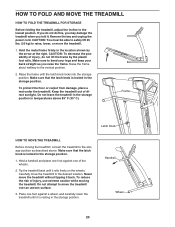
... until the latch knob locks into the storage position. Never move the treadmill to move the treadmill. 1. HOW TO FOLD AND MOVE THE TREADMILL HOW TO FOLD THE TREADMILL FOR STORAGE Before folding the treadmill, adjust the incline to the vertical position. 2. If you do not do not lift the frame by the arrow at the right. To...
... until the latch knob locks into the storage position. Never move the treadmill to move the treadmill. 1. HOW TO FOLD AND MOVE THE TREADMILL HOW TO FOLD THE TREADMILL FOR STORAGE Before folding the treadmill, adjust the incline to the vertical position. 2. If you do not do not lift the frame by the arrow at the right. To...


