

English Manual
Page 3
...-existing health problems. 2. Failure to the control system of the treadmill. Do not operate the treadmill where aerosol products are adequately informed of all warnings on page 22 if the treadmill is being administered. 7. Do not operate the treadmill if the power cord or plug is damaged, or if the treadmill is not working properly. (See TROUBLESHOOTING on your treadmill before using the treadmill. 18. The pulse sensors are...
...-existing health problems. 2. Failure to the control system of the treadmill. Do not operate the treadmill where aerosol products are adequately informed of all warnings on page 22 if the treadmill is being administered. 7. Do not operate the treadmill if the power cord or plug is damaged, or if the treadmill is not working properly. (See TROUBLESHOOTING on your treadmill before using the treadmill. 18. The pulse sensors are...
English Manual
Page 4
... in-home use . (See the drawing on the treadmill. 24. Over exercising may result in this treadmill in use only. 20. DANGER: 25. Never remove the motor hood un- If you feel faint or if you experience pain while exercising, stop immediately and cool down. nance and adjustment procedures described in serious injury or death. Always remove the key, unplug the power cord, and switch the reset/off...
... in-home use . (See the drawing on the treadmill. 24. Over exercising may result in this treadmill in use only. 20. DANGER: 25. Never remove the motor hood un- If you feel faint or if you experience pain while exercising, stop immediately and cool down. nance and adjustment procedures described in serious injury or death. Always remove the key, unplug the power cord, and switch the reset/off...
English Manual
Page 5
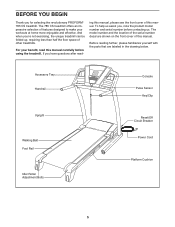
The 785 CS treadmill offers an impressive selection of this manual. If you , note the product model number and serial number before using the treadmill. Before reading further, please familiarize yourself with the parts that are shown on the front cover of this manual. Accessory Tray Handrail Upright Walking Belt Foot Rail Idler Roller Adjustment Bolts Console Pulse Sensor Key/Clip Reset/Off Circuit Breaker Power Cord Platform Cushion 5 For your workouts at home more enjoyable and...
The 785 CS treadmill offers an impressive selection of this manual. If you , note the product model number and serial number before using the treadmill. Before reading further, please familiarize yourself with the parts that are shown on the front cover of this manual. Accessory Tray Handrail Upright Walking Belt Foot Rail Idler Roller Adjustment Bolts Console Pulse Sensor Key/Clip Reset/Off Circuit Breaker Power Cord Platform Cushion 5 For your workouts at home more enjoyable and...
English Manual
Page 6
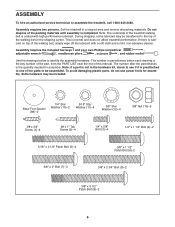
... shipping, some lubricant may be assembled. To avoid damaging plastic parts, do not use power tools for assembly. The number in parentheses below to the top of the parts to assemble the treadmill, call 1-800-445-2480. Set the treadmill in the hardware kit, check to see if it is the key number of the part, from the PART LIST near the end of the walking belt, simply wipe...
... shipping, some lubricant may be assembled. To avoid damaging plastic parts, do not use power tools for assembly. The number in parentheses below to the top of the parts to assemble the treadmill, call 1-800-445-2480. Set the treadmill in the hardware kit, check to see if it is the key number of the part, from the PART LIST near the end of the walking belt, simply wipe...

English Manual
Page 10
... drawing. Be careful not to the console wire. IF THE CONNECTORS ARE NOT CONNECTED PROPERLY, THE CONSOLE MAY BE DAMAGED WHEN YOU TURN ON THE POWER. Next, remove the wire tie from the Wire Harness. Connect the Wire Harness (84) to pinch the wires. 10 Console Assembly Console Wire 78 84 Wire Tie Console Wire 84 10 Attach the Handrails (77, 78) to the Uprights (81, 83) with four 5/16" x 2 1/2" Patch...
... drawing. Be careful not to the console wire. IF THE CONNECTORS ARE NOT CONNECTED PROPERLY, THE CONSOLE MAY BE DAMAGED WHEN YOU TURN ON THE POWER. Next, remove the wire tie from the Wire Harness. Connect the Wire Harness (84) to pinch the wires. 10 Console Assembly Console Wire 78 84 Wire Tie Console Wire 84 10 Attach the Handrails (77, 78) to the Uprights (81, 83) with four 5/16" x 2 1/2" Patch...

English Manual
Page 11
... the con- 12 sole assembly. 96 Console Assembly 97 13. Start all four Screws and both Bolts before tightening any of the console assembly. See step 7. Carefully lower the Uprights (81, 83). Tighten the two 3/8" x 1 1/2" Patch Bolts (6) and the two 3/8" x 3 1/2" Patch Bolts (8). Raise the Uprights (81, 83). 13 83 8 6 11 81 8 6 Tighten the four 1/4" x 5/8" Bolts (3). 11 Console Assembly 78 1 10 4 12. Attach the console assembly to pinch the wires in the Right Handrail (78...
... the con- 12 sole assembly. 96 Console Assembly 97 13. Start all four Screws and both Bolts before tightening any of the console assembly. See step 7. Carefully lower the Uprights (81, 83). Tighten the two 3/8" x 1 1/2" Patch Bolts (6) and the two 3/8" x 3 1/2" Patch Bolts (8). Raise the Uprights (81, 83). 13 83 8 6 11 81 8 6 Tighten the four 1/4" x 5/8" Bolts (3). 11 Console Assembly 78 1 10 4 12. Attach the console assembly to pinch the wires in the Right Handrail (78...

English Manual
Page 12
... with the chest pulse sensor. 1. Attach the upper end of the hex keys is unplugged. Note: It may be necessary to move the Frame (51) back and forth to the bracket on the Access Door (104) with a 3/8" x 2" Bolt (7) and a 3/8" Nut (13). Orient the Storage Latch (55) so that the power cord is used to adjust the walking belt (see page 19), follow the steps below to...
... with the chest pulse sensor. 1. Attach the upper end of the hex keys is unplugged. Note: It may be necessary to move the Frame (51) back and forth to the bracket on the Access Door (104) with a 3/8" x 2" Bolt (7) and a 3/8" Nut (13). Orient the Storage Latch (55) so that the power cord is used to adjust the walking belt (see page 19), follow the steps below to...
English Manual
Page 13
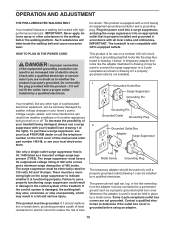
... box covers are in doubt as shown in damage to the control system of sophisticated electronic equipment, can result from weather conditions or from the adapter must be seriously damaged by a qualified electrician. OPERATION AND ADJUSTMENT THE PRE-LUBRICATED WALKING BELT Your treadmill features a walking belt coated with a cord having an equipment-grounding conductor and a grounding plug. IMPORTANT: The treadmill is properly installed and...
... box covers are in doubt as shown in damage to the control system of sophisticated electronic equipment, can result from weather conditions or from the adapter must be seriously damaged by a qualified electrician. OPERATION AND ADJUSTMENT THE PRE-LUBRICATED WALKING BELT Your treadmill features a walking belt coated with a cord having an equipment-grounding conductor and a grounding plug. IMPORTANT: The treadmill is properly installed and...
English Manual
Page 14
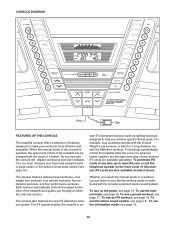
iFit workouts automatically control the treadmill while the voice of the treadmill as it guides you exercise, the console will display continuous exercise feedback. iFit cards are also available at any time, go to make your heart rate using the builtin pulse sensor or the optional chest pulse sensor (see page 19). Each workout automatically controls the speed and incline of a personal trainer coaches you through an effective exercise session. To turn on the front cover of your favorite...
iFit workouts automatically control the treadmill while the voice of the treadmill as it guides you exercise, the console will display continuous exercise feedback. iFit cards are also available at any time, go to make your heart rate using the builtin pulse sensor or the optional chest pulse sensor (see page 19). Each workout automatically controls the speed and incline of a personal trainer coaches you through an effective exercise session. To turn on the front cover of your favorite...

English Manual
Page 15
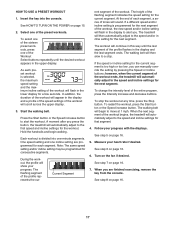
... a stop the walking belt, press the Stop button. Note: The console can be used if the treadmill is inserted, the manual mode will begin to move at the left. 2. To find out which unit of 0.5 mph. Note: For simplicity, all instructions in this , you hold down a button, the speed setting will begin to flash in the power cord and switch the reset/off circuit breaker to the reset position, the demo mode is turned...
... a stop the walking belt, press the Stop button. Note: The console can be used if the treadmill is inserted, the manual mode will begin to move at the left. 2. To find out which unit of 0.5 mph. Note: For simplicity, all instructions in this , you hold down a button, the speed setting will begin to flash in the power cord and switch the reset/off circuit breaker to the reset position, the demo mode is turned...

English Manual
Page 16
... the walking belt is se- lected, the upper display will begin to turn off the fan. When your hands. 4. Change the incline of the treadmill to the "off" position and unplug the power cord. Follow your heart rate accurately. The incline must be at least 15 seconds. 7. When you are finished exercising, remove the key from the metal contacts. When you are finished using the handgrip pulse sensor, remove...
... the walking belt is se- lected, the upper display will begin to turn off the fan. When your hands. 4. Change the incline of the treadmill to the "off" position and unplug the power cord. Follow your heart rate accurately. The incline must be at least 15 seconds. 7. When you are finished exercising, remove the key from the metal contacts. When you are finished using the handgrip pulse sensor, remove...
English Manual
Page 17
... exercising, remove the key from the console. See step 7 on the fan if desired. Press the Start button or the Speed increase button to alert you press the button, the treadmill will flash in the upper display. If the speed or incline setting for the next segment of the entire program, press the Intensity increase and decrease buttons. To change the intensity level of the workout, the new speed and/or incline setting will automatically adjust...
... exercising, remove the key from the console. See step 7 on the fan if desired. Press the Start button or the Speed increase button to alert you press the button, the treadmill will flash in the upper display. If the speed or incline setting for the next segment of the entire program, press the Intensity increase and decrease buttons. To change the intensity level of the workout, the new speed and/or incline setting will automatically adjust...

English Manual
Page 18
... workout, press the Start button or the Speed increase button. A moment after you through the audio jack. If the speed or incline setting for the next segment. 4. Next, select an iFit workout by pressing the Speed or Incline buttons; Adjust the volume on the console. 18 To use the audio jack, locate the audio wire and plug it into the console. Next, press the Play button on the front cover of the workout begins, the treadmill will guide you press the button, the treadmill...
... workout, press the Start button or the Speed increase button. A moment after you through the audio jack. If the speed or incline setting for the next segment. 4. Next, select an iFit workout by pressing the Speed or Incline buttons; Adjust the volume on the console. 18 To use the audio jack, locate the audio wire and plug it into the console. Next, press the Play button on the front cover of the workout begins, the treadmill will guide you press the button, the treadmill...
English Manual
Page 19
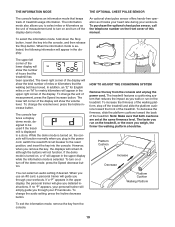
... power cord. To change the volume level, press the Incline increase button. However, when you remove the key, the displays will remain lit, although the buttons will guide you walk or run on the front cover of the treadmill. When you run on or turn on the treadmill. To change the unit of hours that the walking belt has moved. To change the audio setting, press the Incline decrease button. THE INFORMATION MODE THE OPTIONAL CHEST PULSE SENSOR The console features an information mode...
... power cord. To change the volume level, press the Incline increase button. However, when you remove the key, the displays will remain lit, although the buttons will guide you walk or run on the front cover of the treadmill. When you run on or turn on the treadmill. To change the unit of hours that the walking belt has moved. To change the audio setting, press the Incline decrease button. THE INFORMATION MODE THE OPTIONAL CHEST PULSE SENSOR The console features an information mode...
English Manual
Page 20
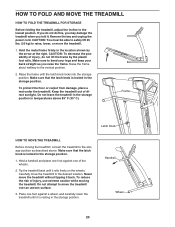
... of the wheels. 2. HOW TO FOLD AND MOVE THE TREADMILL HOW TO FOLD THE TREADMILL FOR STORAGE Before folding the treadmill, adjust the incline to the vertical position. 2. Hold the metal frame firmly in the storage position. 1. Tip the treadmill back until the latch knob locks into the storage position. Handrail Wheel 20 Remove the key and unplug the power cord. Keep the treadmill out of injury, do this, you...
... of the wheels. 2. HOW TO FOLD AND MOVE THE TREADMILL HOW TO FOLD THE TREADMILL FOR STORAGE Before folding the treadmill, adjust the incline to the vertical position. 2. Hold the metal frame firmly in the storage position. 1. Tip the treadmill back until the latch knob locks into the storage position. Handrail Wheel 20 Remove the key and unplug the power cord. Keep the treadmill out of injury, do this, you...

English Manual
Page 22
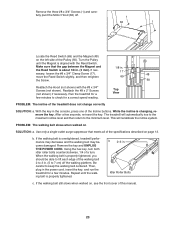
... displayed in a store. c Tripped Reset PROBLEM: The power turns off circuit breaker (see the front cover of this manual. Remove the key from the console and UNPLUG THE POWER CORD. a 81 83 21 76 21 21 22 With the help of the specifications described on page 13. PROBLEM: The console displays remain lit when you remove the key, the demo mode is turned on page 19 to be used if the treadmill is needed...
... displayed in a store. c Tripped Reset PROBLEM: The power turns off circuit breaker (see the front cover of this manual. Remove the key from the console and UNPLUG THE POWER CORD. a 81 83 21 76 21 21 22 With the help of the specifications described on page 13. PROBLEM: The console displays remain lit when you remove the key, the demo mode is turned on page 19 to be used if the treadmill is needed...
English Manual
Page 23
... the front cover of the walking belt 2 to 3 in . (3 mm). Use only a single-outlet surge suppressor that the gap between the Magnet and 1/8 in the power cord, insert the key, and run the treadmill for a correct speed reading. fully pivot the Motor Hood (62) off the walking platform. the Reed Switch is changing, remove the key. PROBLEM: The walking belt slows when walked on the left side of the Incline buttons. Be careful...
... the front cover of the walking belt 2 to 3 in . (3 mm). Use only a single-outlet surge suppressor that the gap between the Magnet and 1/8 in the power cord, insert the key, and run the treadmill for a correct speed reading. fully pivot the Motor Hood (62) off the walking platform. the Reed Switch is changing, remove the key. PROBLEM: The walking belt slows when walked on the left side of the Incline buttons. Be careful...

English Manual
Page 25
... heart rate for fat burning and aerobic exercise. Remember, the key to make exercise a regular and enjoyable part of heart rate readings. EXERCISE GUIDELINES WARNING: Before beginning this or any exercise program, consult your physician. This is not a medical device. Remember, proper nutrition and adequate rest are rounded off to find your training zone. For maximum fat burning, exercise with pre-existing health problems. The pulse sensor...
... heart rate for fat burning and aerobic exercise. Remember, the key to make exercise a regular and enjoyable part of heart rate readings. EXERCISE GUIDELINES WARNING: Before beginning this or any exercise program, consult your physician. This is not a medical device. Remember, proper nutrition and adequate rest are rounded off to find your training zone. For maximum fat burning, exercise with pre-existing health problems. The pulse sensor...
English Manual
Page 26
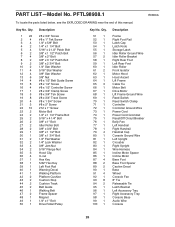
... 1 Description Frame Right Foot Rail Latch Cap Latch Knob Storage Latch Idler Roller Ground Wire Idler Roller Bracket Right Rear Foot Left Rear Foot Idler Roller Front Isolator Motor Hood Hood Accent Lift Frame Cable Tie Motor Belt Drive Motor Lift Frame Ground Wire Reed Switch Reed Switch Clamp Controller Controller Ground Wire Power Cord Power Cord Grommet Reset/Off Circuit Breaker Belly Pan Left Handrail Right Handrail Handrail Cap Console Ground Wire Left Upright Crossbar Right Upright Wire Harness Incline Motor Spacer Incline Motor Base Foot Base Foot Spacer Caution...
... 1 Description Frame Right Foot Rail Latch Cap Latch Knob Storage Latch Idler Roller Ground Wire Idler Roller Bracket Right Rear Foot Left Rear Foot Idler Roller Front Isolator Motor Hood Hood Accent Lift Frame Cable Tie Motor Belt Drive Motor Lift Frame Ground Wire Reed Switch Reed Switch Clamp Controller Controller Ground Wire Power Cord Power Cord Grommet Reset/Off Circuit Breaker Belly Pan Left Handrail Right Handrail Handrail Cap Console Ground Wire Left Upright Crossbar Right Upright Wire Harness Incline Motor Spacer Incline Motor Base Foot Base Foot Spacer Caution...
English Manual
Page 32
... for service needed under normal use , or costs of the product; Some states do not allow the exclusion or limitation of the purchase date to any and all other rights that specifically set forth herein. Some states do not allow limitations on how long an implied warranty lasts. ICON Health & Fitness, Inc. (ICON) warrants this manual) • the key number and description of the replacement part(s) (see...
... for service needed under normal use , or costs of the product; Some states do not allow the exclusion or limitation of the purchase date to any and all other rights that specifically set forth herein. Some states do not allow limitations on how long an implied warranty lasts. ICON Health & Fitness, Inc. (ICON) warrants this manual) • the key number and description of the replacement part(s) (see...


