

English Manual
Page 3
... plug the surge 17. It is being damaged, always use a properly functioning surge suppressor could become caught in sandals. 11. Failure to the control system of all users of heart rate readings. Do not operate the treadmill where aerosol products are used only by or through the use of high speeds. Never use an extension cord. 2. When connecting the power cord (see HOW TO TURN ON...
... plug the surge 17. It is being damaged, always use a properly functioning surge suppressor could become caught in sandals. 11. Failure to the control system of all users of heart rate readings. Do not operate the treadmill where aerosol products are used only by or through the use of high speeds. Never use an extension cord. 2. When connecting the power cord (see HOW TO TURN ON...
English Manual
Page 4
... INSTRUCTIONS 4 Always remove the key, unplug the power cord, and switch the reset/off circuit breaker to raise, lower, or move the treadmill until it is intended for the location of the treadmill regularly. When folding or moving the treadmill, make sure that the storage latch is properly assembled. (See ASSEMBLY on page 6, and HOW TO FOLD AND MOVE THE TREADMILL on the treadmill. Servicing other than the procedures in this manual. Never leave the treadmill...
... INSTRUCTIONS 4 Always remove the key, unplug the power cord, and switch the reset/off circuit breaker to raise, lower, or move the treadmill until it is intended for the location of the treadmill regularly. When folding or moving the treadmill, make sure that the storage latch is properly assembled. (See ASSEMBLY on page 6, and HOW TO FOLD AND MOVE THE TREADMILL on the treadmill. Servicing other than the procedures in this manual. Never leave the treadmill...

English Manual
Page 5
... YOU BEGIN Thank you for selecting the revolutionary NordicTrack® T7 ZE treadmill with Universal Dock for iPod offers a selection of other treadmills. The T7 ZE treadmill with the parts that are shown on the front cover of this manual. Speaker Accessory Tray Handrail Upright Console Pulse Sensor Key/Clip Walking Belt Foot Rail Reset/Off Circuit Breaker Power Cord Rear Roller Adjustment Bolts Platform Cushion 5 And when you , note the product model number and serial number before using the treadmill.
... YOU BEGIN Thank you for selecting the revolutionary NordicTrack® T7 ZE treadmill with Universal Dock for iPod offers a selection of other treadmills. The T7 ZE treadmill with the parts that are shown on the front cover of this manual. Speaker Accessory Tray Handrail Upright Console Pulse Sensor Key/Clip Walking Belt Foot Rail Reset/Off Circuit Breaker Power Cord Rear Roller Adjustment Bolts Platform Cushion 5 And when you , note the product model number and serial number before using the treadmill.

English Manual
Page 9
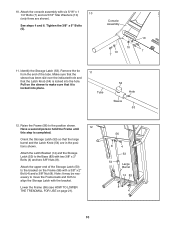
... the console wire. If necessary, use needlenose 95 pliers to pinch the wires. 9 Console Assembly Console Wire 78 38 Long Tie Console Wire 38 9 Tighten a 1/4" x 1 1/4" Bolt (5) with four #8 x 3/4" Screws (1) (only two are pinched. If they do not overtighten the Screws. Make sure that no wires are shown). Next, insert the console wire into place. Console Wire Wire Tie 5 33 Bracket Console Assembly 94 9. Be careful not to pull the console wire out. Connect the Upright Wire (38...
... the console wire. If necessary, use needlenose 95 pliers to pinch the wires. 9 Console Assembly Console Wire 78 38 Long Tie Console Wire 38 9 Tighten a 1/4" x 1 1/4" Bolt (5) with four #8 x 3/4" Screws (1) (only two are pinched. If they do not overtighten the Screws. Make sure that no wires are shown). Next, insert the console wire into place. Console Wire Wire Tie 5 33 Bracket Console Assembly 94 9. Be careful not to pull the console wire out. Connect the Upright Wire (38...
English Manual
Page 10
... be necessary to move the Frame back and forth to the Base (83) with a 3/8" x 2" Bolt (4) and a 3/8" Nut (8). 10. Attach the console assembly with the bracket. Identify the Storage Latch (53). Pull on the sleeve to make sure that it is completed. Have a second person hold the Frame until 12 this step is locked into the hole. Lower the Frame...
... be necessary to move the Frame back and forth to the Base (83) with a 3/8" x 2" Bolt (4) and a 3/8" Nut (8). 10. Attach the console assembly with the bracket. Identify the Storage Latch (53). Pull on the sleeve to make sure that it is completed. Have a second person hold the Frame until 12 this step is locked into the hole. Lower the Frame...

English Manual
Page 12
... this manual. HOW TO PLUG IN THE POWER CORD DANGER: Improper connection of the equipment-grounding conductor can be a monitoring light on the front cover of sophisticated electronic equipment, can result in place by a qualified electrician. Check with your treadmill being turned on a nominal 120-volt circuit, and has a grounding plug that is damaged, the walking belt may slow, accelerate, or stop unexpectedly...
... this manual. HOW TO PLUG IN THE POWER CORD DANGER: Improper connection of the equipment-grounding conductor can be a monitoring light on the front cover of sophisticated electronic equipment, can result in place by a qualified electrician. Check with your treadmill being turned on a nominal 120-volt circuit, and has a grounding plug that is damaged, the walking belt may slow, accelerate, or stop unexpectedly...
English Manual
Page 13
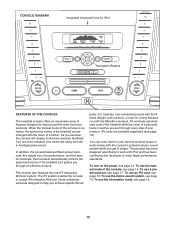
... 8week Weight Loss workout, or train for iPod Navigation Buttons FEATURES OF THE CONSOLE The treadmill console offers an impressive array of the treadmill as it guides you achieve specific fitness goals. To use the manual mode of your heart rate using the builtin handgrip pulse sensor. The console also features the new iFit Interactive Workout system. When the manual mode of the console is selected, the speed and incline of the treadmill can even measure your workout. As...
... 8week Weight Loss workout, or train for iPod Navigation Buttons FEATURES OF THE CONSOLE The treadmill console offers an impressive array of the treadmill as it guides you achieve specific fitness goals. To use the manual mode of your heart rate using the builtin handgrip pulse sensor. The console also features the new iFit Interactive Workout system. When the manual mode of the console is selected, the speed and incline of the treadmill can even measure your workout. As...
English Manual
Page 14
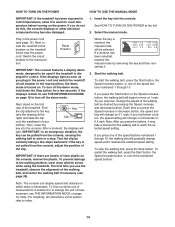
... console features a display demo mode, designed to be selected. Next, stand on the console, remove the plastic. Test the clip by removing the key and then reinserting it. 3. If you press the Speed increase or decrease button, the speed setting will change by pressing the Speed increase and decrease buttons. To prevent damage to the reset position. Start the walking belt. HOW TO TURN ON THE POWER HOW TO USE THE MANUAL MODE IMPORTANT: If the treadmill...
... console features a display demo mode, designed to be selected. Next, stand on the console, remove the plastic. Test the clip by removing the key and then reinserting it. 3. If you press the Speed increase or decrease button, the speed setting will change by pressing the Speed increase and decrease buttons. To prevent damage to the reset position. Start the walking belt. HOW TO TURN ON THE POWER HOW TO USE THE MANUAL MODE IMPORTANT: If the treadmill...
English Manual
Page 15
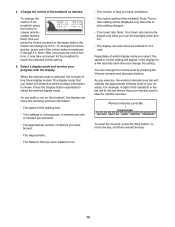
... you use the handgrip pulse sensor. • The display can be displayed only when the incline setting changes. • Your heart rate. Regardless of the walking belt. • Your walking or running pace, in the display for the treadmill to select the desired display mode. Note: Your heart rate can also show the following workout information: • The speed of which workout information is ideal for aerobic exercise. To change by pressing the Volume increase and decrease buttons...
... you use the handgrip pulse sensor. • The display can be displayed only when the incline setting changes. • Your heart rate. Regardless of the walking belt. • Your walking or running pace, in the display for the treadmill to select the desired display mode. Note: Your heart rate can also show the following workout information: • The speed of which workout information is ideal for aerobic exercise. To change by pressing the Volume increase and decrease buttons...
English Manual
Page 16
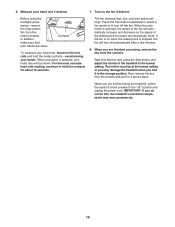
... storage position. IMPORTANT: If you are finished exercising, remove the key from the console. When your pulse is detected, your heart rate if desired. 7. When the auto mode is stopped, the fan will turn off circuit breaker to the lowest setting. The incline must be shown. Next, remove the key from the metal contacts. Measure your heart rate will automatically increase and decrease as the speed of the walking belt...
... storage position. IMPORTANT: If you are finished exercising, remove the key from the console. When your pulse is detected, your heart rate if desired. 7. When the auto mode is stopped, the fan will turn off circuit breaker to the lowest setting. The incline must be shown. Next, remove the key from the metal contacts. Measure your heart rate will automatically increase and decrease as the speed of the walking belt...
English Manual
Page 17
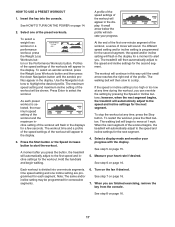
... heart rate if desired. See HOW TO TURN ON THE POWER on page 16. 7. The treadmill will begin walking. The walking belt will then automatically adjust to a stop the workout at any time, press the Stop button. Press Enter to alert you are programmed for the second segment, the speed and/or incline setting will appear in the display. If the speed or incline setting is programmed for each preset workout is divided into the console...
... heart rate if desired. See HOW TO TURN ON THE POWER on page 16. 7. The treadmill will begin walking. The walking belt will then automatically adjust to a stop the workout at any time, press the Stop button. Press Enter to alert you are programmed for the second segment, the speed and/or incline setting will appear in the display. If the speed or incline setting is programmed for each preset workout is divided into the console...

English Manual
Page 18
... display. Next, select an iFit workout by pressing the Speed or Incline buttons; When an iFit workout is pressed, the treadmill will guide you are inserted into several oneminute segments. HOW TO USE AN IFIT CARD To purchase iFit cards at any time, press the Stop button. During the workout, a personal trainer will automatically adjust to www.iFit.com or call the telephone number on page 14. 2. To restart the workout, press the Start button or the Speed increase button. See step...
... display. Next, select an iFit workout by pressing the Speed or Incline buttons; When an iFit workout is pressed, the treadmill will guide you are inserted into several oneminute segments. HOW TO USE AN IFIT CARD To purchase iFit cards at any time, press the Stop button. During the workout, a personal trainer will automatically adjust to www.iFit.com or call the telephone number on page 14. 2. To restart the workout, press the Start button or the Speed increase button. See step...
English Manual
Page 19
... the power cord, switch the reset/off the demo mode, press the Speed decrease button. The display will simply guide you must connect your iPod. Press the Speed increase button to the console through the audio jack or through the Integrated Universal Dock for kilometers will not function. To use an iFit card, a personal trainer will appear in . When the information mode is fully plugged in a store. To exit the information mode, remove the key from the console and...
... the power cord, switch the reset/off the demo mode, press the Speed decrease button. The display will simply guide you must connect your iPod. Press the Speed increase button to the console through the audio jack or through the Integrated Universal Dock for kilometers will not function. To use an iFit card, a personal trainer will appear in . When the information mode is fully plugged in a store. To exit the information mode, remove the key from the console and...
English Manual
Page 20
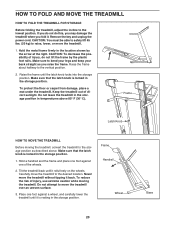
... TO FOLD AND MOVE THE TREADMILL HOW TO FOLD THE TREADMILL FOR STORAGE Before folding the treadmill, adjust the incline to the vertical position. 2. CAUTION: You must be able to safely lift 45 lbs. (20 kg) to the desired location. Raise the frame until it back. Make sure that the latch knob is locked in the storage position. 1. Make sure that the latch knob is locked...
... TO FOLD AND MOVE THE TREADMILL HOW TO FOLD THE TREADMILL FOR STORAGE Before folding the treadmill, adjust the incline to the vertical position. 2. CAUTION: You must be able to safely lift 45 lbs. (20 kg) to the desired location. Raise the frame until it back. Make sure that the latch knob is locked in the storage position. 1. Make sure that the latch knob is locked...
English Manual
Page 22
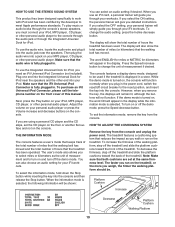
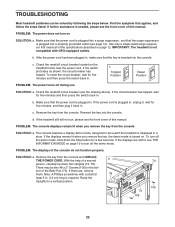
... INFORMATION MODE on the treadmill frame near the power cord. If the circuit breaker has tripped, wait for five minutes and then press the switch back in . c. d. PROBLEM: The console displays remain lit when you remove the key, the demo mode is needed, please see the front cover of the specifications described on page 12. Remove the key from the console. Raise the Uprights to turn off the demo mode. TROUBLESHOOTING Most treadmill problems can be two #8 x 2" Screws...
... INFORMATION MODE on the treadmill frame near the power cord. If the circuit breaker has tripped, wait for five minutes and then press the switch back in . c. d. PROBLEM: The console displays remain lit when you remove the key, the demo mode is needed, please see the front cover of the specifications described on page 12. Remove the key from the console. Raise the Uprights to turn off the demo mode. TROUBLESHOOTING Most treadmill problems can be two #8 x 2" Screws...
English Manual
Page 23
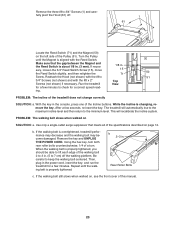
... the key. Rear Roller Bolts c. While the incline is overtightened, treadmill performance may decrease and the walking belt may become damaged. Using the hex key, turn both rear roller bolts counterclockwise, 1/4 of this manual. 23 sary, loosen the 3/4" Reed Switch Screw (15), move 15 the Reed Switch slightly, and then retighten the 71 50 Screw. Remove the key and UNPLUG THE POWER CORD. Make sure that meets all of the Incline buttons. b. When the walking belt is about 1/8 in the console, press...
... the key. Rear Roller Bolts c. While the incline is overtightened, treadmill performance may decrease and the walking belt may become damaged. Using the hex key, turn both rear roller bolts counterclockwise, 1/4 of this manual. 23 sary, loosen the 3/4" Reed Switch Screw (15), move 15 the Reed Switch slightly, and then retighten the 71 50 Screw. Remove the key and UNPLUG THE POWER CORD. Make sure that meets all of the Incline buttons. b. When the walking belt is about 1/8 in the console, press...
English Manual
Page 24
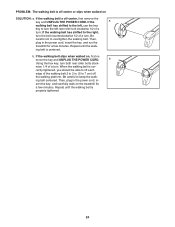
... or slips when walked on , first re- ing belt centered. move the key and UNPLUG THE POWER CORD. Then, plug in - ing belt is cor- Then, plug in the power cord, in the power cord, insert the key, and run the treadmill for a few minutes. Be careful not to turn the left , use the hex key to overtighten the walking belt. If the walking belt slips when walked on SOLUTION: a. PROBLEM: The walking belt is off the walking platform...
... or slips when walked on , first re- ing belt centered. move the key and UNPLUG THE POWER CORD. Then, plug in - ing belt is cor- Then, plug in the power cord, in the power cord, insert the key, and run the treadmill for a few minutes. Be careful not to turn the left , use the hex key to overtighten the walking belt. If the walking belt slips when walked on SOLUTION: a. PROBLEM: The walking belt is off the walking platform...
English Manual
Page 25
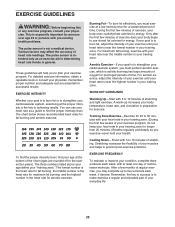
... level for a sustained period of heart rate readings. For maximum fat burning, exercise with at the proper intensity is intended only as a guide to the nearest ten years). A warm-up to five workouts each week, with your heart rate near the highest number in your exercise program. The pulse sensor is the key to use your condition, complete three workouts each week, if desired. Remember...
... level for a sustained period of heart rate readings. For maximum fat burning, exercise with at the proper intensity is intended only as a guide to the nearest ten years). A warm-up to five workouts each week, with your heart rate near the highest number in your exercise program. The pulse sensor is the key to use your condition, complete three workouts each week, if desired. Remember...
English Manual
Page 26
... 1 Front Roller/Pulley 15 1/2" Wire Tie Storage Latch Latch Knob Right Foot Rail Frame Rear Roller Bracket Rear Roller Left Rear Foot Right Rear Foot Hood Drive Belt 3/8" Jam Nut Drive Motor Lift Frame Wire Tie Controller Ground Wire Power Cord Power Cord Grommet Controller Reed Switch Reed Switch Clip Belly Pan Left Upright Incline Motor Left Upright Spacer Base Endcap Right Upright Right Upright Spacer Latch Endcap Base Pad Caution Decal Base Wheel Releasable Tie 8" Tie Access Door 5/16" Cage Nut Console Bolt Spacer Console Base Plastic Tie Incline Wire Handrail...
... 1 Front Roller/Pulley 15 1/2" Wire Tie Storage Latch Latch Knob Right Foot Rail Frame Rear Roller Bracket Rear Roller Left Rear Foot Right Rear Foot Hood Drive Belt 3/8" Jam Nut Drive Motor Lift Frame Wire Tie Controller Ground Wire Power Cord Power Cord Grommet Controller Reed Switch Reed Switch Clip Belly Pan Left Upright Incline Motor Left Upright Spacer Base Endcap Right Upright Right Upright Spacer Latch Endcap Base Pad Caution Decal Base Wheel Releasable Tie 8" Tie Access Door 5/16" Cage Nut Console Bolt Spacer Console Base Plastic Tie Incline Wire Handrail...
English Manual
Page 32
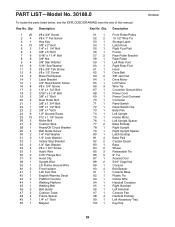
... (see the front cover of this manual) • the key number and description of the replacement part(s) (see the front cover of this manual. products used as store display models. ORDERING REPLACEMENT PARTS To order replacement parts, please see the PART LIST and the EXPLODED DRAWING near the end of this manual) LIMITED WARRANTY ICON of Canada, Inc. (ICON) warrants this product to be preauthorized by an ICON authorized service center; Parts and labor are...
... (see the front cover of this manual) • the key number and description of the replacement part(s) (see the front cover of this manual. products used as store display models. ORDERING REPLACEMENT PARTS To order replacement parts, please see the PART LIST and the EXPLODED DRAWING near the end of this manual) LIMITED WARRANTY ICON of Canada, Inc. (ICON) warrants this product to be preauthorized by an ICON authorized service center; Parts and labor are...


