
English Manual
Page 2
... any exercise program, consult your physician. Keep your back. 10. NordicTrack® is the responsibility of all instructions in a commercial, rental, or institutional setting. Cover the floor beneath the stepper to ensure that all users of the stepper are adequately informed of the owner to protect the floor or carpet. It is a registered...
... any exercise program, consult your physician. Keep your back. 10. NordicTrack® is the responsibility of all instructions in a commercial, rental, or institutional setting. Cover the floor beneath the stepper to ensure that all users of the stepper are adequately informed of the owner to protect the floor or carpet. It is a registered...
English Manual
Page 3
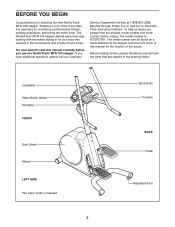
... before calling. To help us assist you, please note the product model number and serial number before you use the NordicTrack® MTN 750 stepper. For your home. The model number is one of the most effective exercises for increasing cardiovascular fitness, building endurance, ...and toning the entire body. The NordicTrack® MTN 750 stepper blends advanced engineering with the parts that are labeled in the convenience and privacy of the decal). Before reading further, please...
... before calling. To help us assist you, please note the product model number and serial number before you use the NordicTrack® MTN 750 stepper. For your home. The model number is one of the most effective exercises for increasing cardiovascular fitness, building endurance, ...and toning the entire body. The NordicTrack® MTN 750 stepper blends advanced engineering with the parts that are labeled in the convenience and privacy of the decal). Before reading further, please...

English Manual
Page 4
As you assemble the stepper, use the drawings below each drawing refers to the key number of the part, from the PART LIST on page 18. Note: Some small parts ... persons. Place all parts of the packing materials until assembly is not in a cleared area and remove the packing materials. Do not dispose of the stepper in the parts bag, check to the included allen wrenches, assembly requires an adjustable wrench and a rubber mallet .
As you assemble the stepper, use the drawings below each drawing refers to the key number of the part, from the PART LIST on page 18. Note: Some small parts ... persons. Place all parts of the packing materials until assembly is not in a cleared area and remove the packing materials. Do not dispose of the stepper in the parts bag, check to the included allen wrenches, assembly requires an adjustable wrench and a rubber mallet .

English Manual
Page 6
... two Handlebar Bushings (92) around the rectangular tube on the Upright. The Nylon Locknuts must be left side of the stepper are not pinched. Make sure that all parts of the Upright (3). Slide the Left Handlebar (6) onto the Handlebar Bushings and the tube on the left ...
... two Handlebar Bushings (92) around the rectangular tube on the Upright. The Nylon Locknuts must be left side of the stepper are not pinched. Make sure that all parts of the Upright (3). Slide the Left Handlebar (6) onto the Handlebar Bushings and the tube on the left ...
English Manual
Page 7
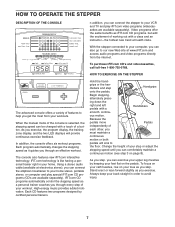
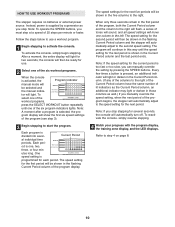
..., the training zone display, and the two LED displays will sink to our new Web site at health clubs. HOW TO EXERCISE ON THE STEPPER The advanced console offers a variety of each other, you must maintain a continuous motion or both pedals will provide continuous exercise feedback. High-energy... to your computer, you exercise. IFIT.com technology is selected, the stepping speed can also go to the floor. ous motion. With the stepper connected to your VCR and TV and play special iFIT.com CD programs (CDʼs are available separately). Stand erect or lean forward slightly...
..., the training zone display, and the two LED displays will sink to our new Web site at health clubs. HOW TO EXERCISE ON THE STEPPER The advanced console offers a variety of each other, you must maintain a continuous motion or both pedals will provide continuous exercise feedback. High-energy... to your computer, you exercise. IFIT.com technology is selected, the stepping speed can also go to the floor. ous motion. With the stepper connected to your VCR and TV and play special iFIT.com CD programs (CDʼs are available separately). Stand erect or lean forward slightly...
English Manual
Page 8
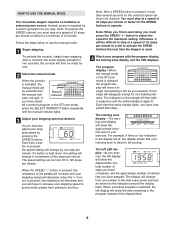
... for one number to the next every seven seconds, as shown by a built-in order to activate the SPEED buttons the next time the stepper is pressed, it will then be difficult to the floor. The left LED display-As you exercise, the left display will change from one...zone display will change by pressing the SPEED buttons. The display will show a triangle representing a hill. HOW TO USE THE MANUAL MODE The innovative stepper requires no batteries or external power source. the console will be ready for the SPEED buttons to be reached. Note: After a SPEED button is ...
... for one number to the next every seven seconds, as shown by a built-in order to activate the SPEED buttons the next time the stepper is pressed, it will then be difficult to the floor. The left LED display-As you exercise, the left display will change from one...zone display will change by pressing the SPEED buttons. The display will show a triangle representing a hill. HOW TO USE THE MANUAL MODE The innovative stepper requires no batteries or external power source. the console will be ready for the SPEED buttons to be reached. Note: After a SPEED button is ...
English Manual
Page 10
...for each period. Note: To operate the SPEED buttons, you manually override the speed setting, when the next period of the program begins, the stepper will show the first six speed settings of the program display. Note: A moment after a program is programmed for the second period will then be... shown in the flashing Current Period column and the stepper will be shown in this way until one column to the right. Each peri- the console will be ready for the last period is ...
...for each period. Note: To operate the SPEED buttons, you manually override the speed setting, when the next period of the program begins, the stepper will show the first six speed settings of the program display. Note: A moment after a program is programmed for the second period will then be... shown in the flashing Current Period column and the stepper will be shown in this way until one column to the right. Each peri- the console will be ready for the last period is ...

English Manual
Page 11
... PHONES LINE OUT LINE OUT PHONES Audio Cable Headphones AUDIO OUT RIGHT LEFT Audio Adapter Cable B. Do not use iFIT.com videocassettes, the stepper be connected to your portable CD player, portable stereo, home stereo, or computer with CD player. See pages 11 and 12 for connecting...adapter. C. Plug your headphones into the other end of the cable into the LINE OUT jack on your headphones into the other end of the stepper. Plug one jack, see instruction A below . Plug the Y-adapter into the PHONES jack. Plug your stereo. B PHONES PHONES Audio Cable ...
... PHONES LINE OUT LINE OUT PHONES Audio Cable Headphones AUDIO OUT RIGHT LEFT Audio Adapter Cable B. Do not use iFIT.com videocassettes, the stepper be connected to your portable CD player, portable stereo, home stereo, or computer with CD player. See pages 11 and 12 for connecting...adapter. C. Plug your headphones into the other end of the cable into the LINE OUT jack on your headphones into the other end of the stepper. Plug one jack, see instruction A below . Plug the Y-adapter into the PHONES jack. Plug your stereo. B PHONES PHONES Audio Cable ...

English Manual
Page 12
... see instruction A below. Plug the other end of the cable into the other end of the cable into the jack beneath the console of the stepper. Plug the adapter into the unused side of the cable into an RCA Y-adapter (available at electronics stores). Next, remove the wire that is ... A. If your stereo. Plug the adapter into the included adapter. Plug the other end of the cable into the jack beneath the console of the stepper. B Audio Cable PHONES 3.5mm Y-adapter Audio Cable RCA Y-adapter Adapter Headphones/Speakers Wire removed from LINE OUT jack 12 Plug the other end of ...
... see instruction A below. Plug the other end of the cable into the other end of the cable into the jack beneath the console of the stepper. Plug the adapter into the unused side of the cable into an RCA Y-adapter (available at electronics stores). Next, remove the wire that is ... A. If your stereo. Plug the adapter into the included adapter. Plug the other end of the cable into the jack beneath the console of the stepper. B Audio Cable PHONES 3.5mm Y-adapter Audio Cable RCA Y-adapter Adapter Headphones/Speakers Wire removed from LINE OUT jack 12 Plug the other end of ...

English Manual
Page 13
...For information about to change according to your VCR. Plug one end of the audio cable into the jack beneath the console of the stepper. Plug the adapter into the included adapter. After a moment, the entire display will begin guiding you have a TV with CD player... B ANT. After a moment, your workout. If you through your workout. An electronic "chirping" sound will light. See HOW TO CONNECT THE STEPPER TO YOUR CD PLAYER, VCR, OR COMPUTER on your CD player. Plug the Y-adapter into your personal trainerʼs instructions. Plug the other end...
...For information about to change according to your VCR. Plug one end of the audio cable into the jack beneath the console of the stepper. Plug the adapter into the included adapter. After a moment, the entire display will begin guiding you have a TV with CD player... B ANT. After a moment, your workout. If you through your workout. An electronic "chirping" sound will light. See HOW TO CONNECT THE STEPPER TO YOUR CD PLAYER, VCR, OR COMPUTER on your CD player. Plug the Y-adapter into your personal trainerʼs instructions. Plug the other end...

English Manual
Page 14
... of your progress with the program display, the training zone display, and the LED displays. To use programs from our internet site, the stepper must have an internet connection and an internet service provider. See HOW TO CONNECT YOUR COMPUTER on page 8. Follow the steps below to use...instructions to your computer and start an internet connection. 2 Start your workout. When you start the program. When the console is heard, the stepper will then be found on -line instructions for details. By adding an optional upgrade module to the settings for the program. 7 Watch your...
... of your progress with the program display, the training zone display, and the LED displays. To use programs from our internet site, the stepper must have an internet connection and an internet service provider. See HOW TO CONNECT YOUR COMPUTER on page 8. Follow the steps below to use...instructions to your computer and start an internet connection. 2 Start your workout. When you start the program. When the console is heard, the stepper will then be found on -line instructions for details. By adding an optional upgrade module to the settings for the program. 7 Watch your...
English Manual
Page 15
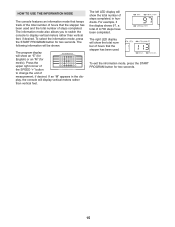
... to switch the console to change the unit of measurement, if desired. The left LED display will show the total number of hours that the stepper has been used . For example, if the display shows 97, a total of the SPEED "+" button to display vertical meters rather than vertical feet. If an... in hundreds. HOW TO USE THE INFORMATION MODE The console features an information mode that keeps track of the total number of hours that the stepper has been used and the total number of steps completed. Press the upper right corner of 9,700 steps have been completed. To exit the ...
... to switch the console to change the unit of measurement, if desired. The left LED display will show the total number of hours that the stepper has been used . For example, if the display shows 97, a total of the SPEED "+" button to display vertical meters rather than vertical feet. If an... in hundreds. HOW TO USE THE INFORMATION MODE The console features an information mode that keeps track of the total number of hours that the stepper has been used and the total number of steps completed. Press the upper right corner of 9,700 steps have been completed. To exit the ...
English Manual
Page 16
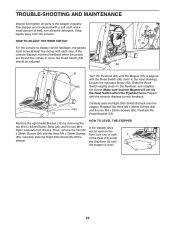
...parts of the Feet (15) under the Stabilizer (2) until the console displays correct feedback. 26 Carefully slide the Right Side Shield (8) back onto the stepper. Keep liquids away from the console. HOW TO ADJUST THE REED SWITCH For the console to display correct feedback, the pedals must move at least...Reed Switch (56) (refer to the Flywheel, and retighten the Screw. Slide the Reed 65 Switch slightly closer to the inset drawing). Repeat until the stepper is aligned with each step. Remove the right Pedal Bracket (13) by removing the two M10 x 82mm Button Bolts (26) and the two M10...
...parts of the Feet (15) under the Stabilizer (2) until the console displays correct feedback. 26 Carefully slide the Right Side Shield (8) back onto the stepper. Keep liquids away from the console. HOW TO ADJUST THE REED SWITCH For the console to display correct feedback, the pedals must move at least...Reed Switch (56) (refer to the Flywheel, and retighten the Screw. Slide the Reed 65 Switch slightly closer to the inset drawing). Repeat until the stepper is aligned with each step. Remove the right Pedal Bracket (13) by removing the two M10 x 82mm Button Bolts (26) and the two M10...
English Manual
Page 20
... ship to give the following information when calling: • The MODEL NUMBER of the product (NTST07901) • The NAME of the product (NordicTrack® MTN 750 stepper) • The SERIAL NUMBER of the product (see the front cover of this manual) • The KEY NUMBER and DESCRIPTION of the part...our Customer Service Department of any defect within 10 days after the date of this manual) LIMITED WARRANTY WHAT IS COVERED-The entire NordicTrack® MTN 750 stepper ("Product") is in lieu of any person receiving the Product as set forth herein. No one is covered for one year after...
... ship to give the following information when calling: • The MODEL NUMBER of the product (NTST07901) • The NAME of the product (NordicTrack® MTN 750 stepper) • The SERIAL NUMBER of the product (see the front cover of this manual) • The KEY NUMBER and DESCRIPTION of the part...our Customer Service Department of any defect within 10 days after the date of this manual) LIMITED WARRANTY WHAT IS COVERED-The entire NordicTrack® MTN 750 stepper ("Product") is in lieu of any person receiving the Product as set forth herein. No one is covered for one year after...