

English Manual
Page 1
... CAUTION Read all precautions and instructions in this manual before using this manual for future reference. NTST07901 Serial No. Serial Number Decal (on our customer hot line will guarantee complete satisfaction through direct assistance from our factory. The trained technicians on frame) QUESTIONS? As a manufacturer, we are missing parts, we will provide immediate assistance, free of charge to providing complete customer...
... CAUTION Read all precautions and instructions in this manual before using this manual for future reference. NTST07901 Serial No. Serial Number Decal (on our customer hot line will guarantee complete satisfaction through direct assistance from our factory. The trained technicians on frame) QUESTIONS? As a manufacturer, we are missing parts, we will provide immediate assistance, free of charge to providing complete customer...
English Manual
Page 2
... the owner to protect the floor or carpet. do not arch your back straight when using the stepper. 2. NordicTrack® is the responsibility of this or any worn parts immediately. 7. Read all users of the stepper are adequately informed of ICON Health & Fitness, Inc. 2 Cover the floor beneath the stepper to ensure that all instructions in a commercial, rental, or institutional setting. Replace any exercise program...
... the owner to protect the floor or carpet. do not arch your back straight when using the stepper. 2. NordicTrack® is the responsibility of this or any worn parts immediately. 7. Read all users of the stepper are adequately informed of ICON Health & Fitness, Inc. 2 Cover the floor beneath the stepper to ensure that all instructions in a commercial, rental, or institutional setting. Replace any exercise program...
English Manual
Page 3
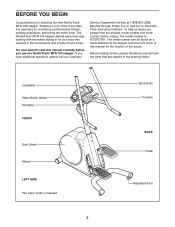
... body. For your home. The model number is one of the decal). If you enjoy this manual for the location of the most effective exercises for selecting the new NordicTrack® MTN 750 stepper. until 6 p.m. Mountain Time (excluding holidays). Handlebar Water Bottle Holder* Handgrip FRONT Side Shield Wheel LEFT SIDE *No water bottle is included 3 Book Rack Console BACK Pedal Adjustable Foot The NordicTrack...
... body. For your home. The model number is one of the decal). If you enjoy this manual for the location of the most effective exercises for selecting the new NordicTrack® MTN 750 stepper. until 6 p.m. Mountain Time (excluding holidays). Handlebar Water Bottle Holder* Handgrip FRONT Side Shield Wheel LEFT SIDE *No water bottle is included 3 Book Rack Console BACK Pedal Adjustable Foot The NordicTrack...

English Manual
Page 4
... Washer (30)-10 M8 Split Washer (54)-4 M8 x 35mm Button Bolt (24)-4 Console Screw (57)-4 M10 x 48mm Button Screw (99)-4 M10 x 82mm Bolt (26)-4 M10 x 91mm Bolt (63)-2 4 Place all parts of the packing materials until assembly is not in the parts bag, check to the quantity used in assembly. The second number refers to see if it has been pre-assembled. ASSEMBLY Assembly requires two persons.
... Washer (30)-10 M8 Split Washer (54)-4 M8 x 35mm Button Bolt (24)-4 Console Screw (57)-4 M10 x 48mm Button Screw (99)-4 M10 x 82mm Bolt (26)-4 M10 x 91mm Bolt (63)-2 4 Place all parts of the packing materials until assembly is not in the parts bag, check to the quantity used in assembly. The second number refers to see if it has been pre-assembled. ASSEMBLY Assembly requires two persons.

English Manual
Page 5
... Harness out of the top of the Button Bolts. Attach the Upright with four M10 x 48mm Button Screws (99) and four M10 Split Washers (30). 1 2 30 30 99 2. Insert an M10 x 82mm Button Bolt (26) into the Pedal Bracket and the Lower Pedal Leg. 1. Insert an M10 x 82mm Button Bolt (26) into the Pedal Bracket and the Right Pedal Leg. Tighten an M10 Nylon Locknut (27) onto each...
... Harness out of the top of the Button Bolts. Attach the Upright with four M10 x 48mm Button Screws (99) and four M10 Split Washers (30). 1 2 30 30 99 2. Insert an M10 x 82mm Button Bolt (26) into the Pedal Bracket and the Lower Pedal Leg. 1. Insert an M10 x 82mm Button Bolt (26) into the Pedal Bracket and the Right Pedal Leg. Tighten an M10 Nylon Locknut (27) onto each...

English Manual
Page 6
... on the Upright. Insert any slack wire into the Upright. Make sure that all parts of the Upright (3). Make sure that the console wire and the Extension Wire (77) are properly tightened. Attach the Left Handlebar with four Console Screws (57) and four M10 Split Washers (30). While another person holds the Console (4) near the Upright (3), connect the console wire to the Upright (3) with two M8 x 35mm Button Bolts (24...
... on the Upright. Insert any slack wire into the Upright. Make sure that all parts of the Upright (3). Make sure that the console wire and the Extension Wire (77) are properly tightened. Attach the Left Handlebar with four Console Screws (57) and four M10 Split Washers (30). While another person holds the Console (4) near the Upright (3), connect the console wire to the Upright (3) with two M8 x 35mm Button Bolts (24...
English Manual
Page 7
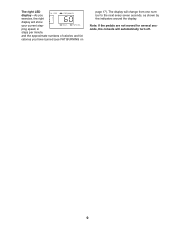
... workout programs. Each program automatically changes the stepping speed as a personal trainer coaches you through an effective workout. Using a stereo audio cable (available at health clubs. Hold the hand- ous motion. As you step, you can connect the elliptical crosstrainer to avoid injury. 7 When the manual mode of the console is like having a personal trainer right in order to your upper leg muscles by certified personal trainers. ing down the right and left pedals...
... workout programs. Each program automatically changes the stepping speed as a personal trainer coaches you through an effective workout. Using a stereo audio cable (available at health clubs. Hold the hand- ous motion. As you step, you can connect the elliptical crosstrainer to avoid injury. 7 When the manual mode of the console is like having a personal trainer right in order to your upper leg muscles by certified personal trainers. ing down the right and left pedals...
English Manual
Page 8
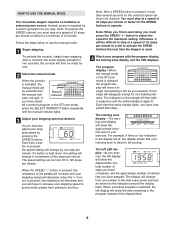
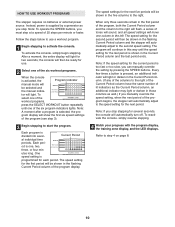
... the manual indicator lights. 3 Adjust your progress with the program display, the training zone display, and the LED displays. Each time the entire triangle lights, you have to increase your stepping speed to prevent both pedals from sinking to the maximum setting. To activate the console, simply begin stepping. the console will disappear except for one flashing indicator. ed a workout program or the iFIT.com mode, press the SELECT WORKOUT button...
... the manual indicator lights. 3 Adjust your progress with the program display, the training zone display, and the LED displays. Each time the entire triangle lights, you have to increase your stepping speed to prevent both pedals from sinking to the maximum setting. To activate the console, simply begin stepping. the console will disappear except for one flashing indicator. ed a workout program or the iFIT.com mode, press the SELECT WORKOUT button...
English Manual
Page 9
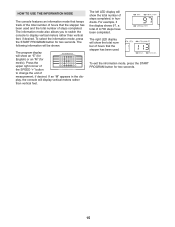
The right LED display-As you exercise, the right display will change from one number to the next every seven seconds, as shown by the indicators around the display. The display will show your current stepping speed, in steps per minute, and the approximate numbers of calories and fat calories you have burned (see FAT BURNING on page 17). Note: If the pedals are not moved for several seconds, the console will automatically turn off. 9
The right LED display-As you exercise, the right display will change from one number to the next every seven seconds, as shown by the indicators around the display. The display will show your current stepping speed, in steps per minute, and the approximate numbers of calories and fat calories you have burned (see FAT BURNING on page 17). Note: If the pedals are not moved for several seconds, the console will automatically turn off. 9
English Manual
Page 10
... manually override the speed setting, when the next period of the workout programs, press the SELECT WORKOUT button repeatedly until the speed setting for the next period. Every few times a button is too fast or too slow, you stop stepping for two seconds; To reactivate the console, simply resume stepping. 4 Watch your progress with the program display, the training zone display, and the LED displays. Follow the steps below to start the program...
... manually override the speed setting, when the next period of the workout programs, press the SELECT WORKOUT button repeatedly until the speed setting for the next period. Every few times a button is too fast or too slow, you stop stepping for two seconds; To reactivate the console, simply resume stepping. 4 Watch your progress with the program display, the training zone display, and the LED displays. Follow the steps below to start the program...

English Manual
Page 11
To use iFIT.com programs directly from our internet site, the stepper must be connected to your home computer. See page 12. Plug one end of the audio cable into an AUDIO OUT jack on your CD player. Plug the other end of the Y-adapter. Plug the adapter into the jack beneath the console of the stepper. A. Plug one end of the audio cable into a 3.5mm Y-adapter (available at electronics...
To use iFIT.com programs directly from our internet site, the stepper must be connected to your home computer. See page 12. Plug one end of the audio cable into an AUDIO OUT jack on your CD player. Plug the other end of the Y-adapter. Plug the adapter into the jack beneath the console of the stepper. A. Plug one end of the audio cable into a 3.5mm Y-adapter (available at electronics...

English Manual
Page 12
... on your computer. Plug the other end of the cable into an RCA Y-adapter (available at electronics stores). Next, remove the wire that is being used, see instruction A below. Plug your stereo has an unused LINE OUT jack, see instruction B. A A CD VCR Amp LINE OUT LINE OUT Audio Adapter Cable LINE OUT Audio Cable B. HOW TO CONNECT YOUR HOME STEREO HOW TO CONNECT YOUR COMPUTER Note: If...
... on your computer. Plug the other end of the cable into an RCA Y-adapter (available at electronics stores). Next, remove the wire that is being used, see instruction A below. Plug your stereo has an unused LINE OUT jack, see instruction B. A A CD VCR Amp LINE OUT LINE OUT Audio Adapter Cable LINE OUT Audio Cable B. HOW TO CONNECT YOUR HOME STEREO HOW TO CONNECT YOUR COMPUTER Note: If...

English Manual
Page 13
... the audio cable into an RCA Y-adapter (available at elec- Plug one end of iFIT.com CDʼs or videocassettes, call toll-free 1-800-884-0620. B. To activate the console, simply begin guiding you when the speed setting is heard, the stepper will automatically change . HOW TO CONNECT YOUR VCR Note: If your personal trainerʼs instructions. When the console is connected to use . 3 Select the iFIT.com mode...
... the audio cable into an RCA Y-adapter (available at elec- Plug one end of iFIT.com CDʼs or videocassettes, call toll-free 1-800-884-0620. B. To activate the console, simply begin guiding you when the speed setting is heard, the stepper will automatically change . HOW TO CONNECT YOUR VCR Note: If your personal trainerʼs instructions. When the console is connected to use . 3 Select the iFIT.com mode...

English Manual
Page 14
... displays. HOW TO USE PROGRAMS DIRECTLY FROM OUR INTERNET SITE Our new internet site at www.iFIT.com. 3 Follow the desired links on page 8. See HOW TO CONNECT YOUR COMPUTER on -screen countdown will alert you when the speed setting is about to change according to the console, you can use . 6 Select the iFIT.com mode and begin stepping. If the speed setting is lit. • Adjust...
... displays. HOW TO USE PROGRAMS DIRECTLY FROM OUR INTERNET SITE Our new internet site at www.iFIT.com. 3 Follow the desired links on page 8. See HOW TO CONNECT YOUR COMPUTER on -screen countdown will alert you when the speed setting is about to change according to the console, you can use . 6 Select the iFIT.com mode and begin stepping. If the speed setting is lit. • Adjust...
English Manual
Page 15
... used . The information mode also allows you to switch the console to change the unit of measurement, if desired. The left LED display will display vertical meters rather than vertical feet, if desired. If an "M" appears in hundreds. To exit the information mode, press the START PROGRAM button for two seconds. 15 The right LED display will show the total number of steps completed, in the display, the console...
... used . The information mode also allows you to switch the console to change the unit of measurement, if desired. The left LED display will display vertical meters rather than vertical feet, if desired. If an "M" appears in hundreds. To exit the information mode, press the START PROGRAM button for two seconds. 15 The right LED display will show the total number of steps completed, in the display, the console...
English Manual
Page 16
... the Magnet will not hit the Reed Switch when the Flywheel turns. Remove the right Pedal Bracket (13) by removing the two M10 x 82mm Button Bolts (26) and the two M10 Nylon Locknuts (not shown). Reattach the three M4 x 38mm Screws (64) 64 and the two M4 x 25mm Screws (65). TROUBLE-SHOOTING AND MAINTENANCE Inspect and tighten all parts of mild, non-abrasive detergent...
... the Magnet will not hit the Reed Switch when the Flywheel turns. Remove the right Pedal Bracket (13) by removing the two M10 x 82mm Button Bolts (26) and the two M10 Nylon Locknuts (not shown). Reattach the three M4 x 38mm Screws (64) 64 and the two M4 x 25mm Screws (65). TROUBLE-SHOOTING AND MAINTENANCE Inspect and tighten all parts of mild, non-abrasive detergent...
English Manual
Page 17
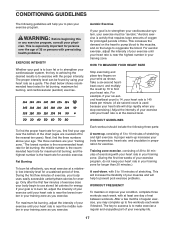
... the result by using your exercise program. For maximum fat burning, adjust the intensity of exercise does your exercise must exercise at the desired level. Training zone exercise, consisting of 20 to 30 minutes of exercising with your heart rate in your training zone. (During the first few minutes of your exercise until your heart rate is to strengthen your cardiovascular system, your body begin to the...
... the result by using your exercise program. For maximum fat burning, adjust the intensity of exercise does your exercise must exercise at the desired level. Training zone exercise, consisting of 20 to 30 minutes of exercising with your heart rate in your training zone. (During the first few minutes of your exercise until your heart rate is to strengthen your cardiovascular system, your body begin to the...

English Manual
Page 18
... Arm 85 1 M4 x 16mm Button Screw 86 4 "J" Bolt 87 6 M8 Split Washer 88 2 Lower Pedal Leg Weld Spacer 89 2 Reed Switch/Wire 90 4 Console Screw 91 1 Reed Switch Bracket 92 4 Mounting Bracket 93 2 M6 x 15mm Button Screw 94 2 Upper Pedal Leg Weld Spacer 95 4 M8 x 48mm Bolt 96 2 M10 x 91mm Button Screw 97 1 M4 x 38mm Screw 98 2 M4 x 25mm Screw 99 4 Wheel Cover # 1 Wheel # 1 Wheel Hub Note: # indicates a non-illustrated part. Specifications are subject to change without...
... Arm 85 1 M4 x 16mm Button Screw 86 4 "J" Bolt 87 6 M8 Split Washer 88 2 Lower Pedal Leg Weld Spacer 89 2 Reed Switch/Wire 90 4 Console Screw 91 1 Reed Switch Bracket 92 4 Mounting Bracket 93 2 M6 x 15mm Button Screw 94 2 Upper Pedal Leg Weld Spacer 95 4 M8 x 48mm Bolt 96 2 M10 x 91mm Button Screw 97 1 M4 x 38mm Screw 98 2 M4 x 25mm Screw 99 4 Wheel Cover # 1 Wheel # 1 Wheel Hub Note: # indicates a non-illustrated part. Specifications are subject to change without...
English Manual
Page 19
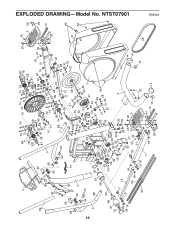
... 94 19 20 2318 52 15 11 27 18 13 15 14 26 28 25 9 26 26 13 28 65 8 64 48 R0303A EXPLODED DRAWING-Model No.
... 94 19 20 2318 52 15 11 27 18 13 15 14 26 28 25 9 26 26 13 28 65 8 64 48 R0303A EXPLODED DRAWING-Model No.
English Manual
Page 20
..., improper assembly or installation, alterations, modifications without charge, any implied warranties of merchantability or fitness for a particular purpose is limited in its scope and duration to use , costs of removal, installation or other warranties and any replacement part or component, providing the repairs are authorized by ICON first and are performed by failure on your part to the terms set out in your Userʼs Manual ("Manual"). as instructed...
..., improper assembly or installation, alterations, modifications without charge, any implied warranties of merchantability or fitness for a particular purpose is limited in its scope and duration to use , costs of removal, installation or other warranties and any replacement part or component, providing the repairs are authorized by ICON first and are performed by failure on your part to the terms set out in your Userʼs Manual ("Manual"). as instructed...


