

English Manual
Page 1
... provide immediate assistance, free of charge to providing complete customer satisfaction. Patent Pending Model No. MST CAUTION Read all precautions and instructions in this manual before using this manual for future reference. ¨ USERÕS MANUAL Visit our website at www.nordictrack.com new products, prizes, fitness tips, and much more! NTSY09990 Serial No.
... provide immediate assistance, free of charge to providing complete customer satisfaction. Patent Pending Model No. MST CAUTION Read all precautions and instructions in this manual before using this manual for future reference. ¨ USERÕS MANUAL Visit our website at www.nordictrack.com new products, prizes, fitness tips, and much more! NTSY09990 Serial No.

English Manual
Page 2
... charge, any defected part for replacement or, if necessary, the entire product, for one is covered by warranty. as your UserÕs Manual (ÒManualÓ). Before shipping, always obtain a Return Authorization Number (RA No.) from state to you , without our written authorization or by an ...of this limited warranty. Limited Warranty WHAT IS COVEREDÑThe entire NordicTrack¨ GRT500 Training System (ÒProductÓ) is VERY IMPORTANT THAT YOU READ THE MANUAL before operating the Product. USERÕS MANUALÑIt is warranted to you may not apply to be free ...
... charge, any defected part for replacement or, if necessary, the entire product, for one is covered by warranty. as your UserÕs Manual (ÒManualÓ). Before shipping, always obtain a Return Authorization Number (RA No.) from state to you , without our written authorization or by an ...of this limited warranty. Limited Warranty WHAT IS COVEREDÑThe entire NordicTrack¨ GRT500 Training System (ÒProductÓ) is VERY IMPORTANT THAT YOU READ THE MANUAL before operating the Product. USERÕS MANUALÑIt is warranted to you may not apply to be free ...
English Manual
Page 3
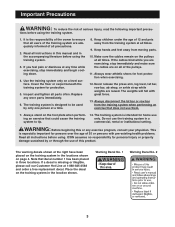
... training system for foot protection when exercising. 12. Place the decal on the foot plate when perform- 14. Keep children under the age of this manual and in a system to ensure that could cause the training only. If the cables bind while you feel pain or dizziness at the right have...
... training system for foot protection when exercising. 12. Place the decal on the foot plate when perform- 14. Keep children under the age of this manual and in a system to ensure that could cause the training only. If the cables bind while you feel pain or dizziness at the right have...
English Manual
Page 4
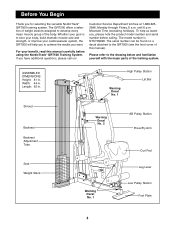
... To help you to the drawing below and familiarize yourself with the major parts of this manual carefully before calling. Please refer to achieve the results you for selecting the versatile NordicTrack¨ GRT500 training system. The model number is to tone your body, build dramatic muscle... size and strength, or improve your benefit, read this manual). The serial number can be found on a decal attached to...
... To help you to the drawing below and familiarize yourself with the major parts of this manual carefully before calling. Please refer to achieve the results you for selecting the versatile NordicTrack¨ GRT500 training system. The model number is to tone your body, build dramatic muscle... size and strength, or improve your benefit, read this manual). The serial number can be found on a decal attached to...
English Manual
Page 5
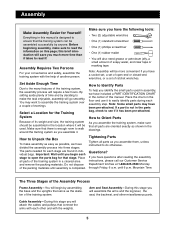
... (1) rubber mallet ¥ You will be assembled successfully by assembling the base and the uprights that connect the arms with each other miscellaneous parts. this manual. Important: Wait until you assemble it takes to open -end or closed-end wrenches, or a set of another person. Tightening Parts Tighten all parts are... also need grease or petroleum jelly, a small amount of its weight and size, the training system should be more time than it . Everything in this manual is not in a cleared area and remove the packing materials.
... (1) rubber mallet ¥ You will be assembled successfully by assembling the base and the uprights that connect the arms with each other miscellaneous parts. this manual. Important: Wait until you assemble it takes to open -end or closed-end wrenches, or a set of another person. Tightening Parts Tighten all parts are... also need grease or petroleum jelly, a small amount of its weight and size, the training system should be more time than it . Everything in this manual is not in a cleared area and remove the packing materials.
English Manual
Page 7
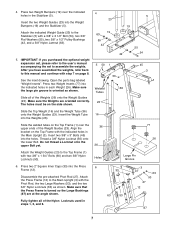
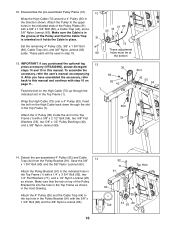
...holes in the Stabilizer (5). Make sure that the Press Frame is oriented as shown. IMPORTANT: If you have assembled the weights, refer back to this manual and continue with two 3/8Ó x 1 3/4Ó Bolts (60) and two 3/8Ó Nylon Locknuts (50). After you purchased the optional weight ...expansion set, please refer to the userÕs manual accompanying the set to the Stabilizer (5) with the indicated holes in steps 1, 2, and 6. 33 63 53 3 63 53 27 12 87 7 Press two ...
...holes in the Stabilizer (5). Make sure that the Press Frame is oriented as shown. IMPORTANT: If you have assembled the weights, refer back to this manual and continue with two 3/8Ó x 1 3/4Ó Bolts (60) and two 3/8Ó Nylon Locknuts (50). After you purchased the optional weight ...expansion set, please refer to the userÕs manual accompanying the set to the Stabilizer (5) with the indicated holes in steps 1, 2, and 6. 33 63 53 3 63 53 27 12 87 7 Press two ...
English Manual
Page 10
... (73) up through the slot in the Pulley Bracket (91) with step 16 on the High Cable back down through the indicated slot in this manual and continue with the 3/8Ó x 1 3/4Ó Bolt (60) and the 3/8Ó Nylon Locknut (63). 25 Tab 44 35 60 10 12. Disassemble the... adjustment holes must be used in the direction shown. These parts will be at the bottom 13. To assemble the accessory, refer the userÕs manual accompanying it holds the Cable in the Top Frame (1) with a 3/8Ó x 1 3/4Ó Bolt (60), a Cable Trap (44), and a 3/8Ó Nylon Jamnut (63). Save ...
... (73) up through the slot in the Pulley Bracket (91) with step 16 on the High Cable back down through the indicated slot in this manual and continue with the 3/8Ó x 1 3/4Ó Bolt (60) and the 3/8Ó Nylon Locknut (63). 25 Tab 44 35 60 10 12. Disassemble the... adjustment holes must be used in the direction shown. These parts will be at the bottom 13. To assemble the accessory, refer the userÕs manual accompanying it holds the Cable in the Top Frame (1) with a 3/8Ó x 1 3/4Ó Bolt (60), a Cable Trap (44), and a 3/8Ó Nylon Jamnut (63). Save ...
English Manual
Page 15
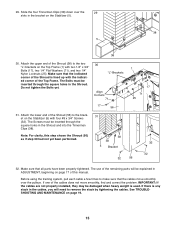
... is used. Make sure that all parts have been properly tightened. Slide the four Tinnerman Clips (38) down over the pulleys. Note: For clarity, this manual. The use of the Shroud (56) to remove the slack by tightening the cables. Attach the lower end of the remaining parts will need to...
... is used. Make sure that all parts have been properly tightened. Slide the four Tinnerman Clips (38) down over the pulleys. Note: For clarity, this manual. The use of the Shroud (56) to remove the slack by tightening the cables. Attach the lower end of the remaining parts will need to...

English Manual
Page 17
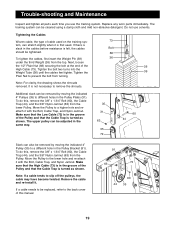
... see how the training system should be connected between the accessory and the cable so the accessory is touching the Weights. The setting of this manual to be performed. Use the WEIGHT RESISTANCE CHART on the back cover of the weight stack can be performed.
... see how the training system should be connected between the accessory and the cable so the accessory is touching the Weights. The setting of this manual to be performed. Use the WEIGHT RESISTANCE CHART on the back cover of the weight stack can be performed.
English Manual
Page 19
... the 3/8Ó Nylon Jamnut (63) from turning. Remove the cable and re-install it with the Bolt, Cable Trap, and Nylon Jamnut. To do this manual. 91 63 73 60 44 35 19 Tighten the bolt two turns into the Weight Tube (36) until the cables feel tighter. Make sure that...
... the 3/8Ó Nylon Jamnut (63) from turning. Remove the cable and re-install it with the Bolt, Cable Trap, and Nylon Jamnut. To do this manual. 91 63 73 60 44 35 19 Tighten the bolt two turns into the Weight Tube (36) until the cables feel tighter. Make sure that...

English Manual
Page 23
... Knob 1Ó Round Inner Cap Pulley Bracket 1/4Ó x 3 3/4Ó Bolt Tab Spacer Hole Plug 5/16Ó x 2 1/2Ó Bolt Fender Washer 1/4Ó x 1Ó Bolt UserÕs Manual Exercise Poster Part ListÑModel No. Qty. 1 1 2 1 3 1 4 1 5 1 6 1 7 1 8 1 9 2 10 1 11 1 12 1 13 1 14 2 15 1 16 1 17 14 18 6 19 2 20 2 21 3 22 1 23 2 24 3 25...
... Knob 1Ó Round Inner Cap Pulley Bracket 1/4Ó x 3 3/4Ó Bolt Tab Spacer Hole Plug 5/16Ó x 2 1/2Ó Bolt Fender Washer 1/4Ó x 1Ó Bolt UserÕs Manual Exercise Poster Part ListÑModel No. Qty. 1 1 2 1 3 1 4 1 5 1 6 1 7 1 8 1 9 2 10 1 11 1 12 1 13 1 14 2 15 1 16 1 17 14 18 6 19 2 20 2 21 3 22 1 23 2 24 3 25...
English Manual
Page 25
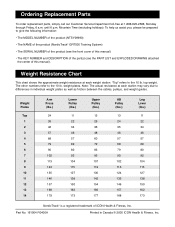
...135 146 157 168 Leg Lever (lbs.) 11 22 34 46 57 69 80 92 104 115 127 138 150 162 173 NordicTrack¨ is a registered trademark of this manual). Part No. 161904 R0400A Printed in individual weight plates as well as friction between the cables, pulleys, and weight guides. weight...information: ¥ The MODEL NUMBER of the product (NTSY09990) ¥ The NAME of the product (NordicTrack¨ GRT500 Training System) ¥ The SERIAL NUMBER of the product (see the front cover of this manual) ¥ The KEY NUMBER and DESCRIPTION of the part(s) (see the PART LIST and EXPLODED DRAWING ...
...135 146 157 168 Leg Lever (lbs.) 11 22 34 46 57 69 80 92 104 115 127 138 150 162 173 NordicTrack¨ is a registered trademark of this manual). Part No. 161904 R0400A Printed in individual weight plates as well as friction between the cables, pulleys, and weight guides. weight...information: ¥ The MODEL NUMBER of the product (NTSY09990) ¥ The NAME of the product (NordicTrack¨ GRT500 Training System) ¥ The SERIAL NUMBER of the product (see the front cover of this manual) ¥ The KEY NUMBER and DESCRIPTION of the part(s) (see the PART LIST and EXPLODED DRAWING ...

