

English Manual
Page 1
Serial Number Decal QUESTIONS? If you have questions, or if there are missing parts, we are committed to you. The trained technicians on our customer hot line will guarantee complete satisfaction through direct assistance from our factory. MST ... No. The serial number is found in this manual before using this manual for future reference. ¨ USERÕS MANUAL Visit our website at www.nordictrack.com new products, prizes, fitness tips, and much more! As a manufacturer, we will provide immediate assistance, free of charge to providing complete customer satisfaction. ...
Serial Number Decal QUESTIONS? If you have questions, or if there are missing parts, we are committed to you. The trained technicians on our customer hot line will guarantee complete satisfaction through direct assistance from our factory. MST ... No. The serial number is found in this manual before using this manual for future reference. ¨ USERÕS MANUAL Visit our website at www.nordictrack.com new products, prizes, fitness tips, and much more! As a manufacturer, we will provide immediate assistance, free of charge to providing complete customer satisfaction. ...

English Manual
Page 2
...failures or damage caused by unauthorized service, misuse, accident, negligence, improper assembly or installation, alterations, modifications without charge, any replacement part or component, providing the repairs are authorized by ICON first and are attached in the Manual to you . notify our Customer ...damages. ICON HEALTH & FITNESS, INC., 1500 S. 1000 W., LOGAN, UT 84321-9813 2 Limited Warranty WHAT IS COVEREDÑThe entire NordicTrack¨ GRT500 Training System (ÒProductÓ) is not responsible or liable for indirect, special or consequential damages arising out of or in...
...failures or damage caused by unauthorized service, misuse, accident, negligence, improper assembly or installation, alterations, modifications without charge, any replacement part or component, providing the repairs are authorized by ICON first and are attached in the Manual to you . notify our Customer ...damages. ICON HEALTH & FITNESS, INC., 1500 S. 1000 W., LOGAN, UT 84321-9813 2 Limited Warranty WHAT IS COVEREDÑThe entire NordicTrack¨ GRT500 Training System (ÒProductÓ) is not responsible or liable for indirect, special or consequential damages arising out of or in...
English Manual
Page 3
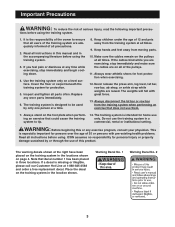
Read all parts often. If you are adequately informed of the training system are exercising, stop immediately and begin cooling down. 4. Keep hands and feet away from the ... an exercise that decal number 1 has been placed in the locations shown on all of 12 and pets away from moving parts. 10. WARNING: Before beginning this or any worn parts immediately. 6. ICON assumes no responsibility for home use the training system in the location shown. If a decal is intended for personal...
Read all parts often. If you are adequately informed of the training system are exercising, stop immediately and begin cooling down. 4. Keep hands and feet away from the ... an exercise that decal number 1 has been placed in the locations shown on all of 12 and pets away from moving parts. 10. WARNING: Before beginning this or any worn parts immediately. 6. ICON assumes no responsibility for home use the training system in the location shown. If a decal is intended for personal...
English Manual
Page 4
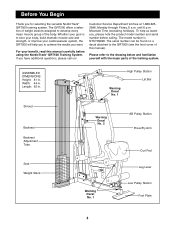
...questions, please call our Customer Service Department toll-free at 1-888-8252588, Monday through Friday, 6 a.m. If you for selecting the versatile NordicTrack¨ GRT500 training system. ASSEMBLED DIMENSIONS: Height: 81 in . Whether your goal is NTSY09990. Please refer to develop every major muscle group... Time (excluding holidays). The GRT500 offers a selection of weight stations designed to the drawing below and familiarize yourself with the major parts of the body. For your cardiovascular system, the GRT500 will help us assist you, please note the product model number and serial...
...questions, please call our Customer Service Department toll-free at 1-888-8252588, Monday through Friday, 6 a.m. If you for selecting the versatile NordicTrack¨ GRT500 training system. ASSEMBLED DIMENSIONS: Height: 81 in . Whether your goal is NTSY09990. Please refer to develop every major muscle group... Time (excluding holidays). The GRT500 offers a selection of weight stations designed to the drawing below and familiarize yourself with the major parts of the body. For your cardiovascular system, the GRT500 will help us assist you, please note the product model number and serial...
English Manual
Page 5
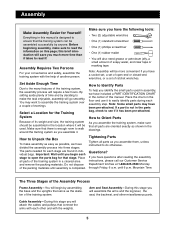
...209;You will save you assemble it ! Arm and Seat AssemblyÑDuring this brief introduction will begin each other miscellaneous parts. How to Unpack the Box To make sure that connect the arms with each stage to assemble the training system over...; One (1) standard screwdriver ¥ One (1) phillips screwdriver ¥ One (1) rubber mallet ¥ You will go smoothly. Questions? Tightening Parts Tighten all parts are found in a cleared area and remove the packing materials. Before beginning assembly, make the task enjoyable, assembly will also need grease or ...
...209;You will save you assemble it ! Arm and Seat AssemblyÑDuring this brief introduction will begin each other miscellaneous parts. How to Unpack the Box To make sure that connect the arms with each stage to assemble the training system over...; One (1) standard screwdriver ¥ One (1) phillips screwdriver ¥ One (1) rubber mallet ¥ You will go smoothly. Questions? Tightening Parts Tighten all parts are found in a cleared area and remove the packing materials. Before beginning assembly, make the task enjoyable, assembly will also need grease or ...
English Manual
Page 6
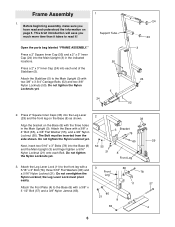
... (8) as shown. 33 Align the bracket on page 5. Frame Assembly 1. Before beginning assembly, make sure you much more time than it ! 1 Support Tube Open the parts bag labeled ÒFRAME ASSEMBLY.Ó Press a 2Ó Square Inner Cap (33) and a 2Ó x 3Ó Inner Cap (24) into the Main Upright (3) in the Main...
... (8) as shown. 33 Align the bracket on page 5. Frame Assembly 1. Before beginning assembly, make sure you much more time than it ! 1 Support Tube Open the parts bag labeled ÒFRAME ASSEMBLY.Ó Press a 2Ó Square Inner Cap (33) and a 2Ó x 3Ó Inner Cap (24) into the Main Upright (3) in the Main...
English Manual
Page 7
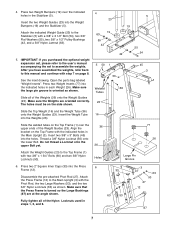
... Pivot Rod, the two Large Washers (53), and the two 3/8Ó Nylon Locknuts (63) as shown. Disassemble the pre-attached Pivot Rod (27). Open the parts bag labeled ÒWeight InsertsÓ. Align the bracket on page 8. Attach the Press Frame (12) to assemble the weights. Place two Weight Bumpers (19...
... Pivot Rod, the two Large Washers (53), and the two 3/8Ó Nylon Locknuts (63) as shown. Disassemble the pre-attached Pivot Rod (27). Open the parts bag labeled ÒWeight InsertsÓ. Align the bracket on page 8. Attach the Press Frame (12) to assemble the weights. Place two Weight Bumpers (19...
English Manual
Page 8
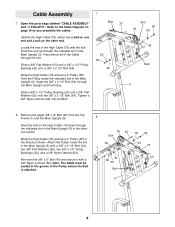
Open the parts bags labeled ÒCABLE ASSEMBLYÓ and Ò4 PULLEYSÓ. Wrap the High Cable (73) around a 4Ó Pulley (35). Bolt 73 Slot 54 35 55 ...
Open the parts bags labeled ÒCABLE ASSEMBLYÓ and Ò4 PULLEYSÓ. Wrap the High Cable (73) around a 4Ó Pulley (35). Bolt 73 Slot 54 35 55 ...
English Manual
Page 10
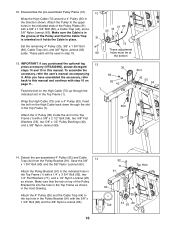
... (73) around a 4Ó Pulley (35) in step 19. 60 31 63 35 44 73 These adjustment holes must be used in the direction shown. These parts will be at the bottom 13. Feed the bolt on the High Cable (73) up through the slot in the Top Frame (1). 13 1 Wrap the...
... (73) around a 4Ó Pulley (35) in step 19. 60 31 63 35 44 73 These adjustment holes must be used in the direction shown. These parts will be at the bottom 13. Feed the bolt on the High Cable (73) up through the slot in the Top Frame (1). 13 1 Wrap the...
English Manual
Page 13
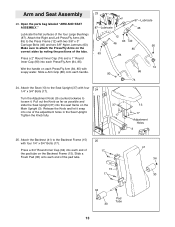
... it . Attach the Backrest (41) to loosen it snap into the seat frame on the Backrest Frame (15). Arm and Seat Assembly 23. Open the parts bag labeled ÒARM AND SEAT ASSEMBLY.Ó Lubricate the flat surfaces of the tabs. Press a 3/4Ó Round Inner Cap (34) into each end of...
... it . Attach the Backrest (41) to loosen it snap into the seat frame on the Backrest Frame (15). Arm and Seat Assembly 23. Open the parts bag labeled ÒARM AND SEAT ASSEMBLY.Ó Lubricate the flat surfaces of the tabs. Press a 3/4Ó Round Inner Cap (34) into each end of...
English Manual
Page 15
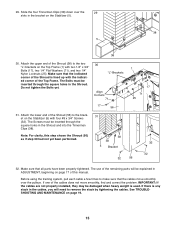
.... Note: For clarity, this manual. See TROUBLESHOOTING AND MAINTENANCE on the Stabilizer (5) with four #8 x 3/4Ó Screws (32). Make sure that all parts have been properly tightened. The Screws must be inserted through the square holes in the bracket on the Top Frame (1) with the indicated corner of... the Shroud is used. If one of the remaining parts will need to make sure that the cables move smoothly, find and correct the problem. Before using the training system, pull each cable ...
.... Note: For clarity, this manual. See TROUBLESHOOTING AND MAINTENANCE on the Stabilizer (5) with four #8 x 3/4Ó Screws (32). Make sure that all parts have been properly tightened. The Screws must be inserted through the square holes in the bracket on the Top Frame (1) with the indicated corner of... the Shroud is used. If one of the remaining parts will need to make sure that the cables move smoothly, find and correct the problem. Before using the training system, pull each cable ...

English Manual
Page 17
... the Knob as far as an exercise is any slack in the correct starting position for each exercise. Adjustment The instructions below describe how each part of the weight stack, insert the Weight Pin (39) under the desired Weight (26). Changing the Weight Setting To change the setting of the training...
... the Knob as far as an exercise is any slack in the correct starting position for each exercise. Adjustment The instructions below describe how each part of the weight stack, insert the Weight Pin (39) under the desired Weight (26). Changing the Weight Setting To change the setting of the training...
English Manual
Page 19
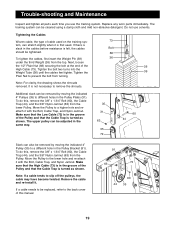
...Weight (26) from the Pulley. Remove the cable and re-install it is turned as shown. Trouble-shooting and Maintenance Inspect and tighten all parts each time you use solvents. The training system can also be removed by moving the indicated 4Ó Pulley (35) to prevent the bolt ...26 High Cable (73). If there is slack in the Pulley Plates (31). Note: For clarity, the drawing shows the shrouds removed. Replace any worn parts immediately. If a cable needs to be removed by moving the indicated 4Ó Pulleys (35) to remove the shrouds. Next, loosen the 1/2Ó Plain ...
...Weight (26) from the Pulley. Remove the cable and re-install it is turned as shown. Trouble-shooting and Maintenance Inspect and tighten all parts each time you use solvents. The training system can also be removed by moving the indicated 4Ó Pulley (35) to prevent the bolt ...26 High Cable (73). If there is slack in the Pulley Plates (31). Note: For clarity, the drawing shows the shrouds removed. Replace any worn parts immediately. If a cable needs to be removed by moving the indicated 4Ó Pulleys (35) to remove the shrouds. Next, loosen the 1/2Ó Plain ...
English Manual
Page 20
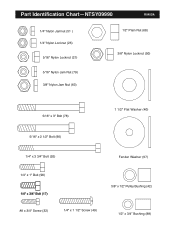
Part Identification ChartÑNTSY09990 R0400A 1/4" Nylon Jamnut (51 ) 1/4" Nylon Locknut (25) 5/16" Nylon Locknut (21) 1/2" Plain Nut (68) 3/8" Nylon Locknut (50) 5/16" Nylon Jam Nut (79) 3/8" Nylon Jam Nut (63) 5/16" x 3" Bolt (78) 1 1/2" Flat Washer (40) 5/16" x 2 1/2" Bolt (96) 1/4" x 3 3/4" Bolt (92) Fender Washer (97) 1/4" x 1" Bolt (98) 1/4" x 3/4" Bolt (17) #8 x 3/4" Screw (32) 5/8Ó x 1/2Ó Pulley Bushing (42) 1/4" x 1 1/2" Screw (49) 1/2Ó x 3/4Ó Bushing (88)
Part Identification ChartÑNTSY09990 R0400A 1/4" Nylon Jamnut (51 ) 1/4" Nylon Locknut (25) 5/16" Nylon Locknut (21) 1/2" Plain Nut (68) 3/8" Nylon Locknut (50) 5/16" Nylon Jam Nut (79) 3/8" Nylon Jam Nut (63) 5/16" x 3" Bolt (78) 1 1/2" Flat Washer (40) 5/16" x 2 1/2" Bolt (96) 1/4" x 3 3/4" Bolt (92) Fender Washer (97) 1/4" x 1" Bolt (98) 1/4" x 3/4" Bolt (17) #8 x 3/4" Screw (32) 5/8Ó x 1/2Ó Pulley Bushing (42) 1/4" x 1 1/2" Screw (49) 1/2Ó x 3/4Ó Bushing (88)

English Manual
Page 23
... Cap Cable Trap 3/8Ó x 3Ó Bolt 3/8Ó x 3Ó Carriage Bolt 1/2Ó x 1/8Ó Flange Bushing 1/2Ó Nylon Jamnut 1/4Ó x 1 1/2Ó Screw 3/8Ó Nylon Locknut Key No. Part ListÑModel No.
... Cap Cable Trap 3/8Ó x 3Ó Bolt 3/8Ó x 3Ó Carriage Bolt 1/2Ó x 1/8Ó Flange Bushing 1/2Ó Nylon Jamnut 1/4Ó x 1 1/2Ó Screw 3/8Ó Nylon Locknut Key No. Part ListÑModel No.
English Manual
Page 25
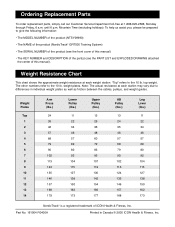
... you, please be prepared to give the following information: ¥ The MODEL NUMBER of the product (NTSY09990) ¥ The NAME of the product (NordicTrack¨ GRT500 Training System) ¥ The SERIAL NUMBER of the product (see the front cover of this manual) ¥ The KEY NUMBER and DESCRIPTION... of the part(s) (see the PART LIST and EXPLODED DRAWING attached the center of ICON Health & Fitness, Inc. Note: The actual resistance at each weight station. ÒTopÓ...
... you, please be prepared to give the following information: ¥ The MODEL NUMBER of the product (NTSY09990) ¥ The NAME of the product (NordicTrack¨ GRT500 Training System) ¥ The SERIAL NUMBER of the product (see the front cover of this manual) ¥ The KEY NUMBER and DESCRIPTION... of the part(s) (see the PART LIST and EXPLODED DRAWING attached the center of ICON Health & Fitness, Inc. Note: The actual resistance at each weight station. ÒTopÓ...


