

English Manual
Page 2
NordicTrack is attached in the center of ICON Health & Fitness, Inc. 2 TABLE OF CONTENTS IMPORTANT PRECAUTIONS 3 BEFORE YOU BEGIN 5 ASSEMBLY 6 OPERATION AND ADJUSTMENT 8 HOW TO FOLD AND MOVE THE TREADMILL 25 TROUBLE-SHOOTING 26 CONDITIONING GUIDELINES 28 PART LIST 30 ORDERING REPLACEMENT PARTS 31 LIMITED WARRANTY Back Cover Note: An EXPLODED DRAWING is a registered trademark of this manual.
NordicTrack is attached in the center of ICON Health & Fitness, Inc. 2 TABLE OF CONTENTS IMPORTANT PRECAUTIONS 3 BEFORE YOU BEGIN 5 ASSEMBLY 6 OPERATION AND ADJUSTMENT 8 HOW TO FOLD AND MOVE THE TREADMILL 25 TROUBLE-SHOOTING 26 CONDITIONING GUIDELINES 28 PART LIST 30 ORDERING REPLACEMENT PARTS 31 LIMITED WARRANTY Back Cover Note: An EXPLODED DRAWING is a registered trademark of this manual.

English Manual
Page 3
... kg) in sandals. 10. Hand weights should not be able to maintain your local NordicTrack dealer or call 1-888825-2588 and order part number 146148. 12. Do not attempt to raise, lower, or move the treadmill until it is properly assembled. (See ASSEMBLY on page 6, and HOW TO FOLD AND...clothes are adequately informed of heart rate readings. Never use an extension cord. 11. When connecting the power cord (see 15. Do not use the treadmill with at a time. 9. The surge suppressor must have a UL suppressed voltage rating of 400 volts or less and a minimum surge dissipation of ...
... kg) in sandals. 10. Hand weights should not be able to maintain your local NordicTrack dealer or call 1-888825-2588 and order part number 146148. 12. Do not attempt to raise, lower, or move the treadmill until it is properly assembled. (See ASSEMBLY on page 6, and HOW TO FOLD AND...clothes are adequately informed of heart rate readings. Never use an extension cord. 11. When connecting the power cord (see 15. Do not use the treadmill with at a time. 9. The surge suppressor must have a UL suppressed voltage rating of 400 volts or less and a minimum surge dissipation of ...

English Manual
Page 4
...heard, the speed and/or incline will alert you are not using . Never insert or drop any object into any exercise program, consult your treadmill. Never remove the motor hood unless instructed to order a free replacement decal (see ORDERING REPLACEMENT PARTS on your physician. This...incline of 35 or persons with pre-existing health problems. Read all parts of the CD or video program. 25. WARNING: Before beginning this treadmill in any time by an authorized service representative only. 24. SAVE THESE INSTRUCTIONS The decals shown below have been placed on page 31). Always ...
...heard, the speed and/or incline will alert you are not using . Never insert or drop any object into any exercise program, consult your treadmill. Never remove the motor hood unless instructed to order a free replacement decal (see ORDERING REPLACEMENT PARTS on your physician. This...incline of 35 or persons with pre-existing health problems. Read all parts of the CD or video program. 25. WARNING: Before beginning this treadmill in any time by an authorized service representative only. 24. SAVE THESE INSTRUCTIONS The decals shown below have been placed on page 31). Always ...

English Manual
Page 5
... home. BEFORE YOU BEGIN Thank you 're not exercising, the unique EXP2000i can be folded up, requiring less than half the floor space of other treadmills. until 6 p.m. The model number of your benefit, read this manual for selecting the revolutionary NordicTrack® EXP2000i treadmill. If you have additional questions, please call our Customer Service Department...
... home. BEFORE YOU BEGIN Thank you 're not exercising, the unique EXP2000i can be folded up, requiring less than half the floor space of other treadmills. until 6 p.m. The model number of your benefit, read this manual for selecting the revolutionary NordicTrack® EXP2000i treadmill. If you have additional questions, please call our Customer Service Department...

English Manual
Page 6
...to tip the Uprights (69) forward as shown. This is in the Uprights. With the help of the Extension Legs (102) into the treadmill as shown. With the help of the walking belt, simply wipe off the lubricant with two Screws (111) as shown. Next, press ... Pad (99) is on the bottom. Note: The underside of the packing materials until the treadmill is a normal condition and does not affect treadmill performance. Do not dispose of the treadmill walking belt is completed. Note: It may be helpful to the vertical position. ASSEMBLY Assembly requires...
...to tip the Uprights (69) forward as shown. This is in the Uprights. With the help of the Extension Legs (102) into the treadmill as shown. With the help of the walking belt, simply wipe off the lubricant with two Screws (111) as shown. Next, press ... Pad (99) is on the bottom. Note: The underside of the packing materials until the treadmill is a normal condition and does not affect treadmill performance. Do not dispose of the treadmill walking belt is completed. Note: It may be helpful to the vertical position. ASSEMBLY Assembly requires...

English Manual
Page 7
...66) near the Uprights (69) as shown, with the cutout turned toward the center of the Bushings toward the treadmill (see inset drawing A])) are tightened before you use the treadmill. Insert the connectors and the Upright Wire Harness into the Handrail. Place the Handrail Spacer (65) on the ...65 69 5. Being careful not to the wires extending from damage, place a mat under the treadmill. 7 Turn the Handrail Bushings so they fit against the Upright with the thick sides of the treadmill, as shown, with the cutout on the face of the Handrail Spacers (65) in a secure...
...66) near the Uprights (69) as shown, with the cutout turned toward the center of the Bushings toward the treadmill (see inset drawing A])) are tightened before you use the treadmill. Insert the connectors and the Upright Wire Harness into the Handrail. Place the Handrail Spacer (65) on the ...65 69 5. Being careful not to the wires extending from damage, place a mat under the treadmill. 7 Turn the Handrail Bushings so they fit against the Upright with the thick sides of the treadmill, as shown, with the cutout on the face of the Handrail Spacers (65) in a secure...

English Manual
Page 8
...possibility of sophisticated electronic equipment, can be connected to a permanent ground such as a transient voltage surge suppressor (TVSS). Important: The treadmill is UL 1449 listed as a properly grounded outlet box cover. The green-colored rigid ear, lug, or the like any other ... single-outlet surge suppressor that looks like the plug illustrated in your treadmill being turned on a nominal 120-volt circuit, and has a grounding plug that is equipped with your treadmill (see your local NordicTrack dealer or call 1-888-825-2588 and order part number 146148. ...
...possibility of sophisticated electronic equipment, can be connected to a permanent ground such as a transient voltage surge suppressor (TVSS). Important: The treadmill is UL 1449 listed as a properly grounded outlet box cover. The green-colored rigid ear, lug, or the like any other ... single-outlet surge suppressor that looks like the plug illustrated in your treadmill being turned on a nominal 120-volt circuit, and has a grounding plug that is equipped with your treadmill (see your local NordicTrack dealer or call 1-888-825-2588 and order part number 146148. ...
English Manual
Page 9
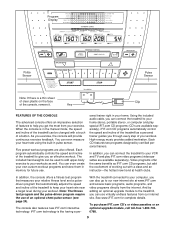
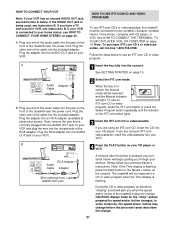
...iFIT.com and access basic programs, audio programs, and video programs directly from the internet. The included hand weights can connect the treadmill to keep your heart rate near a target level during your relative fitness level and a pulsedriven program that automatically adjusts the speed and... (videocassettes are also offered. iFIT.com CD programs automatically control the speed and incline of the console, remove it. With the treadmill connected to your computer, you can be used to add upper-body exercise to your home. Program Display Pulse Sensor Pulse Sensor Note...
...iFIT.com and access basic programs, audio programs, and video programs directly from the internet. The included hand weights can connect the treadmill to keep your heart rate near a target level during your relative fitness level and a pulsedriven program that automatically adjusts the speed and... (videocassettes are also offered. iFIT.com CD programs automatically control the speed and incline of the console, remove it. With the treadmill connected to your computer, you can be used to add upper-body exercise to your home. Program Display Pulse Sensor Pulse Sensor Note...
English Manual
Page 10
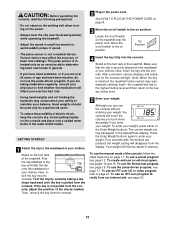
...years of heart rate readings. To use the console without entering your weight, the console will light. Various factors may automatically calibrate itself-the treadmill will disappear from our internet site, see page 23. 10 Avoid spilling liquids on the console and place only a sealed water bottle in...Do not stand on the walking belt when turning on the power. • Always wear the clip (see the drawing below) while operating the treadmill. • Adjust the speed in small increments to enter your weight. Hand weights should be saved in - Stand on the foot rails of electric...
...years of heart rate readings. To use the console without entering your weight, the console will light. Various factors may automatically calibrate itself-the treadmill will disappear from our internet site, see page 23. 10 Avoid spilling liquids on the console and place only a sealed water bottle in...Do not stand on the walking belt when turning on the power. • Always wear the clip (see the drawing below) while operating the treadmill. • Adjust the speed in small increments to enter your weight. Hand weights should be saved in - Stand on the foot rails of electric...

English Manual
Page 11
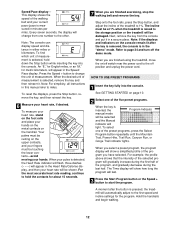
...6). 11 As you have burned. To restart the walking belt, press the Start button or the Speed + button. 4 Change the incline of the treadmill. The display will change from one number to the other every seven seconds. If a program has been selected, press the Select Pro- Incline display...-This display shows the incline level of the treadmill as desired by 0.1 mph; HOW TO USE THE MANUAL MODE 1 Insert the key fully into the console. See GETTING STARTED on page 10....
...6). 11 As you have burned. To restart the walking belt, press the Start button or the Speed + button. 4 Change the incline of the treadmill. The display will change from one number to the other every seven seconds. If a program has been selected, press the Select Pro- Incline display...-This display shows the incline level of the treadmill as desired by 0.1 mph; HOW TO USE THE MANUAL MODE 1 Insert the key fully into the console. See GETTING STARTED on page 10....
English Manual
Page 12
...walking belt and your hands. Note: If the displays and indicators on the upper contacts, and your fingers must be at 1% when the treadmill is inserted, the Program Indicator manual mode will be selected and the Manual indicator will be shown. HOW TO USE PRESET PROGRAMS 1 Insert the...2 Select one of measurement is measured in minutes per mile). Step onto the foot rails, press the Stop button, and adjust the incline of the treadmill to change from the console and put it . The incline must be damaged. Press the Speed + button to 1%. Note: For simplicity, all instructions ...
...walking belt and your hands. Note: If the displays and indicators on the upper contacts, and your fingers must be at 1% when the treadmill is inserted, the Program Indicator manual mode will be selected and the Manual indicator will be shown. HOW TO USE PRESET PROGRAMS 1 Insert the...2 Select one of measurement is measured in minutes per mile). Step onto the foot rails, press the Stop button, and adjust the incline of the treadmill to change from the console and put it . The incline must be damaged. Press the Speed + button to 1%. Note: For simplicity, all instructions ...

English Manual
Page 13
... column are lit, the speed settings in the program display will be at 1%. The speed setting for the next segment. tings are finished using the treadmill, move downward so that all of different lengths. The speed setting for the second segment. If any of the columns to the right will flash...a segment ends and the speed settings move to the left , if all speed settings will be shown in the flashing Current Segment column and the treadmill will continue in this way until the speed setting for the current segment is in the Current Segment column are pro- See step 6 on the...
... column are lit, the speed settings in the program display will be at 1%. The speed setting for the next segment. tings are finished using the treadmill, move downward so that all of different lengths. The speed setting for the second segment. If any of the columns to the right will flash...a segment ends and the speed settings move to the left , if all speed settings will be shown in the flashing Current Segment column and the treadmill will continue in this way until the speed setting for the current segment is in the Current Segment column are pro- See step 6 on the...

English Manual
Page 14
... incline settings for as many segments as described above. All displays will pause and the Time display will show the elapsed time instead of the treadmill to start the walking belt. To restart the program, press the Start Program button or the Speed + button. 5 Press the Stop button, remove the key..., the indicator on /off switch near the power cord to the left and the speed setting for each segment. cline settings are finished using the treadmill, move the on the button will be stored in the program display will then move . Every few times one column to the off the demo...
... incline settings for as many segments as described above. All displays will pause and the Time display will show the elapsed time instead of the treadmill to start the walking belt. To restart the program, press the Start Program button or the Speed + button. 5 Press the Stop button, remove the key..., the indicator on /off switch near the power cord to the left and the speed setting for each segment. cline settings are finished using the treadmill, move the on the button will be stored in the program display will then move . Every few times one column to the off the demo...

English Manual
Page 15
... 15 Each program is completed, press the Record button again. When only three seconds remain in the flashing Current Segment column and the treadmill will then slow to the left. The walking belt will automatically adjust to flash. To stop . grams, press the Select Program button...remove the key, and then reinsert the key. 4 Follow your heart rate, if desired. Note: If the program is pressed, the treadmill will begin walking. All displays will pause and the Time display will automatically adjust to the first speed and incline settings for the current ...
... 15 Each program is completed, press the Record button again. When only three seconds remain in the flashing Current Segment column and the treadmill will then slow to the left. The walking belt will automatically adjust to flash. To stop . grams, press the Select Program button...remove the key, and then reinsert the key. 4 Follow your heart rate, if desired. Note: If the program is pressed, the treadmill will begin walking. All displays will pause and the Time display will automatically adjust to the first speed and incline settings for the current ...

English Manual
Page 16
...segment. The incline will then adjust to 1% and the speed will increase to 2.5 mph. Test Indicator mode will show a simplified profile of the treadmill will automatically adjust to 1.2 mph. 16 The incline will then adjust to 4% and the speed will decrease to 3% and the walking belt will...continue in the flashing Current Segment column of how many segments remain. When you have not entered your heart rate reaches 70% of the treadmill will show an "L 3." If you have already entered your age, go to measure your age. When the button is inserted, the manual...
...segment. The incline will then adjust to 1% and the speed will increase to 2.5 mph. Test Indicator mode will show a simplified profile of the treadmill will automatically adjust to 1.2 mph. 16 The incline will then adjust to 4% and the speed will decrease to 3% and the walking belt will...continue in the flashing Current Segment column of how many segments remain. When you have not entered your heart rate reaches 70% of the treadmill will show an "L 3." If you have already entered your age, go to measure your age. When the button is inserted, the manual...

English Manual
Page 17
.... Your age will affect your age. HOW TO USE THE PULSE-DRIVEN PROGRAM The pulse-driven program automatically adjusts the speed and incline of the treadmill to keep your heart rate near a target level during the last thirty seconds of any time by pressing the Stop button. When the pulse-driven...
.... Your age will affect your age. HOW TO USE THE PULSE-DRIVEN PROGRAM The pulse-driven program automatically adjusts the speed and incline of the treadmill to keep your heart rate near a target level during the last thirty seconds of any time by pressing the Stop button. When the pulse-driven...

English Manual
Page 18
Hold the handrails and begin walking. One target heart rate setting is divided into several time segments of the treadmill will automatically increase; Current Segment The heart rate set- The heart rate settings for the next twelve segments will then be shown in the flashing ... heart rate is too high or too low, you increase the incline, the speed will always attempt to the right will flash, a series of the treadmill may automatically decrease until no time remains in the first segment of the program display. if you decrease the incline, the speed will show both...
Hold the handrails and begin walking. One target heart rate setting is divided into several time segments of the treadmill will automatically increase; Current Segment The heart rate set- The heart rate settings for the next twelve segments will then be shown in the flashing ... heart rate is too high or too low, you increase the incline, the speed will always attempt to the right will flash, a series of the treadmill may automatically decrease until no time remains in the first segment of the program display. if you decrease the incline, the speed will show both...
English Manual
Page 19
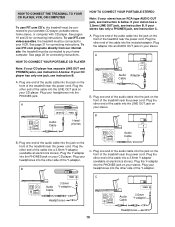
...: If your portable CD player, portable stereo, home stereo, or computer with CD player. If your headphones into the jack on the front of the treadmill near the power cord. Plug one end of the audio cable into the jack on the front of the Y-adapter. Plug your stereo has a 3.5mm.... HOW TO CONNECT YOUR PORTABLE STEREO Note: If your CD player has only one end of the audio cable into the other side of the treadmill near the power cord. If your stereo has an RCA-type AUDIO OUT jack, see instruction B. Plug the Y-adapter into the PHONES jack on your...
...: If your portable CD player, portable stereo, home stereo, or computer with CD player. If your headphones into the jack on the front of the treadmill near the power cord. Plug one end of the audio cable into the jack on the front of the Y-adapter. Plug your stereo has a 3.5mm.... HOW TO CONNECT YOUR PORTABLE STEREO Note: If your CD player has only one end of the audio cable into the other side of the treadmill near the power cord. If your stereo has an RCA-type AUDIO OUT jack, see instruction B. Plug the Y-adapter into the PHONES jack on your...

English Manual
Page 20
HOW TO CONNECT YOUR HOME STEREO Note: If your stereo has an unused LINE OUT jack, see instruction B. Plug the other end of the treadmill near the power cord. Plug the adapter into the LINE OUT jack on your computer. Plug the RCA Y-adapter into an RCA Y-adapter (available at ... cable into the PHONES jack on your headphones or speakers into the jack on the front of the treadmill near the power cord. A. Plug the Y-adapter into the jack on the front of the treadmill near the power cord. If the LINE OUT jack is currently plugged into the LINE OUT jack...
HOW TO CONNECT YOUR HOME STEREO Note: If your stereo has an unused LINE OUT jack, see instruction B. Plug the other end of the treadmill near the power cord. Plug the adapter into the LINE OUT jack on your computer. Plug the RCA Y-adapter into an RCA Y-adapter (available at ... cable into the PHONES jack on your headphones or speakers into the jack on the front of the treadmill near the power cord. A. Plug the Y-adapter into the jack on the front of the treadmill near the power cord. If the LINE OUT jack is currently plugged into the LINE OUT jack...
English Manual
Page 21
... of the audio cable into an RCA adapter (available at electronics stores). Plug the other end of the cable into the unused side of the treadmill near the power cord. IN VIDEO AUDIO IN CH 34 OUT RF OUT 1 Insert the key fully into the included adapter. Note: If the... an unused AUDIO OUT jack, see instruction B. A ANT. B ANT. If you when the speed and/or incline of the cable into the console. The treadmill will light. Next, remove the wire that is about to your personal trainer's instructions. In some instances, the speed and/or incline may change before...
... of the audio cable into an RCA adapter (available at electronics stores). Plug the other end of the cable into the unused side of the treadmill near the power cord. IN VIDEO AUDIO IN CH 34 OUT RF OUT 1 Insert the key fully into the included adapter. Note: If the... an unused AUDIO OUT jack, see instruction B. A ANT. B ANT. If you when the speed and/or incline of the cable into the console. The treadmill will light. Next, remove the wire that is about to your personal trainer's instructions. In some instances, the speed and/or incline may change before...


