
English Manual
Page 3
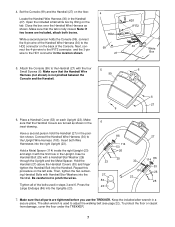
... power cord or plug is damaged, or if the TREKKER is not working properly.) 17. Never allow more amps. Never use an extension cord. 13. Remove the key, unplug the power cord, and move the walking belt while the power is the responsibility of all times. 9. The TREKKER is shown on page 5 if the TREKKER is capable of clearance behind it is UL 1449 listed...
... power cord or plug is damaged, or if the TREKKER is not working properly.) 17. Never allow more amps. Never use an extension cord. 13. Remove the key, unplug the power cord, and move the walking belt while the power is the responsibility of all times. 9. The TREKKER is shown on page 5 if the TREKKER is capable of clearance behind it is UL 1449 listed...
English Manual
Page 4
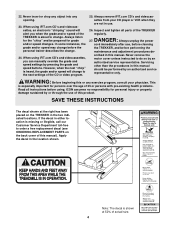
... damage sustained by pressing the grade and speed buttons. Note: The decal is missing or illegible, call our Customer Service Department toll-free to change. Never remove the motor cover unless instructed to the next settings of this product. Apply the decal in either location is shown at the right has been placed on the back cover of the CD or video program. 25. In...
... damage sustained by pressing the grade and speed buttons. Note: The decal is missing or illegible, call our Customer Service Department toll-free to change. Never remove the motor cover unless instructed to the next settings of this product. Apply the decal in either location is shown at the right has been placed on the back cover of the CD or video program. 25. In...
English Manual
Page 5
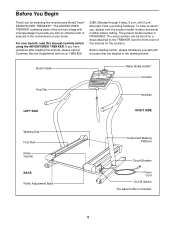
... Holder* Console Key/Clip Handrail LEFT SIDE RIGHT SIDE Walking Belt Foot Rail Roller Guards BACK Roller Adjustment Bolts Cushioned Walking Platform Circuit Breaker Power Cord On/Off Switch *No water bottle is NTHK99902. For your home. The serial number can be found on a decal attached to provide you with the parts that are labeled in the convenience of exercise in the drawing below. The product model number is included...
... Holder* Console Key/Clip Handrail LEFT SIDE RIGHT SIDE Walking Belt Foot Rail Roller Guards BACK Roller Adjustment Bolts Cushioned Walking Platform Circuit Breaker Power Cord On/Off Switch *No water bottle is NTHK99902. For your home. The serial number can be found on a decal attached to provide you with the parts that are labeled in the convenience of exercise in the drawing below. The product model number is included...
English Manual
Page 6
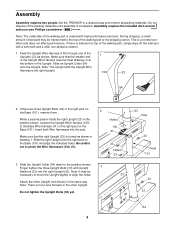
... to align the holes. Set the TREKKER in the same way. During shipping, a small amount of lubricant may be transferred to the top of the Upright. Feed the Upright Wire Harness (100) through one of the walking belt, simply wipe off the lubricant with Upright 3 Washers (32) into the post. Assembly Assembly requires two people. Finger tighten the three Upright Bolts (33) with a soft...
... to align the holes. Set the TREKKER in the same way. During shipping, a small amount of lubricant may be transferred to the top of the Upright. Feed the Upright Wire Harness (100) through one of the walking belt, simply wipe off the lubricant with Upright 3 Washers (32) into the post. Assembly Assembly requires two people. Finger tighten the three Upright Bolts (33) with a soft...
English Manual
Page 7
... wrench is fully closed. Make sure that the tab is used in steps 3 and 6. Next, connect the 4-pin wire to the IFIT2 connector, and the 3-pin wire to adjust the walking belt (see page 22). Open the included small white box by lifting on the floor. Locate the Handrail Wire Harness (30) in the Upright. Set the Console (99) and the Handrail (27) on the tab.
... wrench is fully closed. Make sure that the tab is used in steps 3 and 6. Next, connect the 4-pin wire to the IFIT2 connector, and the 3-pin wire to adjust the walking belt (see page 22). Open the included small white box by lifting on the floor. Locate the Handrail Wire Harness (30) in the Upright. Set the Console (99) and the Handrail (27) on the tab.
English Manual
Page 8
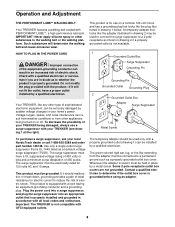
...-825-2588 and order part number 146148. Contact a qualified electrician to whether the product is not compatible with PERFORMANT LUBETM, a high-performance lubricant. Operation and Adjustment THE PERFORMANT LUBETM WALKING BELT Your TREKKER features a walking belt coated with GFCI-equipped outlets. If it must have a proper outlet installed by sudden voltage changes in drawing 2 may be used only until a properly grounded...
...-825-2588 and order part number 146148. Contact a qualified electrician to whether the product is not compatible with PERFORMANT LUBETM, a high-performance lubricant. Operation and Adjustment THE PERFORMANT LUBETM WALKING BELT Your TREKKER features a walking belt coated with GFCI-equipped outlets. If it must have a proper outlet installed by sudden voltage changes in drawing 2 may be used only until a properly grounded...
English Manual
Page 9
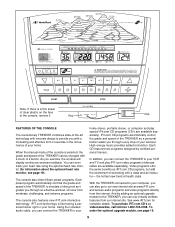
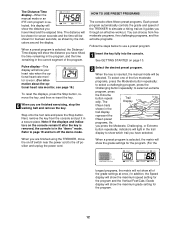
... site at health clubs. You can connect the TREKKER to provide you exercise, the console will display continuous exercise feedback. The console also offers fifteen preset programs. Each preset program automatically controls the grade and speed of your workout. Using the included audio cable, you through an effective workout. Note: If there is like having a personal trainer right in the convenience of the console, remove it guides you can use virtually endless...
... site at health clubs. You can connect the TREKKER to provide you exercise, the console will display continuous exercise feedback. The console also offers fifteen preset programs. Each preset program automatically controls the grade and speed of your workout. Using the included audio cable, you through an effective workout. Note: If there is like having a personal trainer right in the convenience of the console, remove it guides you can use virtually endless...
English Manual
Page 10
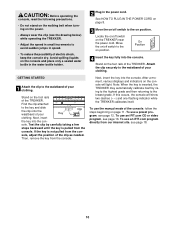
.... sole, adjust the position of your clothing. GETTING STARTED 1 Attach the clip to the on the TREKKER near the power cord. Next, insert the key into the con- To use the manual mode of electric shock, keep the console dry. See HOW TO PLUG IN THE POWER CORD on page 8. 3 Move the on/off switch to the waistband of the clip as needed. Then, remove the key from...
.... sole, adjust the position of your clothing. GETTING STARTED 1 Attach the clip to the on the TREKKER near the power cord. Next, insert the key into the con- To use the manual mode of electric shock, keep the console dry. See HOW TO PLUG IN THE POWER CORD on page 8. 3 Move the on/off switch to the waistband of the clip as needed. Then, remove the key from...

English Manual
Page 11
... the manual mode or an iFIT.com program is pressed, the walking belt will display a triangle representing a mountain. Note: For simplicity, all instructions in either miles or kilometers. A moment after the button is selected, the matrix will begin to move at a time until the Manual indicator lights. 3 Press the Start button or the Speed + button to reach the selected speed setting. The speed range is 0% to 6 mph. To stop the walking belt, press the Stop button. An...
... the manual mode or an iFIT.com program is pressed, the walking belt will display a triangle representing a mountain. Note: For simplicity, all instructions in either miles or kilometers. A moment after the button is selected, the matrix will begin to move at a time until the Manual indicator lights. 3 Press the Start button or the Speed + button to reach the selected speed setting. The speed range is 0% to 6 mph. To stop the walking belt, press the Stop button. An...
English Manual
Page 12
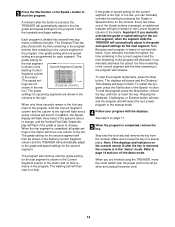
... switch near the power cord to show your heart rate when the optional heart rate monitor is worn. (For information about the optional heart rate monitor, see page 19.) To reset the displays, press the Stop button, remove the key, and then re-insert the key. 6 When you have hiked, the time remaining in the program, and the time remaining in a secure place. Pulse display-This display will show the distance you are finished exercising, stop the walking belt...
... switch near the power cord to show your heart rate when the optional heart rate monitor is worn. (For information about the optional heart rate monitor, see page 19.) To reset the displays, press the Stop button, remove the key, and then re-insert the key. 6 When you have hiked, the time remaining in the program, and the time remaining in a secure place. Pulse display-This display will show the distance you are finished exercising, stop the walking belt...
English Manual
Page 13
... of the matrix. (The speed set- To end the program, press the Stop button, remove the key, and then re-insert the key. In addition, the Speed display will flash three times if the speed is about to change , and the Vertical Feet/Cals./Grade display will automatically adjust to change . See step 5 on the console. trix.) The grade settings for upcoming segments are programmed for the first segment is...
... of the matrix. (The speed set- To end the program, press the Stop button, remove the key, and then re-insert the key. In addition, the Speed display will flash three times if the speed is about to change , and the Vertical Feet/Cals./Grade display will automatically adjust to change . See step 5 on the console. trix.) The grade settings for upcoming segments are programmed for the first segment is...
English Manual
Page 16
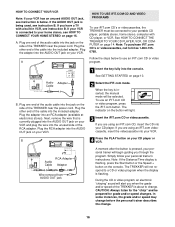
... included adapter. If your VCR is flashing, press the Start button or the Speed + button on page 14. Plug the adapter into an RCA adapter (available at electronics stores). IN VIDEO AUDIO IN CH 34 OUT RF OUT AUDIO OUT RIGHT LEFT HOW TO USE IFIT.COM CD AND VIDEO PROGRAMS To use an iFIT.com CD or video program, press the iFIT.com button. Note: If the Distance/Time display is connected to your personal trainer's instructions.
... included adapter. If your VCR is flashing, press the Start button or the Speed + button on page 14. Plug the adapter into an RCA adapter (available at electronics stores). IN VIDEO AUDIO IN CH 34 OUT RF OUT AUDIO OUT RIGHT LEFT HOW TO USE IFIT.COM CD AND VIDEO PROGRAMS To use an iFIT.com CD or video program, press the iFIT.com button. Note: If the Distance/Time display is connected to your personal trainer's instructions.
English Manual
Page 17
... video program, press the Stop button or remove the key and go to flash. When the CD or video program is completed, the walking belt will stop and the Distance/Time display will change when a "chirp" is heard: • make sure that the audio cable is properly connected, that it is flashing, press the Start button or the Speed + button on the console. • adjust the volume of your progress with the displays. See step 6 on the console...
... video program, press the Stop button or remove the key and go to flash. When the CD or video program is completed, the walking belt will stop and the Distance/Time display will change when a "chirp" is heard: • make sure that the audio cable is properly connected, that it is flashing, press the Start button or the Speed + button on the console. • adjust the volume of your progress with the displays. See step 6 on the console...
English Manual
Page 18
... key fully into the console. To use another program, press the Stop button and go to the next settings of the TREKKER does not change to our internet site at any time by pressing the Grade or Speed buttons on -line instructions for details. The indicator on the button will change when a "chirp" is heard, make sure that the audio cable is properly connected, that it is fully plugged...
... key fully into the console. To use another program, press the Stop button and go to the next settings of the TREKKER does not change to our internet site at any time by pressing the Grade or Speed buttons on -line instructions for details. The indicator on the button will change when a "chirp" is heard, make sure that the audio cable is properly connected, that it is fully plugged...
English Manual
Page 19
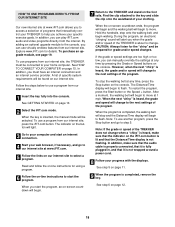
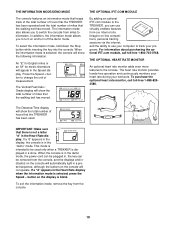
... miles that the walking belt has moved. When the console is in the Heart Rate display. To select the information mode, hold down the Stop button while inserting the key into the console. The Vertical Feet/Cals./ Grade display will automatically light in a store. THE OPTIONAL HEART RATE MONITOR An optional heart rate monitor adds even more features to track your workouts. If a "d" appears in the display, the console is in the demo mode, the power cord can be plugged...
... miles that the walking belt has moved. When the console is in the Heart Rate display. To select the information mode, hold down the Stop button while inserting the key into the console. The Vertical Feet/Cals./ Grade display will automatically light in a store. THE OPTIONAL HEART RATE MONITOR An optional heart rate monitor adds even more features to track your workouts. If a "d" appears in the display, the console is in the demo mode, the power cord can be plugged...
English Manual
Page 21
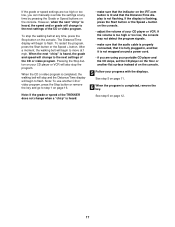
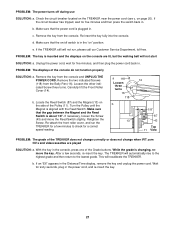
... Front Roller Cover (14). a 118 Loosen three turns 16 118 b 13 14 1/8" 87 43 Top 11 View PROBLEM: The grade of the Grade buttons. b. Unplug the power cord, wait for five minutes, and then plug the power cord back in the console, press one of the TREKKER does not change correctly or does not change when iFIT.com CD's and videocassettes are lit, but the walking belt...
... Front Roller Cover (14). a 118 Loosen three turns 16 118 b 13 14 1/8" 87 43 Top 11 View PROBLEM: The grade of the Grade buttons. b. Unplug the power cord, wait for five minutes, and then plug the power cord back in the console, press one of the TREKKER does not change correctly or does not change when iFIT.com CD's and videocassettes are lit, but the walking belt...
English Manual
Page 23
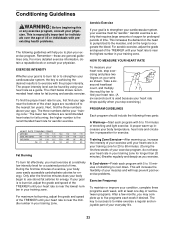
... by using your body uses easily accessible carbohydrate calories for a sustained period of exercise, your heart rate as you stop exercising and place two fingers on the lungs to burn fat, adjust the grade and speed of time. Only after the first few minutes of time. A Cool-down . Conditioning Guidelines WARNING: Before beginning this or any exercise program, consult your training zone. The chart...
... by using your body uses easily accessible carbohydrate calories for a sustained period of exercise, your heart rate as you stop exercising and place two fingers on the lungs to burn fat, adjust the grade and speed of time. Only after the first few minutes of time. A Cool-down . Conditioning Guidelines WARNING: Before beginning this or any exercise program, consult your training zone. The chart...
English Manual
Page 24
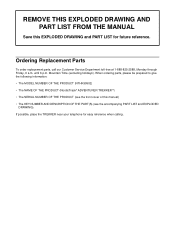
... following information: • The MODEL NUMBER OF THE PRODUCT (NTHK99902) • The NAME OF THE PRODUCT (NordicTrack® ADVENTURER TREKKERTM) • The SERIAL NUMBER OF THE PRODUCT (see the accompanying PART LIST and EXPLODED DRAWING). REMOVE THIS EXPLODED DRAWING AND PART LIST FROM THE MANUAL Save this manual) • The KEY NUMBER AND DESCRIPTION OF THE PART(S) (see the front cover of this EXPLODED DRAWING and PART LIST for...
... following information: • The MODEL NUMBER OF THE PRODUCT (NTHK99902) • The NAME OF THE PRODUCT (NordicTrack® ADVENTURER TREKKERTM) • The SERIAL NUMBER OF THE PRODUCT (see the accompanying PART LIST and EXPLODED DRAWING). REMOVE THIS EXPLODED DRAWING AND PART LIST FROM THE MANUAL Save this manual) • The KEY NUMBER AND DESCRIPTION OF THE PART(S) (see the front cover of this EXPLODED DRAWING and PART LIST for...
English Manual
Page 25
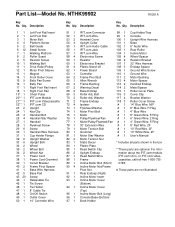
... Insert Left Foot Rail Motor Belt Platform Screw Belt Guide Small Screw Walking Platform Roller Guard Resistor Screw Walking Belt Drive Roller/Pulley Motor Pivot Sleeve Magnet Front Roller Cover Belly Pan Screw Belly Pan Right Foot Rail Insert Right Foot Rail Chest Pulse IFIT.com Module IFIT.com Videocassette IFIT.com CD Upright Key/Clip Handrail Bolt Handrail Star Washer Handrail Flywheel Screw Screw Handrail Wire Harness Cup Holder Flange Upright Washer Upright Bolt Wheel Wheel Bolt Wheel Nut Power Cord Power Cord Grommet Circuit Breaker...
... Insert Left Foot Rail Motor Belt Platform Screw Belt Guide Small Screw Walking Platform Roller Guard Resistor Screw Walking Belt Drive Roller/Pulley Motor Pivot Sleeve Magnet Front Roller Cover Belly Pan Screw Belly Pan Right Foot Rail Insert Right Foot Rail Chest Pulse IFIT.com Module IFIT.com Videocassette IFIT.com CD Upright Key/Clip Handrail Bolt Handrail Star Washer Handrail Flywheel Screw Screw Handrail Wire Harness Cup Holder Flange Upright Washer Upright Bolt Wheel Wheel Bolt Wheel Nut Power Cord Power Cord Grommet Circuit Breaker...
English Manual
Page 27
... IS IT COVERED-ICON Health & Fitness, Inc. ("ICON"), warrants the motor for three years after the date of purchase. Before shipping, always obtain a Return Authorization Number (RA No.) from our Customer Service Department; Accordingly, the above limitation may not apply to you . Limited Warranty WHAT IS COVERED-The entire NordicTrack® ADVENTURER TREKKER ("Product") is warranted to be free of all other warranties and any...
... IS IT COVERED-ICON Health & Fitness, Inc. ("ICON"), warrants the motor for three years after the date of purchase. Before shipping, always obtain a Return Authorization Number (RA No.) from our Customer Service Department; Accordingly, the above limitation may not apply to you . Limited Warranty WHAT IS COVERED-The entire NordicTrack® ADVENTURER TREKKER ("Product") is warranted to be free of all other warranties and any...


