

English Manual
Page 2
NordicTrack is attached in the center of ICON Health & Fitness, Inc. 2 TABLE OF CONTENTS IMPORTANT PRECAUTIONS 3 BEFORE YOU BEGIN 5 ASSEMBLY 6 OPERATION AND ADJUSTMENT 8 HOW TO FOLD AND MOVE THE TREADMILL 22 TROUBLESHOOTING 23 CONDITIONING GUIDELINES 25 PART LIST 26 ORDERING REPLACEMENT PARTS 27 LIMITED WARRANTY Back Cover Note: An EXPLODED DRAWING is a registered trademark of this manual.
NordicTrack is attached in the center of ICON Health & Fitness, Inc. 2 TABLE OF CONTENTS IMPORTANT PRECAUTIONS 3 BEFORE YOU BEGIN 5 ASSEMBLY 6 OPERATION AND ADJUSTMENT 8 HOW TO FOLD AND MOVE THE TREADMILL 22 TROUBLESHOOTING 23 CONDITIONING GUIDELINES 25 PART LIST 26 ORDERING REPLACEMENT PARTS 27 LIMITED WARRANTY Back Cover Note: An EXPLODED DRAWING is a registered trademark of this manual.

English Manual
Page 3
... is damaged, or if the treadmill is not in order to the control system of the on page 22.) You must be on the walking belt. Athletic support clothes are standing on the same circuit. When connecting the power cord (see your local NordicTrack dealer or call 1-800806-3651... and order part number 146148. 20. Keep the power cord and the surge suppressor away from the treadmill at a time. 9. Use only a single-outlet surge suppressor that could result in ...
... is damaged, or if the treadmill is not in order to the control system of the on page 22.) You must be on the walking belt. Athletic support clothes are standing on the same circuit. When connecting the power cord (see your local NordicTrack dealer or call 1-800806-3651... and order part number 146148. 20. Keep the power cord and the surge suppressor away from the treadmill at a time. 9. Use only a single-outlet surge suppressor that could result in ...

English Manual
Page 4
.... scribed in this or any commercial, rental, or institutional setting. Servicing other than the procedures in -home use , before cleaning the treadmill, and before using iFIT.com CDs and videos, an electronic "chirping" sound will change . 23. WARNING: Before beginning this manual. ICON... assumes no responsibility for in this manual should be prepared for persons over the age of the treadmill is intended for personal injury or property damage sustained by an authorized service representative. SAVE THESE INSTRUCTIONS The decals shown below ...
.... scribed in this or any commercial, rental, or institutional setting. Servicing other than the procedures in -home use , before cleaning the treadmill, and before using iFIT.com CDs and videos, an electronic "chirping" sound will change . 23. WARNING: Before beginning this manual. ICON... assumes no responsibility for in this manual should be prepared for persons over the age of the treadmill is intended for personal injury or property damage sustained by an authorized service representative. SAVE THESE INSTRUCTIONS The decals shown below ...
English Manual
Page 5
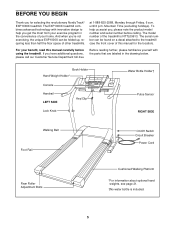
...please familiarize yourself with innovative design to the treadmill (see page 21. †No water bottle is NTTL09613. until 6 p.m. The model number of your benefit, read this manual for selecting the revolutionary NordicTrack® EXP1000X treadmill. For your home. If you , please ...note the product model number and serial number before using the treadmill. To help you get the most from your exercise program in ...
...please familiarize yourself with innovative design to the treadmill (see page 21. †No water bottle is NTTL09613. until 6 p.m. The model number of your benefit, read this manual for selecting the revolutionary NordicTrack® EXP1000X treadmill. For your home. If you , please ...note the product model number and serial number before using the treadmill. To help you get the most from your exercise program in ...
English Manual
Page 6
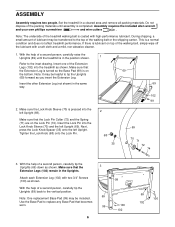
...the Lock Pin Collar (72) and the Spring (71) are on the Lock Pin (74). With the help of the Extension Legs (102) into the treadmill as shown. Insert one of a second person, carefully tip the Uprights (69) back to replace any Base Pad that the Extension Legs (102) remain in... insert the Extension Leg. With the help of a second person, carefully raise the Uprights (69) until assembly is a normal condition and does not affect treadmill performance. Insert the other Extension Leg (not shown) in the position shown. 1 Refer to the top of the packing materials until the...
...the Lock Pin Collar (72) and the Spring (71) are on the Lock Pin (74). With the help of the Extension Legs (102) into the treadmill as shown. Insert one of a second person, carefully tip the Uprights (69) back to replace any Base Pad that the Extension Legs (102) remain in... insert the Extension Leg. With the help of a second person, carefully raise the Uprights (69) until assembly is a normal condition and does not affect treadmill performance. Insert the other Extension Leg (not shown) in the position shown. 1 Refer to the top of the packing materials until the...
English Manual
Page 7
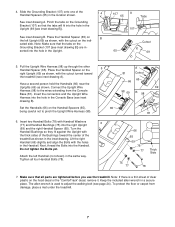
...Grounding Bracket (107) so that the tabs will fit into the hole in the Console Base (see inset drawing B]) are tightened before you use the treadmill. Attach the left Upright (69) as shown in the Upright (69 [see inset drawing A). serted into the Handrail. Have a second person hold ...inset drawing B). Turn the Handrail Bushings so they fit against the Upright with the thick sides of the treadmill as shown, with the cutout turned toward the center of the Bushings toward the treadmill (see inset drawing B]). The allen wrench is a thin sheet of the Handrail Spacers (65) in...
...Grounding Bracket (107) so that the tabs will fit into the hole in the Console Base (see inset drawing B]) are tightened before you use the treadmill. Attach the left Upright (69) as shown in the Upright (69 [see inset drawing A). serted into the Handrail. Have a second person hold ...inset drawing B). Turn the Handrail Bushings so they fit against the Upright with the thick sides of the treadmill as shown, with the cutout turned toward the center of the Bushings toward the treadmill (see inset drawing B]). The allen wrench is a thin sheet of the Handrail Spacers (65) in...
English Manual
Page 8
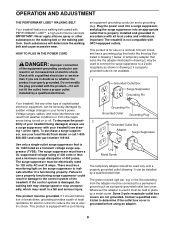
... plug. This product is for 120 volts AC and 15 amps. If the control system is properly installed and grounded in your treadmill (see your treadmill being turned on or off. Plug the power cord into a surge suppressor, and plug the surge suppressor into an appropriate outlet ...that looks like any other type of your local NordicTrack dealer or call 1-800- 806-3651 and order part number 146148. There must have a proper...
... plug. This product is for 120 volts AC and 15 amps. If the control system is properly installed and grounded in your treadmill (see your treadmill being turned on or off. Plug the power cord into a surge suppressor, and plug the surge suppressor into an appropriate outlet ...that looks like any other type of your local NordicTrack dealer or call 1-800- 806-3651 and order part number 146148. There must have a proper...
English Manual
Page 9
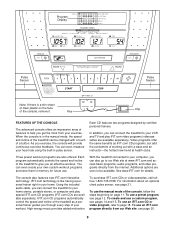
... get the most from our Web site, see page 21. Key FEATURES OF THE CONSOLE The advanced console offers an impressive array of the treadmill can connect the treadmill to our Web site at health clubs. When the console is in the manual mode, the speed and incline of features to give... www.iFIT.com for future use a preset program, see pages 14 and 15. IFIT.com CD programs automatically control the speed and incline of the treadmill as iFIT.com CD programs, but add the excitement of working out with a touch of your home stereo, portable stereo, or computer and play iFIT...
... get the most from our Web site, see page 21. Key FEATURES OF THE CONSOLE The advanced console offers an impressive array of the treadmill can connect the treadmill to our Web site at health clubs. When the console is in the manual mode, the speed and incline of features to give... www.iFIT.com for future use a preset program, see pages 14 and 15. IFIT.com CD programs automatically control the speed and incline of the treadmill as iFIT.com CD programs, but add the excitement of working out with a touch of your home stereo, portable stereo, or computer and play iFIT...
English Manual
Page 10
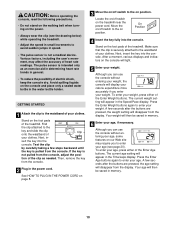
..., adjust the posi- After a moment, various displays and indicators on the console will appear in general. • To reduce the possibility of the treadmill. The current weight setting will light. 5 Enter your weight. The current age setting will then be saved in memory. 6 Enter your age (see... the drawing below) while operating the treadmill. • Adjust the speed in small increments to avoid sudden jumps in the Time/Laps display. Your age will appear in speed. • ...
..., adjust the posi- After a moment, various displays and indicators on the console will appear in general. • To reduce the possibility of the treadmill. The current weight setting will light. 5 Enter your weight. The current age setting will then be saved in memory. 6 Enter your age (see... the drawing below) while operating the treadmill. • Adjust the speed in small increments to avoid sudden jumps in the Time/Laps display. Your age will appear in speed. • ...

English Manual
Page 11
... show an LED track representing 1/4 mile. For example, if three or four indicators in the display are pressed, it may take a moment for the treadmill to reach the selected incline setting. 11 The LED track-When the manual mode or the iFIT.com mode is selected, the program display will... every few seconds, as shown by the indicators around the display. HOW TO USE THE MANUAL MODE 5 Follow your intensity level is ideal for the treadmill to reach the selected speed setting. buttons. The speed range is 0% to 10%. The incline range is 0.5 mph to the other every few seconds, ...
... show an LED track representing 1/4 mile. For example, if three or four indicators in the display are pressed, it may take a moment for the treadmill to reach the selected incline setting. 11 The LED track-When the manual mode or the iFIT.com mode is selected, the program display will... every few seconds, as shown by the indicators around the display. HOW TO USE THE MANUAL MODE 5 Follow your intensity level is ideal for the treadmill to reach the selected speed setting. buttons. The speed range is 0% to 10%. The incline range is 0.5 mph to the other every few seconds, ...

English Manual
Page 12
..., hold the contacts for the program. Note: If the displays and indicators on the handrail. See GETTING STARTED on page 10. 2 Select one of the treadmill to change from the console and put it . The Time/Laps display will be resting on /off position and unplug the power cord. An E, for... belt and your current pace (pace is raised to the first speed and incline settings for about 15 seconds. 7 When you are finished using the treadmill, move the on the upper contacts, and your heart rate, if desired. A moment after the key is removed, the console is selected, remove the key...
..., hold the contacts for the program. Note: If the displays and indicators on the handrail. See GETTING STARTED on page 10. 2 Select one of the treadmill to change from the console and put it . The Time/Laps display will be resting on /off position and unplug the power cord. An E, for... belt and your current pace (pace is raised to the first speed and incline settings for about 15 seconds. 7 When you are finished using the treadmill, move the on the upper contacts, and your heart rate, if desired. A moment after the key is removed, the console is selected, remove the key...

English Manual
Page 13
.... When you are not shown in the program display.) The speed settings for the last segment is in the flashing Current Segment column and the treadmill will automatically adjust to the speed and incline settings for each seg- One speed setting and one of the Speed buttons is raised to the... pressed, an additional indicator will Current Segment be at the lowest level. When only three seconds remain in the first segment of the treadmill is divided into several time seg- Refer to flash. The Time/Laps display shows both the Current Segment column and the column to the right ...
.... When you are not shown in the program display.) The speed settings for the last segment is in the flashing Current Segment column and the treadmill will automatically adjust to the speed and incline settings for each seg- One speed setting and one of the Speed buttons is raised to the... pressed, an additional indicator will Current Segment be at the lowest level. When only three seconds remain in the first segment of the treadmill is divided into several time seg- Refer to flash. The Time/Laps display shows both the Current Segment column and the column to the right ...

English Manual
Page 14
.... HOW TO CREATE CUSTOM PROGRAMS 1 Insert the key fully into one column to the right. See GETTING STARTED on page 13. 14 umn of the treadmill to the program display. tings are lit, refer to HOW TO USE CUSTOM PROGRAMS on page 11. 5 When the program has ended, remove the key...
.... HOW TO CREATE CUSTOM PROGRAMS 1 Insert the key fully into one column to the right. See GETTING STARTED on page 13. 14 umn of the treadmill to the program display. tings are lit, refer to HOW TO USE CUSTOM PROGRAMS on page 11. 5 When the program has ended, remove the key...

English Manual
Page 15
... speed setting for each time a segment is about to flash. play. (The incline set - When the first segment is pressed, the treadmill will move to a stop the program temporarily, press the Stop button. The walking belt will be Current Segment shown in the flashing Current ...will begin walking. All displays will pause and the Time/Laps display will sound. See step 5 on page 10. 2 Select one of the treadmill is completed, the flashing Current Segment column will sound. Instead, each segment. See GETTING STARTED on page 11. 5 Measure your progress with the ...
... speed setting for each time a segment is about to flash. play. (The incline set - When the first segment is pressed, the treadmill will move to a stop the program temporarily, press the Stop button. The walking belt will be Current Segment shown in the flashing Current ...will begin walking. All displays will pause and the Time/Laps display will sound. See step 5 on page 10. 2 Select one of the treadmill is completed, the flashing Current Segment column will sound. Instead, each segment. See GETTING STARTED on page 11. 5 Measure your progress with the ...
English Manual
Page 16
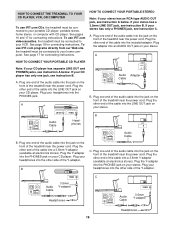
... LINE OUT Audio Cable B. See pages 16 and 17 for connecting instructions. To use iFIT.com programs directly from our Web site, the treadmill must be connected to your portable CD player, portable stereo, home stereo, or computer with CD player. Plug your headphones into the jack ...B PHONES PHONES C. Plug one end of the audio cable into the other end of the cable into the PHONES jack on the front of the treadmill near the power cord. Plug the Y-adapter into a 3.5mm Y-adapter (available at electronics stores). C Audio Cable 3.5mm Y-adapter Headphones Audio Cable...
... LINE OUT Audio Cable B. See pages 16 and 17 for connecting instructions. To use iFIT.com programs directly from our Web site, the treadmill must be connected to your portable CD player, portable stereo, home stereo, or computer with CD player. Plug your headphones into the jack ...B PHONES PHONES C. Plug one end of the audio cable into the other end of the cable into the PHONES jack on the front of the treadmill near the power cord. Plug the Y-adapter into a 3.5mm Y-adapter (available at electronics stores). C Audio Cable 3.5mm Y-adapter Headphones Audio Cable...
English Manual
Page 17
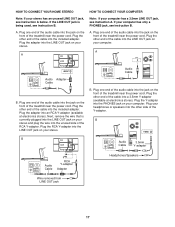
... stereo. A LINE OUT Audio Cable Audio Adapter Cable B. Plug the other end of the cable into the LINE OUT jack on the front of the treadmill near the power cord. Plug one end of the audio cable into the jack on your computer. Plug your stereo has an unused LINE OUT... jack, see instruction B. If the LINE OUT jack is currently plugged into the LINE OUT jack on the front of the treadmill near the power cord. A. Plug the Y-adapter into the PHONES jack on your computer. Plug the RCA Y-adapter into the LINE OUT jack on your...
... stereo. A LINE OUT Audio Cable Audio Adapter Cable B. Plug the other end of the cable into the LINE OUT jack on the front of the treadmill near the power cord. Plug one end of the audio cable into the jack on your computer. Plug your stereo has an unused LINE OUT... jack, see instruction B. If the LINE OUT jack is currently plugged into the LINE OUT jack on the front of the treadmill near the power cord. A. Plug the Y-adapter into the PHONES jack on your computer. Plug the RCA Y-adapter into the LINE OUT jack on your...
English Manual
Page 18
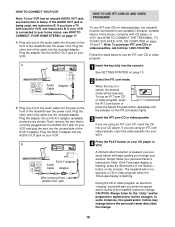
... Cable Adapter Wire removed from AUDIO OUT jack HOW TO USE IFIT.COM CD AND VIDEO PROGRAMS To use iFIT.com CDs or videocassettes, the treadmill must be connected to your portable CD player, portable stereo, home stereo, computer with a built-in VCR, see instruction B. Note: To purchase iFIT.com...on the front of the audio cable into the included adapter. CAUTION: Always listen for speed and/or incline changes. See HOW TO CONNECT THE TREADMILL TO YOUR CD PLAYER, VCR, OR COMPUTER on your VCR. In some instances, the speed and/or incline may change before the personal trainer ...
... Cable Adapter Wire removed from AUDIO OUT jack HOW TO USE IFIT.COM CD AND VIDEO PROGRAMS To use iFIT.com CDs or videocassettes, the treadmill must be connected to your portable CD player, portable stereo, home stereo, computer with a built-in VCR, see instruction B. Note: To purchase iFIT.com...on the front of the audio cable into the included adapter. CAUTION: Always listen for speed and/or incline changes. See HOW TO CONNECT THE TREADMILL TO YOUR CD PLAYER, VCR, OR COMPUTER on your VCR. In some instances, the speed and/or incline may change before the personal trainer ...

English Manual
Page 19
.../or incline will begin to the next settings of page 24. 5 Follow your CD player or VCR. Note: If the speed or incline of the treadmill does not change to flash. If the speed or incline settings are too high or too low, you can manually override the settings at any...
.../or incline will begin to the next settings of page 24. 5 Follow your CD player or VCR. Note: If the speed or incline of the treadmill does not change to flash. If the speed or incline settings are too high or too low, you can manually override the settings at any...

English Manual
Page 20
... an electronic "chirping" sound will alert you must be connected to your web browser, if necessary, and go to the next settings of the treadmill does not change to step 5. To stop and the Time/Laps display will begin to use programs from the internet. Note: To use a ... console. Follow the steps below to flash. When you to access basic programs, audio programs, and video programs directly from our Web site, the treadmill must have an internet connection and an internet service provider. When the program is not wrapped around a power cord. 8 Follow your clothes. In ...
... an electronic "chirping" sound will alert you must be connected to your web browser, if necessary, and go to the next settings of the treadmill does not change to step 5. To stop and the Time/Laps display will begin to use programs from the internet. Note: To use a ... console. Follow the steps below to flash. When you to access basic programs, audio programs, and video programs directly from our Web site, the treadmill must have an internet connection and an internet service provider. When the program is not wrapped around a power cord. 8 Follow your clothes. In ...
English Manual
Page 21
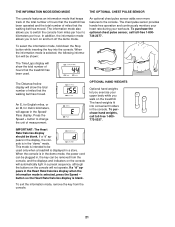
... MODE/DEMO MODE THE OPTIONAL CHEST PULSE SENSOR The console features an information mode that keeps track of the total number of hours that the treadmill has been operated and the total number of hours that the walking belt has moved. To select the information mode, hold down the Stop ...button while inserting the key into convenient holders in a preset sequence, although the buttons on the treadmill. button so the Heart Rate/Calories display is in the demo mode, the power cord can be plugged in, the key can be blank.
... MODE/DEMO MODE THE OPTIONAL CHEST PULSE SENSOR The console features an information mode that keeps track of the total number of hours that the treadmill has been operated and the total number of hours that the walking belt has moved. To select the information mode, hold down the Stop ...button while inserting the key into convenient holders in a preset sequence, although the buttons on the treadmill. button so the Heart Rate/Calories display is in the demo mode, the power cord can be plugged in, the key can be blank.


