

English Manual
Page 3
... the treadmill if the power cord or plug is damaged, or if the treadmill is running. Adjust the speed in order to raise, lower, or move the treadmill until it is properly assembled. (See ASSEMBLY on page 6, and HOW TO FOLD AND MOVE THE TREADMILL on any surface that all users of this treadmill are recommended for the location of the specifications described on /off . Athletic support clothes are adequately informed...
... the treadmill if the power cord or plug is damaged, or if the treadmill is running. Adjust the speed in order to raise, lower, or move the treadmill until it is properly assembled. (See ASSEMBLY on page 6, and HOW TO FOLD AND MOVE THE TREADMILL on any surface that all users of this treadmill are recommended for the location of the specifications described on /off . Athletic support clothes are adequately informed...

English Manual
Page 4
... time by pressing the speed and incline buttons. When using iFIT.com CD's and videos, you when the speed and/or incline of 35 or persons with pre-existing health problems. Read all parts regularly. 23. Do not use of actual size. 4 When using iFIT.com CD's and videos, an electronic "chirping" sound will change . 24. DANGER: 28. tenance and adjustment procedures de- Never remove the motor hood unless instructed to change before performing...
... time by pressing the speed and incline buttons. When using iFIT.com CD's and videos, you when the speed and/or incline of 35 or persons with pre-existing health problems. Read all parts regularly. 23. Do not use of actual size. 4 When using iFIT.com CD's and videos, an electronic "chirping" sound will change . 24. DANGER: 28. tenance and adjustment procedures de- Never remove the motor hood unless instructed to change before performing...

English Manual
Page 5
... design to the treadmill (see the front cover of this manual carefully before calling. If you for the location). please call our Customer Service Department toll-free at 1-888-825-2588, Monday through Friday, 6 a.m. Hand Weights Console Handrail LEFT SIDE Lock Knob Book Holder Key/Clip Water Bottle Holder* Pulse Sensor RIGHT SIDE Walking Belt Foot Rail On/Off Switch Circuit Breaker Power Cord Rear Roller Adjustment Bolts *No water bottle...
... design to the treadmill (see the front cover of this manual carefully before calling. If you for the location). please call our Customer Service Department toll-free at 1-888-825-2588, Monday through Friday, 6 a.m. Hand Weights Console Handrail LEFT SIDE Lock Knob Book Holder Key/Clip Water Bottle Holder* Pulse Sensor RIGHT SIDE Walking Belt Foot Rail On/Off Switch Circuit Breaker Power Cord Rear Roller Adjustment Bolts *No water bottle...

English Manual
Page 7
Place the Handrail Spacer (65) on the hood decal, remove it. serted into the right Upright (69) and the right Handrail Spacer (65). Connect the Upright Wire Harness (98) to adjust the walking belt (see page 27). Insert two Handrail Bolts (78) with Handrail Bushings (77) into the hole in - Tighten all parts are in the Upright. 75 A 65 Tabs 75 Cutout 65 69...
Place the Handrail Spacer (65) on the hood decal, remove it. serted into the right Upright (69) and the right Handrail Spacer (65). Connect the Upright Wire Harness (98) to adjust the walking belt (see page 27). Insert two Handrail Bolts (78) with Handrail Bushings (77) into the hole in - Tighten all parts are in the Upright. 75 A 65 Tabs 75 Cutout 65 69...

English Manual
Page 8
... with your treadmill (see your home's power. Grounding Pin Grounded Outlet Grounding Plug Grounded Outlet Box Adapter Surge Suppressor Use only a single-outlet surge suppressor that looks like any other substances to a 2-pole receptacle as a transient voltage surge suppressor (TVSS). If it will deteriorate the walking belt and cause excessive wear. HOW TO PLUG IN THE POWER CORD DANGER: Improper connection of the...
... with your treadmill (see your home's power. Grounding Pin Grounded Outlet Grounding Plug Grounded Outlet Box Adapter Surge Suppressor Use only a single-outlet surge suppressor that looks like any other substances to a 2-pole receptacle as a transient voltage surge suppressor (TVSS). If it will deteriorate the walking belt and cause excessive wear. HOW TO PLUG IN THE POWER CORD DANGER: Improper connection of the...

English Manual
Page 9
... relative fitness level and a pulsedriven program that automatically adjusts the speed and incline of features to keep your heart rate near a target level during your exercise. See www.iFIT.com for future use of working out with a touch of the console, remove it. Program Display Pulse Sensor Pulse Sensor Note: If there is like having a personal trainer right in your home. iFIT.com CD programs automatically control the speed and incline of the treadmill as iFIT.com CD programs...
... relative fitness level and a pulsedriven program that automatically adjusts the speed and incline of features to keep your heart rate near a target level during your exercise. See www.iFIT.com for future use of working out with a touch of the console, remove it. Program Display Pulse Sensor Pulse Sensor Note: If there is like having a personal trainer right in your home. iFIT.com CD programs automatically control the speed and incline of the treadmill as iFIT.com CD programs...

English Manual
Page 10
... 23. 10 Press the Enter Weight buttons again to enter your balance. To use an iFIT.com program directly from the console. 5 Enter your exercise hart rate. 2 Plug in the power cord. Note: When the key is securely attached to the waistband of your weight, press either of your clothes. GETTING STARTED 1 Attach the clip to the waistband of the Enter Weight buttons. Next, in the Speed/Pace display. Your weight will appear in...
... 23. 10 Press the Enter Weight buttons again to enter your balance. To use an iFIT.com program directly from the console. 5 Enter your exercise hart rate. 2 Plug in the power cord. Note: When the key is securely attached to the waistband of your weight, press either of your clothes. GETTING STARTED 1 Attach the clip to the waistband of the Enter Weight buttons. Next, in the Speed/Pace display. Your weight will appear in...

English Manual
Page 11
... level of the walking belt as desired. HOW TO USE THE MANUAL MODE 1 Insert the key fully into the console. If a program has been selected, press the Select Pro- As you have completed 1/4 mile. buttons. When a different program is pressed, the speed setting will show the time remaining in the program and the time remaining in sequence until you exercise, the Training Zone display will change from one number to the other...
... level of the walking belt as desired. HOW TO USE THE MANUAL MODE 1 Insert the key fully into the console. If a program has been selected, press the Select Pro- As you have completed 1/4 mile. buttons. When a different program is pressed, the speed setting will show the time remaining in the program and the time remaining in sequence until you exercise, the Training Zone display will change from one number to the other...

English Manual
Page 12
... the treadmill to change from the console and put it . Step onto the foot rails, press the Stop button, and adjust the incline of measurement is selected, hold the contacts for the program. Note: If the displays and indicators on /off switch near the power cord to the off the demo mode. Refer to start the program. When you have selected. Note: The console can display speed and distance in this manual refer...
... the treadmill to change from the console and put it . Step onto the foot rails, press the Stop button, and adjust the incline of measurement is selected, hold the contacts for the program. Note: If the displays and indicators on /off switch near the power cord to the off the demo mode. Refer to start the program. When you have selected. Note: The console can display speed and distance in this manual refer...

English Manual
Page 13
.... Note: If the displays and indicators on /off the demo mode. Step onto the foot rails and make sure that all of the treadmill is divided into several time seg- To restart the program, press the Start Program button or the Speed + button. Each program is at 1% when the treadmill is raised to flash. Note: If you manually adjust the speed setting so that the incline of the indicators...
.... Note: If the displays and indicators on /off the demo mode. Step onto the foot rails and make sure that all of the treadmill is divided into several time seg- To restart the program, press the Start Program button or the Speed + button. Each program is at 1% when the treadmill is raised to flash. Note: If you manually adjust the speed setting so that the incline of the indicators...
English Manual
Page 16
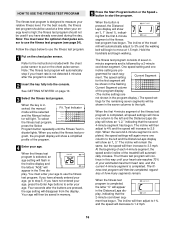
... fitness level. HOW TO USE THE FITNESS TEST PROGRAM The fitness test program is designed to put on the chest pulse sensor. gram, the program display will automatically stop if your energy level is high; Hold the handrails and begin to move at a time when your heart rate is not detected 4 minutes after the buttons are pro- The speed setting Current Segment for each 4-minute segment, the speed and/or incline...
... fitness level. HOW TO USE THE FITNESS TEST PROGRAM The fitness test program is designed to put on the chest pulse sensor. gram, the program display will automatically stop if your energy level is high; Hold the handrails and begin to move at a time when your heart rate is not detected 4 minutes after the buttons are pro- The speed setting Current Segment for each 4-minute segment, the speed and/or incline...

English Manual
Page 17
... the program. 4 Enter your workout. gram, press the Select Program button repeat- HOW TO USE THE PULSE-DRIVEN PROGRAM The pulse-driven program automatically adjusts the speed and incline of 0 (FL: 0). When the pulse-driven program is selected, an age setting will flash in the Incline display and the letters "AGE" will slow to enter your age to use the pulse-driven program. See step 6 on the chest pulse sensor. 2 Insert the key fully into the console...
... the program. 4 Enter your workout. gram, press the Select Program button repeat- HOW TO USE THE PULSE-DRIVEN PROGRAM The pulse-driven program automatically adjusts the speed and incline of 0 (FL: 0). When the pulse-driven program is selected, an age setting will flash in the Incline display and the letters "AGE" will slow to enter your age to use the pulse-driven program. See step 6 on the chest pulse sensor. 2 Insert the key fully into the console...

English Manual
Page 18
... pulse-driven program should not be increased any further. One target heart rate setting is detected. The walking belt will be shown in the twelve columns to the left. The treadmill will always attempt to keep your heart rate near the current target heart rate setting. if you decrease the incline, the speed will decrease. As you can adjust the setting with the Speed or Incline buttons. The program will automatically change...
... pulse-driven program should not be increased any further. One target heart rate setting is detected. The walking belt will be shown in the twelve columns to the left. The treadmill will always attempt to keep your heart rate near the current target heart rate setting. if you decrease the incline, the speed will decrease. As you can adjust the setting with the Speed or Incline buttons. The program will automatically change...

English Manual
Page 21
A. Follow the steps below . Plug one end of the audio cable into your CD player. Plug the Y-adapter into the jack on your VCR. RCA Y-adapter Audio Cable Adapter Wire removed from AUDIO OUT jack A moment after the button is pressed, your personal trainer will alert you when the speed and/or incline of the Y-adapter. Note: If the Time display is about to change . During the CD or video program, an electronic "chirping...
A. Follow the steps below . Plug one end of the audio cable into your CD player. Plug the Y-adapter into the jack on your VCR. RCA Y-adapter Audio Cable Adapter Wire removed from AUDIO OUT jack A moment after the button is pressed, your personal trainer will alert you when the speed and/or incline of the Y-adapter. Note: If the Time display is about to change . During the CD or video program, an electronic "chirping...

English Manual
Page 22
... program signals. • Make sure that the audio cable is properly connected, that it is completed, the walking belt will stop the walking belt at any time, press the Stop button on the console. Note: To use another flat surface instead of on the console. • See the instructions near the bottom of the treadmill does not change to the next settings of page 13. Note: If the speed or incline...
... program signals. • Make sure that the audio cable is properly connected, that it is completed, the walking belt will stop the walking belt at any time, press the Stop button on the console. Note: To use another flat surface instead of on the console. • See the instructions near the bottom of the treadmill does not change to the next settings of page 13. Note: If the speed or incline...

English Manual
Page 23
..., step onto the walking belt, and begin and the walking belt will change when a "chirp" is heard, make sure that the audio cable is properly connected, that it is not flashing. If the speed or incline settings are soon to step 5. See www.iFIT.com for speed and/or incline changes. Find the clip attached to use a program from our Web site. 1 Insert the key fully into the console. To use another program, press the Stop button...
..., step onto the walking belt, and begin and the walking belt will change when a "chirp" is heard, make sure that the audio cable is properly connected, that it is not flashing. If the speed or incline settings are soon to step 5. See www.iFIT.com for speed and/or incline changes. Find the clip attached to use a program from our Web site. 1 Insert the key fully into the console. To use another program, press the Stop button...

English Manual
Page 24
... continuously monitors your heart rate during your workouts. The Distance/Laps display will not operate. If a "d" appears in the display, the console is intended to change the unit of hours that the walking belt has moved. To select the information mode, hold down the Stop button while inserting the key into the console. THE INFORMATION MODE/DEMO MODE THE OPTIONAL CHEST PULSE SENSOR The console features an information mode that keeps track of the total number of hours that the treadmill...
... continuously monitors your heart rate during your workouts. The Distance/Laps display will not operate. If a "d" appears in the display, the console is intended to change the unit of hours that the walking belt has moved. To select the information mode, hold down the Stop button while inserting the key into the console. THE INFORMATION MODE/DEMO MODE THE OPTIONAL CHEST PULSE SENSOR The console features an information mode that keeps track of the total number of hours that the treadmill...

English Manual
Page 27
... the walking belt. Repeat until the walking belt is properly tightened. b 3"-4" Rear Roller Adjustment Bolts c. After a few minutes. Be careful to keep the walking belt centered. Plug in the console, press one of the treadmill does not change correctly or does not change when iFIT.com CD's and videos are played SOLUTION: a. ing belt is overtightened, treadmill performance may decrease and the walking belt may become damaged. When the walking belt is changing, remove the key. If the walking belt...
... the walking belt. Repeat until the walking belt is properly tightened. b 3"-4" Rear Roller Adjustment Bolts c. After a few minutes. Be careful to keep the walking belt centered. Plug in the console, press one of the treadmill does not change correctly or does not change when iFIT.com CD's and videos are played SOLUTION: a. ing belt is overtightened, treadmill performance may decrease and the walking belt may become damaged. When the walking belt is changing, remove the key. If the walking belt...

English Manual
Page 31
...; The NAME OF THE PRODUCT (NordicTrack® EXP2000 XI treadmill) • The SERIAL NUMBER OF THE PRODUCT (see the front cover of this manual) Description # 1 4" Black Wire, 2F # 1 12" Green Wire, 2 Ring # 3 8" Green Wire, F/Ring # 1 7" Green Wire, M/Ring # 1 User's Manual * Includes all parts shown in the center of this manual) • The KEY NUMBER AND DESCRIPTION OF THE PART(S) (see the PART LIST on pages 30 and 31 and...
...; The NAME OF THE PRODUCT (NordicTrack® EXP2000 XI treadmill) • The SERIAL NUMBER OF THE PRODUCT (see the front cover of this manual) Description # 1 4" Black Wire, 2F # 1 12" Green Wire, 2 Ring # 3 8" Green Wire, F/Ring # 1 7" Green Wire, M/Ring # 1 User's Manual * Includes all parts shown in the center of this manual) • The KEY NUMBER AND DESCRIPTION OF THE PART(S) (see the PART LIST on pages 30 and 31 and...

English Manual
Page 34
LIMITED WARRANTY WHAT IS COVERED-The entire NordicTrack® EXP2000 XI treadmill ("Product") is warranted to be free of sale; WHO IS COVERED-The original purchaser or any person receiving the Product as instructed, return any defected part for replacement or, if necessary, the entire product, for service where your Product is located or advise you may have other consequential damages of whatsoever...
LIMITED WARRANTY WHAT IS COVERED-The entire NordicTrack® EXP2000 XI treadmill ("Product") is warranted to be free of sale; WHO IS COVERED-The original purchaser or any person receiving the Product as instructed, return any defected part for replacement or, if necessary, the entire product, for service where your Product is located or advise you may have other consequential damages of whatsoever...


