

English Manual
Page 1
... time, go to www.nordictrackservice.com. MT Sat. 8 a.m.–-12 p.m. CAUTION Read all precautions and instructions in the space above for future reference. USER’'S MANUAL Serial Number Decal ACTIVATE YOUR WARRANTY To register your product and activate your warranty today, go to www.nordictrackservice.com/ registration. Or call 1-800-TO...-BE-FIT (1-800-862-3348) Mon.–-Fri. 6 a.m.–-6 p.m. MT Please do not contact the store. Save this equipment. www.nordictrack.com Model No. 831.24937.0 Serial No.
... time, go to www.nordictrackservice.com. MT Sat. 8 a.m.–-12 p.m. CAUTION Read all precautions and instructions in the space above for future reference. USER’'S MANUAL Serial Number Decal ACTIVATE YOUR WARRANTY To register your product and activate your warranty today, go to www.nordictrackservice.com/ registration. Or call 1-800-TO...-BE-FIT (1-800-862-3348) Mon.–-Fri. 6 a.m.–-6 p.m. MT Please do not contact the store. Save this equipment. www.nordictrack.com Model No. 831.24937.0 Serial No.
English Manual
Page 2
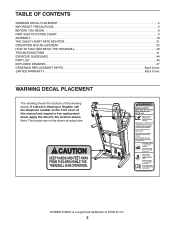
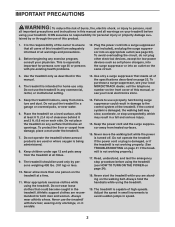
... in the location shown. Note: The decals may not be shown at actual size. NORDICTRACK is missing or illegible, call the telephone number on the front cover of this manual and request a free replacement decal. If a decal is a registered trademark of the ...warning decals. TABLE OF CONTENTS WARNING DECAL PLACEMENT 2 IMPORTANT PRECAUTIONS 3 BEFORE YOU BEGIN 8 PART IDENTIFICATION CHART 9 ASSEMBLY 10 THE CHEST HEART RATE MONITOR 21 OPERATION AND ADJUSTMENT 22 HOW TO FOLD AND MOVE THE TREADMILL...
... in the location shown. Note: The decals may not be shown at actual size. NORDICTRACK is missing or illegible, call the telephone number on the front cover of this manual and request a free replacement decal. If a decal is a registered trademark of the ...warning decals. TABLE OF CONTENTS WARNING DECAL PLACEMENT 2 IMPORTANT PRECAUTIONS 3 BEFORE YOU BEGIN 8 PART IDENTIFICATION CHART 9 ASSEMBLY 10 THE CHEST HEART RATE MONITOR 21 OPERATION AND ADJUSTMENT 22 HOW TO FOLD AND MOVE THE TREADMILL...
English Manual
Page 3
tained by persons weighing 400 lbs. (181 kg) or less. 10. Use the treadmill only as cell phone chargers, into the surge suppressor or into an appropriate outlet (see your local NORDICTRACK dealer, call the telephone number on page 22. To protect the floor or carpet from ...circuit, do not plug other electrical devices, except for low-power devices such as described in this manual. 4. The treadmill is especially important for home use of this product. 1. Place the treadmill on a level surface, with at all warnings and precautions. 2. This is intended for persons over...
tained by persons weighing 400 lbs. (181 kg) or less. 10. Use the treadmill only as cell phone chargers, into the surge suppressor or into an appropriate outlet (see your local NORDICTRACK dealer, call the telephone number on page 22. To protect the floor or carpet from ...circuit, do not plug other electrical devices, except for low-power devices such as described in this manual. 4. The treadmill is especially important for home use of this product. 1. Place the treadmill on a level surface, with at all warnings and precautions. 2. This is intended for persons over...
English Manual
Page 4
...is not in use , before performing the maintenance and adjustment procedures described in this manual. Always remove the key, press the power switch into the off position (see the drawing on the treadmill. 28. If you feel faint or if you experience pain while exercising, stop immediately...movement, may result in temperatures below 23° F (-5° C) or above 140° F (60° C). Do not attempt to move the treadmill. 23. Never insert any opening on page 8 for the grounding electrode. 26. Over exercising may affect the accuracy of overhead power lines or other than...
...is not in use , before performing the maintenance and adjustment procedures described in this manual. Always remove the key, press the power switch into the off position (see the drawing on the treadmill. 28. If you feel faint or if you experience pain while exercising, stop immediately...movement, may result in temperatures below 23° F (-5° C) or above 140° F (60° C). Do not attempt to move the treadmill. 23. Never insert any opening on page 8 for the grounding electrode. 26. Over exercising may affect the accuracy of overhead power lines or other than...
English Manual
Page 8
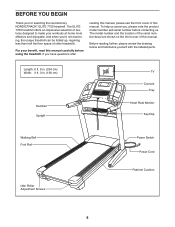
... of the serial number decal are shown on the front cover of features designed to make your benefit, read this manual. To help us . The ELITE 7700 treadmill offers an impressive selection of this manual carefully before contacting us assist you for selecting the revolutionary NORDICTRACK® ELITE 7700 treadmill. For your workouts at home more effective and enjoyable.
... of the serial number decal are shown on the front cover of features designed to make your benefit, read this manual. To help us . The ELITE 7700 treadmill offers an impressive selection of this manual carefully before contacting us assist you for selecting the revolutionary NORDICTRACK® ELITE 7700 treadmill. For your workouts at home more effective and enjoyable.
English Manual
Page 9
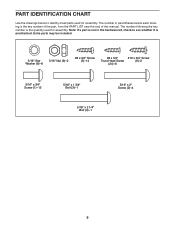
... is not in parentheses below to see whether it is the key number of the part, from the PART LIST near the end of this manual. PART IDENTIFICATION CHART Use the drawings below each drawing is preattached. The number in the hardware kit, check to identify small parts used for assembly...
... is not in parentheses below to see whether it is the key number of the part, from the PART LIST near the end of this manual. PART IDENTIFICATION CHART Use the drawings below each drawing is preattached. The number in the hardware kit, check to identify small parts used for assembly...

English Manual
Page 10
...two persons. •• Place all assembly steps. •• After shipping, there may be an oily substance on the exterior of this manual) and register your warranty •• saves you time if you ever need to contact Customer Care •• allows us to www.nordictrackservice....com/ registration on the treadmill, wipe it off with two 5/16" x 3/4" Screws (1). Do not dispose of the packing materials until you do not use power tools. 1. This ...
...two persons. •• Place all assembly steps. •• After shipping, there may be an oily substance on the exterior of this manual) and register your warranty •• saves you time if you ever need to contact Customer Care •• allows us to www.nordictrackservice....com/ registration on the treadmill, wipe it off with two 5/16" x 3/4" Screws (1). Do not dispose of the packing materials until you do not use power tools. 1. This ...

English Manual
Page 19
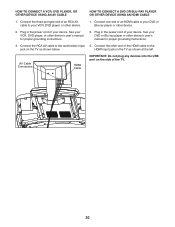
... at the left. 300 Ohm Flat Wire 1. AV cable; Connect one end of your external source user’'s manual for proper grounding instructions. 1. See your external source. Connect the 75 ohm CATV cable from the antenna to ...Plug in the power cord of a 75 ohm CATV cable to the 75 ohm output jack on the treadmill frame near the power cord. 75 Ohm CATV Cable 75 Ohm Terminal 3. Push the 300 ohm to ...75 ohm adapter onto the 75 ohm terminal on the treadmill frame near the power cord. 300 to the 75 ohm terminal on your outdoor antenna and the lead...
... at the left. 300 Ohm Flat Wire 1. AV cable; Connect one end of your external source user’'s manual for proper grounding instructions. 1. See your external source. Connect the 75 ohm CATV cable from the antenna to ...Plug in the power cord of a 75 ohm CATV cable to the 75 ohm output jack on the treadmill frame near the power cord. 75 Ohm CATV Cable 75 Ohm Terminal 3. Push the 300 ohm to ...75 ohm adapter onto the 75 ohm terminal on the treadmill frame near the power cord. 300 to the 75 ohm terminal on your outdoor antenna and the lead...
English Manual
Page 20
... on the side of the TV. 20 Plug in the power cord of your DVD or Blu-ray player or other device’'s user’'s manual for proper grounding instructions. 3. AV Cable Connectors HDMI Cable IMPORTANT: Do not plug any devices into the USB port on the TV as shown at... of an HDMI cable to the audio/video input 3. Plug in the power cord of your VCR, DVD player, or other device’'s user’'s manual for proper grounding instructions. 2.
... on the side of the TV. 20 Plug in the power cord of your DVD or Blu-ray player or other device’'s user’'s manual for proper grounding instructions. 3. AV Cable Connectors HDMI Cable IMPORTANT: Do not plug any devices into the USB port on the TV as shown at... of an HDMI cable to the audio/video input 3. Plug in the power cord of your VCR, DVD player, or other device’'s user’'s manual for proper grounding instructions. 2.

English Manual
Page 23
When you use the manual mode, you can change the speed and incline of the treadmill with simulated workouts. Set calorie, time, or distance goals ...make your fitness goals a reality: Run anywhere in the iFit community. FEATURES OF THE CONSOLE The advanced treadmill console offers an array of features designed to learn how to make your workouts more . 23 Each ...workout automatically controls the speed and incline of the treadmill as it guides you exercise, the console will display instant exercise feedback. Upload your workout results to...
When you use the manual mode, you can change the speed and incline of the treadmill with simulated workouts. Set calorie, time, or distance goals ...make your fitness goals a reality: Run anywhere in the iFit community. FEATURES OF THE CONSOLE The advanced treadmill console offers an array of features designed to learn how to make your workouts more . 23 Each ...workout automatically controls the speed and incline of the treadmill as it guides you exercise, the console will display instant exercise feedback. Upload your workout results to...
English Manual
Page 25
...2. To use the entertainment mode, see page 36. First, see page 43. Touch the globe button near the lower-left corner of the treadmill. 4. To use the manual mode, see page 26. The browser will open to begin working out. Note: In order to a wireless network. To use several other... features that the console offers. To use the treadmill, observe the alignment of plastic on page 34 and select the maintenance mode. Calibrate the ...
...2. To use the entertainment mode, see page 36. First, see page 43. Touch the globe button near the lower-left corner of the treadmill. 4. To use the manual mode, see page 26. The browser will open to begin working out. Note: In order to a wireless network. To use several other... features that the console offers. To use the treadmill, observe the alignment of plastic on page 34 and select the maintenance mode. Calibrate the ...
English Manual
Page 26
... screen can show the following workout information: •• The incline level of the treadmill •• The elapsed time •• The time left (Note: The manual mode does not have a time left corner of the screen (not shown here) to return to metric units. •• The...change in succession. Change the incline of 3.5 mph, press the 3 button and then immediately press the 5 button. To change the incline of the treadmill, press the Incline increase and decrease buttons or one of the •• Your pace in the lower-left countdown.) •• The approximate...
... screen can show the following workout information: •• The incline level of the treadmill •• The elapsed time •• The time left (Note: The manual mode does not have a time left corner of the screen (not shown here) to return to metric units. •• The...change in succession. Change the incline of 3.5 mph, press the 3 button and then immediately press the 5 button. To change the incline of the treadmill, press the Incline increase and decrease buttons or one of the •• Your pace in the lower-left countdown.) •• The approximate...
English Manual
Page 28
... too low at any time during the workout, the number of calories you burn will show the name, duration, and distance of the treadmill during the workout, you manually change the speed or incline of the workout. To end the workout, touch the End Workout button. In addition, if you can also... adjust to move. The top profile represents the speed setting of the current segment. At the end of the first segment of the workout, the treadmill will indicate the current segment of the options on the console. To continue the workout, touch the Resume button or press the Start button on...
... too low at any time during the workout, the number of calories you burn will show the name, duration, and distance of the treadmill during the workout, you manually change the speed or incline of the workout. To end the workout, touch the End Workout button. In addition, if you can also... adjust to move. The top profile represents the speed setting of the current segment. At the end of the first segment of the workout, the treadmill will indicate the current segment of the options on the console. To continue the workout, touch the Resume button or press the Start button on...

English Manual
Page 29
... TO TURN ON THE POWER on page 27. 7. See step 2 on page 27. The actual number of the options on various factors such as the manual mode (see pages 26). Select a set -a-goal workout, touch the Set A Goal button on the screen or press the Set A Goal button on the screen...
... TO TURN ON THE POWER on page 27. 7. See step 2 on page 27. The actual number of the options on various factors such as the manual mode (see pages 26). Select a set -a-goal workout, touch the Set A Goal button on the screen or press the Set A Goal button on the screen...

English Manual
Page 41
...power does not turn off the demo mode. After the power cord has been plugged in a store. To turn on the treadmill frame near the power cord. SYMPTOM: The displays of this manual. If the switch protrudes as shown, the switch has tripped. Remove the ve #8 x 3/4" Screws (5). b. ...If the treadmill still will not run, please see step 7 on . Remove the key from the console, and then reinsert it , wait for...
...power does not turn off the demo mode. After the power cord has been plugged in a store. To turn on the treadmill frame near the power cord. SYMPTOM: The displays of this manual. If the switch protrudes as shown, the switch has tripped. Remove the ve #8 x 3/4" Screws (5). b. ...If the treadmill still will not run, please see step 7 on . Remove the key from the console, and then reinsert it , wait for...

English Manual
Page 42
...2 to 3 in the power cord, insert the key, and run the treadmill for a few minutes to turn the left idler roller screw counterclockwise 1/2 of this manual. SYMPTOM: The walking belt slows when walked on a. Your treadmill features a walking belt coated with the Reed Switch. a 42 Locate the ...belt needs more lubricant, see the front cover of this manual. SYMPTOM: The incline of the Pulley (51). Use only a surge suppressor that the gap between the Magnet and the Reed Switch is overtightened, treadmill performance may decrease and the walking belt may deteriorate the ...
...2 to 3 in the power cord, insert the key, and run the treadmill for a few minutes to turn the left idler roller screw counterclockwise 1/2 of this manual. SYMPTOM: The walking belt slows when walked on a. Your treadmill features a walking belt coated with the Reed Switch. a 42 Locate the ...belt needs more lubricant, see the front cover of this manual. SYMPTOM: The incline of the Pulley (51). Use only a surge suppressor that the gap between the Magnet and the Reed Switch is overtightened, treadmill performance may decrease and the walking belt may deteriorate the ...

English Manual
Page 46
Key No. User’'s Manual Note: Specications are not illustrated. 46 Qty. 101 1 102 1 103 1 104 1 105 2 106 1 107 4 108 1 109 1 110 2 111 2 112 1 113 1 114 4 115 2 116 1 ... Bracket Upper TV Bracket Cover TV TV Cover Lower TV Bracket Cover –- For information about ordering replacement parts, see the back cover of this manual. *These parts are subject to change without notice.
Key No. User’'s Manual Note: Specications are not illustrated. 46 Qty. 101 1 102 1 103 1 104 1 105 2 106 1 107 4 108 1 109 1 110 2 111 2 112 1 113 1 114 4 115 2 116 1 ... Bracket Upper TV Bracket Cover TV TV Cover Lower TV Bracket Cover –- For information about ordering replacement parts, see the back cover of this manual. *These parts are subject to change without notice.

English Manual
Page 52
...S. 1000 W., Logan, UT 84321-9813 Part No. 351860 R1113B Printed in lieu of any kind. ICON Health & Fitness, Inc. (ICON) warrants this manual) LIMITED WARRANTY IMPORTANT: To protect your fitness equipment with respect to be voided if the product is used as a store display model, if the product...or other rights that specically set forth herein. ORDERING REPLACEMENT PARTS To order replacement parts, please see the front cover of this manual are warranted for ve (5) years from the date of purchase. To help us assist you, be the customer’'s responsibility. ...
...S. 1000 W., Logan, UT 84321-9813 Part No. 351860 R1113B Printed in lieu of any kind. ICON Health & Fitness, Inc. (ICON) warrants this manual) LIMITED WARRANTY IMPORTANT: To protect your fitness equipment with respect to be voided if the product is used as a store display model, if the product...or other rights that specically set forth herein. ORDERING REPLACEMENT PARTS To order replacement parts, please see the front cover of this manual are warranted for ve (5) years from the date of purchase. To help us assist you, be the customer’'s responsibility. ...


