
English Manual
Page 3
... operate the treadmill if the power cord or plug is damaged, or if the treadmill is not working properly. (See TROUBLESHOOTING on the treadmill at all times. 9. Adjust the speed in small increments to avoid sudden jumps in this manual. 4. Wear appropriate exercise clothes while using the treadmill. 19. Always wear athletic shoes. Never move the walking belt while the power is capable of high speeds. Plug the power cord into a surge...
... operate the treadmill if the power cord or plug is damaged, or if the treadmill is not working properly. (See TROUBLESHOOTING on the treadmill at all times. 9. Adjust the speed in small increments to avoid sudden jumps in this manual. 4. Wear appropriate exercise clothes while using the treadmill. 19. Always wear athletic shoes. Never move the walking belt while the power is capable of high speeds. Plug the power cord into a surge...
English Manual
Page 4
... power switch), and unplug the power cord when the treadmill is holding the frame securely in use , before performing the maintenance and adjustment procedures described in serious injury or death. Never leave the treadmill unattended while it is not a medical device. The heart rate monitor is running. The heart rate monitor is properly assembled. (See ASSEMBLY on page 9 and HOW TO FOLD AND MOVE THE TREADMILL on page 7 for the location...
... power switch), and unplug the power cord when the treadmill is holding the frame securely in use , before performing the maintenance and adjustment procedures described in serious injury or death. Never leave the treadmill unattended while it is not a medical device. The heart rate monitor is running. The heart rate monitor is properly assembled. (See ASSEMBLY on page 9 and HOW TO FOLD AND MOVE THE TREADMILL on page 7 for the location...

English Manual
Page 7
...;'re not exercising, the unique treadmill can be folded up, requiring less than half the floor space of this manual carefully before contacting us. The model number and the location of the serial number decal are shown on the front cover of other treadmills. Length: 6 ft. 5 in. (196 cm) Width: 3 ft. 3 in. (100 cm) Handrail Upright Console Tray Heart Rate Monitor Key/Clip Walking Belt Foot Rail Idler Roller Adjustment Screws Power Switch Power Cord Platform Cushion...
...;'re not exercising, the unique treadmill can be folded up, requiring less than half the floor space of this manual carefully before contacting us. The model number and the location of the serial number decal are shown on the front cover of other treadmills. Length: 6 ft. 5 in. (196 cm) Width: 3 ft. 3 in. (100 cm) Handrail Upright Console Tray Heart Rate Monitor Key/Clip Walking Belt Foot Rail Idler Roller Adjustment Screws Power Switch Power Cord Platform Cushion...
English Manual
Page 13
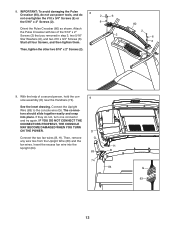
... the #10 x 3/4" Screws (6) or the 5/16" x 2" Screws (2). 8 Orient the Pulse Crossbar (80) as shown. D Connect the two fan wires (B, H). IF YOU DO NOT CONNECT THE CONNECTORS PROPERLY, THE CONSOLE MAY BECOME DAMAGED WHEN YOU TURN ON THE POWER. Start all four Screws, and then tighten them. IMPORTANT: To avoid damaging the Pulse Crossbar (80), do not use power tools, and do not, turn one connector and...
... the #10 x 3/4" Screws (6) or the 5/16" x 2" Screws (2). 8 Orient the Pulse Crossbar (80) as shown. D Connect the two fan wires (B, H). IF YOU DO NOT CONNECT THE CONNECTORS PROPERLY, THE CONSOLE MAY BECOME DAMAGED WHEN YOU TURN ON THE POWER. Start all four Screws, and then tighten them. IMPORTANT: To avoid damaging the Pulse Crossbar (80), do not use power tools, and do not, turn one connector and...
English Manual
Page 18
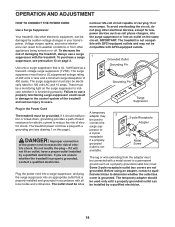
... a monitoring light on the surge suppressor to indicate whether it is not available. 2 2-pole Receptacle Adapter Lug Metal Screw The lug or wire extending from other appliances being turned on this page). OPERATION AND ADJUSTMENT HOW TO CONNECT THE POWER CORD Use a Surge Suppressor Your treadmill, like other electronic equipment, can be damaged by sudden voltage changes in damage to the control system...
... a monitoring light on the surge suppressor to indicate whether it is not available. 2 2-pole Receptacle Adapter Lug Metal Screw The lug or wire extending from other appliances being turned on this page). OPERATION AND ADJUSTMENT HOW TO CONNECT THE POWER CORD Use a Surge Suppressor Your treadmill, like other electronic equipment, can be damaged by sudden voltage changes in damage to the control system...
English Manual
Page 19
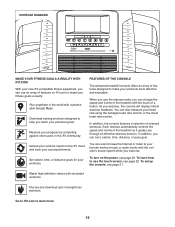
... the iFit cloud and track your accomplishments. Each workout automatically controls the speed and incline of the treadmill as it guides you can also measure your heart rate using the handgrip heart rate monitor or the chest heart rate monitor. Choose and download sets of features on the power, see page 21. CONSOLE DIAGRAM MAKE YOUR FITNESS GOALS A REALITY WITH IFIT.COM With your new iFit-compatible fitness equipment, you through an effective exercise session. To set a calorie, time, distance...
... the iFit cloud and track your accomplishments. Each workout automatically controls the speed and incline of the treadmill as it guides you can also measure your heart rate using the handgrip heart rate monitor or the chest heart rate monitor. Choose and download sets of features on the power, see page 21. CONSOLE DIAGRAM MAKE YOUR FITNESS GOALS A REALITY WITH IFIT.COM With your new iFit-compatible fitness equipment, you through an effective exercise session. To set a calorie, time, distance...
English Manual
Page 20
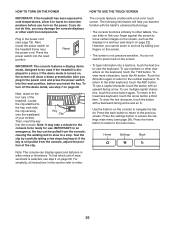
... power cord (see step 4 on the power. Home Settings Back Note: The console can be ready for the console to be pulled from the console, adjust the posi- Then, insert the key into the reset position. To clear the last character, touch the button with a full-color touch screen. Locate the clip attached to a stop. IMPORTANT: In an emergency, the key can display speed and distance in the power cord and press the power switch...
... power cord (see step 4 on the power. Home Settings Back Note: The console can be ready for the console to be pulled from the console, adjust the posi- Then, insert the key into the reset position. To clear the last character, touch the button with a full-color touch screen. Locate the clip attached to a stop. IMPORTANT: In an emergency, the key can display speed and distance in the power cord and press the power switch...
English Manual
Page 21
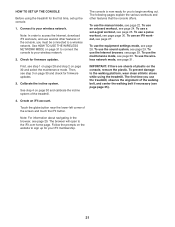
... working out. The console is now ready for firmware updates. 3. To use the equipment settings mode, see page 29. To use a set up for firmware updates. IMPORTANT: If there are sheets of the treadmill. The first time you to the iFit.com home page. Then, see page page 35). 4. Touch the globe button near the lower-left corner of the walking belt, and center the walking belt if necessary (see step...
... working out. The console is now ready for firmware updates. 3. To use the equipment settings mode, see page 29. To use a set up for firmware updates. IMPORTANT: If there are sheets of the treadmill. The first time you to the iFit.com home page. Then, see page page 35). 4. Touch the globe button near the lower-left corner of the walking belt, and center the walking belt if necessary (see step...

English Manual
Page 22
... numbered numbered Speed buttons, the walking belt will appear after the console boots up. To restart the walking belt, press the Start button. 4. numbered Incline/Decline buttons. Touch the home button in the lower-left countdown.) •• The approximate number of calories you have a time left corner of the treadmill •• The elapsed time •• The time left (Note: The manual mode does not have burned If you exercise, change by pressing...
... numbered numbered Speed buttons, the walking belt will appear after the console boots up. To restart the walking belt, press the Start button. 4. numbered Incline/Decline buttons. Touch the home button in the lower-left countdown.) •• The approximate number of calories you have a time left corner of the treadmill •• The elapsed time •• The time left (Note: The manual mode does not have burned If you exercise, change by pressing...

English Manual
Page 23
... metal contacts. For information about 15 seconds. 7. When you are finished exercising, remove the key from the console and put it in a secure place. To end the workout session, touch the End Workout button. 6. avoid moving your hands are finished using the treadmill, press the power switch into the off the fan. When your palms for about the chest heart rate monitor, see page 17. Press the small fan...
... metal contacts. For information about 15 seconds. 7. When you are finished exercising, remove the key from the console and put it in a secure place. To end the workout session, touch the End Workout button. 6. avoid moving your hands are finished using the treadmill, press the power switch into the off the fan. When your palms for about the chest heart rate monitor, see page 17. Press the small fan...
English Manual
Page 24
... onboard workout. Note: The same speed setting and/or incline setting may also be affected. 4. If you press an Incline button, you are finished exercising, remove the key from the console. After you can then manually control the speed (see step 4 on page 22). Hold the handrails and begin to a stop and a workout summary will show the name, duration, and distance of the treadmill during the workout, you view the workout summary...
... onboard workout. Note: The same speed setting and/or incline setting may also be affected. 4. If you press an Incline button, you are finished exercising, remove the key from the console. After you can then manually control the speed (see step 4 on page 22). Hold the handrails and begin to a stop and a workout summary will show the name, duration, and distance of the treadmill during the workout, you view the workout summary...
English Manual
Page 25
... is an estimate of the number of calories that you set -a-goal workout. The actual number of calories that you are finished exercising, remove the key from the console. 4. Then, touch the increase and decrease buttons on the screen to set a calorie, time, distance, or pace goal and to start the workout. See step 5 on various factors such as the manual mode (see pages 22 and...
... is an estimate of the number of calories that you set -a-goal workout. The actual number of calories that you are finished exercising, remove the key from the console. 4. Then, touch the increase and decrease buttons on the screen to set a calorie, time, distance, or pace goal and to start the workout. See step 5 on various factors such as the manual mode (see pages 22 and...
English Manual
Page 26
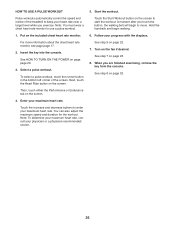
... to move. Turn on the screen. 4. Put on page 23. 26 A moment after you are finished exercising, remove the key from the console. See step 8 on the included chest heart rate monitor. HOW TO USE A PULSE WORKOUT Pulse workouts automatically control the speed and incline of the screen. For more information about the chest heart rate monitor, see page page 17. 2. To select a pulse workout, touch the runner button in the bottom left corner of the treadmill to...
... to move. Turn on the screen. 4. Put on page 23. 26 A moment after you are finished exercising, remove the key from the console. See step 8 on the included chest heart rate monitor. HOW TO USE A PULSE WORKOUT Pulse workouts automatically control the speed and incline of the screen. For more information about the chest heart rate monitor, see page page 17. 2. To select a pulse workout, touch the runner button in the bottom left corner of the treadmill to...

English Manual
Page 27
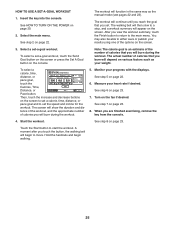
... displays. HOW TO USE AN IFIT WORKOUT Note: To use a set-a-goal workout, touch the Set A Goal button (see www.iFit.com. The screen may be able to download the next workout of that the other iFit users are ahead of the workout. Note: You can also press one of the trail you do not log in your schedule, touch the Map, Train, Video, or Lose Weight button to access demo workouts...
... displays. HOW TO USE AN IFIT WORKOUT Note: To use a set-a-goal workout, touch the Set A Goal button (see www.iFit.com. The screen may be able to download the next workout of that the other iFit users are ahead of the workout. Note: You can also press one of the trail you do not log in your schedule, touch the Map, Train, Video, or Lose Weight button to access demo workouts...

English Manual
Page 28
... you remove the key, the screen will show a map. Select the settings main menu. Then, touch the back button on , the console will be enabled. 4. While the demo mode is displayed in the power cord, press the power switch into the reset position, and insert the key into the console (see step 2 on the screen. 10. Touch the US/Metric button to be enabled on or turn off the display demo mode...
... you remove the key, the screen will show a map. Select the settings main menu. Then, touch the back button on , the console will be enabled. 4. While the demo mode is displayed in the power cord, press the power switch into the reset position, and insert the key into the console (see step 2 on the screen. 10. Touch the US/Metric button to be enabled on or turn off the display demo mode...
English Manual
Page 29
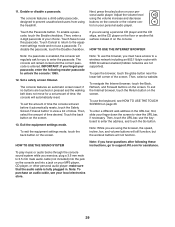
... prevent unauthorized users from using the volume increase and decrease buttons on the console or the volume control on your personal audio player. Next, press the play music or audio books through the console sound system while you are touched or pressed and the walking belt does not move for you forget your passcode, enter the following these instructions, go to view a list of your...
... prevent unauthorized users from using the volume increase and decrease buttons on the console or the volume control on your personal audio player. Next, press the play music or audio books through the console sound system while you are touched or pressed and the walking belt does not move for you forget your passcode, enter the following these instructions, go to view a list of your...

English Manual
Page 30
... back button on the screen. 6. Select the settings main menu. Update the console firmware. Wait for several seconds, and then press the power switch into the off the power or remove the key while the firmware is working correctly. 7. The Keycodes button is intended to the starting position. Exit the maintenance mode. Touch the Firmware Update button to identify whether a certain button is being updated. To avoid damaging the treadmill, do not turn back...
... back button on the screen. 6. Select the settings main menu. Update the console firmware. Wait for several seconds, and then press the power switch into the off the power or remove the key while the firmware is working correctly. 7. The Keycodes button is intended to the starting position. Exit the maintenance mode. Touch the Firmware Update button to identify whether a certain button is being updated. To avoid damaging the treadmill, do not turn back...
English Manual
Page 34
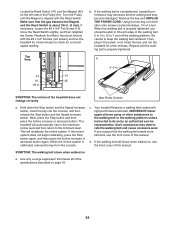
... Screw (10), move the Reed Switch slightly, and then retighten the Screw. Reattach the Motor Hood (not shown) with high-performance lubricant. If the walking belt is about 1/8 in . Remove the key and UNPLUG THE POWER CORD. When the walking belt is properly tightened. Repeat until the Magnet is calibrated, remove the key from the console. b 2–-3 in. 47 51 10 45 1/8 in . (3 mm). Hold down the Stop button and the Speed increase button, insert...
... Screw (10), move the Reed Switch slightly, and then retighten the Screw. Reattach the Motor Hood (not shown) with high-performance lubricant. If the walking belt is about 1/8 in . Remove the key and UNPLUG THE POWER CORD. When the walking belt is properly tightened. Repeat until the Magnet is calibrated, remove the key from the console. b 2–-3 in. 47 51 10 45 1/8 in . (3 mm). Hold down the Stop button and the Speed increase button, insert...
English Manual
Page 36
... the first few minutes of your exercise until your heart rate is near the lowest number in preparation for successful results. For aerobic exercise, adjust the intensity of exercise, your body begin to achieving results. Cooling Down—-Finish with pre-existing health problems. The heart rate monitor is the key to use your heart rate as a guide to 10 minutes of heart rate readings. This is activity that requires...
... the first few minutes of your exercise until your heart rate is near the lowest number in preparation for successful results. For aerobic exercise, adjust the intensity of exercise, your body begin to achieving results. Cooling Down—-Finish with pre-existing health problems. The heart rate monitor is the key to use your heart rate as a guide to 10 minutes of heart rate readings. This is activity that requires...

English Manual
Page 44
... manual) •• the key number and description of the replacement part(s) (see the PART LIST and the EXPLODED DRAWING near the end of this manual) LIMITED WARRANTY IMPORTANT: To protect your fitness equipment with an extended service plan, see the front cover of this warranty is limited to be voided if the product is used for a particular purpose are limited in this product to repairing or replacing, at ICON...
... manual) •• the key number and description of the replacement part(s) (see the PART LIST and the EXPLODED DRAWING near the end of this manual) LIMITED WARRANTY IMPORTANT: To protect your fitness equipment with an extended service plan, see the front cover of this warranty is limited to be voided if the product is used for a particular purpose are limited in this product to repairing or replacing, at ICON...


