
English Manual
Page 2
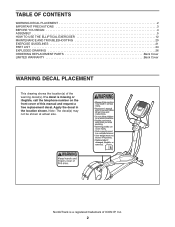
... BEGIN 4 ASSEMBLY 5 HOW TO USE THE ELLIPTICAL EXERCISER 12 MAINTENANCE AND TROUBLESHOOTING 20 EXERCISE GUIDELINES 21 PART LIST 24 EXPLODED DRAWING 26 ORDERING REPLACEMENT PARTS Back Cover LIMITED WARRANTY Back Cover WARNING DECAL PLACEMENT This drawing shows the location(s) of ICON IP, Inc. 2 Note: The decal(s) may not be shown at actual size. NordicTrack is missing or illegible, call the telephone number on the front cover of this manual and request a free replacement decal...
... BEGIN 4 ASSEMBLY 5 HOW TO USE THE ELLIPTICAL EXERCISER 12 MAINTENANCE AND TROUBLESHOOTING 20 EXERCISE GUIDELINES 21 PART LIST 24 EXPLODED DRAWING 26 ORDERING REPLACEMENT PARTS Back Cover LIMITED WARRANTY Back Cover WARNING DECAL PLACEMENT This drawing shows the location(s) of ICON IP, Inc. 2 Note: The decal(s) may not be shown at actual size. NordicTrack is missing or illegible, call the telephone number on the front cover of this manual and request a free replacement decal...

English Manual
Page 3
... body arms when mounting, dismounting, or using your elliptical exerciser in a commercial, rental, or institutional setting. 4. When you feel pain or dizziness while exercising, stop exercising, allow the pedals to slowly come to ensure that all users of the elliptical exerciser are adequately informed of all precautions. 3. Do not use only. Make sure that could become caught on your elliptical exerciser. The pulse sensor is especially important for home use your elliptical exerciser...
... body arms when mounting, dismounting, or using your elliptical exerciser in a commercial, rental, or institutional setting. 4. When you feel pain or dizziness while exercising, stop exercising, allow the pedals to slowly come to ensure that all users of the elliptical exerciser are adequately informed of all precautions. 3. Do not use only. Make sure that could become caught on your elliptical exerciser. The pulse sensor is especially important for home use your elliptical exerciser...
English Manual
Page 4
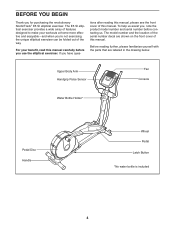
... revolutionary NordicTrack® E5 SI elliptical exerciser. Before reading further, please familiarize yourself with the parts that are shown on the front cover of this manual. Upper Body Arm Handgrip Pulse Sensor Fan Console Water Bottle Holder* Pedal Disc Handle Wheel Pedal Latch Button *No water bottle is included 4 The model number and the location of the way. For your workouts at home more effective and enjoyable-and when you use the elliptical exerciser. To...
... revolutionary NordicTrack® E5 SI elliptical exerciser. Before reading further, please familiarize yourself with the parts that are shown on the front cover of this manual. Upper Body Arm Handgrip Pulse Sensor Fan Console Water Bottle Holder* Pedal Disc Handle Wheel Pedal Latch Button *No water bottle is included 4 The model number and the location of the way. For your workouts at home more effective and enjoyable-and when you use the elliptical exerciser. To...
English Manual
Page 5
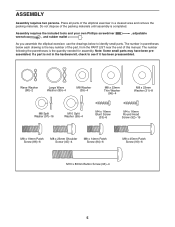
... x 45mm Patch Screw (90)-6 M10 x 80mm Button Screw (93)-4 5 Place all parts of this manual. Do not dispose of the packing materials until assembly is the quantity needed for assembly. The number following the parentheses is completed. ASSEMBLY Assembly requires two persons. Assembly requires the included tools and your own Phillips screwdriver wrench , and rubber mallet . , adjustable As you assemble the elliptical exerciser, use the drawings below...
... x 45mm Patch Screw (90)-6 M10 x 80mm Button Screw (93)-4 5 Place all parts of this manual. Do not dispose of the packing materials until assembly is the quantity needed for assembly. The number following the parentheses is completed. ASSEMBLY Assembly requires two persons. Assembly requires the included tools and your own Phillips screwdriver wrench , and rubber mallet . , adjustable As you assemble the elliptical exerciser, use the drawings below...
English Manual
Page 6
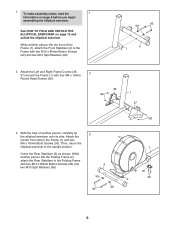
... the upright position. Orient the Rear Stabilizer (3) as shown. 1. To make assembly easier, read the 1 information on page 12 and unfold the elliptical exerciser. Then, return the elliptical exerciser to the Frame (1) with two M10 x 80mm Button Screws (93) and two M10 Split Washers (99). 93 99 1 4 2. While another person lifts the front of another person lifts the Folding Frame (2), attach the Rear Stabilizer...
... the upright position. Orient the Rear Stabilizer (3) as shown. 1. To make assembly easier, read the 1 information on page 12 and unfold the elliptical exerciser. Then, return the elliptical exerciser to the Frame (1) with two M10 x 80mm Button Screws (93) and two M10 Split Washers (99). 93 99 1 4 2. While another person lifts the front of another person lifts the Folding Frame (2), attach the Rear Stabilizer...

English Manual
Page 7
... (1). Orient the Left and Right Upright Covers (19, 20) as shown. Then, attach the Upright Covers around the Upright (10) with four M8 x 19mm Patch Screws (86) and four M8 Split Washers (97). Tip: Avoid pinching the Wire Harnesses (64, 65). 4 While another person holds the Upright (10) near the Frame (1), connect the Upper Wire Harness (65) to the Lower Wire Harness (64).
... (1). Orient the Left and Right Upright Covers (19, 20) as shown. Then, attach the Upright Covers around the Upright (10) with four M8 x 19mm Patch Screws (86) and four M8 Split Washers (97). Tip: Avoid pinching the Wire Harnesses (64, 65). 4 While another person holds the Upright (10) near the Frame (1), connect the Upper Wire Harness (65) to the Lower Wire Harness (64).

English Manual
Page 9
... 9. alkaline batteries are 9 recommended. Plug one end of this product or call the telephone number on the console; 8. Otherwise, you purchased this manual. Remove the battery cover, insert the batteries into the jack on the cover of the AC adapter into the Console, and reattach the battery cover. To purchase an optional AC adapter, contact the store where you may dam- Attach the Left Rear Upper Body Cover (26...
... 9. alkaline batteries are 9 recommended. Plug one end of this product or call the telephone number on the console; 8. Otherwise, you purchased this manual. Remove the battery cover, insert the batteries into the jack on the cover of the AC adapter into the Console, and reattach the battery cover. To purchase an optional AC adapter, contact the store where you may dam- Attach the Left Rear Upper Body Cover (26...

English Manual
Page 10
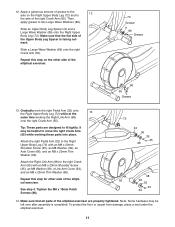
... Console (11) near the Upright (10), connect the console wire harness to the Right Link Arm (98) with four M4 x 16mm Blunt Screws (33). 10 Avoid pinching the wire harnesses 10 11 65 33 Console Wire Harness 33 11. Attach the Right Pedal (35) to the Upper Wire Harness (65). Identify the Right Pedal ...(35) and the Right Link Arm (98), which are marked with "R" stickers, 11 and orient them as shown. Repeat this step for the Left Pedal (not shown) and the Left Link Arm...
... Console (11) near the Upright (10), connect the console wire harness to the Right Link Arm (98) with four M4 x 16mm Blunt Screws (33). 10 Avoid pinching the wire harnesses 10 11 65 33 Console Wire Harness 33 11. Attach the Right Pedal (35) to the Upper Wire Harness (65). Identify the Right Pedal ...(35) and the Right Link Arm (98), which are marked with "R" stickers, 11 and orient them as shown. Repeat this step for the Left Pedal (not shown) and the Left Link Arm...
English Manual
Page 11
... Right Upper Body Leg (72) with an M8 x 23mm Shoulder Screw (45), an M8 Washer (39), a Link Arm Cover (52), and an M8 x 23mm Thin Washer (96). Make sure that all parts of the elliptical exerciser. Then, apply grease to move the right Crank Arm (55) while working the Right Link Arm (98) onto the right Crank Arm (55). Attach the right Pedal Arm (32) to fit tightly. Attach the Right...
... Right Upper Body Leg (72) with an M8 x 23mm Shoulder Screw (45), an M8 Washer (39), a Link Arm Cover (52), and an M8 x 23mm Thin Washer (96). Make sure that all parts of the elliptical exerciser. Then, apply grease to move the right Crank Arm (55) while working the Right Link Arm (98) onto the right Crank Arm (55). Attach the right Pedal Arm (32) to fit tightly. Attach the Right...
English Manual
Page 12
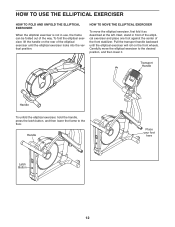
... Handle To unfold the elliptical exerciser, hold the handle, press the latch button, and then lower the frame to the desired position, and then lower it as described at the left. Pull the transport handle backward until the elliptical exerciser locks into the vertical position. Carefully move the elliptical exerciser, first fold it . HOW TO USE THE ELLIPTICAL EXERCISER HOW TO FOLD AND UNFOLD THE ELLIPTICAL EXERCISER When the elliptical exerciser is not...
... Handle To unfold the elliptical exerciser, hold the handle, press the latch button, and then lower the frame to the desired position, and then lower it as described at the left. Pull the transport handle backward until the elliptical exerciser locks into the vertical position. Carefully move the elliptical exerciser, first fold it . HOW TO USE THE ELLIPTICAL EXERCISER HOW TO FOLD AND UNFOLD THE ELLIPTICAL EXERCISER When the elliptical exerciser is not...

English Manual
Page 14
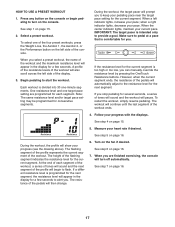
... heart rate using the handgrip pulse sensor. In addition, the console features two heart rate workouts that change the resistance of the pedals with the 8-week Weight Loss workout. CONSOLE DIAGRAM FEATURES OF THE CONSOLE The advanced console offers an array of features designed to keep your heart rate near target heart rate settings while you exercise. The console also offers four preset workouts. iFIT cards are available separately. To use a heart rate workout, see page 17. To use an iFIT workout, see the front cover...
... heart rate using the handgrip pulse sensor. In addition, the console features two heart rate workouts that change the resistance of the pedals with the 8-week Weight Loss workout. CONSOLE DIAGRAM FEATURES OF THE CONSOLE The advanced console offers an array of features designed to keep your heart rate near target heart rate settings while you exercise. The console also offers four preset workouts. iFIT cards are available separately. To use a heart rate workout, see page 17. To use an iFIT workout, see the front cover...
English Manual
Page 15
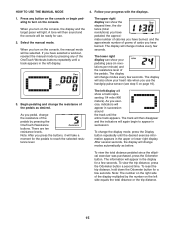
... display can show a track representing 1/4 mile (400 meters). As you have burned. To view the total distance pedaled since the elliptical exerciser was purchased, press the Odometer button. To reset the trip distance, hold down the Odometer button for a few seconds. Select the manual mode. When you have selected a workout, reselect the manual mode by pressing the OneTouch Resistance buttons. The display will appear in the upper or lower right display. Begin pedaling and change modes...
... display can show a track representing 1/4 mile (400 meters). As you have burned. To view the total distance pedaled since the elliptical exerciser was purchased, press the Odometer button. To reset the trip distance, hold down the Odometer button for a few seconds. Select the manual mode. When you have selected a workout, reselect the manual mode by pressing the OneTouch Resistance buttons. The display will appear in the upper or lower right display. Begin pedaling and change modes...
English Manual
Page 16
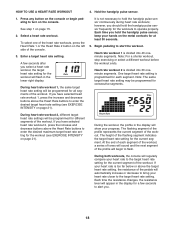
... five minutes, the console will turn off and the displays will automatically increase or decrease as described. Avoid moving your heart rate if desired. 6. To turn on the fan at high speed, press the Fan button. To turn off automatically. never use alcohol, abrasives, or chemicals to squeeze the metal contacts tightly. If the pedals do not move for several seconds, a series of the fan...
... five minutes, the console will turn off and the displays will automatically increase or decrease as described. Avoid moving your heart rate if desired. 6. To turn on the fan at high speed, press the Fan button. To turn off automatically. never use alcohol, abrasives, or chemicals to squeeze the metal contacts tightly. If the pedals do not move for several seconds, a series of the fan...
English Manual
Page 17
... can manually override the resistance level by pressing the OneTouch Resistance buttons. Turn on page 16. See step 1 on page 15. 5. when a right indicator lights, decrease your current pace. Make sure to flash. Begin pedaling to keep your heart rate if desired. One resistance level and one target pace setting are finished exercising, the console will pause. To restart the workout, simply resume pedaling. See step 4 on...
... can manually override the resistance level by pressing the OneTouch Resistance buttons. Turn on page 16. See step 1 on page 15. 5. when a right indicator lights, decrease your current pace. Make sure to flash. Begin pedaling to keep your heart rate if desired. One resistance level and one target pace setting are finished exercising, the console will pause. To restart the workout, simply resume pedaling. See step 4 on...
English Manual
Page 18
... pedaling to enter the desired target heart rate setting (see EXERCISE INTENSITY on page 21). Note: The same target heart rate setting may be programmed for the current segment of the console. 3. During the workout, the profile in the lower right display. Each time you should hold the handgrip pulse sensor continuously during heart rate workouts; See step 1 on the left side of the workout. however, you hold the handgrip pulse sensor...
... pedaling to enter the desired target heart rate setting (see EXERCISE INTENSITY on page 21). Note: The same target heart rate setting may be programmed for the current segment of the console. 3. During the workout, the profile in the lower right display. Each time you should hold the handgrip pulse sensor continuously during heart rate workouts; See step 1 on the left side of the workout. however, you hold the handgrip pulse sensor...
English Manual
Page 19
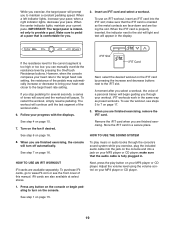
... slot. iFit cards are finished exercising, the console will turn on your heart rate closer to the target heart rate setting, the resistance of tones will sound and the workout will continue until the last segment of this manual. iFIT Slot iFIT Card Next, select the desired workout on the console and into the iFIT slot; When you exercise, plug the included audio cable into the jack on the iFIT card by pressing the OneTouch Resistance buttons. when...
... slot. iFit cards are finished exercising, the console will turn on your heart rate closer to the target heart rate setting, the resistance of tones will sound and the workout will continue until the last segment of this manual. iFIT Slot iFIT Card Next, select the desired workout on the console and into the iFIT slot; When you exercise, plug the included audio cable into the jack on the iFIT card by pressing the OneTouch Resistance buttons. when...
English Manual
Page 20
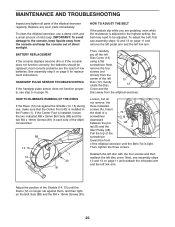
..., remove the four screws (not shown) from the center of low batteries. most console problems are pedaling, even while the resistance is adjusted to the highest setting, the belt may need to the console, keep liquids away from the elliptical exerciser. To adjust the belt, first see assembly steps 12 and 13 on page 11 and reattach the left pedal arm and the left link arm. Then, tighten the three screws. Replace any worn parts...
..., remove the four screws (not shown) from the center of low batteries. most console problems are pedaling, even while the resistance is adjusted to the highest setting, the belt may need to the console, keep liquids away from the elliptical exerciser. To adjust the belt, first see assembly steps 12 and 13 on page 11 and reattach the left pedal arm and the left link arm. Then, tighten the three screws. Replace any worn parts...
English Manual
Page 21
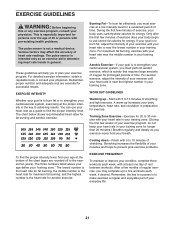
... the key to plan your cardiovascular system, exercising at least one day of stretching and light exercise. For detailed exercise information, obtain a reputable book or consult your "training zone." EXERCISE INTENSITY Whether your goal is to burn fat or to strengthen your exercise program. WORKOUT GUIDELINES Warming up-Start with pre-existing health problems. The pulse sensor is the heart rate for fat burning and aerobic exercise. Cooling...
... the key to plan your cardiovascular system, exercising at least one day of stretching and light exercise. For detailed exercise information, obtain a reputable book or consult your "training zone." EXERCISE INTENSITY Whether your goal is to burn fat or to strengthen your exercise program. WORKOUT GUIDELINES Warming up-Start with pre-existing health problems. The pulse sensor is the heart rate for fat burning and aerobic exercise. Cooling...
English Manual
Page 24
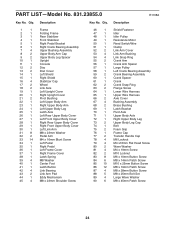
... 4 88 5 89 4 90 6 R1108A Description Shield Fastener Idler Idler Pulley Resistance Motor Reed Switch/Wire Clamp Link Arm Cover Link Arm Bushing Link Snap Ring Crank Arm Crank Arm Spacer Large Pulley Left Crank Bearing Assembly Crank Bearing Assembly Crank Spacer Crank Crank Snap Ring Flange Screw Lower Wire Harness Upper Wire Harness Axle Cover Bushing Assembly Brass Bushing Latch Bracket Pivot Axle Upper Body Axle Right Upper Body Leg Upper Body Leg Cap Belt Foam Grip Frame Cap Transfer Handle Cap M6 Locknut...
... 4 88 5 89 4 90 6 R1108A Description Shield Fastener Idler Idler Pulley Resistance Motor Reed Switch/Wire Clamp Link Arm Cover Link Arm Bushing Link Snap Ring Crank Arm Crank Arm Spacer Large Pulley Left Crank Bearing Assembly Crank Bearing Assembly Crank Spacer Crank Crank Snap Ring Flange Screw Lower Wire Harness Upper Wire Harness Axle Cover Bushing Assembly Brass Bushing Latch Bracket Pivot Axle Upper Body Axle Right Upper Body Leg Upper Body Leg Cap Belt Foam Grip Frame Cap Transfer Handle Cap M6 Locknut...
English Manual
Page 28
... any implied warranties of merchantability or fitness for a minimal handling charge. ICON HEALTH & FITNESS, INC., 1500 S. 1000 W., LOGAN, UT 84321-9813 Part No. 266660 R1108A Printed in China © 2008 ICON IP, Inc. products used as store display models. ICON is warranted for which warranty claims are limited in their scope and duration to the terms set forth above is limited to repairing or replacing, at ICONʼ...
... any implied warranties of merchantability or fitness for a minimal handling charge. ICON HEALTH & FITNESS, INC., 1500 S. 1000 W., LOGAN, UT 84321-9813 Part No. 266660 R1108A Printed in China © 2008 ICON IP, Inc. products used as store display models. ICON is warranted for which warranty claims are limited in their scope and duration to the terms set forth above is limited to repairing or replacing, at ICONʼ...


