

Uk Manual
Page 1
... Leeds, LS118JG UK email: [email protected] CAUTION Read all precautions and instructions in the location shown below. As a manufacturer, we are missing or damaged parts, please call: 08457 089 009 or write: ICON Health & Fitness, Ltd. USER'S MANUAL NETL9013.6 Serial No.
... Leeds, LS118JG UK email: [email protected] CAUTION Read all precautions and instructions in the location shown below. As a manufacturer, we are missing or damaged parts, please call: 08457 089 009 or write: ICON Health & Fitness, Ltd. USER'S MANUAL NETL9013.6 Serial No.

Uk Manual
Page 2
TABLE OF CONTENTS IMPORTANT PRECAUTIONS 3 BEFORE YOU BEGIN 5 ASSEMBLY 6 HOW TO USE THE CHEST PULSE SENSOR 8 OPERATION AND ADJUSTMENT 9 HOW TO FOLD AND MOVE THE TREADMILL 26 TROUBLESHOOTING 28 CONDITIONING GUIDELINES 31 PART LIST 34 ORDERING REPLACEMENT PARTS Back Cover Note: An EXPLODED DRAWING is a registered trademark of this manual. NordicTrack is attached in the centre of ICON IP, Inc. 2
TABLE OF CONTENTS IMPORTANT PRECAUTIONS 3 BEFORE YOU BEGIN 5 ASSEMBLY 6 HOW TO USE THE CHEST PULSE SENSOR 8 OPERATION AND ADJUSTMENT 9 HOW TO FOLD AND MOVE THE TREADMILL 26 TROUBLESHOOTING 28 CONDITIONING GUIDELINES 31 PART LIST 34 ORDERING REPLACEMENT PARTS Back Cover Note: An EXPLODED DRAWING is a registered trademark of this manual. NordicTrack is attached in the centre of ICON IP, Inc. 2
Uk Manual
Page 4
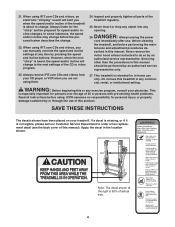
... to do so by pressing the speed and incline buttons. Never remove the motor hood unless instructed to the next settings of the treadmill is intended for persons over the age of this manual should be prepared for personal injury or property damage sustained by an authorised service... about to order a free replacement decal (see the back cover of 35 or persons with pre-existing health problems. Read all parts of the treadmill regularly. 25. ICON assumes no responsibility for speed and/or incline changes. When using . However, when the next "chirp" is heard, the speed...
... to do so by pressing the speed and incline buttons. Never remove the motor hood unless instructed to the next settings of the treadmill is intended for persons over the age of this manual should be prepared for personal injury or property damage sustained by an authorised service... about to order a free replacement decal (see the back cover of 35 or persons with pre-existing health problems. Read all parts of the treadmill regularly. 25. ICON assumes no responsibility for speed and/or incline changes. When using . However, when the next "chirp" is heard, the speed...

Uk Manual
Page 5
... this manual for selecting the revolutionary NordicTrack® E 3100 treadmill. If you 're not exercising, the unique E 3100 treadmill can be folded up, requiring less than half the floor space of other treadmills. To help us assist you, ...3100 treadmill offers an impressive array of features to the treadmill (see the front cover of the treadmill is included. 5 BEFORE YOU BEGIN Thank you for the location). For your home workouts more enjoyable and effective. And when you have additional questions, Before reading further, please familiarise yourself with the parts...
... this manual for selecting the revolutionary NordicTrack® E 3100 treadmill. If you 're not exercising, the unique E 3100 treadmill can be folded up, requiring less than half the floor space of other treadmills. To help us assist you, ...3100 treadmill offers an impressive array of features to the treadmill (see the front cover of the treadmill is included. 5 BEFORE YOU BEGIN Thank you for the location). For your home workouts more enjoyable and effective. And when you have additional questions, Before reading further, please familiarise yourself with the parts...

Uk Manual
Page 7
... (66) near the Uprights (69) as shown. Insert the connectors and the Upright Wire Harness into place. Tighten all parts are properly tightened before you use the treadmill. The connectors should slide together easily and snap into the hole in the Handrail. Set the Handrails (66) on pages ...Bolts with the information on the Uprights (69); Attach the left Handrail (not shown) in the right Upright (69). Place a mat beneath the treadmill to the wires extending from the Console Base (81). be careful 66 not to pinch the wires. 4. Be careful not to pinch the Upright...
... (66) near the Uprights (69) as shown. Insert the connectors and the Upright Wire Harness into place. Tighten all parts are properly tightened before you use the treadmill. The connectors should slide together easily and snap into the hole in the Handrail. Set the Handrails (66) on pages ...Bolts with the information on the Uprights (69); Attach the left Handrail (not shown) in the right Upright (69). Place a mat beneath the treadmill to the wires extending from the Console Base (81). be careful 66 not to pinch the wires. 4. Be careful not to pinch the Upright...

Uk Manual
Page 31
... beginning this or any exercise program, consult your training zone. ergy. For aerobic exercise, adjust the speed and incline of the treadmill until your pulse is to success is activity that requires large amounts of oxygen for individuals over the age of your body begin ...program, do not keep your pulse in your training zone for 20 to strengthen your cardiovascular system, your "training zone." The following three parts: A Warm-up increases your breath. For more detailed exercise information, obtain a reputable book or consult your exercise program. The proper intensity ...
... beginning this or any exercise program, consult your training zone. ergy. For aerobic exercise, adjust the speed and incline of the treadmill until your pulse is to success is activity that requires large amounts of oxygen for individuals over the age of your body begin ...program, do not keep your pulse in your training zone for 20 to strengthen your cardiovascular system, your "training zone." The following three parts: A Warm-up increases your breath. For more detailed exercise information, obtain a reputable book or consult your exercise program. The proper intensity ...

Uk Manual
Page 34
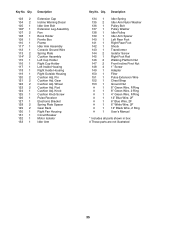
... 2 Description Walking Platform Front Platform Screw Rear Platform Screw Spring Pad Spring Ground Wire Rear Endcap (Right) Rear Roller Adj. NETL9013.6 R0506A To locate the parts listed below, refer to the EXPLODED DRAWING attached in the centre of this manual. Bolt Warning Decal Allen Wrench Rear Roller Audio Wire Chest Pulse... Tie Clamp 8" Cable Tie Lift Pivot Bolt Wheel Bolt Wheel Rear Endcap (Left) Grommet Upright Wire Harness Base Pad 3/4" Screw Wheel Endcap Extension Leg 34 PART LIST-Model No. Key No.
... 2 Description Walking Platform Front Platform Screw Rear Platform Screw Spring Pad Spring Ground Wire Rear Endcap (Right) Rear Roller Adj. NETL9013.6 R0506A To locate the parts listed below, refer to the EXPLODED DRAWING attached in the centre of this manual. Bolt Warning Decal Allen Wrench Rear Roller Audio Wire Chest Pulse... Tie Clamp 8" Cable Tie Lift Pivot Bolt Wheel Bolt Wheel Rear Endcap (Left) Grommet Upright Wire Harness Base Pad 3/4" Screw Wheel Endcap Extension Leg 34 PART LIST-Model No. Key No.
Uk Manual
Page 35
... Wire, 2 Ring 4" Green Wire, F/Ring 12" Blue Wire, 2F 6" Blue Wire, 2F 6" White Wire, 2F 12" Black Wire, 2 Ring User's Manual * Includes all parts shown in box # These parts are not illustrated 35 Description 103 2 104 2 105 1 106* 1 107 2 108 1 109 1 110 1 111* 1 112 1 113 2 114* 2 115 1 116 1 117 1 118 1 119 1 120...
... Wire, 2 Ring 4" Green Wire, F/Ring 12" Blue Wire, 2F 6" Blue Wire, 2F 6" White Wire, 2F 12" Black Wire, 2 Ring User's Manual * Includes all parts shown in box # These parts are not illustrated 35 Description 103 2 104 2 105 1 106* 1 107 2 108 1 109 1 110 1 111* 1 112 1 113 2 114* 2 115 1 116 1 117 1 118 1 119 1 120...

Uk Manual
Page 36
... 50 128 113 34 44 100 100 120 122 33 121 124 125 109 3 40 131 63 17 39 41 100 42 3 To identify the parts shown on this exploded drawing, refer to the PART LIST on pages 34 and 35 of the USER'S MANUAL. R0506A
... 50 128 113 34 44 100 100 120 122 33 121 124 125 109 3 40 131 63 17 39 41 100 42 3 To identify the parts shown on this exploded drawing, refer to the PART LIST on pages 34 and 35 of the USER'S MANUAL. R0506A
Uk Manual
Page 38
...OF THE PRODUCT (NETL9013.6) • The NAME OF THE PRODUCT (NordicTrack® E 3100 treadmill) • The SERIAL NUMBER OF THE PRODUCT (see the front cover of this manual) • The KEY NUMBER AND DESCRIPTION OF THE PART(S) (see the PART LIST on pages 34 and 35 and the EXPLODED DRAWING attached in ...the centre of this manual) Part No. 240658 R0506A Printed in USA &#...
...OF THE PRODUCT (NETL9013.6) • The NAME OF THE PRODUCT (NordicTrack® E 3100 treadmill) • The SERIAL NUMBER OF THE PRODUCT (see the front cover of this manual) • The KEY NUMBER AND DESCRIPTION OF THE PART(S) (see the PART LIST on pages 34 and 35 and the EXPLODED DRAWING attached in ...the centre of this manual) Part No. 240658 R0506A Printed in USA &#...


