

English Manual
Page 2
TABLE OF CONTENTS IMPORTANT PRECAUTIONS 3 BEFORE YOU BEGIN 5 ASSEMBLY 6 OPERATION AND ADJUSTMENT 9 HOW TO FOLD AND MOVE THE TREADMILL 20 TROUBLESHOOTING 22 CONDITIONING GUIDELINES 25 PART LIST 26 ORDERING REPLACEMENT PARTS 27 EXPLODED DRAWING 28 LIMITED WARRANTY Back Cover NordicTrack is a registered trademark of ICON IP, Inc. 2
TABLE OF CONTENTS IMPORTANT PRECAUTIONS 3 BEFORE YOU BEGIN 5 ASSEMBLY 6 OPERATION AND ADJUSTMENT 9 HOW TO FOLD AND MOVE THE TREADMILL 20 TROUBLESHOOTING 22 CONDITIONING GUIDELINES 25 PART LIST 26 ORDERING REPLACEMENT PARTS 27 EXPLODED DRAWING 28 LIMITED WARRANTY Back Cover NordicTrack is a registered trademark of ICON IP, Inc. 2
English Manual
Page 3
...in a fall and serious injury. 13. Athletic support clothes are adequately informed of 12 and pets away from damage, place a mat under the treadmill. 3 Always wear athletic shoes. No other appliance should not be able to safely lift 45 pounds (20 kg) to persons, read the ...following important precautions and information before using the treadmill (see your local NordicTrack dealer or call the tollfree telephone number on the front cover of the treadmill by persons weighing more than one person on the walking belt. Use only a single-...
...in a fall and serious injury. 13. Athletic support clothes are adequately informed of 12 and pets away from damage, place a mat under the treadmill. 3 Always wear athletic shoes. No other appliance should not be able to safely lift 45 pounds (20 kg) to persons, read the ...following important precautions and information before using the treadmill (see your local NordicTrack dealer or call the tollfree telephone number on the front cover of the treadmill by persons weighing more than one person on the walking belt. Use only a single-...
English Manual
Page 4
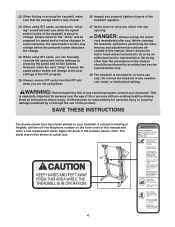
...this manual should be prepared for personal injury or property damage sustained by an authorized service representative. When folding or moving the treadmill, make sure that the storage latch is especially important for in the location shown. When using . scribed in any commercial,...DANGER: 28. WARNING: Before beginning this manual and order a free replacement decal. 22. Apply the decal in -home use the treadmill in this manual. tenance and adjustment procedures de- Inspect and properly tighten all instructions before using iFIT cards, an electronic "chirping" ...
...this manual should be prepared for personal injury or property damage sustained by an authorized service representative. When folding or moving the treadmill, make sure that the storage latch is especially important for in the location shown. When using . scribed in any commercial,...DANGER: 28. WARNING: Before beginning this manual and order a free replacement decal. 22. Apply the decal in -home use the treadmill in this manual. tenance and adjustment procedures de- Inspect and properly tighten all instructions before using iFIT cards, an electronic "chirping" ...
English Manual
Page 5
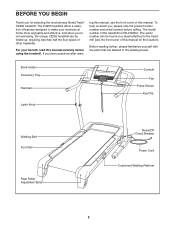
And when you for the location). The model number of features designed to the treadmill (see the front cover of this manual for selecting the revolutionary NordicTrack® C2255 treadmill. Book Holder Accessory Tray Handrail Latch Knob Console Fan Pulse Sensor Key/Clip Walking Belt Foot Rail Rear Roller Adjustment Bolts Reset/Off Circuit...
And when you for the location). The model number of features designed to the treadmill (see the front cover of this manual for selecting the revolutionary NordicTrack® C2255 treadmill. Book Holder Accessory Tray Handrail Latch Knob Console Fan Pulse Sensor Key/Clip Walking Belt Foot Rail Rear Roller Adjustment Bolts Reset/Off Circuit...

English Manual
Page 6
... assembly hardware, see if it is the key number of the part, from the PART LIST on top of a second person, carefully tip the treadmill onto its side as shown. Note: Some small parts may be transferred to see the drawings below each drawing is completely assembled. If a part ... is the quantity needed for assembly. Partially fold the Frame (55) so the treadmill is a normal condition and does not affect treadmill performance. Do not dispose of the Uprights (85). Note: The underside of the treadmill walking belt is on the base of the packing materials until it has been pre...
... assembly hardware, see if it is the key number of the part, from the PART LIST on top of a second person, carefully tip the treadmill onto its side as shown. Note: Some small parts may be transferred to see the drawings below each drawing is completely assembled. If a part ... is the quantity needed for assembly. Partially fold the Frame (55) so the treadmill is a normal condition and does not affect treadmill performance. Do not dispose of the Uprights (85). Note: The underside of the treadmill walking belt is on the base of the packing materials until it has been pre...

English Manual
Page 7
... connectors do not slide together easily and snap into the right Upright (85). 73 85 73 7 With the help of a second person, carefully tip the treadmill down so that becomes worn. IF THE CONNECTORS ARE NOT CONNECTED PROPERLY, THE CONSOLE MAY BE DAMAGED WHEN THE POWER IS TURNED ON. Insert the...
... connectors do not slide together easily and snap into the right Upright (85). 73 85 73 7 With the help of a second person, carefully tip the treadmill down so that becomes worn. IF THE CONNECTORS ARE NOT CONNECTED PROPERLY, THE CONSOLE MAY BE DAMAGED WHEN THE POWER IS TURNED ON. Insert the...

English Manual
Page 8
...the Console Base (98). 2. Keep the included allen wrench in a secure place. Console Assembly 6. Remove the knob from damage, place a mat under the treadmill. Make sure that no wires are properly tightened before tightening any of a second person, set the con- Remove the indicated Screw (7) and the Access Door.... Make sure that all four Console Bolts before you purchase the optional chest pulse sensor (see page 23). If you use the treadmill. With the help of them. 5. Connect the wire on the receiver (A) to the plastic posts on the Uprights (85).
...the Console Base (98). 2. Keep the included allen wrench in a secure place. Console Assembly 6. Remove the knob from damage, place a mat under the treadmill. Make sure that no wires are properly tightened before tightening any of a second person, set the con- Remove the indicated Screw (7) and the Access Door.... Make sure that all four Console Bolts before you purchase the optional chest pulse sensor (see page 23). If you use the treadmill. With the help of them. 5. Connect the wire on the receiver (A) to the plastic posts on the Uprights (85).

English Manual
Page 9
...-grounding conductor can result from weather conditions or from the adapter must have a proper outlet installed by a qualified electrician. Your treadmill, like the plug illustrated in accordance with your local electronics store. A temporary adapter that looks like the adapter illustrated in drawing...be used only until a properly grounded outlet (drawing 1) can be grounded. The surge suppressor must be held in your local NordicTrack dealer or call the toll-free telephone number on or off. The surge suppressor must be seriously damaged by sudden voltage changes...
...-grounding conductor can result from weather conditions or from the adapter must have a proper outlet installed by a qualified electrician. Your treadmill, like the plug illustrated in accordance with your local electronics store. A temporary adapter that looks like the adapter illustrated in drawing...be used only until a properly grounded outlet (drawing 1) can be grounded. The surge suppressor must be held in your local NordicTrack dealer or call the toll-free telephone number on or off. The surge suppressor must be seriously damaged by sudden voltage changes...

English Manual
Page 10
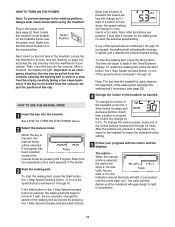
...continuous exercise feedback. Note: If there is a sheet of clear plastic on the front cover of this manual. iFIT programs automatically control the treadmill while the voice of a personal trainer coaches you and motivates you through an effective workout. To purchase iFIT Cards at select stores. In ...pages 15 and 16. iFIT Cards are available separately. One iFIT Card with three new programs is selected, the speed and incline of the treadmill can even create your workouts. To use a custom program, see page 17. To use the manual mode of the console, follow the ...
...continuous exercise feedback. Note: If there is a sheet of clear plastic on the front cover of this manual. iFIT programs automatically control the treadmill while the voice of a personal trainer coaches you and motivates you through an effective workout. To purchase iFIT Cards at select stores. In ...pages 15 and 16. iFIT Cards are available separately. One iFIT Card with three new programs is selected, the speed and incline of the treadmill can even create your workouts. To use a custom program, see page 17. To use the manual mode of the console, follow the ...
English Manual
Page 11
...11 Each time a button is used, observe the alignment of the walking belt, and align the walking belt if necessary (see the drawing on the treadmill frame near the power cord. To restart the walking belt, press the Start button, the 1 Step Speed increase button, or one of the speed ...buttons numbered 1 through 10. Note: The first time the treadmill is pressed, the speed setting will change by 0.1 mph; The track will then darken and the indicators will begin to light in the matrix. 3 Start...
...11 Each time a button is used, observe the alignment of the walking belt, and align the walking belt if necessary (see the drawing on the treadmill frame near the power cord. To restart the walking belt, press the Start button, the 1 Step Speed increase button, or one of the speed ...buttons numbered 1 through 10. Note: The first time the treadmill is pressed, the speed setting will change by 0.1 mph; The track will then darken and the indicators will begin to light in the matrix. 3 Start...

English Manual
Page 12
The display will show the approximate number of calories you have burned and the incline level of the treadmill. The Calories/Pulse display-This display will change from one number to miles. The display will appear in the program instead of your exercise. To ...
The display will show the approximate number of calories you have burned and the incline level of the treadmill. The Calories/Pulse display-This display will change from one number to miles. The display will appear in the program instead of your exercise. To ...

English Manual
Page 13
...speed, press the button a second time; The incline must be at the lowest setting when the treadmill is stopped, the fan will be damaged. See page 18 and turn off the demo mode. To.... 8 When you are finished exercising, remove the key. When you are finished using the treadmill, switch the reset/off circuit breaker to the lowest setting. the word "AUTO" will automatically increase and...a few seconds. To turn on when the walking belt is folded to the storage position or the treadmill will automatically turn off after the key is removed, the console is selected, the speed of the fan...
...speed, press the button a second time; The incline must be at the lowest setting when the treadmill is stopped, the fan will be damaged. See page 18 and turn off the demo mode. To.... 8 When you are finished exercising, remove the key. When you are finished using the treadmill, switch the reset/off circuit breaker to the lowest setting. the word "AUTO" will automatically increase and...a few seconds. To turn on when the walking belt is folded to the storage position or the treadmill will automatically turn off after the key is removed, the console is selected, the speed of the fan...

English Manual
Page 14
... segments. See HOW TO TURN ON THE POWER on page 11. 2 Select one of the preset programs. To select one of the program ends, the treadmill will scroll across the matrix. 3 Press the Start button or the 1 Step Speed increase button to alert you can manually override the setting by pressing... next segment. 14 The walking belt will begin to the right of the Current Segment column have the same number of the program begins, the treadmill will begin walking. If any of the columns to flash in those columns as the Current Segment column, an additional indicator may move downward so...
... segments. See HOW TO TURN ON THE POWER on page 11. 2 Select one of the preset programs. To select one of the program ends, the treadmill will scroll across the matrix. 3 Press the Start button or the 1 Step Speed increase button to alert you can manually override the setting by pressing... next segment. 14 The walking belt will begin to the right of the Current Segment column have the same number of the program begins, the treadmill will begin walking. If any of the columns to flash in those columns as the Current Segment column, an additional indicator may move downward so...

English Manual
Page 15
See step 5 on page 13. 7 When you are finished using the treadmill, switch the reset/off circuit breaker to the left, and the speed setting for the first segment will then move . See... Segment column. See page 18 and turn off " position and unplug the power cord. If more than three columns of the treadmill as desired; Hold the handrails and begin to forty segments. ting can have programmed and the number of segments that the incline... will scroll across the matrix. See step 6 on page 12. 6 Turn on page 11. 2 Select one of the treadmill is divided into the console.
See step 5 on page 13. 7 When you are finished using the treadmill, switch the reset/off circuit breaker to the left, and the speed setting for the first segment will then move . See... Segment column. See page 18 and turn off " position and unplug the power cord. If more than three columns of the treadmill as desired; Hold the handrails and begin to forty segments. ting can have programmed and the number of segments that the incline... will scroll across the matrix. See step 6 on page 12. 6 Turn on page 11. 2 Select one of the treadmill is divided into the console.

English Manual
Page 16
... settings are finished exercising, remove the key from the console. When only three seconds remain in the flashing Current Segment column and the treadmill will flash in the Time/Resistance display. The speed set- To stop . The Time/Distance display will show how long the program ...incline settings for the current segment, simply press the Speed or Incline buttons. To decrease the length of the program begins, the treadmill will automatically adjust to alert you have added as many additional segments as desired, press the Stop button twice. The time will flash...
... settings are finished exercising, remove the key from the console. When only three seconds remain in the flashing Current Segment column and the treadmill will flash in the Time/Resistance display. The speed set- To stop . The Time/Distance display will show how long the program ...incline settings for the current segment, simply press the Speed or Incline buttons. To decrease the length of the program begins, the treadmill will automatically adjust to alert you have added as many additional segments as desired, press the Stop button twice. The time will flash...

English Manual
Page 17
... a personal trainer will scroll across the matrix. however, when the next segment begins, the treadmill will automatically adjust to the first speed and incline settings that the iFIT Card is pressed, the treadmill will begin walking. HOW TO USE AN IFIT CARD 1 Insert the key into the iFIT...1 mph. Hold the handrails and begin to start the program. In addition, a profile of the speed settings of the program begins, the treadmill will automatically adjust to the speed and incline settings for two or more consecutive segments. 3 Press the Start button or the 1 Step Speed ...
... a personal trainer will scroll across the matrix. however, when the next segment begins, the treadmill will automatically adjust to the first speed and incline settings that the iFIT Card is pressed, the treadmill will begin walking. HOW TO USE AN IFIT CARD 1 Insert the key into the iFIT...1 mph. Hold the handrails and begin to start the program. In addition, a profile of the speed settings of the program begins, the treadmill will automatically adjust to the speed and incline settings for two or more consecutive segments. 3 Press the Start button or the 1 Step Speed ...
English Manual
Page 18
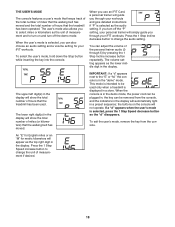
... can be used . The user's mode also allows you through your personal trainer will show the total number of hours that the treadmill has been used only when a treadmill is selected, you turn off the "P" setting, your iFIT workouts. The lower right digit(s) in the display. If you can.... Press the 1 Step Incline decrease button to be removed from the console. This mode is intended to change the unit of hours that the treadmill has been operated. To exit the user's mode, remove the key from the console, and the indicators in a preset sequence; You can also...
... can be used . The user's mode also allows you through your personal trainer will show the total number of hours that the treadmill has been used only when a treadmill is selected, you turn off the "P" setting, your iFIT workouts. The lower right digit(s) in the display. If you can.... Press the 1 Step Incline decrease button to be removed from the console. This mode is intended to change the unit of hours that the treadmill has been operated. To exit the user's mode, remove the key from the console, and the indicators in a preset sequence; You can also...

English Manual
Page 19
...the adjustors. Cushion Adjustor Increase Decrease Cushion Adjustor Platform 19 To decrease the firmness, slide the cushion adjustors toward the front of the treadmill. THE OPTIONAL CHEST PULSE SENSOR HOW TO ADJUST THE CUSHIONING SYSTEM An optional chest pulse sensor offers hands-free operation as you walk or... run on the treadmill, or the more you weigh, the firmer the walking platform should be helpful to lift on the platform as it monitors your ...
...the adjustors. Cushion Adjustor Increase Decrease Cushion Adjustor Platform 19 To decrease the firmness, slide the cushion adjustors toward the front of the treadmill. THE OPTIONAL CHEST PULSE SENSOR HOW TO ADJUST THE CUSHIONING SYSTEM An optional chest pulse sensor offers hands-free operation as you walk or... run on the treadmill, or the more you weigh, the firmer the walking platform should be helpful to lift on the platform as it monitors your ...

English Manual
Page 20
...sure that the frame is held securely by the arrow at the right. To reduce the risk of injury, use extreme caution while moving the treadmill, convert it to the desired location. Remove the key and unplug the power cord. Make sure you raise the frame, make sure to ... knob. Make sure that the frame is held securely by the plastic foot rails. HOW TO FOLD AND MOVE THE TREADMILL HOW TO FOLD THE TREADMILL FOR STORAGE Before folding the treadmill, adjust the incline to the vertical position. 2. Move your back. Handrail Wheel 20 CAUTION: To decrease the possibility ...
...sure that the frame is held securely by the arrow at the right. To reduce the risk of injury, use extreme caution while moving the treadmill, convert it to the desired location. Remove the key and unplug the power cord. Make sure you raise the frame, make sure to ... knob. Make sure that the frame is held securely by the plastic foot rails. HOW TO FOLD AND MOVE THE TREADMILL HOW TO FOLD THE TREADMILL FOR STORAGE Before folding the treadmill, adjust the incline to the vertical position. 2. Move your back. Handrail Wheel 20 CAUTION: To decrease the possibility ...

English Manual
Page 21
HOW TO LOWER THE TREADMILL FOR USE 1. Hold the metal frame firmly with your right hand as shown. Knob Frame 21 CAUTION: To decrease the possibility of the treadmill with both hands, and lower it to the floor. Do not drop the frame to the left and hold it is past the pin on the latch knob. 2. Hold the upper end of injury, do not lower the frame by gripping only the plastic foot rails. Using your back straight. Pivot the frame down until it . Make sure to bend your legs and keep your left hand, pull the latch knob to the floor.
HOW TO LOWER THE TREADMILL FOR USE 1. Hold the metal frame firmly with your right hand as shown. Knob Frame 21 CAUTION: To decrease the possibility of the treadmill with both hands, and lower it to the floor. Do not drop the frame to the left and hold it is past the pin on the latch knob. 2. Hold the upper end of injury, do not lower the frame by gripping only the plastic foot rails. Using your back straight. Pivot the frame down until it . Make sure to bend your legs and keep your left hand, pull the latch knob to the floor.


