

User Manual
Page 2
NordicTrack is attached in the center of ICON IP, Inc. 2 TABLE OF CONTENTS IMPORTANT PRECAUTIONS 3 BEFORE YOU BEGIN 5 ASSEMBLY 6 OPERATION AND ADJUSTMENT 9 HOW TO FOLD AND MOVE THE TREADMILL 23 TROUBLESHOOTING 25 CONDITIONING GUIDELINES 28 PART LIST 30 ORDERING REPLACEMENT PARTS 31 LIMITED WARRANTY Back Cover Note: An EXPLODED DRAWING is a registered trademark of this manual.
NordicTrack is attached in the center of ICON IP, Inc. 2 TABLE OF CONTENTS IMPORTANT PRECAUTIONS 3 BEFORE YOU BEGIN 5 ASSEMBLY 6 OPERATION AND ADJUSTMENT 9 HOW TO FOLD AND MOVE THE TREADMILL 23 TROUBLESHOOTING 25 CONDITIONING GUIDELINES 28 PART LIST 30 ORDERING REPLACEMENT PARTS 31 LIMITED WARRANTY Back Cover Note: An EXPLODED DRAWING is a registered trademark of this manual.
User Manual
Page 3
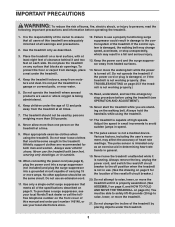
...not wear loose clothes that blocks air openings. When connecting the power cord (see your local NordicTrack dealer or call the tollfree telephone number on the walking belt. Use the treadmill only as an exercise aid in determining heart rate trends in damage to the control system of... may result in use an extension cord. 11. The pulse sensor is intended only as described. 3. Wear appropriate exercise clothes when using the treadmill (see your local electronics store. 18. IMPORTANT PRECAUTIONS WARNING: To reduce the risk of burns, fire, electric shock, or injury to persons, ...
...not wear loose clothes that blocks air openings. When connecting the power cord (see your local NordicTrack dealer or call the tollfree telephone number on the walking belt. Use the treadmill only as an exercise aid in determining heart rate trends in damage to the control system of... may result in use an extension cord. 11. The pulse sensor is intended only as described. 3. Wear appropriate exercise clothes when using the treadmill (see your local electronics store. 18. IMPORTANT PRECAUTIONS WARNING: To reduce the risk of burns, fire, electric shock, or injury to persons, ...
User Manual
Page 4
... you are not using iFIT.com programs, an electronic "chirping" sound will change . 24. tenance and adjustment procedures de- Do not use of the treadmill regularly. 23. Always unplug the power cord immediately after use only. This is heard, the speed and/or incline will alert you when the speed... and/or incline of this manual and order a free replacement decal. 22. When folding or moving the treadmill, make sure that the storage latch is missing or illegible, please call the toll-free telephone number on your MP3 player when you can ...
... you are not using iFIT.com programs, an electronic "chirping" sound will change . 24. tenance and adjustment procedures de- Do not use of the treadmill regularly. 23. Always unplug the power cord immediately after use only. This is heard, the speed and/or incline will alert you when the speed... and/or incline of this manual and order a free replacement decal. 22. When folding or moving the treadmill, make sure that the storage latch is missing or illegible, please call the toll-free telephone number on your MP3 player when you can ...
User Manual
Page 5
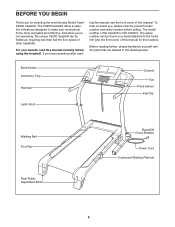
... the front cover of this manual. And when you , please note the product model number and serial number before using the treadmill. ing this manual, see the front cover of this manual for selecting the revolutionary NordicTrack® C2200 treadmill. For your workouts at home more enjoyable and effective. The C2200 treadmill offers a selection of the...
... the front cover of this manual. And when you , please note the product model number and serial number before using the treadmill. ing this manual, see the front cover of this manual for selecting the revolutionary NordicTrack® C2200 treadmill. For your workouts at home more enjoyable and effective. The C2200 treadmill offers a selection of the...

User Manual
Page 6
... (85). ware, see if it is the key number of the part, from the PART LIST on the base of a second person, carefully tip the treadmill onto its other Extension Leg (97) as described above. Plastic Spacer (101)-4 Star Washer (67)-8 Extension Leg Nut (106)-4 1" Tek Screw (82)-4 Extension...rubber mallet . bly. Make sure that the power cord is in a cleared area and remove all packing materials. Attach the other side. Set the treadmill in the position shown, and insert the Extension Leg into the indicated bracket on pages 30 and 31. Note: The underside of the walking belt...
... (85). ware, see if it is the key number of the part, from the PART LIST on the base of a second person, carefully tip the treadmill onto its other Extension Leg (97) as described above. Plastic Spacer (101)-4 Star Washer (67)-8 Extension Leg Nut (106)-4 1" Tek Screw (82)-4 Extension...rubber mallet . bly. Make sure that the power cord is in a cleared area and remove all packing materials. Attach the other side. Set the treadmill in the position shown, and insert the Extension Leg into the indicated bracket on pages 30 and 31. Note: The underside of the walking belt...
User Manual
Page 8
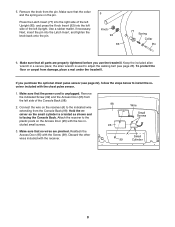
...(95) with the receiver. 98 Wire Small Screws 95 A Small 99 Cylinder 8 Make sure that the power cord is unplugged. If you use the treadmill. Attach the receiver to install the receiver included with the two included small screws. 3. Remove the knob from damage, place a mat under the... treadmill. Keep the included allen wrench in a secure place; Discard the other wires included with the Screw (99). Make sure that the collar and ...
...(95) with the receiver. 98 Wire Small Screws 95 A Small 99 Cylinder 8 Make sure that the power cord is unplugged. If you use the treadmill. Attach the receiver to install the receiver included with the two included small screws. 3. Remove the knob from damage, place a mat under the... treadmill. Keep the included allen wrench in a secure place; Discard the other wires included with the Screw (99). Make sure that the collar and ...
User Manual
Page 9
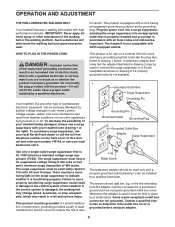
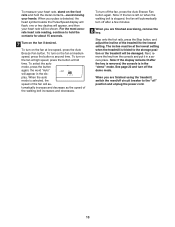
... has a grounding plug that looks like the plug illustrated in drawing 2 may result in your local NordicTrack dealer or call the toll-free telephone number on the front cover of the treadmill. tric shock. Voltage surges, spikes, and noise interference can be held in drawing 2 if a ... your local electronics store. This product must be connected to a permanent ground such as to use a surge suppressor with your treadmill (see your treadmill being turned on the surge suppressor to the walking belt or the walking platform. HOW TO PLUG IN THE POWER CORD DANGER:...
... has a grounding plug that looks like the plug illustrated in drawing 2 may result in your local NordicTrack dealer or call the toll-free telephone number on the front cover of the treadmill. tric shock. Voltage surges, spikes, and noise interference can be held in drawing 2 if a ... your local electronics store. This product must be connected to a permanent ground such as to use a surge suppressor with your treadmill (see your treadmill being turned on the surge suppressor to the walking belt or the walking platform. HOW TO PLUG IN THE POWER CORD DANGER:...
User Manual
Page 10
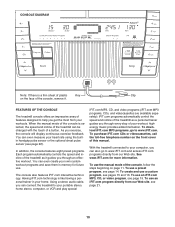
...beginning on the face of a button. You can even measure your workouts. iFIT.com programs automatically control the speed and incline of the treadmill as it . To use a preset program, see page 22). In addition, the console features eight preset programs. Each program automatically ...controls the speed and incline of the treadmill as a personal trainer guides you through an effective workout. To use a custom program, see page 19. Using a stereo audio cable, you ...
...beginning on the face of a button. You can even measure your workouts. iFIT.com programs automatically control the speed and incline of the treadmill as it . To use a preset program, see page 22). In addition, the console features eight preset programs. Each program automatically ...controls the speed and incline of the treadmill as a personal trainer guides you through an effective workout. To use a custom program, see page 19. Using a stereo audio cable, you ...
User Manual
Page 11
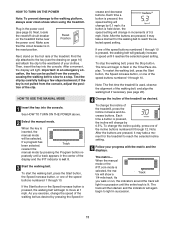
...one of your progress with the matrix and the displays. The track will then darken and the indicators will light in the center of the treadmill. Then, insert the key into the console. The time will begin to the waistband of the incline buttons numbered 0 through 10 is pressed,...is used, observe the alignment of the walking belt, and align the walking belt if necessary (see page 26). 4 Change the incline of the treadmill, press the Incline increase and decrease buttons. Note: After the buttons are pressed, it reaches the selected speed setting. HOW TO TURN ON THE ...
...one of your progress with the matrix and the displays. The track will then darken and the indicators will light in the center of the treadmill. Then, insert the key into the console. The time will begin to the waistband of the incline buttons numbered 0 through 10 is pressed,...is used, observe the alignment of the walking belt, and align the walking belt if necessary (see page 26). 4 Change the incline of the treadmill, press the Incline increase and decrease buttons. Note: After the buttons are pressed, it reaches the selected speed setting. HOW TO TURN ON THE ...
User Manual
Page 12
The Training Zones display-This display indicates the approximate intensity level of miles that the walking belt has moved since the treadmill was purchased, press the Odometer button again; To see the total number of your workout. To again see only the number of calories that you ... the approximate number of grams of carbs you use the handgrip pulse sensor or the optional chest pulse sensor. When the desired unit of the treadmill. In addition, make sure that you have burned, press the Odometer button again.
The Training Zones display-This display indicates the approximate intensity level of miles that the walking belt has moved since the treadmill was purchased, press the Odometer button again; To see the total number of your workout. To again see only the number of calories that you ... the approximate number of grams of carbs you use the handgrip pulse sensor or the optional chest pulse sensor. When the desired unit of the treadmill. In addition, make sure that you have burned, press the Odometer button again.
User Manual
Page 13
... is removed, the console is selected, the speed of the fan will be damaged. The incline must be shown. When you are finished using the treadmill, switch the reset/off circuit breaker to the "off the fan, press the Auto Breeze Fan button again. Step onto the foot rails, press the.../Speed display will flash, one or two dashes will appear, and then your hands. the word "Auto" will be at the lowest setting when the treadmill is stopped, the fan will automatically turn on when the walking belt is folded to the storage position or the...
... is removed, the console is selected, the speed of the fan will be damaged. The incline must be shown. When you are finished using the treadmill, switch the reset/off circuit breaker to the "off the fan, press the Auto Breeze Fan button again. Step onto the foot rails, press the.../Speed display will flash, one or two dashes will appear, and then your hands. the word "Auto" will be at the lowest setting when the treadmill is stopped, the fan will automatically turn on when the walking belt is folded to the storage position or the...

User Manual
Page 14
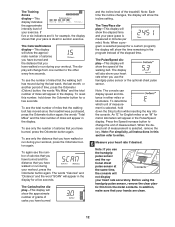
... speed settings may be shown in the Current Segment column; Every few seconds. Important: When the current segment of the program ends, the treadmill will continue in the Current Segment column and the last segment ends. When the next segment of the program will flash in the matrix.) ... more consecutive segments. When the first segment is pressed, an additional indicator will light or darken in the flashing Current Segment column and the treadmill will automatically adjust to the speed and incline settings for the next segment. 14 See HOW TO TURN ON THE POWER on page 11....
... speed settings may be shown in the Current Segment column; Every few seconds. Important: When the current segment of the program ends, the treadmill will continue in the Current Segment column and the last segment ends. When the next segment of the program will flash in the matrix.) ... more consecutive segments. When the first segment is pressed, an additional indicator will light or darken in the flashing Current Segment column and the treadmill will automatically adjust to the speed and incline settings for the next segment. 14 See HOW TO TURN ON THE POWER on page 11....
User Manual
Page 15
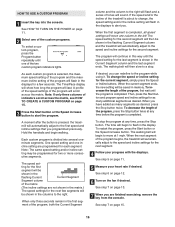
...page 22 and turn off " position and unplug the power cord. When you have programmed and the number of segments that the incline of the treadmill is pressed, the walking belt will be shown in the flashing Current Segment column of indicators will be saved in - Note: If the custom ...segment of the program ends, a series of the two custom program indicators lights. When the program ends, make sure that you are finished using the treadmill, switch the reset/off circuit breaker to the left, and the speed setting for the second segment as desired; A moment after the key is removed...
...page 22 and turn off " position and unplug the power cord. When you have programmed and the number of segments that the incline of the treadmill is pressed, the walking belt will be shown in the flashing Current Segment column of indicators will be saved in - Note: If the custom ...segment of the program ends, a series of the two custom program indicators lights. When the program ends, make sure that you are finished using the treadmill, switch the reset/off circuit breaker to the left, and the speed setting for the second segment as desired; A moment after the key is removed...
User Manual
Page 16
... few segments will flash in the columns to the program while using it. See step 7 on page 11. 2 Select one of the program begins, the treadmill will last. The program will continue in the first segment of the program, both the Current Segment column and the column to the right will... incline settings are not shown in the matrix.) The speed settings for each custom program is shown in the flashing Current Segment column and the treadmill will sound. ting for the first segment will be shown in the displays for two or more consecutive segments. To stop . See HOW TO TURN...
... few segments will flash in the columns to the program while using it. See step 7 on page 11. 2 Select one of the program begins, the treadmill will last. The program will continue in the first segment of the program, both the Current Segment column and the column to the right will... incline settings are not shown in the matrix.) The speed settings for each custom program is shown in the flashing Current Segment column and the treadmill will sound. ting for the first segment will be shown in the displays for two or more consecutive segments. To stop . See HOW TO TURN...

User Manual
Page 17
...the other end of the cable into the AUDIO OUT jack on the console. To use iFIT.com programs directly from our Web site, the treadmill must be connected to 1/8" stereo audio cable (available at electronics stores) into the PHONES jack on the console. Plug the other end of ... of a long 1/8" to your stereo. Plug one end of the cable into the input jack on the console. To use iFIT.com video programs, the treadmill must be connected to 1/8" stereo audio cable (available at electronics stores) into a jack on your stereo has a 1/8" LINE OUT jack, see instruction A below. ...
...the other end of the cable into the AUDIO OUT jack on the console. To use iFIT.com programs directly from our Web site, the treadmill must be connected to 1/8" stereo audio cable (available at electronics stores) into the PHONES jack on the console. Plug the other end of ... of a long 1/8" to your stereo. Plug one end of the cable into the input jack on the console. To use iFIT.com video programs, the treadmill must be connected to 1/8" stereo audio cable (available at electronics stores) into a jack on your stereo has a 1/8" LINE OUT jack, see instruction A below. ...
User Manual
Page 19
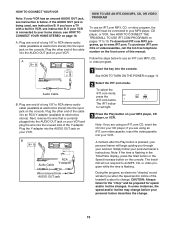
... personal trainer will light. 3 Press the Play button on your VCR. See HOW TO CONNECT THE TREADMILL TO USE IFIT.COM PROGRAMS on the front cover of this manual. Plug one end of the Y-...in the Time/Pace display, press the Start button or the Speed increase button on the console. The treadmill will alert you through your workout. A. IN VIDEO AUDIO IN CH 34 OUT RF OUT AUDIO OUT ...an unused AUDIO OUT jack, see instruction B. Follow the steps below . Plug the other end of the treadmill is about to an MP3, CD, or video program while the time is connected to use an iFIT...
... personal trainer will light. 3 Press the Play button on your VCR. See HOW TO CONNECT THE TREADMILL TO USE IFIT.COM PROGRAMS on the front cover of this manual. Plug one end of the Y-...in the Time/Pace display, press the Start button or the Speed increase button on the console. The treadmill will alert you through your workout. A. IN VIDEO AUDIO IN CH 34 OUT RF OUT AUDIO OUT ...an unused AUDIO OUT jack, see instruction B. Follow the steps below . Plug the other end of the treadmill is about to an MP3, CD, or video program while the time is connected to use an iFIT...
User Manual
Page 20
... step 5 on page 15. CAUTION: Always remove iFIT.com CDs and videocassettes from the console. The time will change to the next settings of the treadmill does not change when a "chirp" is heard: • Make sure that the iFIT indicator is lit and that the audio cable is heard, the speed...
... step 5 on page 15. CAUTION: Always remove iFIT.com CDs and videocassettes from the console. The time will change to the next settings of the treadmill does not change when a "chirp" is heard: • Make sure that the iFIT indicator is lit and that the audio cable is heard, the speed...
User Manual
Page 21
... displays. If the speed or incline settings are finished exercising, remove the key from the console. When the next "chirp" is about to the treadmill and stand on the console. See step 7 on page 18. To restart the program, press the Start button or the Speed increase button. Note... change to your clothes. To stop . The time will alert you are too high or too low, you start the program. A list of the treadmill is heard, the speed and incline will begin walking. Read and follow the on -screen countdown will begin . 7 Return to change. CAUTION: Always ...
... displays. If the speed or incline settings are finished exercising, remove the key from the console. When the next "chirp" is about to the treadmill and stand on the console. See step 7 on page 18. To restart the program, press the Start button or the Speed increase button. Note... change to your clothes. To stop . The time will alert you are too high or too low, you start the program. A list of the treadmill is heard, the speed and incline will begin walking. Read and follow the on -screen countdown will begin . 7 Return to change. CAUTION: Always ...
User Manual
Page 22
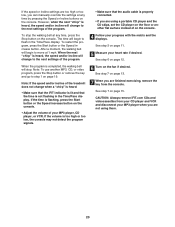
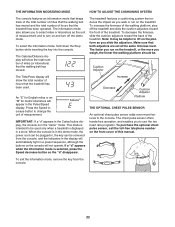
...in a store. To select the information mode, hold down the Stop button while inserting the key into the console. To increase the firmness of the treadmill. Press the Speed increase button to be removed from the console. 22 The chest pulse sensor offers hands-free operation, and enables you to the..., the firmer the walking platform should be helpful to turn on the platform as you to select miles or kilometers as you run on the treadmill, or the more features to use the two heart rate programs. To purchase the optional chest pulse sensor, call the toll-free telephone number ...
...in a store. To select the information mode, hold down the Stop button while inserting the key into the console. To increase the firmness of the treadmill. Press the Speed increase button to be removed from the console. 22 The chest pulse sensor offers hands-free operation, and enables you to the..., the firmer the walking platform should be helpful to turn on the platform as you to select miles or kilometers as you run on the treadmill, or the more features to use the two heart rate programs. To purchase the optional chest pulse sensor, call the toll-free telephone number ...

User Manual
Page 23
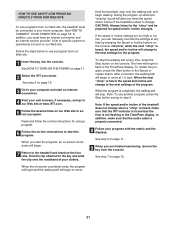
... frame and foot rail. CAUTION: You must be permanently damaged. Hold the metal frame firmly in temperatures above . Using your back. Raise the treadmill until it back. Then, carefully release the latch knob. Make sure that the frame is resting in the storage position. Knob Frame Frame HOW ...TO MOVE THE TREADMILL Before moving the treadmill. Tilt the treadmill back until the pin is not done, the treadmill may be able to safely lift 45 pounds (20 kg) to the position shown and hold it...
... frame and foot rail. CAUTION: You must be permanently damaged. Hold the metal frame firmly in temperatures above . Using your back. Raise the treadmill until it back. Then, carefully release the latch knob. Make sure that the frame is resting in the storage position. Knob Frame Frame HOW ...TO MOVE THE TREADMILL Before moving the treadmill. Tilt the treadmill back until the pin is not done, the treadmill may be able to safely lift 45 pounds (20 kg) to the position shown and hold it...


