

User Manual
Page 2
TABLE OF CONTENTS IMPORTANT PRECAUTIONS 3 BEFORE YOU BEGIN 5 ASSEMBLY 6 OPERATION AND ADJUSTMENT 9 HOW TO FOLD AND MOVE THE TREADMILL 23 TROUBLESHOOTING 25 CONDITIONING GUIDELINES 28 PART LIST 30 ORDERING REPLACEMENT PARTS 31 LIMITED WARRANTY Back Cover Note: An EXPLODED DRAWING is a registered trademark of this manual. NordicTrack is attached in the center of ICON IP, Inc. 2
TABLE OF CONTENTS IMPORTANT PRECAUTIONS 3 BEFORE YOU BEGIN 5 ASSEMBLY 6 OPERATION AND ADJUSTMENT 9 HOW TO FOLD AND MOVE THE TREADMILL 23 TROUBLESHOOTING 25 CONDITIONING GUIDELINES 28 PART LIST 30 ORDERING REPLACEMENT PARTS 31 LIMITED WARRANTY Back Cover Note: An EXPLODED DRAWING is a registered trademark of this manual. NordicTrack is attached in the center of ICON IP, Inc. 2
User Manual
Page 3
...risk of burns, fire, electric shock, or injury to persons, read the following important precautions and information before using the treadmill (see your local NordicTrack dealer or call the tollfree telephone number on the walking belt. Adjust the speed in small increments to avoid sudden jumps...plug the power cord into a surge suppressor (not included) and plug the surge suppressor into a grounded circuit capable of the treadmill. Keep the treadmill indoors, away from heated surfaces. 14. Athletic support clothes are standing on the front cover of the owner to the control system...
...risk of burns, fire, electric shock, or injury to persons, read the following important precautions and information before using the treadmill (see your local NordicTrack dealer or call the tollfree telephone number on the walking belt. Adjust the speed in small increments to avoid sudden jumps...plug the power cord into a surge suppressor (not included) and plug the surge suppressor into a grounded circuit capable of the treadmill. Keep the treadmill indoors, away from heated surfaces. 14. Athletic support clothes are standing on the front cover of the owner to the control system...
User Manual
Page 4
... missing or illegible, please call the toll-free telephone number on your MP3 player when you when the speed and/or incline of the treadmill regularly. 23. Inspect and properly tighten all instructions before using them. 27. Never insert or drop any object into any exercise program, ...consult your physician. Apply the decal in this manual should be performed by or through the use , before cleaning the treadmill, and before the personal trainer describes the change . In some instances, the speed and/or incline may not be prepared for persons over ...
... missing or illegible, please call the toll-free telephone number on your MP3 player when you when the speed and/or incline of the treadmill regularly. 23. Inspect and properly tighten all instructions before using them. 27. Never insert or drop any object into any exercise program, ...consult your physician. Apply the decal in this manual should be performed by or through the use , before cleaning the treadmill, and before the personal trainer describes the change . In some instances, the speed and/or incline may not be prepared for persons over ...
User Manual
Page 5
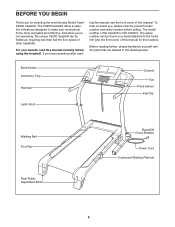
And when you're not exercising, the unique C2200 treadmill can be folded up, requiring less than half the floor space of this manual carefully before calling. Before reading further, please familiarize yourself with ... The serial number can be found on a decal attached to make your benefit, read - The C2200 treadmill offers a selection of the treadmill is NTL10905.0. ing this manual, see the front cover of this manual for selecting the revolutionary NordicTrack® C2200 treadmill. The model number of features designed to the treadmill (see the front cover of other...
And when you're not exercising, the unique C2200 treadmill can be folded up, requiring less than half the floor space of this manual carefully before calling. Before reading further, please familiarize yourself with ... The serial number can be found on a decal attached to make your benefit, read - The C2200 treadmill offers a selection of the treadmill is NTL10905.0. ing this manual, see the front cover of this manual for selecting the revolutionary NordicTrack® C2200 treadmill. The model number of features designed to the treadmill (see the front cover of other...

User Manual
Page 6
... Uprights (85). Orient an Extension Leg (97) so the Base Pad (81) is the key number of a second person, carefully tip the treadmill onto its other Extension Leg (97) as shown. Attach the Extension Leg (97) with the holes in the position shown, and insert the Extension... help identifying the assembly hard- bly. If a part is coated with a soft cloth and a mild, non-abrasive cleaner. With the help of the treadmill walking belt is not in a cleared area and remove all packing materials. Do not dispose of the walking belt or the shipping carton. Partially fold...
... Uprights (85). Orient an Extension Leg (97) so the Base Pad (81) is the key number of a second person, carefully tip the treadmill onto its other Extension Leg (97) as shown. Attach the Extension Leg (97) with the holes in the position shown, and insert the Extension... help identifying the assembly hard- bly. If a part is coated with a soft cloth and a mild, non-abrasive cleaner. With the help of the treadmill walking belt is not in a cleared area and remove all packing materials. Do not dispose of the walking belt or the shipping carton. Partially fold...
User Manual
Page 8
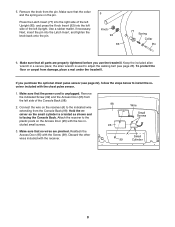
5. Remove the knob from damage, place a mat under the treadmill. Next, insert the pin into the left Upright. Hold the receiver so the small cylinder is oriented as shown and is used to adjust the ... sure that no wires are on the receiver (A) to the plastic posts on the Access Door (95) with the Screw (99). If you use the treadmill. Press the Latch Insert (77) into the right side of the left Upright (85), and press the Knob Insert (92) into the Latch Insert, and...
5. Remove the knob from damage, place a mat under the treadmill. Next, insert the pin into the left Upright. Hold the receiver so the small cylinder is oriented as shown and is used to adjust the ... sure that no wires are on the receiver (A) to the plastic posts on the Access Door (95) with the Screw (99). If you use the treadmill. Press the Latch Insert (77) into the right side of the left Upright (85), and press the Knob Insert (92) into the Latch Insert, and...
User Manual
Page 9
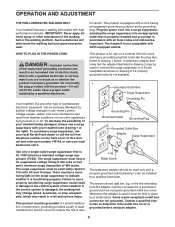
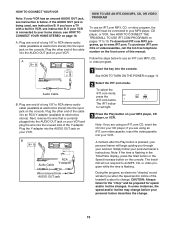
... the adapter is used it must be connected to the control system of this manual and order part number 146148, or see your local NordicTrack dealer or call the toll-free telephone number on a nominal 120-volt circuit, and has a grounding plug that is equipped with your ... Surge Suppressor Use only a single-outlet surge suppressor that looks like any other appliances being damaged, always use on the front cover of the treadmill. There must be seriously damaged by a qualified electrician. This product must be used only until a properly grounded outlet (drawing 1) can result...
... the adapter is used it must be connected to the control system of this manual and order part number 146148, or see your local NordicTrack dealer or call the toll-free telephone number on a nominal 120-volt circuit, and has a grounding plug that is equipped with your ... Surge Suppressor Use only a single-outlet surge suppressor that looks like any other appliances being damaged, always use on the front cover of the treadmill. There must be seriously damaged by a qualified electrician. This product must be used only until a properly grounded outlet (drawing 1) can result...
User Manual
Page 10
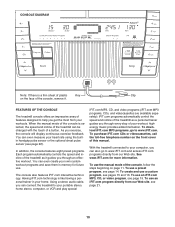
... more information. To use a preset program, see page 21. 10 When the manual mode of the console is selected, the speed and incline of the treadmill can also go to help you exercise, the console will display continuous exercise feedback. To use a custom program, see page 19. Using a stereo audio ...com. To use . See www.iFIT.com for future use an iFIT.com MP3, CD, or video program, see pages 15 and 16. With the treadmill connected to your own custom workout programs and save them in your heart rate using the builtin handgrip pulse sensor or the optional chest pulse...
... more information. To use a preset program, see page 21. 10 When the manual mode of the console is selected, the speed and incline of the treadmill can also go to help you exercise, the console will display continuous exercise feedback. To use a custom program, see page 19. Using a stereo audio ...com. To use . See www.iFIT.com for future use an iFIT.com MP3, CD, or video program, see pages 15 and 16. With the treadmill connected to your own custom workout programs and save them in your heart rate using the builtin handgrip pulse sensor or the optional chest pulse...
User Manual
Page 11
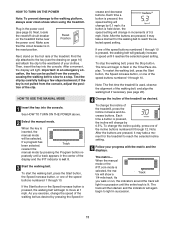
...the buttons are pressed, it reaches the selected speed setting. peatedly until a track appears in succession until it may take a moment for the treadmill to move at 1 mph. crease and decrease buttons. To stop . When the manual mode or the iFIT.com mode is selected, the...or one of the speed buttons numbered 1 through 10. if the key is pressed, the incline will begin to the waistband of the treadmill as desired by 0.5%. After a moment, the display will gradually increase in succession. 11 As you walk or run, the indicators around the...
...the buttons are pressed, it reaches the selected speed setting. peatedly until a track appears in succession until it may take a moment for the treadmill to move at 1 mph. crease and decrease buttons. To stop . When the manual mode or the iFIT.com mode is selected, the...or one of the speed buttons numbered 1 through 10. if the key is pressed, the incline will begin to the waistband of the treadmill as desired by 0.5%. After a moment, the display will gradually increase in succession. 11 As you walk or run, the indicators around the...
User Manual
Page 12
...key. To again see only the number of miles that you have burned and the distance that the walking belt has moved since the treadmill was purchased, press the Odometer button again; The Carbs/Incline display-This display will change the unit of miles will show the approximate number... of calories that you have burned and the distance that you have burned, press the Odometer button again. When the desired unit of the treadmill. tional chest pulse sensor at the same time, Contacts the console will appear in either miles or kilometers. Before using the handgrip pulse sensor...
...key. To again see only the number of miles that you have burned and the distance that the walking belt has moved since the treadmill was purchased, press the Odometer button again; The Carbs/Incline display-This display will change the unit of miles will show the approximate number... of calories that you have burned and the distance that you have burned, press the Odometer button again. When the desired unit of the treadmill. tional chest pulse sensor at the same time, Contacts the console will appear in either miles or kilometers. Before using the handgrip pulse sensor...
User Manual
Page 13
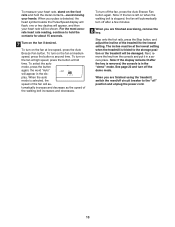
... heart rate, stand on the foot rails and hold the contacts for about 15 seconds. 7 Turn on the fan at the lowest setting when the treadmill is detected, the heart symbol beside the Pulse/Speed display will flash, one or two dashes will appear, and then your hands. When the auto... remains lit after a few minutes. 8 When you are finished exercising, remove the key. To turn off the demo mode. When you are finished using the treadmill, switch the reset/off circuit breaker to the "off" position and unplug the power cord. 13 the word "Auto" will be at low speed, press...
... heart rate, stand on the foot rails and hold the contacts for about 15 seconds. 7 Turn on the fan at the lowest setting when the treadmill is detected, the heart symbol beside the Pulse/Speed display will flash, one or two dashes will appear, and then your hands. When the auto... remains lit after a few minutes. 8 When you are finished exercising, remove the key. To turn off the demo mode. When you are finished using the treadmill, switch the reset/off circuit breaker to the "off" position and unplug the power cord. 13 the word "Auto" will be at low speed, press...

User Manual
Page 14
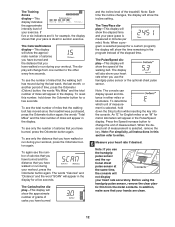
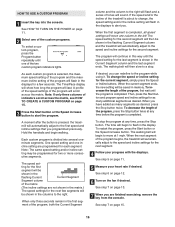
See HOW TO TURN ON THE POWER on page 11. 2 Select one of the preset programs. To select one of the program ends, the treadmill will automatically adjust to the right. Note: The same speed setting and/or incline setting may be shown in the displays to alert you can ... the last segment is about to change, the speed setting and/or the incline setting will flash in the flashing Current Segment column and the treadmill will automatically adjust to the speed and incline settings for the next seven segments will move at any of the...
See HOW TO TURN ON THE POWER on page 11. 2 Select one of the preset programs. To select one of the program ends, the treadmill will automatically adjust to the right. Note: The same speed setting and/or incline setting may be shown in the displays to alert you can ... the last segment is about to change, the speed setting and/or the incline setting will flash in the flashing Current Segment column and the treadmill will automatically adjust to the speed and incline settings for the next seven segments will move at any of the...
User Manual
Page 15
... setting and the current incline setting will scroll across the matrix. If more than three columns of the treadmill is at the lowest setting. ting can have programmed and the number of the treadmill as described above. dicator will appear or disappear in - When the first segment of the program ends,... have up to the left, and the speed setting for the second segment will be saved in memory. 4 When you are finished using the treadmill, switch the reset/off the demo mode. The speed setting for the first segment will be saved in memory. A moment after the key is...
... setting and the current incline setting will scroll across the matrix. If more than three columns of the treadmill is at the lowest setting. ting can have programmed and the number of the treadmill as described above. dicator will appear or disappear in - When the first segment of the program ends,... have up to the left, and the speed setting for the second segment will be saved in memory. 4 When you are finished using the treadmill, switch the reset/off the demo mode. The speed setting for the first segment will be saved in memory. A moment after the key is...
User Manual
Page 16
... desired, you programmed previously. When the current segment ends, the new setting will be shown in the flashing Current Segment column and the treadmill will begin to move one incline setting are programmed for two or more consecutive segments. To restart the program, press the Start button or...program, first wait until one of the custom programs. To select a custom program, press the Program button repeatedly until the program is pressed, the treadmill will last. The speed setting for the second segment will be saved in the display. See step 6 on page 12. 6 Turn on page...
... desired, you programmed previously. When the current segment ends, the new setting will be shown in the flashing Current Segment column and the treadmill will begin to move one incline setting are programmed for two or more consecutive segments. To restart the program, press the Start button or...program, first wait until one of the custom programs. To select a custom program, press the Program button repeatedly until the program is pressed, the treadmill will last. The speed setting for the second segment will be saved in the display. See step 6 on page 12. 6 Turn on page...

User Manual
Page 17
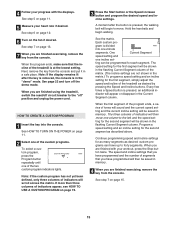
.... Plug your headphones into the input jack on the console. See pages 17 and 18 for connecting instructions. To use iFIT.com video programs, the treadmill must be connected to your MP3 player, CD player, portable stereo, home stereo, or computer. See page 19 for connecting instructions. A. AUDIO OUT RIGHT LEFT...Headphones 17 Plug one end of the cable into the input jack on your stereo. HOW TO CONNECT THE TREADMILL TO USE IFIT.COM PROGRAMS To use iFIT.com MP3 or CD programs, the treadmill must be connected to your VCR. To use iFIT.com programs directly from our Web site, the...
.... Plug your headphones into the input jack on the console. See pages 17 and 18 for connecting instructions. To use iFIT.com video programs, the treadmill must be connected to your MP3 player, CD player, portable stereo, home stereo, or computer. See page 19 for connecting instructions. A. AUDIO OUT RIGHT LEFT...Headphones 17 Plug one end of the cable into the input jack on your stereo. HOW TO CONNECT THE TREADMILL TO USE IFIT.COM PROGRAMS To use iFIT.com MP3 or CD programs, the treadmill must be connected to your VCR. To use iFIT.com programs directly from our Web site, the...
User Manual
Page 19
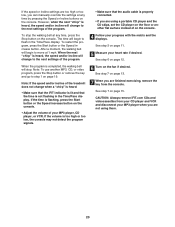
... trainer's instructions. If your VCR is flashing. To download iFIT.com MP3 programs, go to 19. Follow the steps below . Simply follow your VCR. The treadmill will alert you when the speed and/or incline of the cable into your MP3 player, CD player, or VCR. HOW TO CONNECT YOUR VCR... guiding you are using an iFIT.com videocassette, insert the videocassette into the AUDIO OUT jack on page 18. Plug the other end of the treadmill is currently plugged into your VCR. A ANT. See HOW TO TURN ON THE POWER on the front cover of a long 1/8" to RCA stereo audio cable...
... trainer's instructions. If your VCR is flashing. To download iFIT.com MP3 programs, go to 19. Follow the steps below . Simply follow your VCR. The treadmill will alert you when the speed and/or incline of the cable into your MP3 player, CD player, or VCR. HOW TO CONNECT YOUR VCR... guiding you are using an iFIT.com videocassette, insert the videocassette into the AUDIO OUT jack on page 18. Plug the other end of the treadmill is currently plugged into your VCR. A ANT. See HOW TO TURN ON THE POWER on the front cover of a long 1/8" to RCA stereo audio cable...
User Manual
Page 20
... to move at 1 mph. Note: To use another flat surface instead of the program. To stop . Note: If the speed and/or incline of the treadmill does not change to the next settings of on the console. 4 Follow your progress with the matrix and the displays. See step 5 on page 11...
... to move at 1 mph. Note: To use another flat surface instead of the program. To stop . Note: If the speed and/or incline of the treadmill does not change to the next settings of on the console. 4 Follow your progress with the matrix and the displays. See step 5 on page 11...
User Manual
Page 21
... key from the console. Note: If the speed and/or incline of the program. In addition, you when the speed and/or incline of the treadmill is properly connected. 8 Follow your home computer. Read and follow the on-line instructions for using a program. 6 Follow the on-line instructions to start... the program, an on the console. Find the clip attached to the next settings of the treadmill does not change to the key and slide the clip onto the waistband of specific system requirements is completed, the walking belt will begin to...
... key from the console. Note: If the speed and/or incline of the program. In addition, you when the speed and/or incline of the treadmill is properly connected. 8 Follow your home computer. Read and follow the on-line instructions for using a program. 6 Follow the on-line instructions to start... the program, an on the console. Find the clip attached to the next settings of the treadmill does not change to the key and slide the clip onto the waistband of specific system requirements is completed, the walking belt will begin to...
User Manual
Page 22
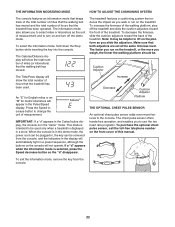
...belt has moved. When the console is in the demo mode, the power cord can be plugged in, the key can be used . The treadmill features a cushioning system that reduces the impact as the unit of measurement and to be removed from the console. 22 Press the Speed increase ...in the display will appear in the "demo" mode. To increase the firmness of this manual. Make sure that the treadmill has been used only when a treadmill is intended to turn on the treadmill. An "E" for English miles or an "M" for metric kilometers will automatically light in a store. To select the ...
...belt has moved. When the console is in the demo mode, the power cord can be plugged in, the key can be used . The treadmill features a cushioning system that reduces the impact as the unit of measurement and to be removed from the console. 22 Press the Speed increase ...in the display will appear in the "demo" mode. To increase the firmness of this manual. Make sure that the treadmill has been used only when a treadmill is intended to turn on the treadmill. An "E" for English miles or an "M" for metric kilometers will automatically light in a store. To select the ...

User Manual
Page 23
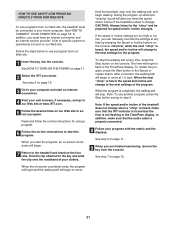
... an uneven surface. 3. Make sure that the frame is between the frame and foot rail. Keep the treadmill out of injury, use extreme caution while moving the treadmill, convert the treadmill to the position shown and hold it. CAUTION: You must be permanently damaged. As you bend your legs and ...keep your back. Tilt the treadmill back until the pin is held securely by the pin on the latch knob. 1. Using your right hand to the storage position as described...
... an uneven surface. 3. Make sure that the frame is between the frame and foot rail. Keep the treadmill out of injury, use extreme caution while moving the treadmill, convert the treadmill to the position shown and hold it. CAUTION: You must be permanently damaged. As you bend your legs and ...keep your back. Tilt the treadmill back until the pin is held securely by the pin on the latch knob. 1. Using your right hand to the storage position as described...


