
User Manual
Page 1
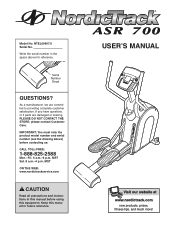
... THE WEB: www.nordictrackservice.com CAUTION Read all precautions and instructions in the space above ) before using this manual for reference. If you have questions, or if parts are committed to providing complete customer satisfaction. MST Sat. 8 a.m.-4 p.m. Model No. IMPORTANT: You must note the product model number and serial number (see the drawing above for future reference. Keep this equipment...
... THE WEB: www.nordictrackservice.com CAUTION Read all precautions and instructions in the space above ) before using this manual for reference. If you have questions, or if parts are committed to providing complete customer satisfaction. MST Sat. 8 a.m.-4 p.m. Model No. IMPORTANT: You must note the product model number and serial number (see the drawing above for future reference. Keep this equipment...
User Manual
Page 2
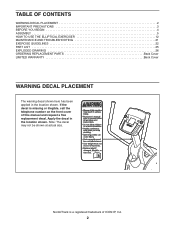
... YOU BEGIN 4 ASSEMBLY 5 HOW TO USE THE ELLIPTICAL EXERCISER 12 MAINTENANCE AND TROUBLESHOOTING 21 EXERCISE GUIDELINES 22 PART LIST 25 EXPLODED DRAWING 26 ORDERING REPLACEMENT PARTS Back Cover LIMITED WARRANTY Back Cover WARNING DECAL PLACEMENT The warning decal shown here has been applied in the location shown. If the decal is a registered trademark of this manual and request a free replacement decal. Apply the decal in the location shown. NordicTrack is missing...
... YOU BEGIN 4 ASSEMBLY 5 HOW TO USE THE ELLIPTICAL EXERCISER 12 MAINTENANCE AND TROUBLESHOOTING 21 EXERCISE GUIDELINES 22 PART LIST 25 EXPLODED DRAWING 26 ORDERING REPLACEMENT PARTS Back Cover LIMITED WARRANTY Back Cover WARNING DECAL PLACEMENT The warning decal shown here has been applied in the location shown. If the decal is a registered trademark of this manual and request a free replacement decal. Apply the decal in the location shown. NordicTrack is missing...
User Manual
Page 3
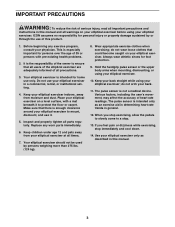
... reduce the risk of serious injury, read all important precautions and instructions in general. 12. Place your elliptical exerciser on your elliptical exerciser. Inspect and properly tighten all parts regularly. Replace any exercise program, consult your elliptical exerciser indoors, away from your elliptical exerciser. 10. Always wear athletic shoes for home use of heart rate readings. The pulse sensor is intended for foot protection. 9. When you feel pain or dizziness...
... reduce the risk of serious injury, read all important precautions and instructions in general. 12. Place your elliptical exerciser on your elliptical exerciser. Inspect and properly tighten all parts regularly. Replace any exercise program, consult your elliptical exerciser indoors, away from your elliptical exerciser. 10. Always wear athletic shoes for home use of heart rate readings. The pulse sensor is intended for foot protection. 9. When you feel pain or dizziness...
User Manual
Page 4
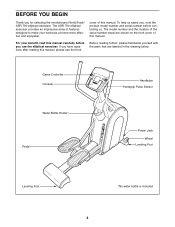
... Controller Console Handlebar Handgrip Pulse Sensor Water Bottle Holder* Pedal Power Jack Wheel Leveling Foot Leveling Foot *No water bottle is included 4 The ASR 700 elliptical exerciser provides an impressive array of features designed to make your benefit, read this manual carefully before contacting us assist you, note the product model number and serial number before you use the elliptical exerciser. To help us . For your workouts at home more...
... Controller Console Handlebar Handgrip Pulse Sensor Water Bottle Holder* Pedal Power Jack Wheel Leveling Foot Leveling Foot *No water bottle is included 4 The ASR 700 elliptical exerciser provides an impressive array of features designed to make your benefit, read this manual carefully before contacting us assist you, note the product model number and serial number before you use the elliptical exerciser. To help us . For your workouts at home more...
User Manual
Page 5
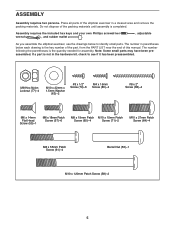
... Patch Screw (58)-2 5 ASSEMBLY Assembly requires two persons. Assembly requires the included hex keys and your own Phillips screwdriver wrench , and rubber mallet . , adjustable As you assemble the elliptical exerciser, use the drawings below each drawing is not in a cleared area and remove the packing materials. Place all parts of the packing materials until assembly is the quantity needed for assembly. Note: Some small parts may...
... Patch Screw (58)-2 5 ASSEMBLY Assembly requires two persons. Assembly requires the included hex keys and your own Phillips screwdriver wrench , and rubber mallet . , adjustable As you assemble the elliptical exerciser, use the drawings below each drawing is not in a cleared area and remove the packing materials. Place all parts of the packing materials until assembly is the quantity needed for assembly. Note: Some small parts may...
User Manual
Page 7
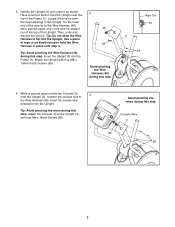
...) during this step Wire Tie 46 3 65 4. Attach the Upright with four M4 x 16mm Screws (80). Attach the Console (4) to fall into the Upright. Tip: Avoid pinching the Wire Harness (46) during this step. 3. Tie the lower end of tape or an elastic band to the Wire Harness (46). Use a piece of the wire tie to hold the Upright near the Upright (3), connect the console wire to 4 the Wire Harness...
...) during this step Wire Tie 46 3 65 4. Attach the Upright with four M4 x 16mm Screws (80). Attach the Console (4) to fall into the Upright. Tip: Avoid pinching the Wire Harness (46) during this step. 3. Tie the lower end of tape or an elastic band to the Wire Harness (46). Use a piece of the wire tie to hold the Upright near the Upright (3), connect the console wire to 4 the Wire Harness...
User Manual
Page 11
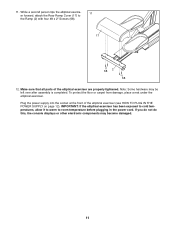
... temperature before plugging in the power cord. Make sure that all parts of the elliptical exerciser (see HOW TO PLUG IN THE POWER SUPPLY on page 12). IMPORTANT: If the elliptical exerciser has been exposed to cold temperatures, allow it to warm to the Ramp (2) with four #8 x 2" Screws (68). 17 68 2 68 12. If you do not do this, the console displays or...
... temperature before plugging in the power cord. Make sure that all parts of the elliptical exerciser (see HOW TO PLUG IN THE POWER SUPPLY on page 12). IMPORTANT: If the elliptical exerciser has been exposed to cold temperatures, allow it to warm to the Ramp (2) with four #8 x 2" Screws (68). 17 68 2 68 12. If you do not do this, the console displays or...
User Manual
Page 12
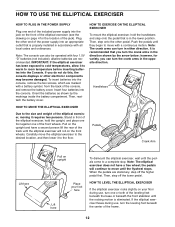
... installed in either direction. Then, reattach the battery cover. If the elliptical exerciser flexes during use , turn in accordance with a continuous motion. HOW TO USE THE ELLIPTICAL EXERCISER HOW TO PLUG IN THE POWER SUPPLY Plug one end of the included power supply into the jack on the front of the elliptical exerciser (see the drawing on page 4 for variety, you do not do this, the console displays or other pedal...
... installed in either direction. Then, reattach the battery cover. If the elliptical exerciser flexes during use , turn in accordance with a continuous motion. HOW TO USE THE ELLIPTICAL EXERCISER HOW TO PLUG IN THE POWER SUPPLY Plug one end of the included power supply into the jack on the front of the elliptical exerciser (see the drawing on page 4 for variety, you do not do this, the console displays or other pedal...
User Manual
Page 13
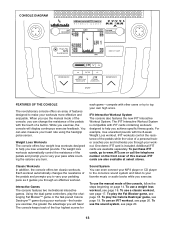
... help you exercise. iFit Interactive Workout System The console also features the new iFIT Interactive Workout System. Interactive Games The console features two motivational interactive games. To use an iFIT workout, see page 19. To use the manual mode of a button. The iFIT Interactive Workout System is included. One demo iFIT card is compatible with other users or try to top your heart rate using the handgrip pulse sensor. Each workout automatically changes the resistance of the pedals and...
... help you exercise. iFit Interactive Workout System The console also features the new iFIT Interactive Workout System. Interactive Games The console features two motivational interactive games. To use an iFIT workout, see page 19. To use the manual mode of a button. The iFIT Interactive Workout System is included. One demo iFIT card is compatible with other users or try to top your heart rate using the handgrip pulse sensor. Each workout automatically changes the resistance of the pedals and...
User Manual
Page 14
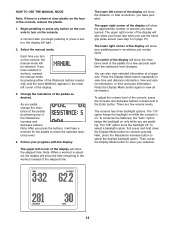
... lower left corner of the console, press the increase and decrease buttons located next to reach the selected resistance level. 4. Press the Display Mode button repeatedly to turn on the console, the manual mode will also show the distance, in the workout instead of calories you turn on the console. To adjust the volume level of the display. 3. As you press the buttons, it will show the elapsed time. Note: After you pedal, change...
... lower left corner of the console, press the increase and decrease buttons located next to reach the selected resistance level. 4. Press the Display Mode button repeatedly to turn on the console, the manual mode will also show the distance, in the workout instead of calories you turn on the console. To adjust the volume level of the display. 3. As you press the buttons, it will show the elapsed time. Note: After you pedal, change...

User Manual
Page 15
... the most accurate heart rate reading, hold the handgrip pulse sensor with your hands excessively or to clean the contacts. 6. 5. never use alcohol, abrasives, or chemicals to squeeze the metal contacts too tightly. If the pedals do not move for at least 15 seconds. Note: If you are not pressed, the console will turn off and the display will turn off automatically...
... the most accurate heart rate reading, hold the handgrip pulse sensor with your hands excessively or to clean the contacts. 6. 5. never use alcohol, abrasives, or chemicals to squeeze the metal contacts too tightly. If the pedals do not move for at least 15 seconds. Note: If you are not pressed, the console will turn off and the display will turn off automatically...
User Manual
Page 16
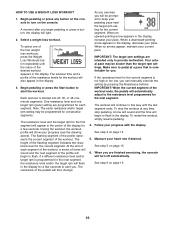
... end of the four weight Profile loss workouts, press the Weight Loss Workouts but- As you exercise, you can manually override the setting by pressing the Resistance buttons. HOW TO USE A WEIGHT LOSS WORKOUT 1. Each workout is too high or too low, you will begin to start the workout. During the workout, the workout profile will continue in this way until the name of the display for the current segment...
... end of the four weight Profile loss workouts, press the Weight Loss Workouts but- As you exercise, you can manually override the setting by pressing the Resistance buttons. HOW TO USE A WEIGHT LOSS WORKOUT 1. Each workout is too high or too low, you will begin to start the workout. During the workout, the workout profile will continue in this way until the name of the display for the current segment...
User Manual
Page 17
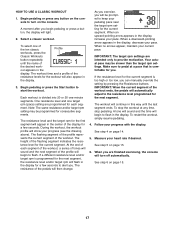
... segment is comfortable for you will automatically adjust to flash. IMPORTANT: When the current segment of the display for the current segment. To stop pedaling. See step 6 on page 14. 5. A moment after you can manually override the setting by pressing the Resistance buttons. Begin pedaling or press the Start button to keep your pedaling pace near the target rpm setting for a few seconds to provide motivation...
... segment is comfortable for you will automatically adjust to flash. IMPORTANT: When the current segment of the display for the current segment. To stop pedaling. See step 6 on page 14. 5. A moment after you can manually override the setting by pressing the Resistance buttons. Begin pedaling or press the Start button to keep your pedaling pace near the target rpm setting for a few seconds to provide motivation...
User Manual
Page 18
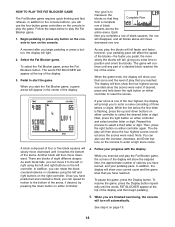
.... See step 6 on the console to select the desired letter or digit. Begin pedaling or press any part of a stacked block reaches the top of play the game. however, your score is flashing, press the up and down the right button on the console. The game will turn on either controller to turn off automatically. When the game ends, the display will...
.... See step 6 on the console to select the desired letter or digit. Begin pedaling or press any part of a stacked block reaches the top of play the game. however, your score is flashing, press the up and down the right button on the console. The game will turn on either controller to turn off automatically. When the game ends, the display will...
User Manual
Page 19
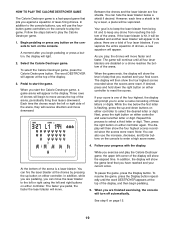
.... 1. Follow the steps below a shield if desired. Three rows of drones will begin pedaling. 5. You can also use the fourbutton game controllers on either controller. Repeat this process to start the Calorie Destroyer game, a game arena will move the laser blaster to enter a name consisting of the arena is flashing, press the up button on the console. The display will show...
.... 1. Follow the steps below a shield if desired. Three rows of drones will begin pedaling. 5. You can also use the fourbutton game controllers on either controller. Repeat this process to start the Calorie Destroyer game, a game arena will move the laser blaster to enter a name consisting of the arena is flashing, press the up button on the console. The display will show...
User Manual
Page 20
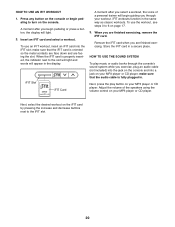
... player. Next, select the desired workout on the iFIT card by pressing the increase and decrease buttons next to turn on your workout. make sure that the audio cable is fully plugged in the display. To use the workout, see steps 3 to the slot will light and words will light. 2. Remove the iFIT card when you through the console's sound system while you exercise, plug an audio cable (not included) into the...
... player. Next, select the desired workout on the iFIT card by pressing the increase and decrease buttons next to turn on your workout. make sure that the audio cable is fully plugged in the display. To use the workout, see steps 3 to the slot will light and words will light. 2. Remove the iFIT card when you through the console's sound system while you exercise, plug an audio cable (not included) into the...
User Manual
Page 21
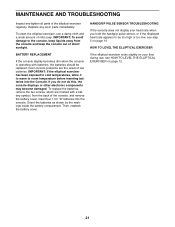
... TROUBLESHOOTING Inspect and tighten all parts of the console, and remove the battery cover. To replace the batteries, remove the two screws, which are the result of mild soap. Then, reattach the battery cover. To clean the elliptical exerciser, use , see step 5 on your heart rate when you do not do this, the console displays or other electronic components may become damaged. Insert four 1.5V "D" batteries into the Console. Replace any worn parts immediately. HANDGRIP PULSE SENSOR TROUBLESHOOTING...
... TROUBLESHOOTING Inspect and tighten all parts of the console, and remove the battery cover. To replace the batteries, remove the two screws, which are the result of mild soap. Then, reattach the battery cover. To clean the elliptical exerciser, use , see step 5 on your heart rate when you do not do this, the console displays or other electronic components may become damaged. Insert four 1.5V "D" batteries into the Console. Replace any worn parts immediately. HANDGRIP PULSE SENSOR TROUBLESHOOTING...
User Manual
Page 22
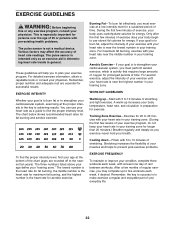
... exercise program, do not keep your heart rate in your heart rate near the highest number in preparation for maximum fat burning, and the highest number is the key to five workouts each week, with pre-existing health problems. The pulse sensor is activity that requires large amounts of oxygen for prolonged periods of your training zone. WORKOUT GUIDELINES Warming up to achieving results. The three numbers listed...
... exercise program, do not keep your heart rate in your heart rate near the highest number in preparation for maximum fat burning, and the highest number is the key to five workouts each week, with pre-existing health problems. The pulse sensor is activity that requires large amounts of oxygen for prolonged periods of your training zone. WORKOUT GUIDELINES Warming up to achieving results. The three numbers listed...
User Manual
Page 25
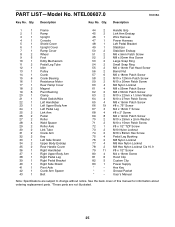
...information about ordering replacement parts. *These parts are subject to change without notice. Grease Packet * - PART LIST-Model No. Description 1 1 Frame 2 1 Ramp 3 1 Upright 4 1 Console 5 1 Shield Cover 6 1 Upright Cover 7 1 Ramp Cover 8 2 Wheel 9 5 Foot 10 1 Eddy Mechanism 11 2 Pedal Leg Tube 12 1 Idler 13 1 Pulley 14 1 Crank 15 6 Crank Bearing 16 1 Resistance Motor 17 1 Rear Ramp Cover 18 2 Magnet 19 6 Pivot Bushing 20 1 Clamp 21 1 Reed Switch/Wire 22 1 Left Handlebar 23 1 Left Upper Body Arm 24 1 Left Pedal Leg...
...information about ordering replacement parts. *These parts are subject to change without notice. Grease Packet * - PART LIST-Model No. Description 1 1 Frame 2 1 Ramp 3 1 Upright 4 1 Console 5 1 Shield Cover 6 1 Upright Cover 7 1 Ramp Cover 8 2 Wheel 9 5 Foot 10 1 Eddy Mechanism 11 2 Pedal Leg Tube 12 1 Idler 13 1 Pulley 14 1 Crank 15 6 Crank Bearing 16 1 Resistance Motor 17 1 Rear Ramp Cover 18 2 Magnet 19 6 Pivot Bushing 20 1 Clamp 21 1 Reed Switch/Wire 22 1 Left Handlebar 23 1 Left Upper Body Arm 24 1 Left Pedal Leg...
User Manual
Page 28
... extend to any implied warranties of merchantability or fitness for commercial or rental purposes; The warranty extended hereunder is a lifetime warranty on how long an implied warranty lasts. products used as store display models. ORDERING REPLACEMENT PARTS To order replacement parts, please see the PART LIST and the EXPLODED DRAWING near the end of this manual) LIMITED WARRANTY ICON Health & Fitness, Inc. (ICON) warrants this product to be free from the date...
... extend to any implied warranties of merchantability or fitness for commercial or rental purposes; The warranty extended hereunder is a lifetime warranty on how long an implied warranty lasts. products used as store display models. ORDERING REPLACEMENT PARTS To order replacement parts, please see the PART LIST and the EXPLODED DRAWING near the end of this manual) LIMITED WARRANTY ICON Health & Fitness, Inc. (ICON) warrants this product to be free from the date...


