
English Manual
Page 3
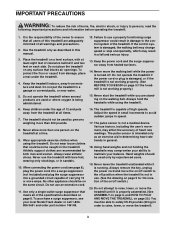
... treadmill should be on the walking belt. Adjust the speed in a fall and serious injury. 13. Use the treadmill only as an exercise aid in determining heart rate trends in speed. 17. Do not operate the treadmill if the power cord or plug is damaged, or if the treadmill is not in use a properly functioning surge suppressor could become caught in damage to the off switch to the control...
... treadmill should be on the walking belt. Adjust the speed in a fall and serious injury. 13. Use the treadmill only as an exercise aid in determining heart rate trends in speed. 17. Do not operate the treadmill if the power cord or plug is damaged, or if the treadmill is not in use a properly functioning surge suppressor could become caught in damage to the off switch to the control...
English Manual
Page 4
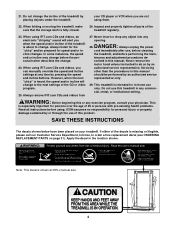
... storage latch is especially important for the "chirp" and be performed by placing objects under the treadmill. In some instances, the speed and/or incline may change to order a free replacement decal (see ORDERING REPLACEMENT PARTS on your physician. When using . DANGER: 28. This treadmill is about to do so by pressing the speed and incline buttons. Always remove iFIT.com CDs and videos from 27. scribed in -home use this manual...
... storage latch is especially important for the "chirp" and be performed by placing objects under the treadmill. In some instances, the speed and/or incline may change to order a free replacement decal (see ORDERING REPLACEMENT PARTS on your physician. When using . DANGER: 28. This treadmill is about to do so by pressing the speed and incline buttons. Always remove iFIT.com CDs and videos from 27. scribed in -home use this manual...
English Manual
Page 5
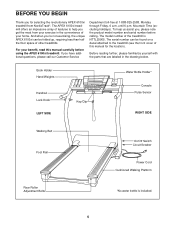
... Lock Knob LEFT SIDE Key/Clip Water Bottle Holder* Console Pulse Sensor RIGHT SIDE Walking Belt Foot Rail On/Off Switch Circuit Breaker Power Cord Cushioned Walking Platform Rear Roller Adjustment Bolts *No water bottle is NTTL25905. For your benefit, read this manual for selecting the revolutionary APEX 6100xi treadmill from your home. until 6 p.m. BEFORE YOU BEGIN Thank you for the location). And when you're not exercising, the unique APEX 6100xi can be folded...
... Lock Knob LEFT SIDE Key/Clip Water Bottle Holder* Console Pulse Sensor RIGHT SIDE Walking Belt Foot Rail On/Off Switch Circuit Breaker Power Cord Cushioned Walking Platform Rear Roller Adjustment Bolts *No water bottle is NTTL25905. For your benefit, read this manual for selecting the revolutionary APEX 6100xi treadmill from your home. until 6 p.m. BEFORE YOU BEGIN Thank you for the location). And when you're not exercising, the unique APEX 6100xi can be folded...
English Manual
Page 7
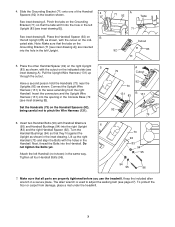
... wrench is used to adjust the walking belt (see inset drawing A). See inset drawing B. cated side. Connect the Upright Wire Harness (131) to pinch the Wire Harness (131). 6. Tighten all parts are inserted into the hole in the left Handrail (not shown) in the Handrail. To protect the floor or carpet from the right Handrail. Do not tighten the Bolts yet. Set the...
... wrench is used to adjust the walking belt (see inset drawing A). See inset drawing B. cated side. Connect the Upright Wire Harness (131) to pinch the Wire Harness (131). 6. Tighten all parts are inserted into the hole in the left Handrail (not shown) in the Handrail. To protect the floor or carpet from the right Handrail. Do not tighten the Bolts yet. Set the...

English Manual
Page 8
... damaged, the walking belt may change speed or stop unexpectedly, which may be installed by sudden voltage changes in a fall and serious injury. The green-colored rigid ear, lug, or the like the plug illustrated in damage to the control system of the treadmill. Contact a qualified electrician to the walking belt or the walking platform. HOW TO PLUG IN THE POWER CORD DANGER: Improper connection of electric...
... damaged, the walking belt may change speed or stop unexpectedly, which may be installed by sudden voltage changes in a fall and serious injury. The green-colored rigid ear, lug, or the like the plug illustrated in damage to the control system of the treadmill. Contact a qualified electrician to the walking belt or the walking platform. HOW TO PLUG IN THE POWER CORD DANGER: Improper connection of electric...

English Manual
Page 9
... of your workout. IFIT.com CD programs automatically control the speed and incline of the treadmill as a personal trainer guides you through every step of working out with a touch of the console is like having a per- 9 Video programs offer the same benefits as you get the most from the internet. Additional options are available separately). For information about an optional chest pulse sensor, see page 24). IFIT.com technology...
... of your workout. IFIT.com CD programs automatically control the speed and incline of the treadmill as a personal trainer guides you through every step of working out with a touch of the console is like having a per- 9 Video programs offer the same benefits as you get the most from the internet. Additional options are available separately). For information about an optional chest pulse sensor, see page 24). IFIT.com technology...

English Manual
Page 10
... the water bottle holder. 2 Plug in - Next, insert the key into the console. sole, adjust the position of the clip as an exercise aid in determining heart rate trends in speed. • The pulse sensor is not a medical device. To use an iFIT.com CD or video program, see page 21. To create and use the pulse-driven program. Find the clip attached to the on position. If...
... the water bottle holder. 2 Plug in - Next, insert the key into the console. sole, adjust the position of the clip as an exercise aid in determining heart rate trends in speed. • The pulse sensor is not a medical device. To use an iFIT.com CD or video program, see page 21. To create and use the pulse-driven program. Find the clip attached to the on position. If...
English Manual
Page 11
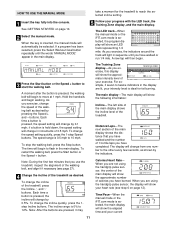
... track-When the manual mode or the iFIT.com mode is held down, the speed setting will then begin to flash in increments of the treadmill as desired. A new lap will change by pressing the Speed + and - If a program has been selected, press the Select Workout Goal button repeatedly until you have walked or run 1/4 mile. Distance/Laps-The next section of the main display shows the distance that you use...
... track-When the manual mode or the iFIT.com mode is held down, the speed setting will then begin to flash in increments of the treadmill as desired. A new lap will change by pressing the Speed + and - If a program has been selected, press the Select Workout Goal button repeatedly until you have walked or run 1/4 mile. Distance/Laps-The next section of the main display shows the distance that you use...

English Manual
Page 12
... place. Next, press the Select Course button repeatedly to miles. When a program is selected, remove the key and then reinsert it in the main display, you are finished exercising, stop the walking belt and remove the key. Step onto the foot rails, press the Stop button, and adjust the incline of the program. When your pulse is measured in this manual refer to select one number to the off the demo mode. Speed-The right side...
... place. Next, press the Select Course button repeatedly to miles. When a program is selected, remove the key and then reinsert it in the main display, you are finished exercising, stop the walking belt and remove the key. Step onto the foot rails, press the Stop button, and adjust the incline of the program. When your pulse is measured in this manual refer to select one number to the off the demo mode. Speed-The right side...
English Manual
Page 13
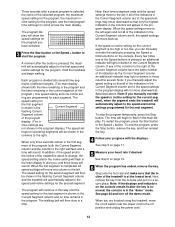
... a stop the program temporarily, press the Stop button. The walking belt will then slow to the left again and not all speed settings will continue in the "demo" mode. Note: Each time a segment ends and the speed settings move one incline set - If the speed or incline setting for each segment. Every few times one of the indicators in a secure place. See step 5 on page 12. 6 When the program has ended, remove...
... a stop the program temporarily, press the Stop button. The walking belt will then slow to the left again and not all speed settings will continue in the "demo" mode. Note: Each time a segment ends and the speed settings move one incline set - If the speed or incline setting for each segment. Every few times one of the indicators in a secure place. See step 5 on page 12. 6 When the program has ended, remove...
English Manual
Page 15
... program, press the Start button or the Speed + button. Each program is shown in the Current Segment column and no time remains in the main display. To change the speed or incline setting during the current segment, simply press the Speed or Incline buttons. When the current segment is inserted, the manual mode will automatically be selected. To end the program, press the Stop button, remove the key, and then reinsert the key. 4 Follow your heart rate...
... program, press the Start button or the Speed + button. Each program is shown in the Current Segment column and no time remains in the main display. To change the speed or incline setting during the current segment, simply press the Speed or Incline buttons. When the current segment is inserted, the manual mode will automatically be selected. To end the program, press the Stop button, remove the key, and then reinsert the key. 4 Follow your heart rate...

English Manual
Page 16
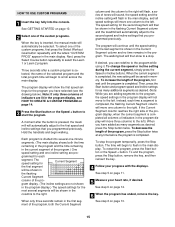
... begin to move one column to use the fitness test program. 1 Put on the chest pulse sensor. the fitness test program should be shown in the main display, and all speed settings will flash in the thirteen columns to enter your age, press the Enter Age buttons to the right. See GETTING STARTED on the chest pulse sensor, see page 24). When the key is selected, the program display will automatically...
... begin to move one column to use the fitness test program. 1 Put on the chest pulse sensor. the fitness test program should be shown in the main display, and all speed settings will flash in the thirteen columns to enter your age, press the Enter Age buttons to the right. See GETTING STARTED on the chest pulse sensor, see page 24). When the key is selected, the program display will automatically...

English Manual
Page 17
... the fitness test program is intended only to indicate your workout. HOW TO USE THE PULSE-DRIVEN PROGRAM The pulse-driven program automatically adjusts the speed and incline of the treadmill to a stop. Note: The Speed and Incline buttons will then show a fitness level of 0 (FL: 0). 3 Select the pulse-driven program. To select the pulsedriven program, first press the Select Workout Goal button repeatedly until the words "PULSE DRIVEN" appear. 17 If your exercise heart rate. At...
... the fitness test program is intended only to indicate your workout. HOW TO USE THE PULSE-DRIVEN PROGRAM The pulse-driven program automatically adjusts the speed and incline of the treadmill to a stop. Note: The Speed and Incline buttons will then show a fitness level of 0 (FL: 0). 3 Select the pulse-driven program. To select the pulsedriven program, first press the Select Workout Goal button repeatedly until the words "PULSE DRIVEN" appear. 17 If your exercise heart rate. At...
English Manual
Page 21
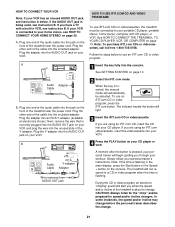
... the main display, press the Start button or the Speed + button on your VCR and plug the wire into the AUDIO OUT jack on the console. HOW TO CONNECT YOUR VCR Note: If your personal trainer's instructions. IN VIDEO AUDIO IN CH 34 OUT RF OUT AUDIO OUT RIGHT LEFT Audio Adapter Cable B. During the CD or video program, an electronic "chirping" sound will not respond to a CD or video program when the...
... the main display, press the Start button or the Speed + button on your VCR and plug the wire into the AUDIO OUT jack on the console. HOW TO CONNECT YOUR VCR Note: If your personal trainer's instructions. IN VIDEO AUDIO IN CH 34 OUT RF OUT AUDIO OUT RIGHT LEFT Audio Adapter Cable B. During the CD or video program, an electronic "chirping" sound will not respond to a CD or video program when the...
English Manual
Page 22
... console may not detect the program signals. • Make sure that the audio cable is properly connected, that it is heard, the speed and incline will change to the next settings of the CD or video program. To restart the program, press the Start button or the Speed + button. When the CD or video program is heard, the speed and/or incline will change to the next settings of the CD or video program. See step...
... console may not detect the program signals. • Make sure that the audio cable is properly connected, that it is heard, the speed and incline will change to the next settings of the CD or video program. To restart the program, press the Start button or the Speed + button. When the CD or video program is heard, the speed and/or incline will change to the next settings of the CD or video program. See step...
English Manual
Page 23
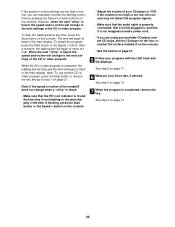
..., press the Stop button on our Web site. A list of the treadmill does not change to access basic programs, audio programs, and video programs directly from our Web site, press the iFIT.com button. When you start an internet connection. 4 Start your computer and start the program, an on the foot rails. Hold the handrails, step onto the walking belt, and begin to your progress with the LED track and the displays. If the speed or incline settings...
..., press the Stop button on our Web site. A list of the treadmill does not change to access basic programs, audio programs, and video programs directly from our Web site, press the iFIT.com button. When you start an internet connection. 4 Start your computer and start the program, an on the foot rails. Hold the handrails, step onto the walking belt, and begin to your progress with the LED track and the displays. If the speed or incline settings...

English Manual
Page 24
... Speed - button so the display is in the demo mode, the power cord can be plugged in the main display. When the information mode is not a letter "D" in , the key can be used . IMPORTANT: Make sure that the walking belt has moved. To exit the information mode, remove the key from miles per hour. To select the information mode, hold down the Stop button while inserting the key into the console. THE INFORMATION MODE/DEMO MODE THE OPTIONAL CHEST PULSE SENSOR The console features an information mode...
... Speed - button so the display is in the demo mode, the power cord can be plugged in the main display. When the information mode is not a letter "D" in , the key can be used . IMPORTANT: Make sure that the walking belt has moved. To exit the information mode, remove the key from miles per hour. To select the information mode, hold down the Stop button while inserting the key into the console. THE INFORMATION MODE/DEMO MODE THE OPTIONAL CHEST PULSE SENSOR The console features an information mode...
English Manual
Page 27
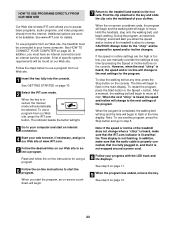
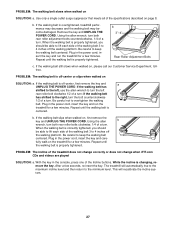
... walking platform. fully walk on SOLUTION: a. b. b 3"-4" Rear Roller Adjustment Bolts c. Repeat until the walking belt is properly tightened. PROBLEM: The incline of a turn the left rear roller bolt clockwise 1/2 of the Incline buttons. Using the allen b wrench, turn . If the walking belt slips when walked on page 8. Plug in the power cord, insert the key and run the treadmill for a few minutes. The treadmill will recalibrate the incline system. 27 Plug in the console, press one of a turn . Plug in the power cord, insert the key and care- Use...
... walking platform. fully walk on SOLUTION: a. b. b 3"-4" Rear Roller Adjustment Bolts c. Repeat until the walking belt is properly tightened. PROBLEM: The incline of a turn the left rear roller bolt clockwise 1/2 of the Incline buttons. Using the allen b wrench, turn . If the walking belt slips when walked on page 8. Plug in the power cord, insert the key and run the treadmill for a few minutes. The treadmill will recalibrate the incline system. 27 Plug in the console, press one of a turn . Plug in the power cord, insert the key and care- Use...
English Manual
Page 31
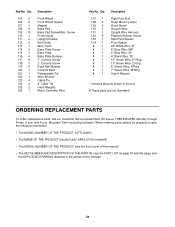
... Upright Endcap Belt Guide Wire Track Base Plate Screw Base Plate Base Plate Bumper 1" Console Screw 2" Console Screw Deck Rail Washer Console Back Releaseable Tie Allen Wrench Cable Tie 8" Cable Tie Hand Weights Motor Controller Wire Key No. Qty. 127 1 128 5 129 2 130 1 131 1 132 8 133 1 134 1 # 1 # 1 # 1 # 1 # 1 # 1 # 1 # 1 # 1 Description Right Foot Rail Hood Mount (Large) Hood Mount Ground Wire Upright Wire Harness Platform Bracket Screw Split Pivot Spacer Pivot Spacer 26" White Wire, 2F 8" Blue Wire, M/F 4" Blue Wire...
... Upright Endcap Belt Guide Wire Track Base Plate Screw Base Plate Base Plate Bumper 1" Console Screw 2" Console Screw Deck Rail Washer Console Back Releaseable Tie Allen Wrench Cable Tie 8" Cable Tie Hand Weights Motor Controller Wire Key No. Qty. 127 1 128 5 129 2 130 1 131 1 132 8 133 1 134 1 # 1 # 1 # 1 # 1 # 1 # 1 # 1 # 1 # 1 Description Right Foot Rail Hood Mount (Large) Hood Mount Ground Wire Upright Wire Harness Platform Bracket Screw Split Pivot Spacer Pivot Spacer 26" White Wire, 2F 8" Blue Wire, M/F 4" Blue Wire...
English Manual
Page 32
... connection with respect to any defected part for replacement or, if necessary, the entire product, for indirect, special or consequential damages arising out of or in material and workmanship. This warranty gives you specific legal rights and you believe the service is covered by warranty. LIMITED WARRANTY WHAT IS COVERED-The entire NordicTrack® APEX 6100xi treadmill ("Product") is warranted to be free of all other warranties...
... connection with respect to any defected part for replacement or, if necessary, the entire product, for indirect, special or consequential damages arising out of or in material and workmanship. This warranty gives you specific legal rights and you believe the service is covered by warranty. LIMITED WARRANTY WHAT IS COVERED-The entire NordicTrack® APEX 6100xi treadmill ("Product") is warranted to be free of all other warranties...


